はじめに
2017年 Node-RED Advent Calendarの3日目の記事です。
2015年 Node-RED Advent Calendarで@stomitaさんが Node-REDをAWS Lambdaで動かす話 という記事を書かれています。
この方式はS3やSESなどのトリガーで動かせるというメリットがありますが、HTTP inノードの利用を諦める+専用ノードを使ってフローを作る必要がありました。
今回の記事は、HTTP inノードが利用できる状態でNode-REDをlambdaで動かす方法です。
これによってHTTP inノードを使ったフローを修正なしでlamdbaで動かせるようになります。
(デメリットとしてAPI Gateway以外のトリガーでは動かせません。)
また、フロー更新のたびに毎回flow.jsonを含んだNode-REDをlambdaにデプロイする構成では、デプロイ時間がネックで修正サイクルがリズムよく回せません。
これでは開発効率が悪いので、flow.json ファイルはS3に置いてフロー更新はS3のファイルを更新すれば済む構成にします。
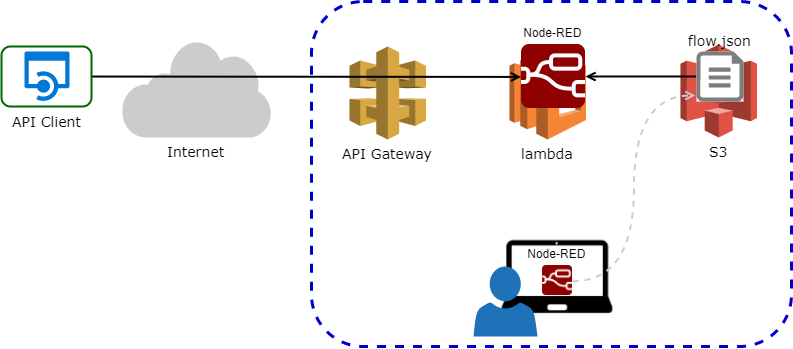
構成図
今回の構成は下図のとおりです。この記事では青点線範囲の設定方法を説明します。
準備するもの
-
AWSアカウント
-
AWS CLI が使える端末(AWSアクセスキー他が設定済みであること)
$ export AWS_ACCESS_KEY_ID=AKIAXXXXXXXXXXXXXXXX
$ export AWS_SECRET_ACCESS_KEY=xxxxxxxxxxxxxxxxxxxxxxxxxxxxxxxxxxxxxxxx
$ export AWS_DEFAULT_REGION=us-west-2
* ブラウザ

# 設定方法
* 所要時間参考:約10分

1. GitHubから[aws-serverless-node-red](https://github.com/sakazuki/aws-serverless-node-red) リポジトリをクローンします

    ```bash:
$ git clone https://github.com/sakazuki/aws-serverless-node-red.git
$ cd aws-serverless-node-red
-
自分のAWS環境に合わせた設定ファイルを準備します
$ AWS_ACCOUNT_ID=123456789012
$ S3_BUCKET=nodered12
$ AWS_REGION=us-west-2
$ AWS_FUNCNAME=api12
$ AWS_STACK_NAME=Node-RED
$ npm run config -- --account-id="${AWS_ACCOUNT_ID}"
--bucket-name="${S3_BUCKET}"
--region="${AWS_REGION}"
--function-name="${AWS_FUNCNAME}"
--stack-name="${AWS_STACK_NAME}"
※これにより次のファイルが自分のAWS環境用に更新されます。

    ```bash:
package.json
simple-proxy-api.yaml
cloudformation.yaml
settings.js
-
Node-REDと必要パッケージをインストールして、lambdaにデプロイします。
$ npm run setup
4. PC上でNode-REDを起動してフローを作成します

    ```bash:
$ node node_modules/.bin/node-red -s ./settings.js
http://localhost:1880 にブラウザでアクセスしてNode-REDエディタでフローを作成します。
HTTP inノードが使えることを確認するためフォームのサンプルフローを作ります。

<details><summary>フローデータはこちら</summary>コピーして、右上のドロップメニューから**[読み込み]-[クリップボード]**でインポートできます<pre>
[{"id":"e164ca79.d4bba8","type":"http in","z":"d540fb70.fb4658","name":"","url":"/hello","method":"get","upload":false,"swaggerDoc":"","x":170,"y":100,"wires":[["f5cc40d7.836fd"]]},{"id":"4818807c.9a996","type":"http response","z":"d540fb70.fb4658","name":"","statusCode":"","headers":{},"x":510,"y":100,"wires":[]},{"id":"f5cc40d7.836fd","type":"template","z":"d540fb70.fb4658","name":"form","field":"payload","fieldType":"msg","format":"handlebars","syntax":"mustache","template":"<form method="POST">\n Input your name<input type="text" name="key1">\n <input type="submit">\n</form>","output":"str","x":350,"y":100,"wires":[["4818807c.9a996"]]},{"id":"5c77ba58.b744e4","type":"http in","z":"d540fb70.fb4658","name":"","url":"/hello","method":"post","upload":false,"swaggerDoc":"","x":180,"y":180,"wires":[["4c91fba9.11ed84"]]},{"id":"4c91fba9.11ed84","type":"template","z":"d540fb70.fb4658","name":"view","field":"payload","fieldType":"msg","format":"handlebars","syntax":"mustache","template":"<h1>Hello {{payload.key1}}</h1>","output":"str","x":350,"y":180,"wires":[["4818807c.9a996"]]}]
-
動作確認(ローカル)
デプロイしたら、次のURLにアクセスしてローカルで動作確認してください。
6. 動作確認(API Gateway)
正常動作が確認できたら、API Gateway経由でも確認します。
次のコマンドでAPI Gatewayの**ApiUrl**を確認します。

    ```bash:
$ aws cloudformation describe-stacks --stack-name ${AWS_STACK_NAME} \
  --output json --query "Stacks[*].Outputs"
[
    [
        {
            "Description": "Invoke URL for your API. Clicking this link will perform a GET request on the root resource of your API.",
            "OutputKey": "ApiUrl",
            "OutputValue": "https://1xxx2y5zzz.execute-api.us-west-2.amazonaws.com/prod/"
        },
        {
            "Description": "Console URL for the API Gateway API's Stage.",
            "OutputKey": "ApiGatewayApiConsoleUrl",
            "OutputValue": "https://us-west-2.console.aws.amazon.com/apigateway/home?region=us-west-2#/apis/1xxx2y5zzz/stages/prod"
        },
        {
            "Description": "Console URL for the Lambda Function.",
            "OutputKey": "LambdaFunctionConsoleUrl",
            "OutputValue": "https://us-west-2.console.aws.amazon.com/lambda/home?region=us-west-2#/functions/api12"
        }
    ]
]
$
ブラウザで ApiUrlにアクセスして動作確認します。
```bash:

動作が確認できました。
1. 後片付け(オプション)
この手順で作成されたものを削除する場合には以下のコマンドを実行します。
```bash:
$ npm run delete-stack
まとめ
- lambdaでNode-REDのフローを動かしました
- Node-RED on lambdaでHTTP inノードが使えるようになりました
- フローファイル(
flow.json)をS3から読み込ませました。- これでNode-RED本体の再デプロイをすることなく、フローファイルだけを更新できるようになり、開発や修正が簡単になりました。
Node-REDで作ったAPIアプリは、lambdaに簡単に載せられることがわかりました。
皆さんも、試してみてはどうでしょうか。
明日は
@taiponrockさんのNode-RED on IBM Cloud with Watson APIの記事です。