こんにちは!逆瀬川 ( https://x.com/gyakuse ) です!
このアドベントカレンダーでは生成AIのアプリケーションを実際に作り、どのように作ればいいのか、ということをわかりやすく書いていければと思います。アプリケーションだけではなく、プロダクト開発に必要なモデルの調査方法、training方法、基礎知識等にも触れていければと思います。
0. 今回の記事について
こちらの記事の続きをやっていきます。
【社長】
やっぱリアルで麻雀打つことになったからその点数計算をするアプリお願い😅
というところから始まります。
今回の記事で学べること
- 合成データセットの作り方
- Florence2の使い方
- Florence2をLoRAでFine-Tuningする方法
1. 前回のおさらい
前回はオンライン麻雀ゲームのスクリーンショットからの点数予測というタスクを実行しました。
今回は与件が変わり、リアルの麻雀の点数予測を行うことになりました。
こうした与件の変動は現実でもつきものでしょう。
2. タスクの整理
前回与えられた情報から予測すると、今回のタスクは「麻雀の牌画像から点数予測をする」というものになります。
容易に想像される難しいポイントとしては、以下が検討できます
- 画像からの牌の認識
- その他情報の認識 (積み棒、リー棒、自風、場風等々)
- 手牌、ツモ牌 or ロン牌、ポン、カン、表ドラ、裏ドラ等のレイアウト認識
まず、積み棒やリーチ棒、自風場風等を処理するのは今回は諦めましょう。
gpt-4oやgeminiを使えばワンチャンいけますが、非常に難易度が高いです。
また、1つの画像にドラを写すと解釈が非常に難しくなることは容易に考えられます。
こちらのUIを参考にさせてもらいましょう。非常にスマートな解決をされています。
- ツモ/ロン, 親/子, 自風/場風については選択式
- ドラと本場に関しては手動で数を入力
- 手牌とポン、カン、ツモ牌はレイアウト的に分けて撮影. 不要な情報は入らないようにする
これを社長に伝え合意を得ました。
それでは、次に画像認識をやっていきましょう。
3. gpt-4o / gemini-exp-1206 で実験してみる
gpt-4oやgemini-exp-1206で情報抽出できるか実験します。
やり方はシンプルで、牌画像をもとに「この画像に写っている麻雀牌をすべて教えて」と聞くだけです。
今回はgpt-4oやgemini-exp-1206が両方とも失敗したため、LMMを使ったアプローチを断念します。なお、もうちょっとプロンプトを駆使すれば推論能力が上がるかもしれませんし、牌画像を1枚ずつ、合計34種分many-shot的に与えた場合、多分うまくいきます。今回は別のアプローチを紹介したいので、一旦この方針は取りません。
4. Florence2 について
今回は画像からの物体検出にFlorence2を使います。yoloでもなんでもいいのですが、ただの趣味です。
最近流行りのVQAではなく、物体検出やOCRなどの下流タスクにフォーカスしたモデルになっています。
(VQA等をしたい場合は Florence-VLを使うとよいでしょう)
上図を見れば分かる通り、Florence-2は統一されたシンプルなアーキテクチャを採用しています。画像をImage Encoderでトークン化し、その視覚トークンとテキスト埋め込み(+位置情報トークン)を結合してseq-to-seqモデルに入力します。出力はテキスト+位置情報トークンとして一貫性があり、多様なタスクに柔軟に対応可能です。
5. Florence2 で実験してみる
それではFlorence2を用いて実験をしていきましょう。
modelのロード
今回は microsoft/Florence-2-base-ft を利用する
import requests

import torch
from PIL import Image
from transformers import AutoProcessor, AutoModelForCausalLM


device = "cuda:0" if torch.cuda.is_available() else "cpu"
torch_dtype = torch.float16 if torch.cuda.is_available() else torch.float32

model = AutoModelForCausalLM.from_pretrained("microsoft/Florence-2-base-ft", torch_dtype=torch_dtype, trust_remote_code=True).to(device)
processor = AutoProcessor.from_pretrained("microsoft/Florence-2-base-ft", trust_remote_code=True)
実行用関数
def run_example(task_prompt, image, text_input=None):
    if text_input is None:
        prompt = task_prompt
    else:
        prompt = task_prompt + text_input
    inputs = processor(text=prompt, images=image, return_tensors="pt").to(device, torch_dtype)
    generated_ids = model.generate(
      input_ids=inputs["input_ids"],
      pixel_values=inputs["pixel_values"],
      max_new_tokens=1024,
      num_beams=3
    )
    generated_text = processor.batch_decode(generated_ids, skip_special_tokens=False)[0]

    parsed_answer = processor.post_process_generation(generated_text, task=task_prompt, image_size=(image.width, image.height))

    return parsed_answer
テスト
以下の画像でテストを実施
task = "<OD>"
image_path = "./data/01.png"
image = Image.open(image_path)
result = run_example(task, image)
結果
{'<OD>': {'bboxes': [[2.0160000324249268, 1.5119999647140503, 4025.9521484375, 3019.4638671875]], 'labels': ['table']}}
テーブルしか検出されなかった;;
6. 合成データセットを作成する
時間のないとき、十分なデータセットを構築するのが難しいときは少量のデータから Data Augmentation を行ったり、Synthetic Data (合成データ) に頼ったりするのが良いでしょう。
物体検出のデータセット構築においては3Dモデルを用いた合成データセットが有効であり (Peng at al., 2014)、現実世界のデータとのgap (Reality Gap) を埋めるためは適切にランダム化する必要があります (Tobin et al., 2017)。
また、3Dシーンからの合成データセット作成には非常に便利なライブラリがあり、Unity Perception などが有名です。
今回は以下の麻雀牌データを購入し合成データセットを作成します (こうした外部データを購入する際は規約等をしっかり読みましょう)。
めちゃくちゃ最高なモデルを公開している lyohmさんに感謝です。
作業
- UnityでHDRPプロジェクトを作成
- Perceptionパッケージインストール
- AssetsにIdLabelConfigを追加
- 麻雀牌のfbxをAssetに追加, prefab化
-
Assets/EditorにLabel自動付けスクリプトMahjongAutoSetupEditor.csを追加 (Appendix参照)- 今回はラベルのもととなる情報が fbx に
JongPi_Etc_East_Yという感じで牌が入っています。先頭のJongPi_と後ろの_Yを除去すれば牌の情報であるEtc_East(東) が取れます (Etcを除去してもよいですが)
- 今回はラベルのもととなる情報が fbx に
-
Tools / Mahjong Auto Setupで上記スクリプトを実行 (MahjongPi_YellowとIdLabelConfigの参照を渡す) - 空のGame Object作成 -> Fixed Length Scenarioをアタッチ
- ForegroundObjectPlacementRandomizer (Depth: 0, Separation: 1.5, Placement 10, 1),RotationRandomizer (X, Yは固定でZのみ0-360) を追加
- 今回は回転と座標ランダムのみ行います
- なお、ちゃんとやる場合はカメラ回転やノイズ等を入れると頑健性のあるデータセットができます。
- 個別麻雀牌Prefab化
- カメラ位置調整, 麻雀牌のサイズを調整
- RotationRandomizerTagを個別Prefabに追加
- ForegroundObjectPlacementRandomizerのPrefabsに牌のprefab群を追加
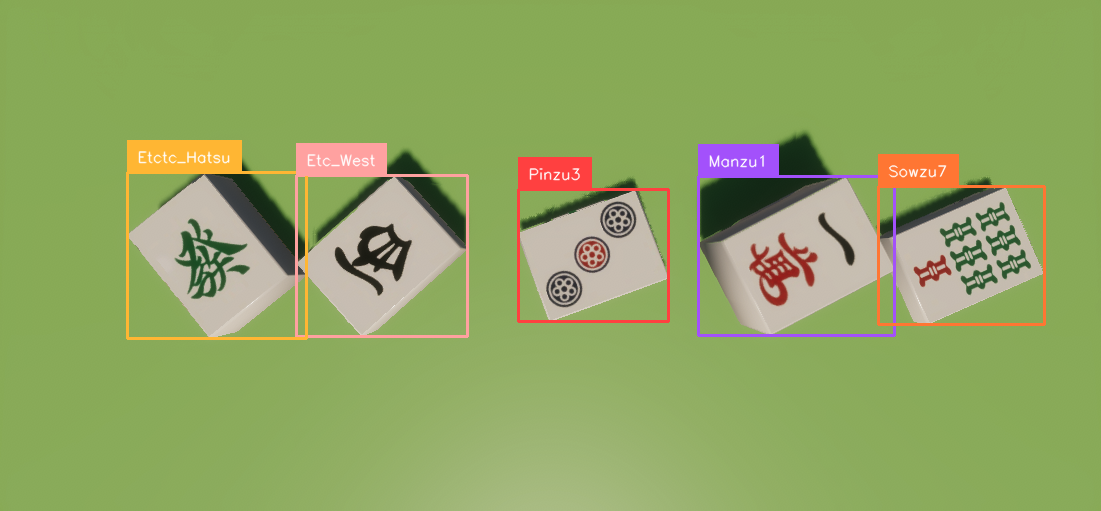
できた合成データセット
ワッとやるとこんな感じになります。2万枚程度生成しました。
7. Florence2のデータセットに変換する
Perceptionではデフォルト設定でSOLOデータセットが出力されます。これをcocoデータセット形式に直したりする必要があります。Florence2のデータセットではOD等のタスク情報を入れる prefix, 座標情報の suffix 等を含んだ jsonl を作ります。
変換コードはAppendix参照のこと
8. Florence2のfine-tuning
ということで、ここで20時を超えました。社長には優れたアプリケーションのURLを渡しつつ、fine-tuningを走らせて寝ることにします。
RunpodでA100を借りて実行します。
トレーニングの実装等はAppendix参照のこと
1epochの結果
A100を借りるのは高い(1時間180円程度)なので、1epoch回しての結果を見てみます。
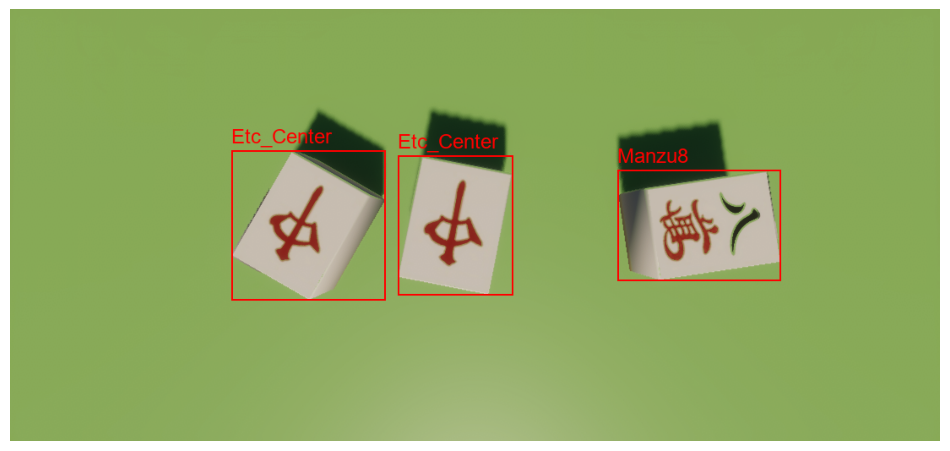
合成データのtestデータで試します。
正しくすべての牌が認識されています。
では次に学習データにない、実写データをもとにやってみます。ドメイン適応が正しく起きていれば成功です。
牌自体の認識はできてそう!
lossがまだ1.4程度あるのに頑張ってます。
記事を書いているときに2epochまで達し、0.6に下がっていたので10epochくらい回したらいいモデルになりそうな気配があります。マンズ、ピンズ、ソーズも正しく認識して………
ん?
Appendix
Label自動付けスクリプト
using UnityEngine;
using UnityEditor;
using UnityEngine.Perception.GroundTruth; // For Labeling
using UnityEngine.Perception.GroundTruth.LabelManagement; // For IdLabelConfig, IdLabelEntry
using System.Linq;
using System.Collections.Generic;

public class MahjongAutoSetupEditor : EditorWindow
{
    [Header("References")]
    public GameObject mahjongPrefab;       // MahjongPi_YellowのPrefabをアサイン
    public IdLabelConfig idLabelConfig;    // ID Label Configアセットをアサイン

    [MenuItem("Tools/Mahjong Auto Setup")]
    static void OpenWindow()
    {
        GetWindow<MahjongAutoSetupEditor>("Mahjong Auto Setup");
    }

    void OnGUI()
    {
        GUILayout.Label("Auto Setup for Mahjong", EditorStyles.boldLabel);

        mahjongPrefab = (GameObject)EditorGUILayout.ObjectField("Mahjong Prefab", mahjongPrefab, typeof(GameObject), false);
        idLabelConfig = (IdLabelConfig)EditorGUILayout.ObjectField("ID Label Config", idLabelConfig, typeof(IdLabelConfig), false);

        if (GUILayout.Button("Run Auto Setup"))
        {
            RunAutoSetup();
        }
    }

    void RunAutoSetup()
    {
        if (mahjongPrefab == null)
        {
            Debug.LogError("Mahjong Prefab not assigned!");
            return;
        }

        if (idLabelConfig == null)
        {
            Debug.LogError("IdLabelConfig not assigned!");
            return;
        }

        // 1. シーン内のMahjongPi_Yellowを削除
        var existing = GameObject.Find("MahjongPi_Yellow");
        if (existing != null)
        {
            Undo.DestroyObjectImmediate(existing);
        }

        // 2. Prefabをシーンに再配置
        var mahjongInstance = (GameObject)PrefabUtility.InstantiatePrefab(mahjongPrefab);
        mahjongInstance.name = "MahjongPi_Yellow";
        Undo.RegisterCreatedObjectUndo(mahjongInstance, "Create MahjongPi_Yellow");

        // 3. 名前から自動ラベリング
        var allTransforms = mahjongInstance.GetComponentsInChildren<Transform>(true);
        var newLabels = new HashSet<string>();

        foreach (var t in allTransforms)
        {
            if (t.name.StartsWith("JongPi_") && t.name.EndsWith("_Y"))
            {
                string coreName = t.name.Replace("JongPi_", "").Replace("_Y", "");
                var labeling = t.GetComponent<Labeling>();
                if (labeling == null)
                {
                    labeling = Undo.AddComponent<Labeling>(t.gameObject);
                }

                labeling.labels.Clear();
                labeling.labels.Add(coreName);
                newLabels.Add(coreName);
            }
        }

        // 4. ID Label Configへの自動追加(SerializedObjectを使う)
        var existingLabels = idLabelConfig.labelEntries.Select(l => l.label).ToHashSet();

        // ラベルエントリにシリアルアクセスするためSerializedObjectを使用
        SerializedObject so = new SerializedObject(idLabelConfig);
        SerializedProperty labelEntriesProp = so.FindProperty("m_LabelEntries");

        bool addedNewLabel = false;
        foreach (var nl in newLabels)
        {
            if (!existingLabels.Contains(nl))
            {
                Undo.RecordObject(idLabelConfig, "Add label to ID Label Config");
                int newIndex = labelEntriesProp.arraySize;
                labelEntriesProp.InsertArrayElementAtIndex(newIndex);
                SerializedProperty newEntryProp = labelEntriesProp.GetArrayElementAtIndex(newIndex);
                SerializedProperty labelProp = newEntryProp.FindPropertyRelative("label");
                labelProp.stringValue = nl;

                // 必要ならIdLabelEntryに他のフィールドがあればここで設定可能

                addedNewLabel = true;
            }
        }

        if (addedNewLabel)
        {
            so.ApplyModifiedProperties();
            EditorUtility.SetDirty(idLabelConfig);
            AssetDatabase.SaveAssets();
        }

        Debug.Log("Auto Setup Completed!");
    }
}
データセット変換スクリプト
import os
import json
import glob
import random
import shutil
from pathlib import Path

DATASET_ROOT = r"../solo_57" # SOLOデータセット
OUTPUT_DIR = r"./datasets" # 出力先ディレクトリ
os.makedirs(OUTPUT_DIR, exist_ok=True)

# 分割比率
TRAIN_RATIO = 0.8
VAL_RATIO = 0.1
TEST_RATIO = 0.1
assert abs(TRAIN_RATIO + VAL_RATIO + TEST_RATIO - 1.0) < 1e-9, "Ratios must sum to 1.0"

# AnnotationのID
TARGET_ANNOTATION_ID = "bounding box"

sequence_dirs = sorted(glob.glob(os.path.join(DATASET_ROOT, "sequence.*")))

samples = []

for seq_dir in sequence_dirs:
    seq_name = os.path.basename(seq_dir)  # e.g. "sequence.7"
    # sequence番号を抽出(数値部分)
    seq_number = seq_name.split(".")[1] if "." in seq_name else seq_name

    frame_data_files = sorted(glob.glob(os.path.join(seq_dir, "step*.frame_data.json")))
    for frame_path in frame_data_files:
        with open(frame_path, "r") as f:
            frame_data = json.load(f)

        captures = frame_data.get("captures", [])
        if len(captures) == 0:
            continue

        # RGBCameraのcaptureを特定
        rgb_capture = None
        for cap in captures:
            if "@type" in cap and "RGBCamera" in cap["@type"]:
                rgb_capture = cap
                break

        if rgb_capture is None:
            continue

        rgb_filename = rgb_capture.get("filename")
        dimension = rgb_capture.get("dimension", [])
        if not rgb_filename or len(dimension) < 2:
            continue

        image_path = os.path.join(seq_dir, rgb_filename)
        if not os.path.exists(image_path):
            continue

        W, H = int(dimension[0]), int(dimension[1])

        # BoundingBox2DAnnotationを抽出
        annotations = rgb_capture.get("annotations", [])
        bbox_values = []
        for ann in annotations:
            if ann.get("@type") == "type.unity.com/unity.solo.BoundingBox2DAnnotation" and ann.get("id") == TARGET_ANNOTATION_ID:
                bbox_values = ann.get("values", [])
                break

        if len(bbox_values) == 0:
            continue

        # Suffixの生成
        bbox_strings = []
        for v in bbox_values:
            label_name = v["labelName"]
            origin_x, origin_y = v["origin"]
            dim_w, dim_h = v["dimension"]

            x1 = origin_x / W
            y1 = origin_y / H
            x2 = (origin_x + dim_w) / W
            y2 = (origin_y + dim_h) / H

            X1_int = round(x1 * 1000)
            Y1_int = round(y1 * 1000)
            X2_int = round(x2 * 1000)
            Y2_int = round(y2 * 1000)

            bbox_str = f"{label_name}<loc_{X1_int}><loc_{Y1_int}><loc_{X2_int}><loc_{Y2_int}>"
            bbox_strings.append(bbox_str)

        if len(bbox_strings) == 0:
            continue

        suffix_str = "".join(bbox_strings)

        # step番号抽出
        frame_basename = os.path.basename(frame_path)
        # "step0"部分からstep番号を取り出す
        step_str = frame_basename.split(".")[0]  # "step0"
        ext = Path(rgb_filename).suffix
        unique_image_name = f"sequence{seq_number}_{step_str}{ext}"

        sample = {
            "prefix": "<OD>",
            "suffix": suffix_str,
            "original_image_path": image_path,
            "unique_image_name": unique_image_name
        }
        samples.append(sample)

# データシャッフル & 分割
random.shuffle(samples)
total = len(samples)
num_train = int(total * TRAIN_RATIO)
num_val = int(total * VAL_RATIO)
num_test = total - num_train - num_val

train_samples = samples[:num_train]
val_samples = samples[num_train:num_train+num_val]
test_samples = samples[num_train+num_val:]

images_dir = Path(OUTPUT_DIR) / "images"
train_img_dir = images_dir / "train"
val_img_dir = images_dir / "val"
test_img_dir = images_dir / "test"
train_img_dir.mkdir(parents=True, exist_ok=True)
val_img_dir.mkdir(parents=True, exist_ok=True)
test_img_dir.mkdir(parents=True, exist_ok=True)

def write_split(jsonl_path, split_samples, img_dir_name):
    with open(jsonl_path, "w", encoding="utf-8") as f:
        for s in split_samples:
            src = Path(s["original_image_path"])
            dst = Path(OUTPUT_DIR) / "images" / img_dir_name / s["unique_image_name"]
            shutil.copy2(src, dst)
            # jsonlに書くimageパスはimages/{split}/unique_image_name
            rel_image_path = Path("images") / img_dir_name / s["unique_image_name"]
            s_out = {
                "prefix": "<OD>",
                "suffix": s["suffix"],
                "image": rel_image_path.as_posix()
            }
            f.write(json.dumps(s_out, ensure_ascii=False) + "\n")

train_path = Path(OUTPUT_DIR) / "train.jsonl"
val_path = Path(OUTPUT_DIR) / "val.jsonl"
test_path = Path(OUTPUT_DIR) / "test.jsonl"

write_split(train_path, train_samples, "train")
write_split(val_path, val_samples, "val")
write_split(test_path, test_samples, "test")

print("Conversion complete!")
print(f"Train samples: {len(train_samples)}, Val samples: {len(val_samples)}, Test samples: {len(test_samples)}")
print(f"Train file: {train_path}")
print(f"Val file: {val_path}")
print(f"Test file: {test_path}")
LoRA Fine-tuning
roboflowの記事を参考にLoRAでFine-tuningします。
pip install -U transformers einops timm peft datasets pillow wandb
import os
import json
from typing import List, Dict, Any, Tuple
from PIL import Image
import torch
from torch.utils.data import Dataset, DataLoader
from transformers import AutoModelForCausalLM, AutoProcessor, get_scheduler
from peft import LoraConfig, get_peft_model
from torch.optim import AdamW
from tqdm import tqdm
import wandb

DEVICE = torch.device("cuda" if torch.cuda.is_available() else "cpu")
REVISION = 'refs/pr/6'

TRAIN_JSON = "datasets/train.jsonl"
TRAIN_IMG_DIR = "datasets"
VAL_JSON = "datasets/val.jsonl"
VAL_IMG_DIR = "datasets"

BATCH_SIZE = 6
NUM_WORKERS = 0
EPOCHS = 10
LR = 5e-6
CHECKPOINT = "microsoft/Florence-2-base-ft"

processor = AutoProcessor.from_pretrained(CHECKPOINT, trust_remote_code=True, revision=REVISION)
model = AutoModelForCausalLM.from_pretrained(CHECKPOINT, trust_remote_code=True, revision=REVISION).to(DEVICE)


class JSONLDataset:
    def __init__(self, jsonl_file_path: str):
        self.jsonl_file_path = jsonl_file_path
        self.entries = self._load_entries()

    def _load_entries(self) -> List[Dict[str, Any]]:
        entries = []
        with open(self.jsonl_file_path, 'r', encoding="utf-8") as file:
            for line in file:
                data = json.loads(line)
                entries.append(data)
        return entries

    def __len__(self) -> int:
        return len(self.entries)

    def __getitem__(self, idx: int) -> Dict[str, Any]:
        if idx < 0 or idx >= len(self.entries):
            raise IndexError("Index out of range")
        return self.entries[idx]


class DetectionDataset(Dataset):
    def __init__(self, jsonl_file_path: str, image_directory_path: str):
        self.dataset = JSONLDataset(jsonl_file_path)
        self.image_directory_path = image_directory_path

    def __len__(self):
        return len(self.dataset)

    def __getitem__(self, idx):
        entry = self.dataset[idx]
        image_path = os.path.join(self.image_directory_path, entry['image'])
        if not os.path.exists(image_path):
            raise FileNotFoundError(f"Image file {image_path} not found.")
        image = Image.open(image_path).convert("RGB")
        return image, entry


def collate_fn(batch):
    images = [b[0] for b in batch]
    data = [b[1] for b in batch]
    prefix = [d['prefix'] for d in data]
    suffix = [d['suffix'] for d in data]

    inputs = processor(text=prefix, images=images, return_tensors="pt", padding=True).to(DEVICE)
    return inputs, suffix

train_dataset = DetectionDataset(TRAIN_JSON, TRAIN_IMG_DIR)
val_dataset = DetectionDataset(VAL_JSON, VAL_IMG_DIR)

train_loader = DataLoader(train_dataset, batch_size=BATCH_SIZE, collate_fn=collate_fn, num_workers=NUM_WORKERS, shuffle=True)
val_loader = DataLoader(val_dataset, batch_size=BATCH_SIZE, collate_fn=collate_fn, num_workers=NUM_WORKERS)

config = LoraConfig(
    r=8,
    lora_alpha=8,
    target_modules=["q_proj", "o_proj", "k_proj", "v_proj", "linear", "Conv2d", "lm_head", "fc2"],
    task_type="CAUSAL_LM",
    lora_dropout=0.05,
    bias="none",
    inference_mode=False,
    use_rslora=True,
    init_lora_weights="gaussian",
    revision=REVISION
)

peft_model = get_peft_model(model, config)
peft_model.print_trainable_parameters()

def render_inference_results(model, dataset: DetectionDataset, count: int):
    count = min(count, len(dataset))
    print("=== Inference Examples ===")
    for i in range(count):
        image, data = dataset[i]
        prefix = data['prefix']
        inputs = processor(text=prefix, images=image, return_tensors="pt").to(DEVICE)
        generated_ids = model.generate(
            input_ids=inputs["input_ids"],
            pixel_values=inputs["pixel_values"],
            max_new_tokens=1024,
            num_beams=3
        )
        generated_text = processor.batch_decode(generated_ids, skip_special_tokens=False)[0]
        answer = processor.post_process_generation(generated_text, task='<OD>', image_size=image.size)
        # テキストベースで結果出力
        print(f"Example {i+1}:")
        print(f"  Prefix: {prefix}")
        print(f"  Generated: {generated_text}")
        print(f"  Post-Processed: {answer}")
        print("")

def train_model(train_loader, val_loader, model, processor, epochs=10, lr=1e-6):
    optimizer = AdamW(model.parameters(), lr=lr)
    num_training_steps = epochs * len(train_loader)
    lr_scheduler = get_scheduler(
        name="linear",
        optimizer=optimizer,
        num_warmup_steps=0,
        num_training_steps=num_training_steps,
    )

    # W&B初期化
    wandb.init(project="florence2-finetune", config={
        "epochs": epochs,
        "learning_rate": lr,
        "batch_size": BATCH_SIZE
    })

    # テスト推論
    render_inference_results(model, val_loader.dataset, 2)

    best_val_loss = float("inf")

    for epoch in range(epochs):
        model.train()
        train_loss = 0
        for inputs, answers in tqdm(train_loader, desc=f"Training Epoch {epoch + 1}/{epochs}"):
            input_ids = inputs["input_ids"]
            pixel_values = inputs["pixel_values"]
            labels = processor.tokenizer(
                text=answers,
                return_tensors="pt",
                padding=True,
                return_token_type_ids=False
            ).input_ids.to(DEVICE)

            outputs = model(input_ids=input_ids, pixel_values=pixel_values, labels=labels)
            loss = outputs.loss

            loss.backward()
            optimizer.step()
            lr_scheduler.step()
            optimizer.zero_grad()
            train_loss += loss.item()

        avg_train_loss = train_loss / len(train_loader)
        print(f"Average Training Loss: {avg_train_loss}")

        model.eval()
        val_loss = 0
        with torch.no_grad():
            for inputs, answers in tqdm(val_loader, desc=f"Validation Epoch {epoch + 1}/{epochs}"):
                input_ids = inputs["input_ids"]
                pixel_values = inputs["pixel_values"]
                labels = processor.tokenizer(
                    text=answers,
                    return_tensors="pt",
                    padding=True,
                    return_token_type_ids=False
                ).input_ids.to(DEVICE)

                outputs = model(input_ids=input_ids, pixel_values=pixel_values, labels=labels)
                loss = outputs.loss
                val_loss += loss.item()

            avg_val_loss = val_loss / len(val_loader)
            print(f"Average Validation Loss: {avg_val_loss}")

        # W&Bにログ送信
        wandb.log({
            "epoch": epoch + 1,
            "train_loss": avg_train_loss,
            "val_loss": avg_val_loss
        })

        # 推論結果の確認
        render_inference_results(model, val_loader.dataset, 2)

        # モデル保存
        if avg_val_loss < best_val_loss:
            best_val_loss = avg_val_loss
            output_dir = f"./model_checkpoints/epoch_{epoch+1}"
            os.makedirs(output_dir, exist_ok=True)
            model.save_pretrained(output_dir)
            processor.save_pretrained(output_dir)

    wandb.finish()

train_model(train_loader, val_loader, peft_model, processor, epochs=EPOCHS, lr=LR)
LoRAの推論
可視化はsupervisionを使います
pip install -U pillow peft transformers einops timm supervision
import torch
from transformers import AutoModelForCausalLM, AutoProcessor
from peft import PeftModel
from PIL import Image

DEVICE = torch.device("cuda" if torch.cuda.is_available() else "cpu")

# lora model
OUTPUT_DIR = "./epoch_1"

BASE_MODEL = "microsoft/Florence-2-base-ft"

base_model = AutoModelForCausalLM.from_pretrained(BASE_MODEL, trust_remote_code=True).to(DEVICE)
model = PeftModel.from_pretrained(base_model, OUTPUT_DIR).to(DEVICE)
processor = AutoProcessor.from_pretrained(OUTPUT_DIR, trust_remote_code=True)

image_path = "02.png"
image = Image.open(image_path).convert("RGB")

prefix = "<OD>"

inputs = processor(text=prefix, images=image, return_tensors="pt").to(DEVICE)

generated_ids = model.generate(
    input_ids=inputs["input_ids"],
    pixel_values=inputs["pixel_values"],
    max_new_tokens=1024,
    num_beams=3
)

generated_text = processor.batch_decode(generated_ids, skip_special_tokens=False)[0]

result = processor.post_process_generation(generated_text, task='<OD>', image_size=image.size)

print("Generated text:", generated_text)
print("Post-processed result:", result)

import supervision as sv
detections = sv.Detections.from_lmm(
    sv.LMM.FLORENCE_2, result, resolution_wh=image.size)

bounding_box_annotator = sv.BoundingBoxAnnotator(
    color_lookup=sv.ColorLookup.INDEX)
label_annotator = sv.LabelAnnotator(
    color_lookup=sv.ColorLookup.INDEX)

image = bounding_box_annotator.annotate(image, detections)
image = label_annotator.annotate(image, detections)
image


