きっかけ
DMARCレポートをスプレッドシートに取り込む実例が検索しても無かったので作ってみました。スプレッドシートで一覧化しておけばピボットテーブルで集計・解析したり、Looker Studioやエクセルでグラフ化して活用できそうです。
とりあえず動けば良い程度で作ったものです。イマイチなコードかもしれませんがどなたかの役にたてればと。
動作概要
スプレッドシートに「dmarc_report」というシートを用意し、ヘッダ行を書き込んでからGASを実行します。実行の度に「dmarc_report」シートの最下行へ読み取った行が追加されていきます。
GAS(Google Apps Script)の使い方はググれば見つかると思います。
記載したコードは「コード.js」にそのまま貼り付けてスプレッドシートのIDを書き換えれば動くはずです。初回実行時は指定したスプレッドシートとの権限認証確認が表示されます。
※少なくとも今日時点では私の環境で動作しています。
画面例
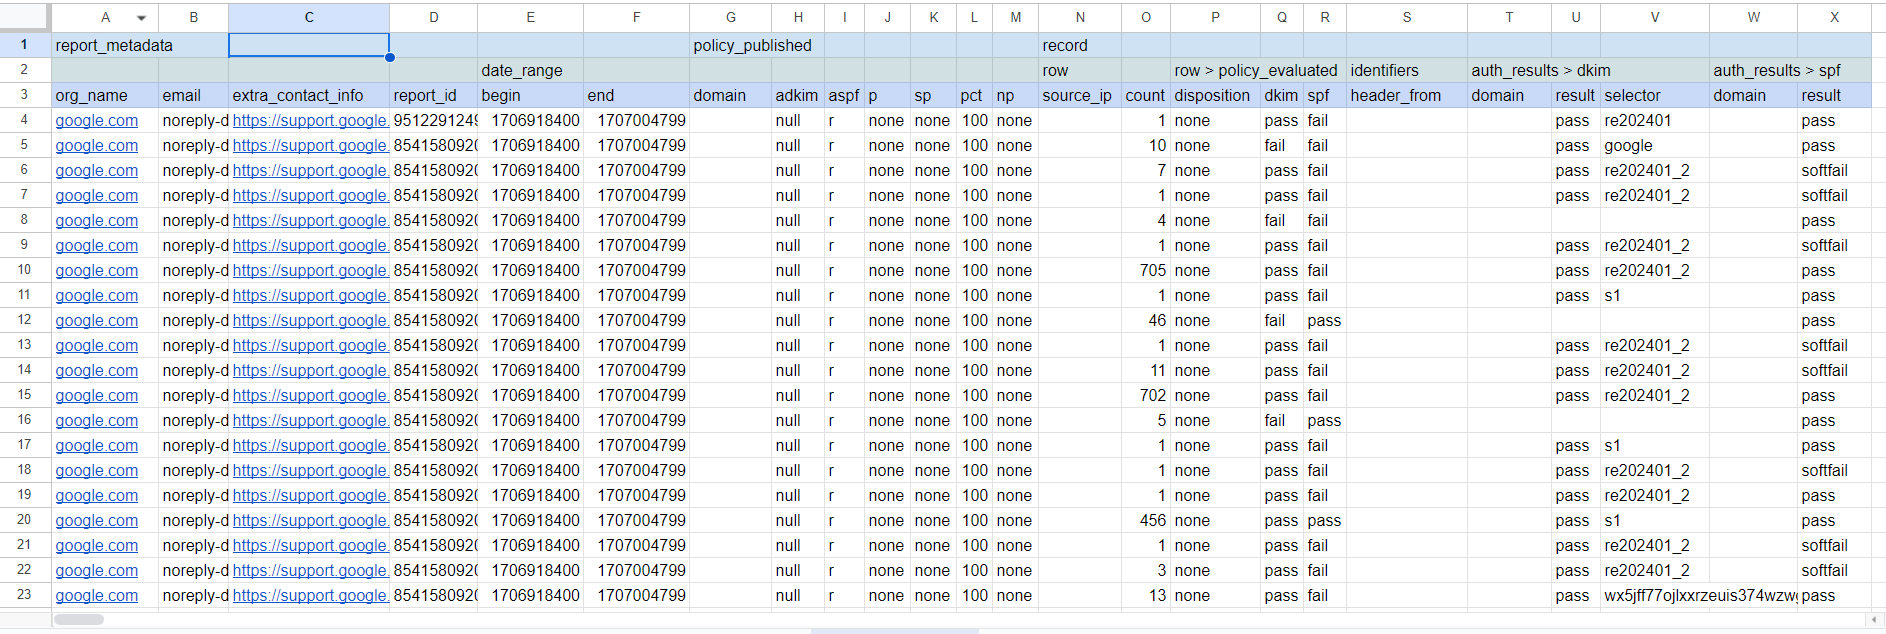
実行後の画面例です。見せちゃいけないセルは消して空白にしています。

最初の3行はヘッダ部分なので以下をそのままコピーして貼り付ければ同じようになるはずです。セル背景色はご自身の好みで。
report_metadata						policy_published							record
				date_range									row		row > policy_evaluated			identifiers	auth_results > dkim			auth_results > spf
org_name	email	extra_contact_info	report_id	begin	end	domain	adkim	aspf	p	sp	pct	np	source_ip	count	disposition	dkim	spf	header_from	domain	result	selector	domain	result
コード
スプレッドシートのIDを★印のところに書き込む必要があります。
IDの調べ方は「スプレッドシートのID」でGoogle検索すればすぐ見つかります。
「メール抽出条件指定」はGoogleから届くレポートを対象に直近1日分のレポートが引っかかるようにしています。
function myFunction() {

  // スプレッドシート指定
  let sheet = SpreadsheetApp.openById("★ここにスプレッドシートのIDを入れる").getSheetByName("dmarc_report");

  let xmls = [];  // スプシ書き出し用配列
  let messages;   // メールスレッド
  let zipblob;    // 添付ファイル(解凍前)
  let fileblob;   // 添付ファイル(解凍後)

 // メール抽出条件指定   Google.com からのメールで"Report domain" "Report-id"がタイトル文字に含まれてて、 newer_than:1d  直近1日分
  const query = 'subject: "Google.com" "Report domain" "Report-id" newer_than:1d ';
  const threads = GmailApp.search(query);

  for (var i = 0; i < threads.length; i++) {
//  for (let i = 0; i < 3; i++) { // テスト時に少数のメール取り出しで使った
    // スレッドからメッセージ(各メール)を取得
    messages = threads[i].getMessages();
//    console.log("メールタイトル:" + threads[i].getFirstMessageSubject());

    for (let j = 0; j < messages.length; j++) {
      // 添付されたzipバイナリ(1つのみ)を取得
      zipblob = messages[j].getAttachments()[0].copyBlob();
      try {
        // XMLファイルのバイナリを取得
        fileblob = Utilities.unzip(zipblob);
      } catch (e) {
        continue;
      }

      for (let k = 0; k < fileblob.length; k++) {
        // 配列にXML文字列を追加する
        // xmls.push(fileblob[k].getDataAsString());
        xmls = parseXml(fileblob[k].getDataAsString());
        xmls.forEach(item => {
          sheet.appendRow(item.split(","));
        })

      }
    }
  }

}

// xml文書を分解して配列で返す
function parseXml(fileblob_string){
  //XMLを取得する
  let document = XmlService.parse(fileblob_string);

  // 各データの要素を取得
  let root = document.getRootElement();

  let report_metadata = "";
  let policy_published = "";
  let record_txt = "";
  let rtn_line = [];

  report_metadata =
              root.getChild("report_metadata").getChild("org_name").getText()
      + "," + root.getChild("report_metadata").getChild("email").getText()
      + "," + root.getChild("report_metadata").getChild("extra_contact_info").getText()
      + "," + root.getChild("report_metadata").getChild("report_id").getText()
      + "," + root.getChild("report_metadata").getChild("date_range").getChild("begin").getText()
      + "," + root.getChild("report_metadata").getChild("date_range").getChild("end").getText()
      ;

  policy_published = root.getChild("policy_published").getChildText("domain")
      + "," + root.getChild("policy_published").getChildText("adkim")
      + "," + root.getChild("policy_published").getChildText("aspf")
      + "," + root.getChild("policy_published").getChildText("p")
      + "," + root.getChild("policy_published").getChildText("sp")
      + "," + root.getChild("policy_published").getChildText("pct")
      + "," + root.getChild("policy_published").getChildText("np")
      ;

  let records = root.getChildren("record");
  records.forEach(record => {
    record_txt = record.getChild("row").getChildText("source_ip")
      + "," + record.getChild("row").getChildText("count")
      + "," + record.getChild("row").getChild("policy_evaluated").getChildText("disposition")
      + "," + record.getChild("row").getChild("policy_evaluated").getChildText("dkim")
      + "," + record.getChild("row").getChild("policy_evaluated").getChildText("spf")
      + "," + record.getChild("identifiers").getChildText("header_from")
    ;

    if(record.getChild("auth_results").getChild("dkim")){
      record_txt = record_txt
        + "," + record.getChild("auth_results").getChild("dkim").getChildText("domain")
        + "," + record.getChild("auth_results").getChild("dkim").getChildText("result")
        + "," + record.getChild("auth_results").getChild("dkim").getChildText("selector")
      ;
    }else{
      record_txt = record_txt + ",,,"
    }

    if(record.getChild("auth_results").getChild("spf")){
      record_txt = record_txt
        + "," + record.getChild("auth_results").getChild("spf").getChildText("domain")
        + "," + record.getChild("auth_results").getChild("spf").getChildText("result")
      ;
    }else{
      record_txt = record_txt + ",,"
    }

    // 1行ずつ配列に入れてく
    rtn_line.push(report_metadata + "," + policy_published + "," + record_txt);

  })

  return(rtn_line);

}
定期的な自動実行について
DMARCレポートは毎日届くので手動実行して動作確認ができたあと、毎日自動で動く設定をしておくと良さそうです。
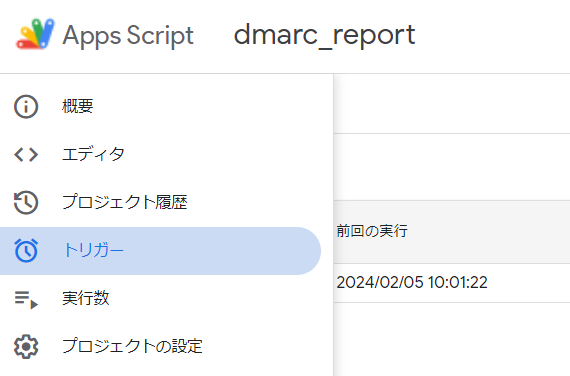
Apps Scriptの画面に「トリガー」項目があるのでそこから設定できます。
私が関わっている環境ではいまのところすべて毎日18時台にレポートメールを受信しています。届く時間帯を避けて自動実行を設定すると重複せず書き出せます。
【参考】DMARCレポートのメールについて
扱っている環境ではGoogleとMSの2箇所からDMARCレポートを受信しています。
届いたメールのタイトルと添付ファイルの拡張子は以下通りです。
添付ファイル拡張子の違い(.gz、.zip)があり、xml本文もちょっと違っていました。
MS メール件名
Report Domain: 対象ドメイン名 Submitter: protection.outlook.com Report-ID: レポートID
添付ファイルは .gz

MS メール件名
[Preview] Report Domain: 対象ドメイン名 Submitter: enterprise.protection.outlook.com Report-ID: レポートID
添付ファイルは .gz

Google メール件名
Report domain: 対象ドメイン名 Submitter: google.com Report-ID: レポートID
添付ファイルは .zip
xmlファイルの中身も若干違いあり、気付けた主なところは以下です。
google
 envelope_toとenvelope_from項目がない
    <identifiers>
      <header_from>ドメイン名</header_from>
    </identifiers>

MS
 envelope_toとenvelope_from項目がある
    <identifiers>
      <envelope_to>ドメイン名</envelope_to>
      <envelope_from>ドメイン名</envelope_from>
      <header_from>ドメイン名</header_from>
    </identifiers>
auth_resultsの中身について、GoogleはDKIM未設定だと項目そのものが省略されていました。MS側でも同様なのか現在の環境では判別付きませんでした。
google
  DKIM設定有り
    <auth_results>
      <dkim>
        <domain>ドメイン名</domain>
        <result>pass</result>
        <selector>セレクタ名</selector>
      </dkim>
      <spf>
        <domain>ドメイン名</domain>
        <result>pass</result>
      </spf>
    </auth_results>

    DKIM設定無し DKIMの項目が省略される
    <auth_results>
      <spf>
        <domain>ドメイン名</domain>
        <result>pass</result>
      </spf>
    </auth_results>
なお、Gmailからの圧縮ファイル取り出しはこちらの「GASサンプルコード」を参考にさせていただきました。
https://inside.pixiv.blog/mipsparc/7869
以上です。
