はじめに
Azure Automationを既定で作った場合、その実行ユーザの権限ロールはサブスクリプションの共同作成者となり、接続認証に利用する証明書も手動で更新が必要となります。
そこで以下を参考にしながら、Automation環境の基本的環境を構築する手順をまとめて記載します。
本手順では特定のリソースグループに対して、接続以外のすべての管理行為が可能であるリソースグループの共同作成者ロールを付与していますが、この権限範囲、スコープは自由に設定が可能ですので任意につけて下さい。
※タイトルにARMと付けているのはASMでの構成の場合、ロールはサブスクリプションの共同作成者でないとならず、また証明書もサブスクリプションの管理証明書を使う必要がある関係上同様の手順で可能か未検証の為となります。
参考文献:
MS:Azure Automation の実行アカウントを管理する
1. Automationアカウントの作成
リソースの追加から、Automationリソースを追加します。 すべてのリソースからAutomationを選択しても良いですし、リソースグループから追加しても良いです。
また、実行アカウントはここで自動作成しておきます。
しなかった場合はAutomationリソース作成後、「アカウント設定」-「実行アカウント」からAzure Automation 実行ユーザ作成を選択してアカウントを作成してください。(クラッシックの方はASMの場合なのでそちらは不要です。)

2. 実行ユーザロールの設定
既定で設定される実行ユーザのロールがサブスクリプションの共同作成者という強い権限の為、権限をリソースグループの共同作成者まで落とします。(付与できる権限は任意で大丈夫ですが、ジョブ機能の実行ユーザとしては管理者権限を持っていた方が操作しやすいのでこの権限とします。)
すべてのサービスからサブスクリプションを選択し、リソースを作ったサブスクリプションを開いたら「アクセス制御(IAM)」-「ロールの割り当て」を見るとAutomationアプリケーションが共同作成者ロールで割り当てられているのが確認できるので、そのロールを削除します。
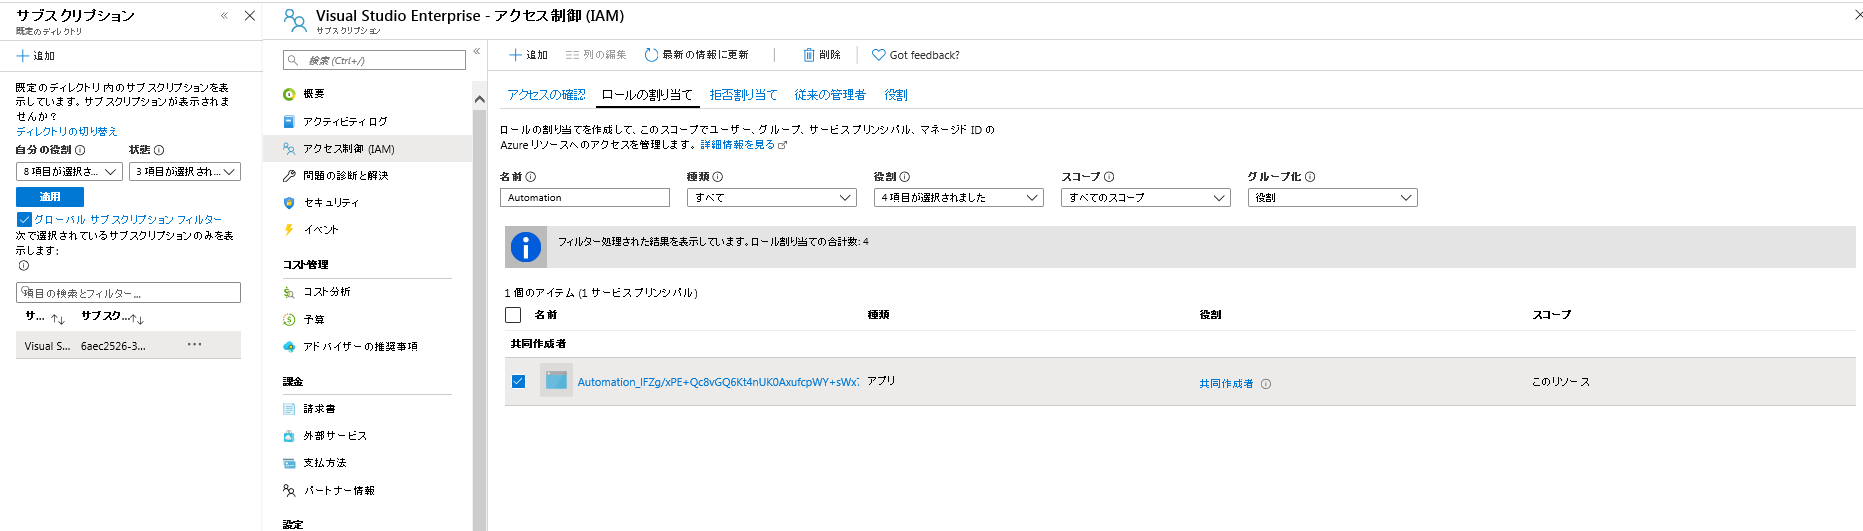
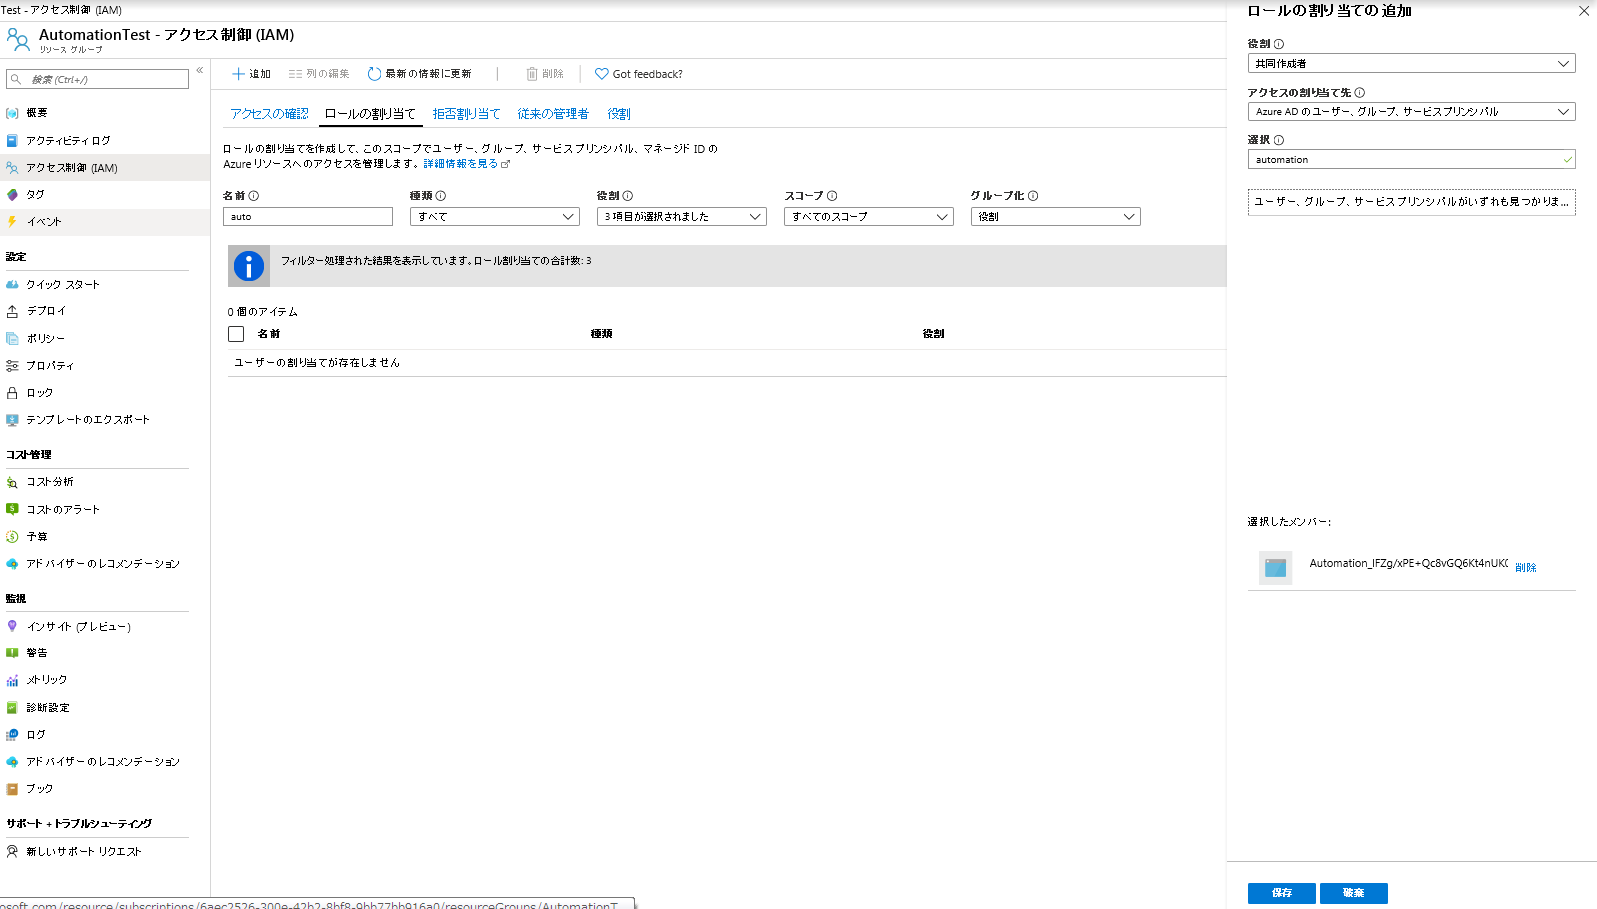
次に操作対象のリソースグループを開いて同じく「アクセス制御(IAM)」-「ロールの割り当て」を展開して、先ほど削除したAutomationアプリのアカウントに共同作成者ロールを追加します。(適用されるとスコープが「このリソース」になってサブスクリプション全体には効果を及ぼせない範囲の権限に制限できたことが分かると思います)

3. 自己証明書の自動更新設定
実行アカウントを自動生成した場合、既定の証明書は自己証明書で1年単位で更新するものが自動生成されます。1年間が過ぎると有効期限切れになり、接続が失敗するようになる為、定期的に更新する必要があります。 一応Portal画面から証明書の更新は手動で実施できるのですが、MSからこれを自動化する用のAutomationスクリプトが提供されている為、これを設定して自動更新できるようにしておきます。
新規にRunbookを作成します。 名前は任意で良いですが種類は「Powershell」で作成してください。

作成したRunbookに以下のスクリプトを貼り付けてください。
 <#
.SYNOPSIS
    This sample automation runbook checks if the RunAs service principal certificate authentication is about to expire, and
    automatically updates it with a new certificate.
.DESCRIPTION
    This sample automation runbook checks if the RunAs service principal certificate authentication is about to expire, and
    automatically updates it with a new certificate. You need to perform the following tasks before you can put this on a schedule
    within the Azure Automation account.
    1. Add the RunAs service principal as an owner of the application created during Automation Account creation. You can get the application
    id from the RunAs page in the Automation account and run the following commands locally after installly the AzureAD module from the PowerShellGallery.
    Connect-AzureAD
    $Application = Get-AzureADApplication -Filter "AppId eq '123456789'"
    $ServicePrincipal = Get-AzureADServicePrincipal -Filter "AppId eq '123456789'"
    Add-AzureADApplicationOwner -ObjectId $Application.ObjectId -RefObjectId $ServicePrincipal.ObjectId
    2. Grant permissions to the Application to be able to update itself. Go to Azure AD in the portal and search for the RunAs application
    in the App Registrations page (select all apps).
    3. Select the application and click Settings button -> Required Permissions -> Add button
    Add the "Manage apps that this app creates or owns" permission from Windows Azure Active Directory.
    4. Select Grant permissions (You may need to be an administrator in Azure AD to be able to perform this task).
    Once the below tasks are done, you can import this runbook into the Automation account, update the Azure modules from the modules page,
    and schedule this to run weekly.
.NOTES
    AUTHOR: Automation Team
    LASTEDIT: October 30th 2018
# >

$ErrorActionPreference = 'stop'

$CertifcateAssetName = "AzureRunAsCertificate"
$ConnectionAssetName = "AzureRunAsConnection"
$ConnectionTypeName = "AzureServicePrincipal"

Function ImportAutomationModule
{
param(

    [Parameter(Mandatory=$true)]
    [String] $ResourceGroupName,

    [Parameter(Mandatory=$true)]
    [String] $AutomationAccountName,

    [Parameter(Mandatory=$true)]
    [String] $ModuleName,

    [Parameter(Mandatory=$false)]
    [String] $ModuleVersion

)

    $Url = "https://www.powershellgallery.com/api/v2/Search()?`$filter=IsLatestVersion&searchTerm=%27$ModuleName%27&targetFramework=%27%27&includePrerelease=false&`$skip=0&`$top=40"
    $SearchResult = Invoke-RestMethod -Method Get -Uri $Url -UseBasicParsing

    if($SearchResult.Length -and $SearchResult.Length -gt 1) {
        $SearchResult = $SearchResult | Where-Object -FilterScript {

            return $_.properties.title -eq $ModuleName

        }
    }

    $PackageDetails = Invoke-RestMethod -Method Get -UseBasicParsing -Uri $SearchResult.id

    if(!$ModuleVersion) {

        $ModuleVersion = $PackageDetails.entry.properties.version
    }

    $ModuleContentUrl = "https://www.powershellgallery.com/api/v2/package/$ModuleName/$ModuleVersion"

    do {

        $ActualUrl = $ModuleContentUrl
        $ModuleContentUrl = (Invoke-WebRequest -Uri $ModuleContentUrl -MaximumRedirection 0 -UseBasicParsing -ErrorAction Ignore).Headers.Location

    } while(!$ModuleContentUrl.Contains(".nupkg"))

    $ActualUrl = $ModuleContentUrl

    $AutomationModule = New-AzureRmAutomationModule `
        -ResourceGroupName $ResourceGroupName `
        -AutomationAccountName $AutomationAccountName `
        -Name $ModuleName `
        -ContentLink $ActualUrl -AzureRmContext $Context

    while(

        (!([string]::IsNullOrEmpty($AutomationModule))) -and
        $AutomationModule.ProvisioningState -ne "Created" -and
        $AutomationModule.ProvisioningState -ne "Succeeded" -and
        $AutomationModule.ProvisioningState -ne "Failed"

    ){
        Write-Verbose -Message "Polling for module import completion"
        Start-Sleep -Seconds 10
        $AutomationModule = $AutomationModule | Get-AzureRmAutomationModule -AzureRmContext $Context
    }


    if($AutomationModule.ProvisioningState -eq "Failed") {

        Write-Error "     Importing $ModuleName module to Automation failed."

    } else {
        $ActualUrl
    }
}

# Get RunAs certificate and check for expiration date. If it is about to expire in less than a week, update it.
$RunAsCert = Get-AutomationCertificate -Name $CertifcateAssetName
if ($RunAsCert.NotAfter -gt (Get-Date).AddDays(8))
{
    Write-Output ("Certificate will expire at " + $RunAsCert.NotAfter)
# 実行をテストする場合はExit(1)行をコメントアウトする。Certificate will expire at ~がでてジョブは失敗するが証明書は更新されている状態であれば正常。
    Exit(1)
}


# Authenticate with RunAs Account
$RunAsConnection = Get-AutomationConnection -Name "AzureRunAsConnection"
Add-AzureRmAccount `
    -ServicePrincipal `
    -TenantId $RunAsConnection.TenantId `
    -ApplicationId $RunAsConnection.ApplicationId `
    -CertificateThumbprint $RunAsConnection.CertificateThumbprint | Write-Verbose

$Context = Set-AzureRmContext -SubscriptionId $RunAsConnection.SubscriptionID

$AutomationResource = Get-AzureRmResource -ResourceType Microsoft.Automation/AutomationAccounts -AzureRmContext $Context

foreach ($Automation in $AutomationResource)
{
    $Job = Get-AzureRmAutomationJob -ResourceGroupName $Automation.ResourceGroupName -AutomationAccountName $Automation.Name `
                -Id $PSPrivateMetadata.JobId.Guid -ErrorAction SilentlyContinue -AzureRmContext $Context
    if (!([string]::IsNullOrEmpty($Job)))
    {
        $AutomationResourceGroupName = $Job.ResourceGroupName
        $AutomationAccountName = $Job.AutomationAccountName
        break;
    }
}

# Import AzureAD module if it is not in the Automation account.
$ADModule = Get-AzureRMAutomationModule -ResourceGroupName $AutomationResourceGroupName -AutomationAccountName $AutomationAccountName `
                         -Name "AzureAD" -AzureRmContext $Context -ErrorAction SilentlyContinue
if ([string]::IsNullOrEmpty($ADModule))
{
    $AzureADGalleryURL = ImportAutomationModule -ResourceGroupName $AutomationResourceGroupName -AutomationAccountName $AutomationAccountName -ModuleName "AzureAD"

    # Donload locally and import the AzureAD module
    $LocalFolder = 'C:\AzureAD'
    New-Item -ItemType directory $LocalFolder -Force -ErrorAction SilentlyContinue | Write-Verbose
    (New-Object System.Net.WebClient).DownloadFile($AzureADGalleryURL, "$LocalFolder\AzureAD.zip")
    Unblock-File $LocalFolder\AzureAD.zip
    Expand-Archive -Path $LocalFolder\AzureAD.zip -DestinationPath $LocalFolder\AzureAD -force
    Import-Module $LocalFolder\AzureAD\AzureAD.psd1
}

# Create RunAs certificate
$SelfSignedCertNoOfMonthsUntilExpired = 12
$SelfSignedCertPlainPassword = (New-Guid).Guid
$CertificateName = $AutomationAccountName + $CertifcateAssetName
$PfxCertPathForRunAsAccount = Join-Path $env:TEMP ($CertificateName + ".pfx")
$CerCertPathForRunAsAccount = Join-Path $env:TEMP ($CertificateName + ".cer")

$Cert = New-SelfSignedCertificate -DnsName $CertificateName -CertStoreLocation Cert:\LocalMachine\My `
                    -KeyExportPolicy Exportable -Provider "Microsoft Enhanced RSA and AES Cryptographic Provider" `
                    -NotBefore (Get-Date).AddDays(-1) -NotAfter (Get-Date).AddMonths($SelfSignedCertNoOfMonthsUntilExpired) -HashAlgorithm SHA256

$CertPassword = ConvertTo-SecureString $SelfSignedCertPlainPassword -AsPlainText -Force
Export-PfxCertificate -Cert ("Cert:\LocalMachine\My\" + $Cert.Thumbprint) -FilePath $PfxCertPathForRunAsAccount -Password $CertPassword -Force | Write-Verbose
Export-Certificate -Cert ("Cert:\LocalMachine\My\" + $Cert.Thumbprint) -FilePath $CerCertPathForRunAsAccount -Type CERT | Write-Verbose

# Connect to Azure AD to manage the application
Connect-AzureAD -CertificateThumbprint $RunAsConnection.CertificateThumbprint -TenantId $RunAsConnection.TenantId -ApplicationId $RunAsConnection.ApplicationId | Write-Verbose

# Find the application
$Filter = "AppId eq '" + $RunasConnection.ApplicationId + "'"
$Application = Get-AzureADApplication -Filter $Filter

# Add new certificate to application
New-AzureADApplicationKeyCredential -ObjectId $Application.ObjectId -CustomKeyIdentifier ([System.Convert]::ToBase64String($cert.GetCertHash())) `
         -Type AsymmetricX509Cert -Usage Verify -Value ([System.Convert]::ToBase64String($cert.GetRawCertData())) -StartDate $cert.NotBefore -EndDate $cert.NotAfter | Write-Verbose

# Update the certificate with the new one in the Automation account
$CertPassword = ConvertTo-SecureString $SelfSignedCertPlainPassword -AsPlainText -Force
Set-AzureRmAutomationCertificate -ResourceGroupName $AutomationResourceGroupName -AutomationAccountName $AutomationAccountName -Path $PfxCertPathForRunAsAccount -Name $CertifcateAssetName `
             -Password $CertPassword -Exportable:$true -AzureRmContext $Context | Write-Verbose


# Update the RunAs connection with the new certificate information
$ConnectionFieldValues = @{"ApplicationId" = $RunasConnection.ApplicationId ; "TenantId" = $RunAsConnection.TenantId; "CertificateThumbprint" = $Cert.Thumbprint; "SubscriptionId" = $RunAsConnection.SubscriptionId }

# Can't just update the thumbprint value due to bug https://github.com/Azure/azure-powershell/issues/5862 so deleting / creating connection
Remove-AzureRmAutomationConnection -ResourceGroupName $AutomationResourceGroupName -AutomationAccountName $AutomationAccountName -Name $ConnectionAssetName -Force
New-AzureRMAutomationConnection -ResourceGroupName $AutomationResourceGroupName -AutomationAccountName $AutomationAccountName -Name $ConnectionAssetName `
              -ConnectionFieldValues $ConnectionFieldValues -ConnectionTypeName $ConnectionTypeName -AzureRmContext $Context | Write-Verbose

Write-Output ("RunAs certificate credentials have been updated")
スクリプト上の120行目付近にある「Exit(1)」をコメントアウトして、公開します。(実行テスト用)
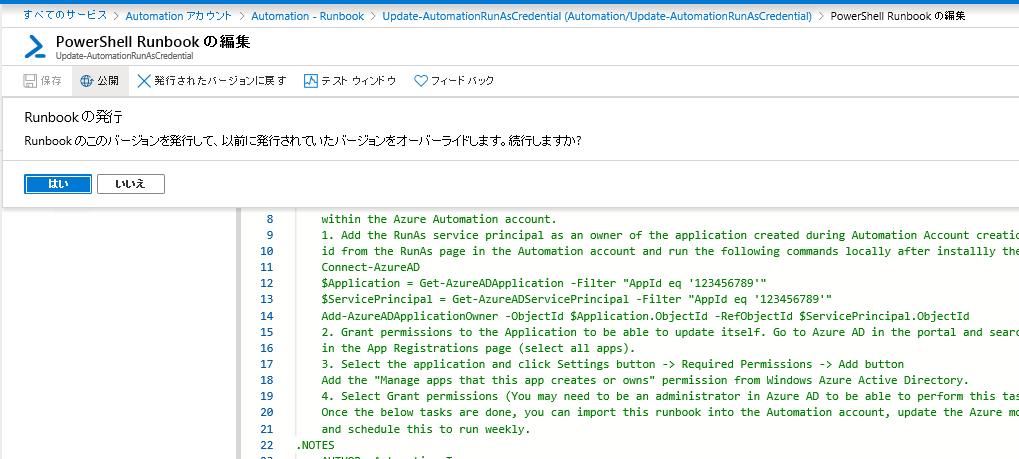
ジョブの実行が失敗して、以下の画面が出力されたら成功ですので、コメントアウトした「Exit(1)」を戻して公開しなおします。
※もう一度実行しなおすと今度は出力内容は同じで、ジョブが「完了」となり正常終了すると思います。

実行結果を確認する為にAutomationアカウントのポータルを開き、「共有リソース」-「証明書」を開きます。
自動生成された証明書があると思うのでそれを選択して開くと証明書の期間が更新されているのが分かると思います。
※この環境では同日に実行している為分かり難いですが、ここでは最終更新時刻が証明書を作成した日時となっており、本来「2019年10月28日 13:03」に作成した証明書の有効期限は「2020年10月28日 13:03」となるはずがジョブ実行後は1年後の09:00で設定されなおされています。(09:00となっているのはスクリプト上では世界標準時0:00に設定しているが表示上日本標準時に直されている為+9時間されている)

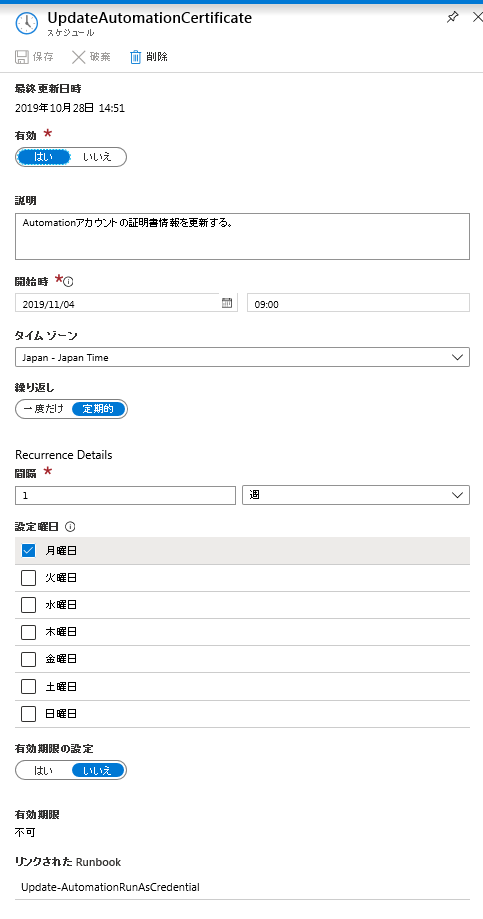
次にこの証明書更新の処理をスケジュールに登録します。
MSのドキュメントを読む限り週1での実行を推奨しているようなので、その通り毎週月曜朝9時で実行するように設定しておきます。
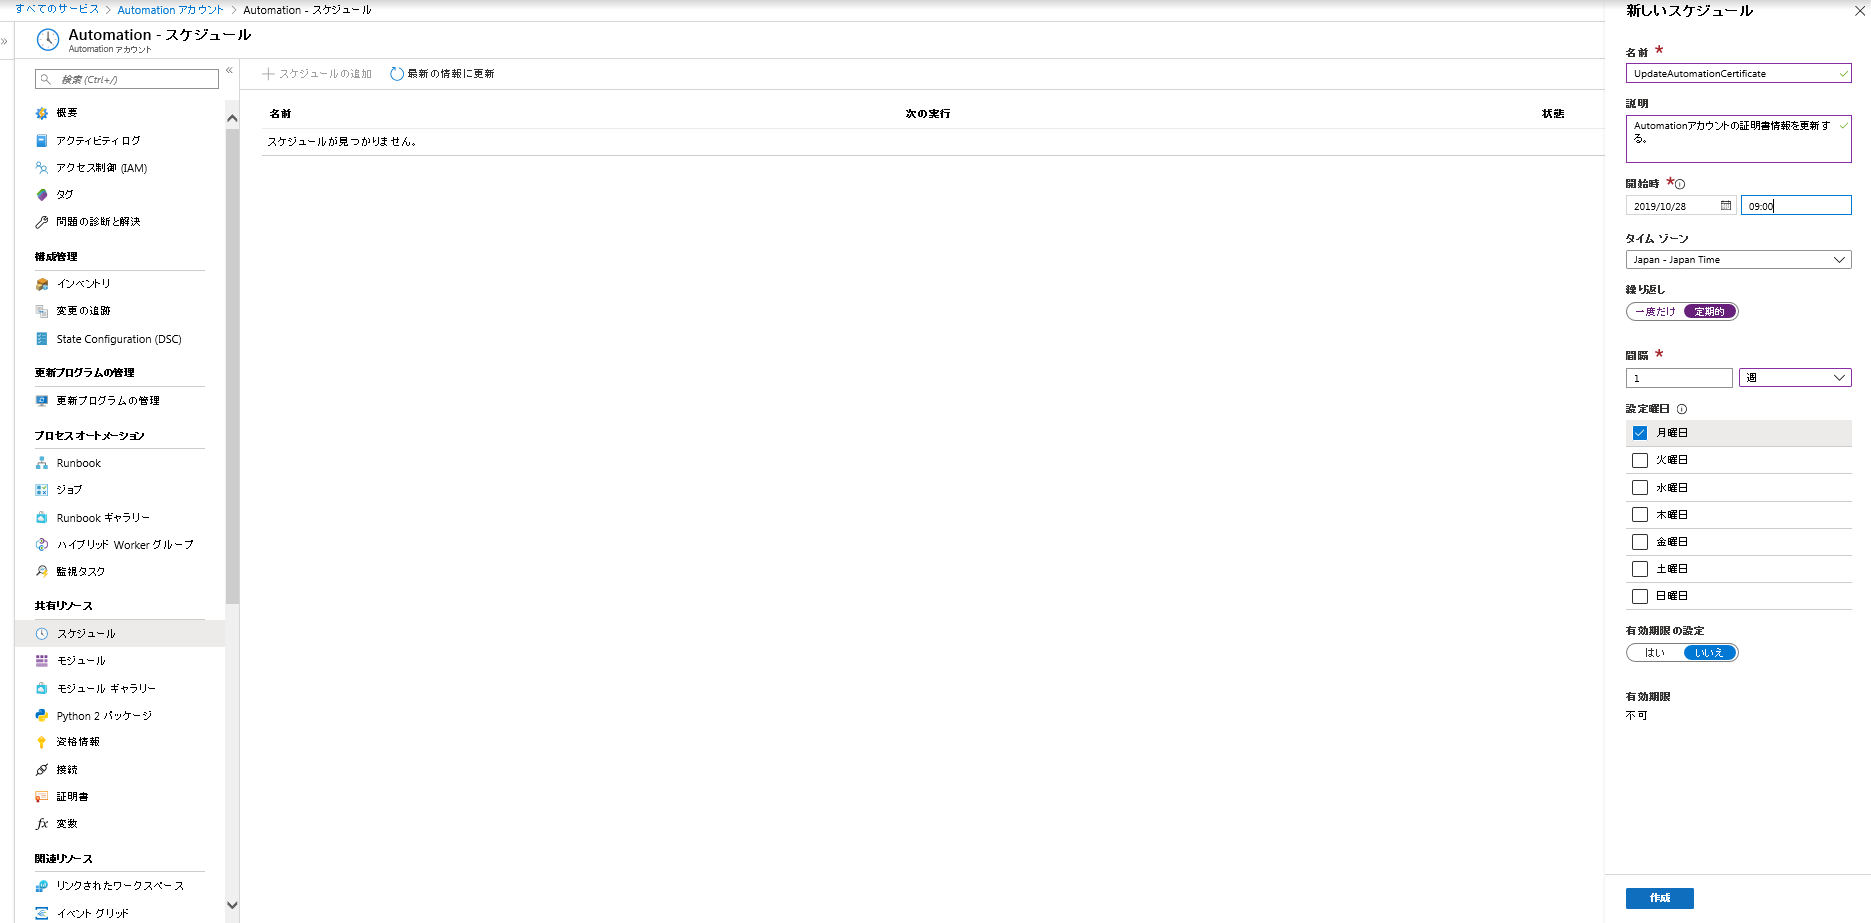
作成すると実行するものが何もない空のスケジュールだけ作成されます。

Runbookから先ほど作成したスクリプトを選択し、概要から「スケジュールへのリンク」を選択します。

先ほど作成したスケジュールを設定します。(今回は入力パラメータは無いのでパラメータは設定なし)
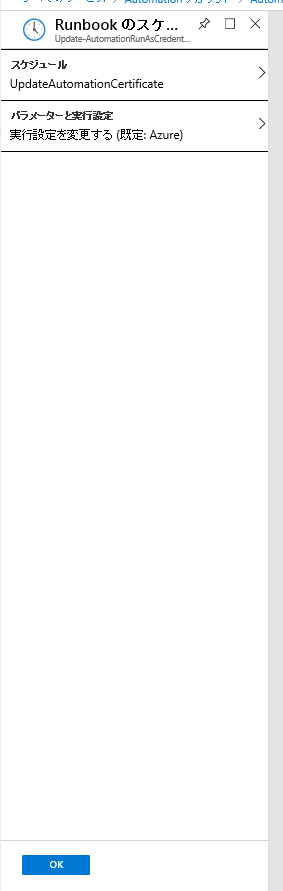
再度スケジュールの設定内容を確認すると実行する内容に証明書更新スクリプトが追加されているのが確認できます。
以上でAutomationの実行環境作成は完了です。
終わりに
オンプレのジョブ用ミドルウェアを構築するよりは遥かに簡単ではあるもののクラウド環境もオンプレ系インフラ技術者的にはなかなか難関ですが、一つ一つ紐解けばそんなに違いない事が分かってほっとしてます。
ただ、Automation機能のビューだけはもっと使いやすくしてほしいなぁとは思います。もっとオペレータさんに優しいインターフェースにならないものですかね。。。