はじめに
何か処理を実行しているとき、ローディング画面を実装したい場合があると思います。
Vuetifyではプロパティやコンポーネントでローディングを簡単に実装できます。今回はその実装方法を簡単にまとめました。
詳しく知りたい方は公式サイトで確認してください。
また、コピペでぱっと確認したい方は最後の方に機能をまとめたサンプルコードを載せているのでそちらをコピペしてください。
環境
- vue 2.6.14
- vuetify 2.6.2
- npm: 7.21.1
- node: 14.17.5
vuetifyのインストール
以下のコードでVuetifyをインストールできます。
vue add vuetify
npm run serveで起動し、下の画面が出てきたら準備は完了です。

詳しい方法は以下のリンクで説明されています。
ローディング画面実装
今回ご紹介するのは4つの方法になります。
- Vuetifyコンポーネントのローディング
- 円グラフを用いたローディング画面
- 棒グラフを用いたローディング画面
- Dialogとの組み合わせ
また、Vuetifyのインストールを無事終えたら、src/components/HelloWorld.vueが作成されてると思いますが、今回はその中身を変更するような形で実装していきます。
Vuetifyのコンポーネントのローディング
Vueityfで用意されているv-cardやv-data-tableなどには標準機能としてローディングが実装されています。
loadingのオプションを設定することで表示が可能になります。
また、自分が調べたところloadingプロパティが利用できるコンポーネントは以下のようになるみたいです。(調べ損ねがあるかもしれません。)
- v-card
- v-data-table
- v-btn
- v-input
- v-overflow-btn
- v-switch
src/components/HelloWorld.vue
今回はisLoadingでローディングの有無を操作しています。
<template>
  <div class="mx-auto mt-3 mb-6 text-center" style="width:600px;">

    <v-btn class="my-2" color="primary" @click="isLoading=!isLoading" >Toggle Loading</v-btn>

    <v-card
      :loading=isLoading
      height="100px"
      class="mx-auto text-center "
    > <v-card-title> Card Loading </v-card-title></v-card>

    <v-data-table
      :loading=isLoading
      :headers="headers"
      :items="items"
      class="mx-auto  my-2 elevation-3 "
    ></v-data-table>


  </div>
</template>

<script>

  export default {
    name: 'HelloWorld',

    data () {
      return {
        isLoading:true,
      }
    },
  }

</script>
結果
成功するとと以下のようなローディング画面が表示できます!
円グラフを用いたローディング画面
Vueitfyのコンポーネントにv-progress-circularという円グラフで状況を伝えるコンポーネントがあります。これを用いることで簡単にローディングを実装できます。
v-progress-circularのindeterminateプロパティを用いることで円グラフがクルクル回転するローディングを実装できます。
また、valueに値を設定すると円グラフのパーセント表示が可能になります。
v-progress-circularにはこれ以外にも様々な機能がありますので、詳しく知りたい方は以下のリンクで確認してください。
src/compnents/HelloWorld.vue
<template>
  <div class="mx-auto mt-3 mb-6 text-center" style="width:600px;">

    <v-btn class="my-2" color="primary" @click="isLoading=!isLoading" >Toggle Loading</v-btn>

    <v-card> <v-card-title>v-progress-circular </v-card-title>
      <v-progress-circular
        :indeterminate="isLoading"
        :size="100"
        color="primary"
        class="my-2"
      ></v-progress-circular>
    </v-card>

    <v-card> <v-card-title>v-progress-circular(%表示) </v-card-title>
      <v-progress-circular
        :size="100"
        :value="value"
        width="15"
        color="red"
        class="my-2"
      >
      {{ value }}%
      </v-progress-circular>
    </v-card>

  </div>
</template>

<script>

  export default {
    name: 'HelloWorld',
    data () {
      return {
        isLoading:true,
        value: 60,
      }
    },
    mounted(){
      this.interval = setInterval(() => {
        this.createIncrease()
      }, 100)
    },

    methods:{
      createIncrease(){
        if(this.value <= 100) this.value++;
        else this.value = 0;
      }
    }
  }

</script>
結果
棒グラフを用いたローディング画面
棒グラフでのローディング画面の表示はv-progress-linearのコンポーネントを使用します。
先ほど説明したv-progress-circularと使い方はほぼ同じです。
indeterminateでローディングを実装でき、valueでパーセント表示が可能になります。
v-progress-linearにはこれ以外にも様々な機能がありますので、詳しく知りたい方は以下のリンクで確認してください。
src/componetnts/HelloWorld.vue
  <template>
  <div class="mx-auto mt-3 mb-6 text-center" style="width:600px;">

    <v-btn class="my-2" color="primary" @click="isLoading=!isLoading" >Toggle Loading</v-btn>

    <v-card> <v-card-title>v-progress-linear </v-card-title>
      <v-progress-linear
        :indeterminate="isLoading"
        color="primary"
        class="my-2"
      ></v-progress-linear>
    </v-card>


    <v-card> <v-card-title>v-progress-linear(%表示) </v-card-title>
      <v-progress-linear
        :value="value"
        height="20"
        color="red"
        class="mt-2"
      >
      {{ value }}%
      </v-progress-linear>
    </v-card>

  </div>
</template>

<script>

  export default {
    name: 'HelloWorld',
    data () {
      return {
        isLoading:true,
        value: 60,
      }
    },
    mounted(){
      this.interval = setInterval(() => {
        this.createIncrease()
      }, 100)
    },

    methods:{
      createIncrease(){
        if(this.value <= 100) this.value++;
        else this.value = 0;
      }
    }

  }

</script>
結果
Dialogとの組み合わせ
ここでは自分が実際に使用しているダイアログとの組み合わせを紹介します。ダイアログを使用することでLoading中に画面を触らせないような実装が可能になります。
今回はv-dialogのv-modelでローディング表示の有無を操作しています。
円グラフ
v-dialogでv-progress-circleを囲むことでローディングを実装できます。v-dialogのpersistentプロパティを使用することで処理中にユーザーに操作させないようにできます。
ただ、処理中にエラーが起きた場合にはpersistentがあるとユーザー画面でローディングが一生回ることになるのでキャンセルボタンをつけることをお勧めします。
src/componetnts/HelloWorld.vue
<template>
  <div class="mx-auto mt-3 text-center" style="width:600px;">

    <v-btn class="my-2" @click="dialog=true" >Dialog Circle Loading</v-btn>

    <v-dialog
      v-model="dialog"
      persistent
      width="300"
    >
      <v-card height="190" class="text-center">
        <v-progress-circular
          :indeterminate="isLoading"
          :size="100"
          color="primary"
          class="mt-4 "
        >Loading...
        </v-progress-circular>
        <v-card-actions>
          <v-btn class="ml-auto my-2" color="primary" @click="dialog=false">close</v-btn>
        </v-card-actions>
      </v-card>
    </v-dialog>

  </div>
</template>

<script>

  export default {
    name: 'HelloWorld',

    data () {
      return {
        isLoading:true,
        dialog:false,

      }
    },

  }

</script>
結果
棒グラフ
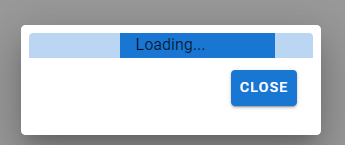
棒グラフでの実装も円グラフと同様にして実装できます。
src/componetnts/HelloWorld.vue
<template>
  <div class="mx-auto mt-3 text-center" style="width:600px;">

    <v-btn class="my-2" @click="dialog=true" >Dialog Linear Loading</v-btn>

    <v-dialog
      v-model="dialog"
      persistent
      width="300"
    >
      <v-card height="110" class="text-center pa-2">
        <v-progress-linear
          indeterminate
          height="25"
          color="primary"
        >Loading...
        </v-progress-linear>
        <v-card-actions>
          <v-btn class="ml-auto my-1" color="primary" @click="dialog=false">close</v-btn>
        </v-card-actions>
      </v-card>
    </v-dialog>

  </div>
</template>

<script>

  export default {
    name: 'HelloWorld',

    data () {
      return {
        isLoading:true,
        dialog:false
      }
    },

  }

</script>
結果
サンプルコード(まとめ)
今まで紹介したローディングをまとめたものです。ぱっと確認したい方は以下のコードをコピペで大丈夫です。
<template>
  <div class="mx-auto mt-3 mb-6 text-center" style="width:600px;">

    <v-btn class="my-2" color="primary" @click="isLoading=!isLoading" >Toggle Loading</v-btn>
    <br>
    <v-btn class="my-2" color="pink" @click="dialogCircle=true" >Dialog Linear Loading</v-btn>
    <br>
    <v-btn class="my-2" color="red" @click="dialogLinear=true" >Dialog Linear Loading</v-btn>

    <v-card
      :loading=isLoading
      height="100px"
      class="mx-auto text-center "
    > <v-card-title> Card Loading </v-card-title></v-card>

    <v-data-table
      :loading=isLoading
      :headers="headers"
      :items="items"
      class="mx-auto  my-2 elevation-3 "
    ></v-data-table>

    <br>
    <v-card> <v-card-title>v-progress-circular </v-card-title>
      <v-progress-circular
        :indeterminate="isLoading"
        :size="100"
        color="primary"
        class="my-2"
      ></v-progress-circular>
    </v-card>


    <v-card> <v-card-title>v-progress-circular(%表示) </v-card-title>
      <v-progress-circular
        :size="100"
        :value="value"
        width="15"
        color="red"
        class="my-2"
      >
      {{ value }}%
      </v-progress-circular>
    </v-card>

        <v-card> <v-card-title>v-progress-linear </v-card-title>
      <v-progress-linear
        :indeterminate="isLoading"
        color="primary"
        class="my-2"
      ></v-progress-linear>
    </v-card>


    <v-card> <v-card-title>v-progress-linear(%表示) </v-card-title>
      <v-progress-linear
        :value="value"
        height="20"
        color="red"
        class="mt-2"
      >
      {{ value }}%
      </v-progress-linear>
    </v-card>

        <v-dialog
      v-model="dialogLinear"
      persistent
      width="300"
    >
      <v-card height="110" class="text-center pa-2">
        <v-progress-linear
          indeterminate
          height="25"
          color="primary"
        >Loading...
        </v-progress-linear>
        <v-card-actions>
          <v-btn class="ml-auto my-1" color="primary" @click="dialogLinear=false">close</v-btn>
        </v-card-actions>
      </v-card>
    </v-dialog>

    <v-dialog
      v-model="dialogCircle"
      persistent
      width="300"
    >
      <v-card height="190" class="text-center">
        <v-progress-circular
          indeterminate
          :size="100"
          color="primary"
          class="mt-4 "
        >Loading...
        </v-progress-circular>
        <v-card-actions>
          <v-btn class="ml-auto my-2" color="primary" @click="dialogCircle=false">close</v-btn>
        </v-card-actions>
      </v-card>
    </v-dialog>

  </div>
</template>

<script>

  export default {
    name: 'HelloWorld',

    data () {
      return {
        isLoading:true,
        dialogCircle:false,
        dialogLinear:false,
        value: 60,
        headers: [
          { text: '名前', value: 'name'},
          { text: '体重', value: 'fat'},
        ],
        items: [
          {name: 'yoko', fat: 6.0},
          {name: 'tae', fat: 9.0},
        ],
      }
    },

    mounted(){
      this.interval = setInterval(() => {
        this.createIncrease()
      }, 100)
    },

    methods:{
      createIncrease(){
        if(this.value <= 100) this.value++;
        else this.value = 0;
      }
    }
  }

</script>
まとめ
今回はVueitfyでのローディングの実装方法を簡単にまとめました。ほかにもこんなローディング実装があるよ!という方はコメントしていただけるとありがたいです。またご指摘等もぜひコメントしただけると幸いです。


