はじめに
Facebook認証するアプリを作りたいと思い色々調べたのですが、最新の方法がキレイにまとまっているものがなく、ちょっと苦労したので自分でまとめてみました。
これから作る方の参考になればなーと思います。
アプリの登録
アプリの登録はこちらから行います。
特につまづくところはなかったかと思います。
準備
環境と使用するライブラリは以下のとおりです。
- Swift 2.0
- Xcode 7.0.1
- Facebook SDK
Podfileを以下のように編集し、pod installでインストールします。
Podfile
# Uncomment this line to define a global platform for your project
platform :ios, '8.4'

use_frameworks!

target 'SampleApp' do
  pod 'FBSDKLoginKit', '~> 4.7.0'
end
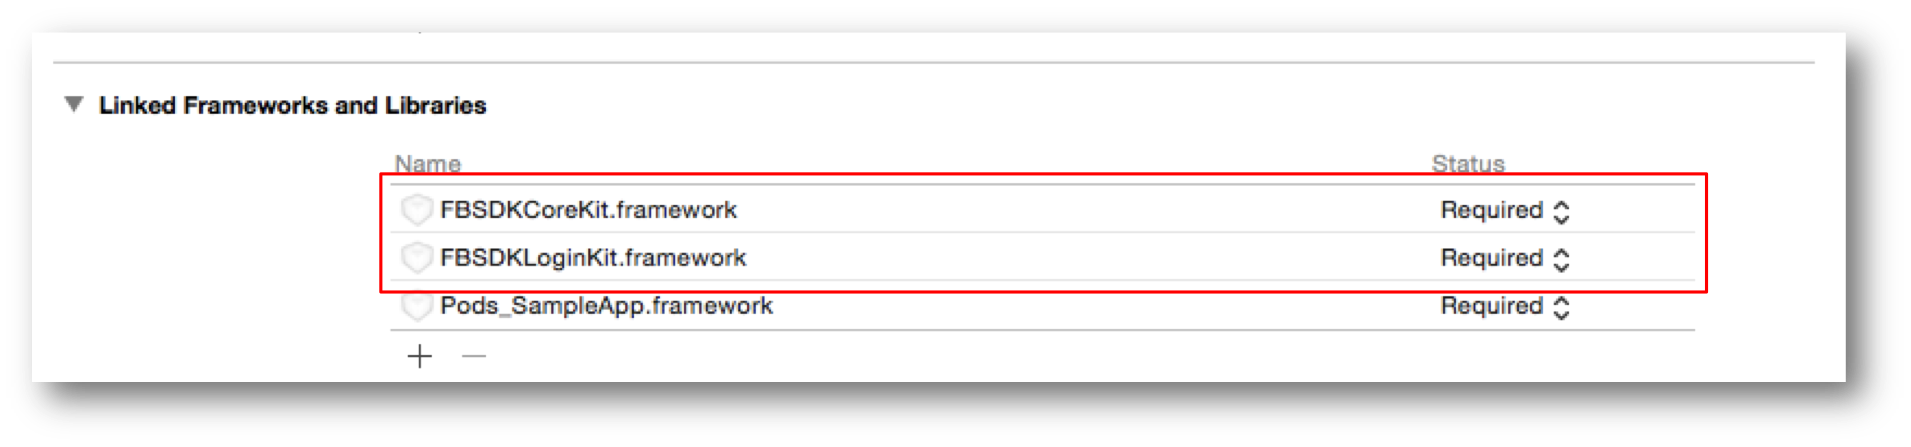
インストール後、open SampleApp.xcworkspaceを実行して、各フレームワークを追加したら準備完了です。
実装
はじめにInfo.plistに以下を追記します。
AppIDやDisplayName等は適宜読み換えてください。
Info.plist
<key>CFBundleURLTypes</key>
<array>
	<dict>
		<key>CFBundleURLSchemes</key>
		<array>
			<string>fb1234567891234567</string>
		</array>
	</dict>
</array>
<key>FacebookAppID</key>
<string>1234567891234567</string>
<key>FacebookDisplayName</key>
<string>MyApp</string>
<key>LSApplicationQueriesSchemes</key>
<array>
	<string>fbapi</string>
	<string>fb-messenger-api</string>
	<string>fbauth2</string>
	<string>fbshareextension</string>
</array>
<key>LSRequiresIPhoneOS</key>
<true/>
<key>NSAppTransportSecurity</key>
<dict>
	<key>NSExceptionDomains</key>
	<dict>
		<key>akamaihd.net</key>
		<dict>
			<key>NSExceptionRequiresForwardSecrecy</key>
			<false/>
			<key>NSIncludesSubdomains</key>
			<true/>
		</dict>
		<key>facebook.com</key>
		<dict>
			<key>NSExceptionRequiresForwardSecrecy</key>
			<false/>
			<key>NSIncludesSubdomains</key>
			<true/>
		</dict>
		<key>fbcdn.net</key>
		<dict>
			<key>NSExceptionRequiresForwardSecrecy</key>
			<false/>
			<key>NSIncludesSubdomains</key>
			<true/>
		</dict>
	</dict>
</dict>
AppDelegate.swiftとFacebookのログインボタンを配置するViewController.swiftはそれぞれ以下のように編集します。
AppDelegate.swift
import UIKit
import CoreData
import FBSDKCoreKit
import FBSDKLoginKit

@UIApplicationMain
class AppDelegate: UIResponder, UIApplicationDelegate {

    var window: UIWindow?

    func application(application: UIApplication, didFinishLaunchingWithOptions launchOptions: [NSObject: AnyObject]?) -> Bool {
        return FBSDKApplicationDelegate.sharedInstance().application(application, didFinishLaunchingWithOptions: launchOptions)
    }

    func application(application: UIApplication, openURL url: NSURL, sourceApplication: String?, annotation: AnyObject) -> Bool {
        return FBSDKApplicationDelegate.sharedInstance().application(application, openURL: url, sourceApplication: sourceApplication, annotation: annotation)
    }

    ...
}
ViewController.swift
import UIKit
import FBSDKCoreKit
import FBSDKLoginKit

class ViewController: UIViewController {

    private var button: UIButton!

    override func viewDidLoad() {
        super.viewDidLoad()
        // Do any additional setup after loading the view, typically from a nib.

        button = UIButton()
        button.frame = CGRectMake(0, 0, 200, 40)
        button.setTitle("Login", forState: UIControlState.Normal)
        button.setTitleColor(UIColor.blueColor(), forState: UIControlState.Normal)
        button.layer.position = CGPoint(x: self.view.frame.width / 2, y: 200)
        button.tag = 1
        button.addTarget(self, action: "loginByFacebook:", forControlEvents: .TouchUpInside)
        self.view.addSubview(button)
    }

    override func didReceiveMemoryWarning() {
        super.didReceiveMemoryWarning()
        // Dispose of any resources that can be recreated.
    }

    internal func loginByFacebook(sender: AnyObject) {
        let fbLoginManager: FBSDKLoginManager = FBSDKLoginManager()
        fbLoginManager.logInWithReadPermissions(["public_profile"], fromViewController:self, handler: { (result, error) -> Void in
            guard (result.grantedPermissions.contains("public_profile") && !result.isCancelled) else {
                return
            }
            guard let _ = error else {
                print("Login")
                return
            }
        })
    }
}
これで認証が成功すれば、コンソールにLoginと表示されるはずです。
Facebookから情報を取得、またはログアウトするには次のようにします。
// nameとemailを取得
let graphRequest: FBSDKGraphRequest = FBSDKGraphRequest(graphPath: "me", parameters: ["fields": "name, email"])
graphRequest.startWithCompletionHandler({ (connection, result, error) -> Void in
    if ((error) != nil) {
        print("Error: \(error)")
    } else {
        let name = result.valueForKey("name") as! NSString
        let email = result.valueForKey("email") as! NSString
        print("Name: \(name), Email: \(email)")
    }
})

// ログアウト
if (FBSDKAccessToken.currentAccessToken() != nil) {
    let fbLoginManager: FBSDKLoginManager = FBSDKLoginManager()
    fbLoginManager.logOut()
}
おわりに
Facebook SDKを使って簡単に認証を実装できました。
ログイン状態等の管理もSDK側で行ってくれるので楽ですね。