初めまして、犬系エンジニアのさ犬と申します。読み方は、さいぬです。
githubのアカウントは、sa-inuです。
私は普段webエンジニアとして、RailsとAngularJS1.x系を使って開発をしているのですが、開発メンバー内で「クライアントをAngular2に移行しようか」といった話が出ているような状況です。
ある程度Angular2を勉強したので「これから始めたいし、どうせなら自分で環境を作りたい」という方向けに簡単に作れるけど、業務でも使えそうな実践的なフォルダ構成で環境を作ります。実際に私がAngular1系の業務で使っているフォルダ構成も紹介します。そのまま発展させて是非ご自分のプロジェクト開発の第一歩にしてください。
私自身まだ趣味の範囲ですので、よかったらコメント等でご指摘いただけると私自身の勉強にもなりますのでよろしくお願いします。
追記2016/10/26
執筆当初の筆者は、情弱でこの記事のように手動で環境を自作していました。
しかし、現在は angular-cli で簡単にAngular2の環境を作れるそうです! ![]()
よかったらそちらも試してみてください!
対象者
- これからAngular2を勉強したいAngular2初心者
- 環境構築をquick starterじゃなくて自分で作りたい車輪の再発明系エンジニア
- 英語の公式ドキュメントを読みたくない欲しがりエンジニア
- 流行りに乗りたい波乗りエンジニア
環境
- node 6.5.0
- npm 3.10.7
使用する技術
- Angular2
- webpack
- typescript
完成形
ソースコード
https://github.com/sa-inu/angular2-sandbox-webpack/tree/master
※他のブランチに以下のアプリがあります。随時追記していきます!
- Hello World
- TodoApp
- ルーティングをもつTodoApp
フォルダ構成
angular2-sandbox-webpack
├── README.md
├── app
│    ├── components
│    │    └── hello-world
│    │         ├── hello-world.component.ts
│    │         └── hello-world.component.html
│    ├── app.component.ts
│    ├── app.module.ts
│    └── index.ts
├── index.html
├── node_modules
├── package.json
├── tsconfig.json
└── webpack.config.js
開発環境構築
まずは開発環境を構築していきます。だいたい新しい技術をやりたいという人がこの環境構築で詰まって挫折してしまうパターンが多いのではないでしょうか。
大丈夫です。これに従ってやれば99%うまくできるはずです。☝️
必要なnpmパッケージをインストール
まず、npmのバージョン管理用のファイルを専用コマンドで生成します。
これはrubyだとbundle initでGemfileを生成しているのと同じ作業です。
$ npm init -y
次に、npmをプロジェクトにインストールします。
$ npm i -S @angular/{common,compiler,core,platform-browser,platform-browser-dynamic} core-js rxjs ts-loader zone.js
$ npm i -D ts-loader typescript webpack webpack-dev-server
@angularで始まる複数のモジュールがAngular2本体です。{}を用いて複数のモジュールをまとめてインストールすることができます。
core-jsはTypeScriptで出力したES5ソースの中でES2015 Promise, Collectionsを動かすために必要なpolyfillです。
rxjsについてはこの記事がわかりやすかったです。簡単にいうと非同期処理をいい感じにしてくれるやつです。
zone.jsも同じで非同期のミドルウェアをいい感じに書けるようにしてくれます。参考
(ライブラリの説明とかムズイし。。。)
ビルドツールの設定をする
typescriptはブラウザが読み取ることができないので、変換方法の指示書tsconfig.jsonを見てjavascriptに変換(コンパイル)します。
そのためにtscという変換ツール(コンパイラ)がありますが、今回はwebpackでコンパイルするためにtsc-loaderを使います。
{
  "compilerOptions": {
    "target": "es5",
    "noImplicitAny": true,
    "experimentalDecorators": true,
    "emitDecoratorMetadata": true,
    "moduleResolution": "node"
  },
  "filesGlob": [
    "./**/*.ts",
    "!./**/*.d.ts",
    "!./node_modules/**/*",
    "./node_modules/typescript/lib/lib.es6.d.ts"
  ],
  "files": [
    "./app/index.ts",
    "./node_modules/typescript/lib/lib.es6.d.ts"
  ]
}
const webpack = require('webpack');

module.exports = [
  {
    entry: {
      filename: './app/index.ts'
    },
    output: {
      filename: './dist/bundle.js'
    },
    // chromeの開発者ツールでコンパイル前のソースコードを見れるようにする
    devtool: 'source-map',
    resolve: {
      extensions: ['', '.ts', '.js']
    },
    module: {
      loaders: [
        { test: /\.ts$/, loader: 'ts-loader' }
      ]
    }
  }
]
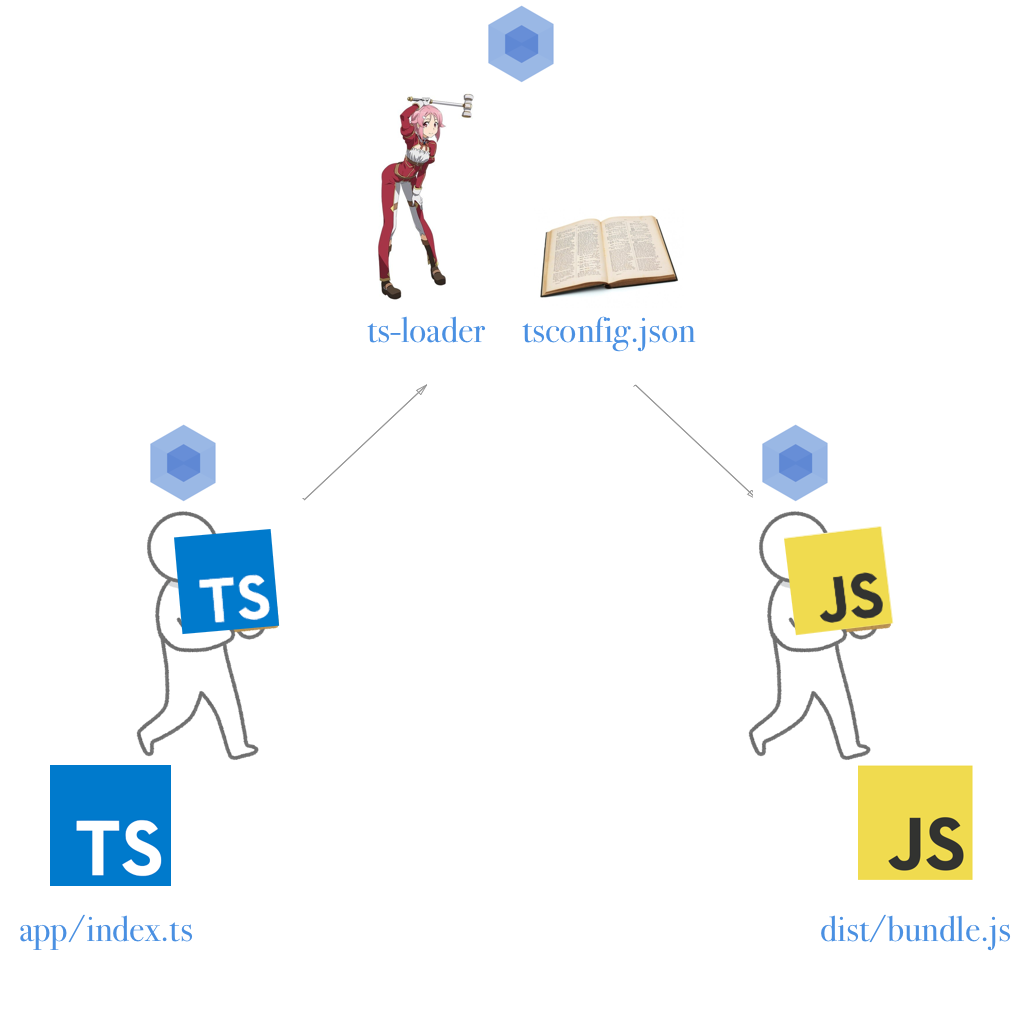
このts-loaderなる存在がイマイチピンとこなかったので図にして見ました。
おそらくやっているのは以下のようなことだと思われます。(webpackのコードを読んでないので憶測です、すみません。)
- webpackが
entryに指定しているファイル群を取得 - 1で取得したファイルの中から、
.tsの拡張子がついたファイルをts-loaderがtsconfig.jsonを参考にjavascriptに変換(コンパイル) -
outputに指定しているファイル名でファイルを出力
最初に表示するHTML文書を用意
SPA(single page application)ではhttp通信でhtmlファイルを読み込むのは最初の1枚だけです。なので、そのhtmlファイルを用意します。
$ vim index.html
---以下をコピー&ペースト
<!DOCTYPE html>
<html lang="ja">
  <head>
    <meta charset="UTF-8">
    <title>Hello Angular 2!</title>
  </head>
  <body>
    <my-app>Loading...</my-app>
    <!-- typescriptからコンパイルしたjavascriptファイルを読み込みます -->
    <script src="./dist/bundle.js"></script>
  </body>
</html>
Angular本体を作成
Angular本体を格納するappフォルダを作ります。
$ mkdir app && cd $_
webpackからビルドされるエントリーファイルを作ります。
$ vim index.ts
import 'core-js';
import 'zone.js/dist/zone';

import { platformBrowserDynamic } from '@angular/platform-browser-dynamic';
import { AppModule } from './app.module';

platformBrowserDynamic().bootstrapModule(AppModule);
Angularのモジュール類を読み込むためのapp.module.tsを作成します。(自分が作ったモジュールやサードパーティのモジュールを読み込んだりします。)コードの解説はしないので、コメントアウトを読んでください。
import { NgModule } from '@angular/core';
import { BrowserModule } from '@angular/platform-browser';
import { AppComponent } from './app.component';
import { HelloWorldComponent } from './components/hello-world/hello-world.component';

@NgModule({
  // 自分のNgModuleに他のNgModuleを取り込む際に使用
  // Angular2が提供している各種モジュールやサードパーティのモジュールをここに記述
  imports: [
    BrowserModule
  ],
  // Directive, Component, Pipeを登録
  declarations: [
    AppComponent,
    HelloWorldComponent
  ],
  // アプリケーションのエントリポイントとなるComponentを指定
  bootstrap: [AppComponent]
})

export class AppModule {}
ルートコンポーネントを作ります。説明はコード内のコメントアウトを読んでください。
// コンポーネントを作るために@angular/coreからComponentをimport
import { Component } from '@angular/core';

// Decorators構文
@Component({
  selector: 'my-app',
  // templateUrlとすると外部ファイルのパスを指定できる
  template: `
    <hello-world></hello-world>
  `
})

// AppComponentというコンポーネントを作る
export class AppComponent {}
Hello Worldを表示するコンポーネントを作ります。
仕事ではページ毎にフォルダを分けてやってて、それが結構わかりやすいので今回もそのやり方で作ります。ディレクトリ構成の参考ページ。一般的には、Component, Viewとかってファイルの種類で分けるのかもしれません。
$ pwd
=> /path/to/app
$ mkdir components && cd $_ && mkdir hello-world && cd $_
import { Component } from '@angular/core';

@Component({
  selector: 'hello-world',
  template: `
    <h1>Hello World</h1>
  `
})

export class HelloWorldComponent {}
簡単にやるならtemplateにして、htmlをそのまま書きますが折角なのでhtmlファイルを切り出してtemplateUrlで呼び出すようにします。
import { Component } from '@angular/core';

@Component({
  // <hello-world></hello-world>って感じで呼び出せるようになる
  selector: 'hello-world',
  // 相対パスで書きたい
  templateUrl: 'app/components/hello-world/hello-world.component.html'
})

export class HelloWorldComponent {}
最後にHello World!を表示するhtmlファイルを作ります。
$ pwd
=> path/to/app/components/hello-world
$ vim hello-world.component.html
<h1>Hello World!<h1>
開発用サーバーを立てる
毎回コマンドを打つのは大変なので、開発用のサーバーを立てます。
webpack-dev-serverをインストール
$ pwd
=> path/to/angular2-sandbox-webpack
$ npm i -D webpack-dev-server
webpack.config.jsの編集
webpack-dev-server用にwebpack.config.jsをちょっと書き足します。
const webpack = require('webpack');

module.exports = [
  {
    // 追記
    // webpack-dev-serverに/appディレクトリ以下を監視させます。
    // そうすると/appディレクトリ以下に変更が加わった場合、サーバーを自動で再読み込みしてくれます。
    content: __dirname + '/app',
    entry: {
      filename: './app/index.ts'
    },
    output: {
      filename: './dist/bundle.js'
    },
    // Enable to show code before compile
    devtool: 'source-map',
    resolve: {
      extensions: ['', '.ts', '.js']
    },
    module: {
      loaders: [
        { test: /\.ts$/, loader: 'ts-loader' }
      ]
    }
  }
]
次にpackage.jsonにコマンドをタスク登録します。
...(中略)...
  "scripts": {
    "start": "webpack-dev-server --progress --colors"
  },
...(中略)...
あとは、サーバーを起動して、 localhost:8080アクセスすればHello Worldが表示できているかと思います ![]()
$ npm run start
