みなさんRecyclerView使ってますか?
私はまだちゃんと使ったことがありません。
RecyclerViewはListViewの代替じゃないとかonClickListenerがないから面倒とか難しそうな印象の記事が多かったのですが、試しに使ってみたら基本的な使い方はそんなに難しくなかったので忘れないように記します。
ちゃんと整理しきれてないのでちょっと煩雑です。気をつけてください。
環境
PC:MacBookPro
OS:MacOSSierra
AndroidStudio:3.1.1
kotlin_version:1.2.30
gradle:3.1.1
buildToolsVersion:27.0.3
参考
RecyclerViewの基本
【Android】RecyclerViewのクリックイベント
特にRecyclerViewの基本は図もあってめちゃくちゃわかりやすいのでオススメです。
(ありがとうございます。)
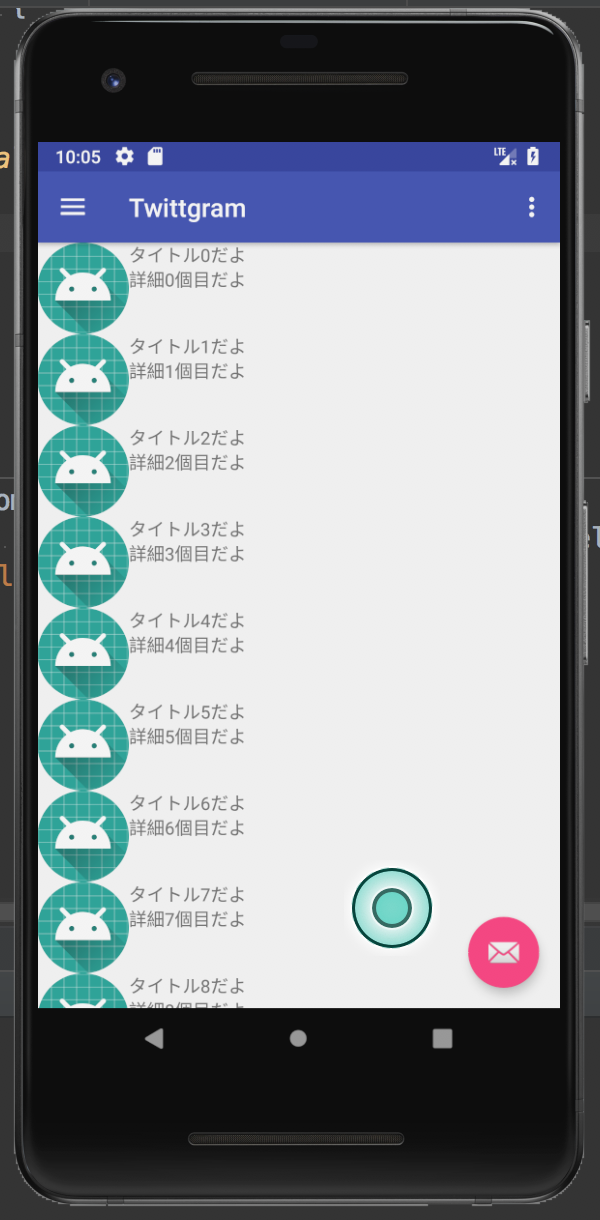
できるもの
適当なテキストをリスト表示してタップすると画面下部に適当なメッセージを出すアプリ。のリスト部分
手順
1.リストの一つのアイテムを表すレイアウトとクラスを作る
list_item.xml
アイテム一つを表すレイアウト。とりあえず固定のアイコンとタイトル、詳細をテキストで並べます。
特別なことはないですが強いていうなら一番親のレイアウトの高さをmatch_parentではなくwrap_contentや任意の高さにするように気をつけましょう。
<?xml version="1.0" encoding="utf-8"?>
<android.support.constraint.ConstraintLayout xmlns:android="http://schemas.android.com/apk/res/android"
    xmlns:tools="http://schemas.android.com/tools"
    android:layout_width="match_parent"
    android:layout_height="wrap_content">


    <LinearLayout
        android:layout_width="match_parent"
        android:layout_height="wrap_content"
        android:orientation="horizontal">

        <ImageView
            android:layout_width="wrap_content"
            android:layout_height="wrap_content"
            android:contentDescription="@string/icon_desc"
            android:src="@mipmap/ic_launcher" />

        <LinearLayout
            android:layout_width="wrap_content"
            android:layout_height="wrap_content"
            android:orientation="vertical">

            <TextView
                android:id="@+id/row_title"
                android:layout_width="wrap_content"
                android:layout_height="0dp"
                android:layout_weight="0.5"
                tools:text="titleです" />

            <TextView
                android:id="@+id/row_detail"
                android:layout_width="wrap_content"
                android:layout_height="0dp"
                android:layout_weight="0.5"
                tools:text="詳細ですよ詳細ですよ詳細ですよ詳細ですよ詳細ですよ" />

        </LinearLayout>

    </LinearLayout>


</android.support.constraint.ConstraintLayout>
RowModel.kt
リストのアイテム一つを表すクラス。Modelとつけたけどdataとかの方がいい可能性もある。
今回はタイトルと詳細をStringで持たせます。
アイテムと同じ数だけ存在することになるはず。
特に注意はない。
package your.package.name

class RowModel {
    var title: String = ""
    var detail: String = ""
}
2.ViewHolderを作る
1クラスだけです
ViewHolder.kt
アイテムのViewを保持します。
アイテムと対になって存在するイメージ。(実際はリサイクルされているようなので同じ数ではない?)
よく考えると名前そのまんまですね。
今回はタイトルと詳細のViewを生成して保持してます。
ここ本当にあってるか自信ないです。
あとで調べます…
追記:ViewHolderの目的がfindViewByIdの結果をキャッシュすることでコストを減らすことのようなのでこれでよさそう。
値とデータをバインドをするメソッドをここに書いても良さそう。
package your.package.name

import android.support.v7.widget.RecyclerView
import android.view.View

class HomeViewHolder(itemView: View) : RecyclerView.ViewHolder(itemView){
    val titleView: TextView = itemView.findViewById(R.id.row_title)
    val detailView: TextView = itemView.findViewById(R.id.row_detail)
}
3.ViewAdapterを作る
これも一ファイルです。
ViewAdapter.kt
ViewHolderを生成したりに生成したViewHolderにViewModelをセットしたりする。
一つのListに対して一つ存在する。
今回はクリックのリスナーも一緒にセットしています。
ここが難しそうに見えてたんですが実際書いてみると全然難しくないです。
コンストラクタにリスト表示するRowModelのリストとタップを検出するためのリスナーを渡されるようにします。
(リスナーはこのクラスの下部にinterfaceを定義してあります)
onCreateViewHolder()でlist_itemのviewを作ってそれを元に先ほどのViewHolderを生成しreturnします。
onBindViewHolder()ではpositionをListのindexとして、ViewHolderに値をセットします。
よく考えたらここでViewHolderにRowModelを渡してあげてもいいかもしれません。
また、今回はここでクリックリスナーもセットしています。リスナーについては公式の例をまだ見つけられてないので何が正しいのかあんまわかっていませんがとりあえずこれが楽だと思いました。
getItemCount()ではlistのサイズを返してあげる必要があるようです。
package your.package.name

import android.support.v7.widget.RecyclerView
import android.util.Log
import android.view.LayoutInflater
import android.view.View
import android.view.ViewGroup
import your.package.name.R


class ViewAdapter(private val list: List<RowModel>, private val listener: ListListener) : RecyclerView.Adapter<ViewHolder>() {

    override fun onCreateViewHolder(parent: ViewGroup, viewType: Int): ViewHolder {
        Log.d("Adapter", "onCreateViewHolder")
        val rowView: View = LayoutInflater.from(parent.context).inflate(R.layout.list_item, parent, false)
        return ViewHolder(rowView)
    }

    override fun onBindViewHolder(holder: ViewHolder, position: Int) {
        Log.d("Adapter", "onBindViewHolder")
        holder.titleView.text = list[position].title
        holder.detailView.text = list[position].detail
        holder.itemView.setOnClickListener {
            listener.onClickRow(it, list[position])
        }
    }

    override fun getItemCount(): Int {
        Log.d("Adapter", "getItemCount")
        return list.size
    }

    interface ListListener {
        fun onClickRow(tappedView: View, rowModel: RowModel)
    }
}
4.レイアウトにRecyclerViewを追加
main_activity.xml
に以下のようなRecyclerViewを追加します。(自分のmain_activityが散らかっていたので部分だけですいません)
 <android.support.v7.widget.RecyclerView
        android:id="@+id/recycler_list"
        android:layout_width="match_parent"
        android:layout_height="match_parent" />
5.activityやfragmentで使う
activityならOnCreate、fragmentならonViewCreatedとかで呼びます(fragmentの方、そこで呼ぶのが正しいかはちょっとまだわかってないです)
今回はfragmentで呼んだのでonViewCreatedだけ抜粋。
this@myFragmentにしてあるのはmyFragmentのonClickRow()をリスナーのそれと同じ名前で宣言したからです。
別の名前にしても良かったんですが初心者が引っかかりがちなのであえて残してあります。
あとはKotlin Android Extensionsを使っているのでfindViewByIdがないです。めちゃくちゃ便利。好き。
みなさんも使いましょう。
    override fun onViewCreated(view: View?, savedInstanceState: Bundle?) {
        super.onViewCreated(view, savedInstanceState)
        Log.d("lifeCycle", "onViewCreated")

        val recyclerView = recycler_list
        val adapter = ViewAdapter(createDataList(), object : ViewAdapter.ListListener {
            override fun onClickRow(tappedView: View, rowModel: RowModel) {
                this@myFragment.onClickRow(tappedView, rowModel)
            }
        })

        recyclerView.setHasFixedSize(true)
        recyclerView.layoutManager = LinearLayoutManager(activity)
        recyclerView.adapter = adapter
    }

  private fun createDataList(): List<RowModel> {

        val dataList = mutableListOf<RowModel>()
        for (i in 0..49) {
            val data: RowModel = RowModel().also {
                it.title = "タイトル" + i + "だよ"
                it.detail = "詳細" + i + "個目だよ"
            }
            dataList.add(data)
        }
        return dataList
    }


   fun onClickRow(tappedView: View, rowModel: RowModel) {
        Snackbar.make(tappedView, "Replace with your own action tapped ${rowModel.title}", Snackbar.LENGTH_LONG)
                .setAction("Action", null).show()
    }
以上!
ということで、順を追って作っていけば基本的な使い方はそんなに難しくないよって話でした。
断片的になってしまったのでそのうちサンプルプロジェクト作って上げられたらいいなあと思っております。
あと追加と削除もやりたい。
今思いましたがログとか入っててすいません。あとで消しときます。
ではまた。