はじめに
今回はアフィン変換を用いることで,画像の回転,拡大縮小,平行移動,せん断,またこれらの組み合わせを行う.
OpenCVを用いると簡単にできるが, それでは面白くないのでnumpyのみ使って自作した.
実装コード
実装したコードはこんな感じ.OpenCVをimportしているが, 画像の読み込みと描画にしか利用しない.
import cv2
import numpy as np

from IPython.display import display, Image


def display_cv_image(image, format='.png'):
    decoded_bytes = cv2.imencode(format, image)[1].tobytes()
    display(Image(data=decoded_bytes))


def add_edge(img):
    H, W = img.shape
    WID = int(np.max(img.shape) * 2**0.5)
    e_img = np.zeros((WID, WID))
    e_img[int((WID-H)/2):int((WID+H)/2),
          int((WID-W)/2):int((WID+W)/2)] = img
    return e_img


def translation_matrix(tx, ty):
    return np.array([[1, 0, -tx],
                     [0, 1, -ty],
                     [0, 0, 1]])


def rotation_matrix(a):
    return np.array([[np.cos(a), -np.sin(a), 0],
                     [np.sin(a),  np.cos(a), 0],
                     [        0,          0, 1]])


def shear_matrix(mx, my):
    return np.array([[1, -mx, 0],
                     [-my, 1, 0],
                     [0,  0, 1]])


def scaling_matrix(sx, sy):
    return np.array([[1/sx, 0, 0],
                     [0, 1/sy, 0],
                     [0,  0, 1]])


def affin(img, m):
    WID = np.max(img.shape)
    x = np.tile(np.linspace(-1, 1, WID).reshape(1, -1), (WID, 1))
    y = np.tile(np.linspace(-1, 1, WID).reshape(-1, 1), (1, WID))
    p = np.array([[x, y, np.ones(x.shape)]])
    dx, dy, _ = np.sum(p * m.reshape(*m.shape, 1, 1), axis=1)
    u = np.clip((dx + 1) * WID / 2, 0, WID-1).astype('i')
    v = np.clip((dy + 1) * WID / 2, 0, WID-1).astype('i')
    return img[v, u]
各関数の説明
今回はJupyter上でOpenCVを用いて画像表示を行うために以下を参考にdisplay_cv_imageを用意した.
http://uphy.hatenablog.com/entry/2016/12/11/110703
また, 回転などを行っても範囲外にはみ出さないように縁をつける処理を作った.
これらはアフィン変換の本質の部分じゃないので( ´_ゝ`)フーンってみてもらえればありがたい.
def display_cv_image(image, format='.png'):
    decoded_bytes = cv2.imencode(format, image)[1].tobytes()
    display(Image(data=decoded_bytes))


def add_edge(img):
    H, W = img.shape
    WID = int(np.max(img.shape) * 2**0.5)
    e_img = np.zeros((WID, WID))
    e_img[int((WID-H)/2):int((WID+H)/2),
          int((WID-W)/2):int((WID+W)/2)] = img
    return e_img
次にこれらはそれぞれ目的の行列を作ってくれる関数.
translation_matrix:平行移動用の行列(txが横, tyが縦の移動)
rotation_matrix:回転用の行列(radで与える)
shear_matrix:せん断用の行列(mxが水平せん断, myが鉛直せん断)
scaling_matrix:拡大縮小用の行列(txが横, tyが縦の拡大縮小)
def translation_matrix(tx, ty):
    return np.array([[1, 0, -tx],
                     [0, 1, -ty],
                     [0, 0, 1]])


def rotation_matrix(a):
    return np.array([[np.cos(a), -np.sin(a), 0],
                     [np.sin(a),  np.cos(a), 0],
                     [        0,          0, 1]])


def shear_matrix(mx, my):
    return np.array([[1, -mx, 0],
                     [-my, 1, 0],
                     [0,  0, 1]])


def scaling_matrix(sx, sy):
    return np.array([[1/sx, 0, 0],
                     [0, 1/sy, 0],
                     [0,  0, 1]])
上の関数で目的の変換を行う行列を作って.
下のaffinに画像と一緒にその行列mを渡すと変換した画像が返ってくる.
処理内容は以下の手順で行っている
1.画像の中央を(0, 0), 左上端を(-1, -1), 右下端を(1, 1)としたx,yを作る.
2.アフィン変換でx, yを変換してdx, dyを求める.
3.dx, dyを画像上の座標系u, vに変換し, 画像の各セルから対応する画素をとってくる.
def affin(img, m):
    WID = np.max(img.shape)
    x = np.tile(np.linspace(-1, 1, WID).reshape(1, -1), (WID, 1))
    y = np.tile(np.linspace(-1, 1, WID).reshape(-1, 1), (1, WID))
    p = np.array([[x, y, np.ones(x.shape)]])
    dx, dy, _ = np.sum(p * m.reshape(*m.shape, 1, 1), axis=1)
    u = np.clip((dx + 1) * WID / 2, 0, WID-1).astype('i')
    v = np.clip((dy + 1) * WID / 2, 0, WID-1).astype('i')
    return img[v, u]
実験
準備
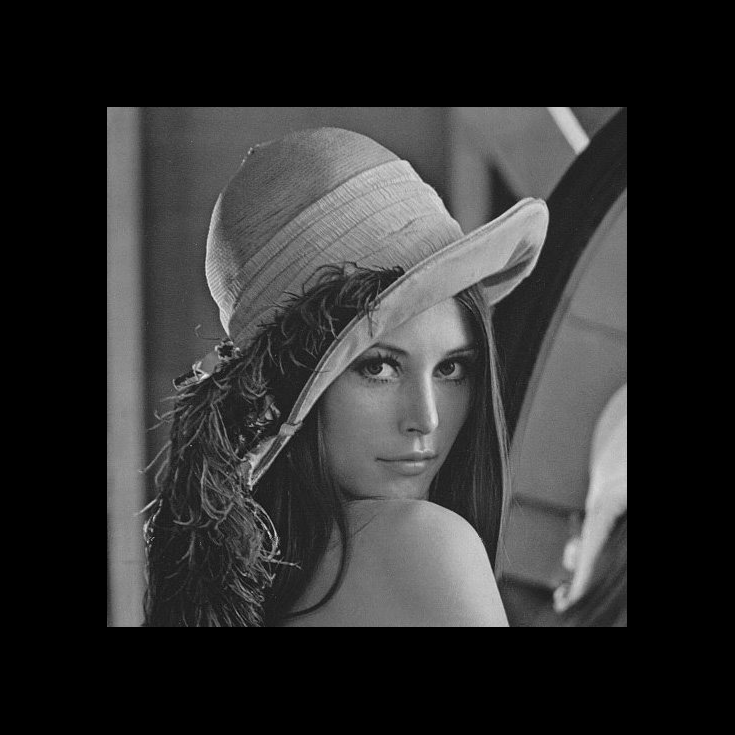
今回は以下の画像を使ってちゃんと変換できるか確認する.

この画像をcv2.imread(lena.jpg, 0)でグレースケール画像として読み込み.
作成したadd_edgeで縁をつける.描画すると次のような画像になっている.
img = cv2.imread('lena.jpg', 0)
e_img = add_edge(img)
display_cv_image(e_img, '.png')
回転
回転はrotation_matrixで作った行列をaffinに渡すとできる.
今回はπ/4(45度)回転させてみた.
m = rotation_matrix(np.pi / 4)
display_cv_image(affin(e_img, m), '.png')

せん断
せん断はshear_matrixで作った行列をaffinに渡すとできる.
今回は水平方向せん断をやってみた.
m = shear_matrix(0.25, 0)
display_cv_image(affin(e_img, m), '.png')
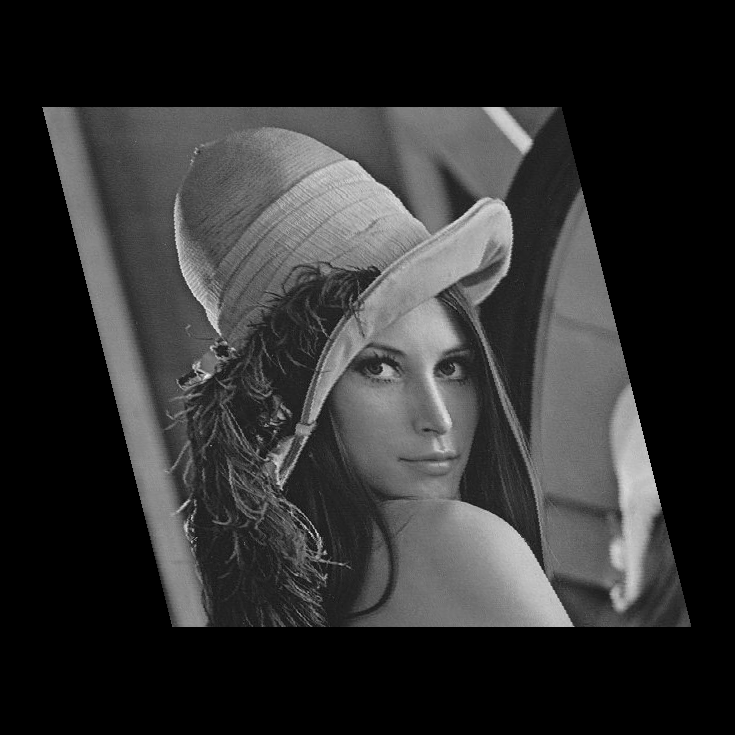
回転+縮小+水平移動
以下でm1が45度回転, m2が横を半分に縮小, m3が画像の0.5だけ横移動を行う行列である.
(移動に関しては中央が0と見て右端までが1, 左端までが-1)
これらの変換を順に行い変換する場合, 順番にaffinに渡していってもよい.
しかし,m = np.dot(np.dot(m1, m2), m3)のようにあらかじめ行列の積を求めてまとめておくと,
m1⇒m2⇒m3の順に変換する行列ができるのでこっちの方がすっきりしてよいと思う.
m1 = rotation_matrix(np.pi / 4)
m2 = scaling_matrix(0.5, 1.0)
m3 = translation_matrix(0.5, 0)
m = np.dot(np.dot(m1, m2), m3)
display_cv_image(affin(e_img, m), '.png')
結果を見てみるとちゃんと回転させた後に横につぶれて, 右に移動している.

まとめ
簡単にだがアフィン変換を実装し実験してみた.
以前作成したものよりはましになった気がする.多分・・・(これ)