はじめに
本記事は、2023/10/19 時点の内容をまとめたものである。
Azure Firewall(以下、AFW)は Azure Portal から停止することができない。
コスト節約のため、AFW を都度作成・削除する運用を行っていたが、Azure PowerShell を利用した AFW の停止・起動方法を知り、手順についてまとめた。
AFW を停止・起動できるツールは下記の通り。
| Azure Portal | Azure CLI | Azure PowerShell | |
|---|---|---|---|
| 停止 | × | × | ○ |
| 起動 | ○ | × | ○ |
前提
- AFW、AFWポリシー、パブリックIPアドレス、仮想ネットワーク、サブネット、仮想マシンは作成済み
- 強制トンネリング用に構成されていない AFW とする
- ローカルPCは Windows
事前準備
1. Windows に PowerShell をインストールする
ローカルPCで下記コマンドを実行し、最新バージョンの PowerShell を検索
winget search Microsoft.PowerShell
Name               Id                           Version   Source
-----------------------------------------------------------------
PowerShell         Microsoft.PowerShell         7.3.8.0   winget
PowerShell Preview Microsoft.PowerShell.Preview 7.4.0.6   winget
実際の画面

id パラメータを使用して PowerShell または PowerShell Preview をインストール
(今回はPowerShellを選択)
winget install --id Microsoft.Powershell --source winget
実際の画面

2. Azure PowerShell モジュールをインストールする
PowerShell で下記コマンドを実行し、Azure PowerShell モジュールをインストール
if (Get-Module -Name AzureRM -ListAvailable) {
    Write-Warning -Message ('Az module not installed. Having both the AzureRM and ' +
      'Az modules installed at the same time is not supported.')
} else {
    Install-Module -Name Az -AllowClobber -Scope CurrentUser
}
実際の画面

PSGallery の初回使用時には、以下のプロンプトが表示される。インストールを続行するには、「Yes」または「Yes to All」を選択

NuGetプロバイダーとリポジトリの信頼が必要な場合の画面

AFW の停止手順
1. Azure Account に接続する
PowerShell で下記コマンドを実行し、認証されたアカウントを使用して Azure 環境に接続
Connect-AzAccount
実際の画面

MFA認証が動作しなかった場合はテナントIDを指定

2. AFW を停止する
下記コマンドを実行し、AFW を停止
$ResourceGroupName = "<リソースグループの名前>"
$AzureFirewallName = "<AFWの名前>"
$azfw = Get-AzFirewall -Name $AzureFirewallName -ResourceGroupName $ResourceGroupName
$azfw.Deallocate()
Set-AzFirewall -AzureFirewall $azfw
3. Azure Portal から確認
-
停止前
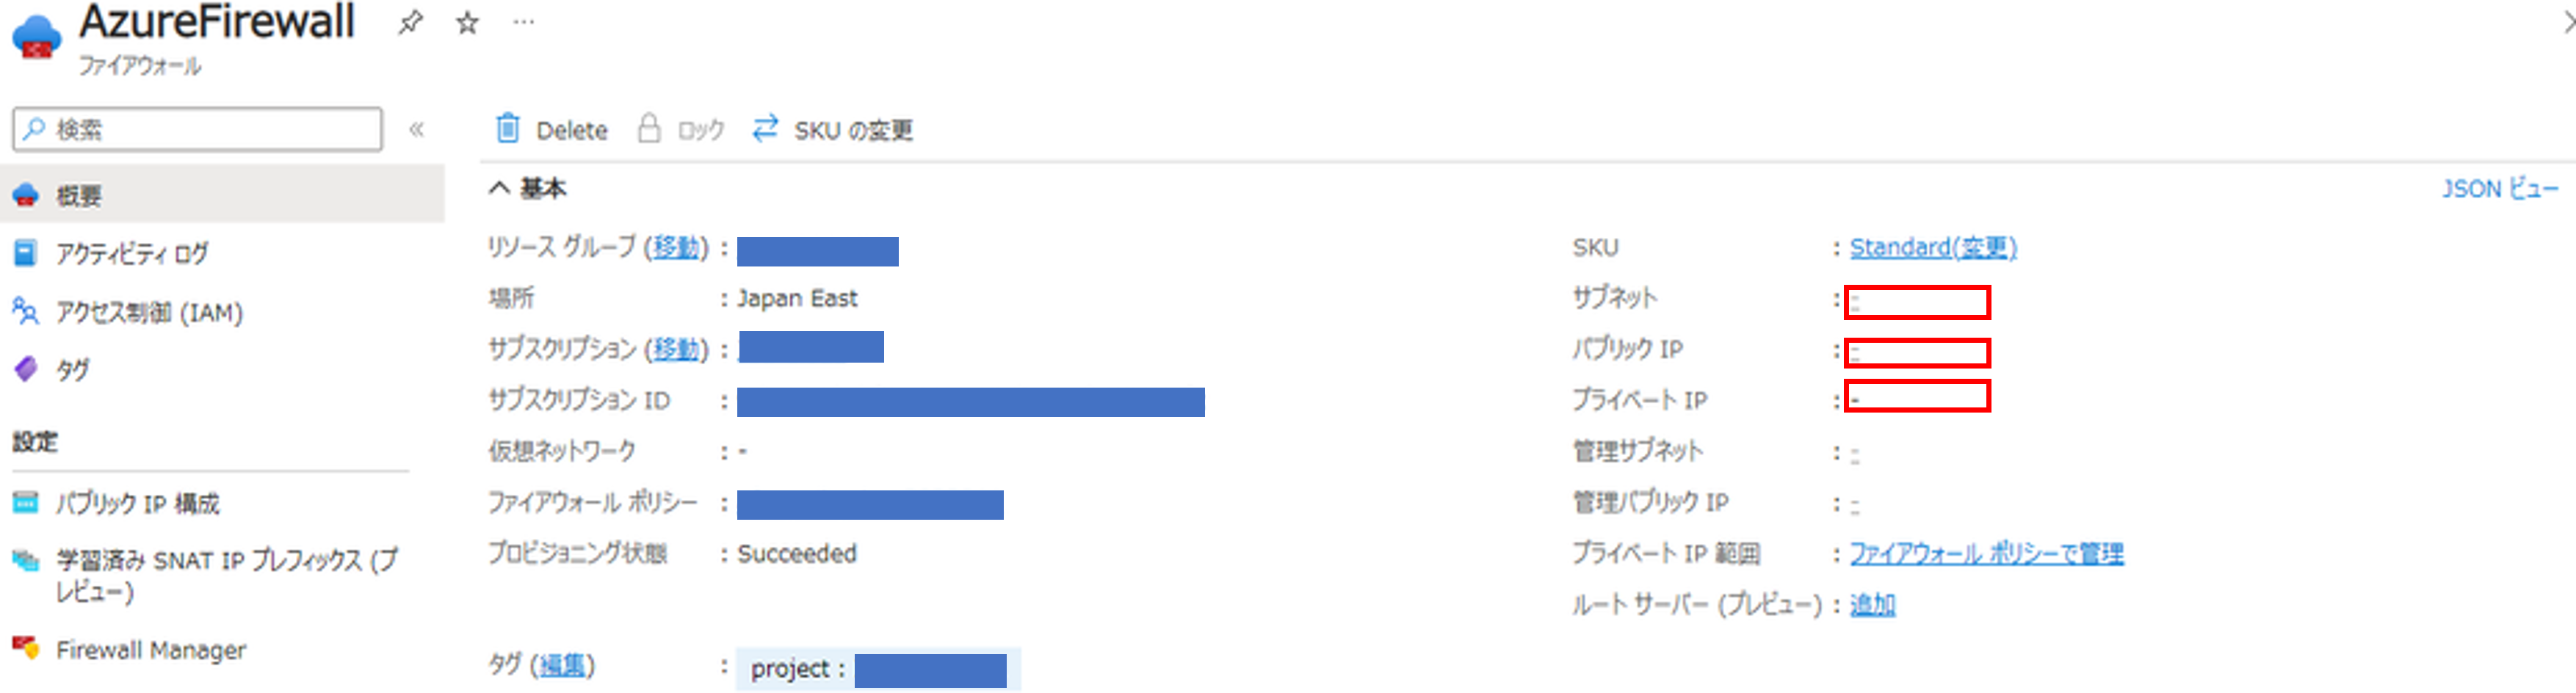
- AFW の画面
- サブネット、パブリックIPアドレス、プライベートIPアドレスが表示されている

- サブネット、パブリックIPアドレス、プライベートIPアドレスが表示されている
- パブリックIPアドレスの画面
- 関連付け先に AFW が表示されている
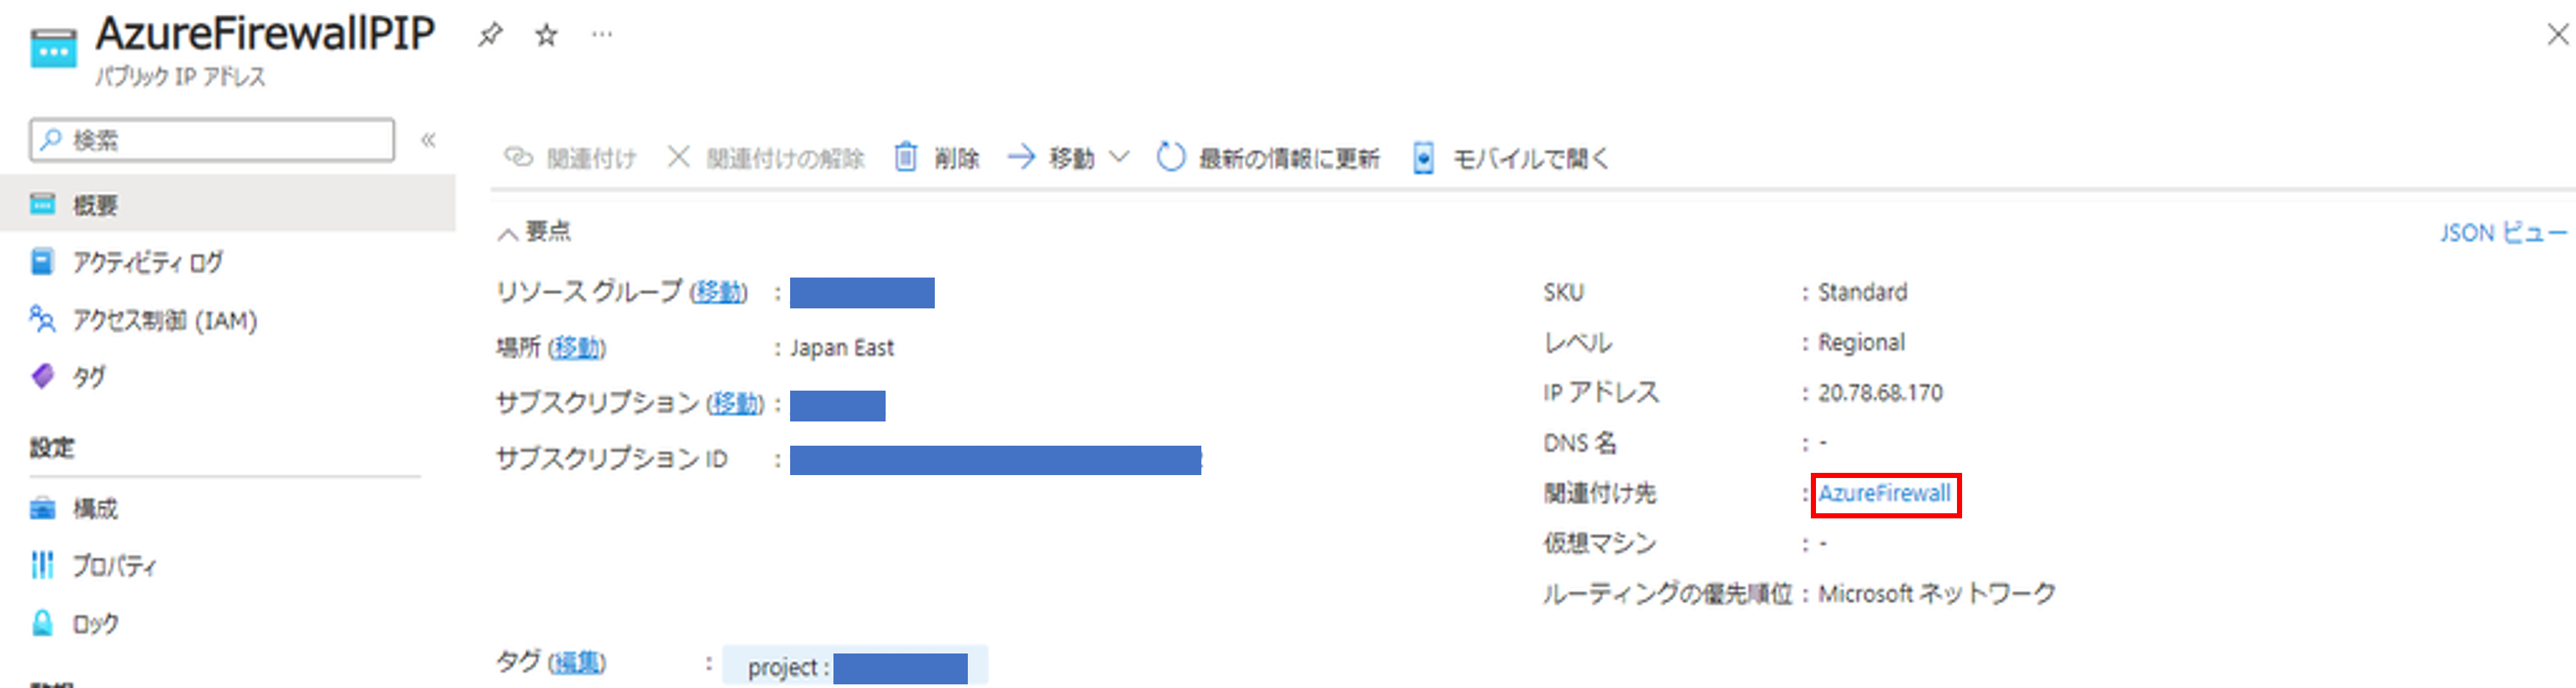
- 関連付け先に AFW が表示されている
- AFW の画面
-
停止後
- AFW の画面
- サブネット、パブリックIPアドレス、プライベートIPアドレスが表示されない
- サブネット、パブリックIPアドレス、プライベートIPアドレスが表示されない
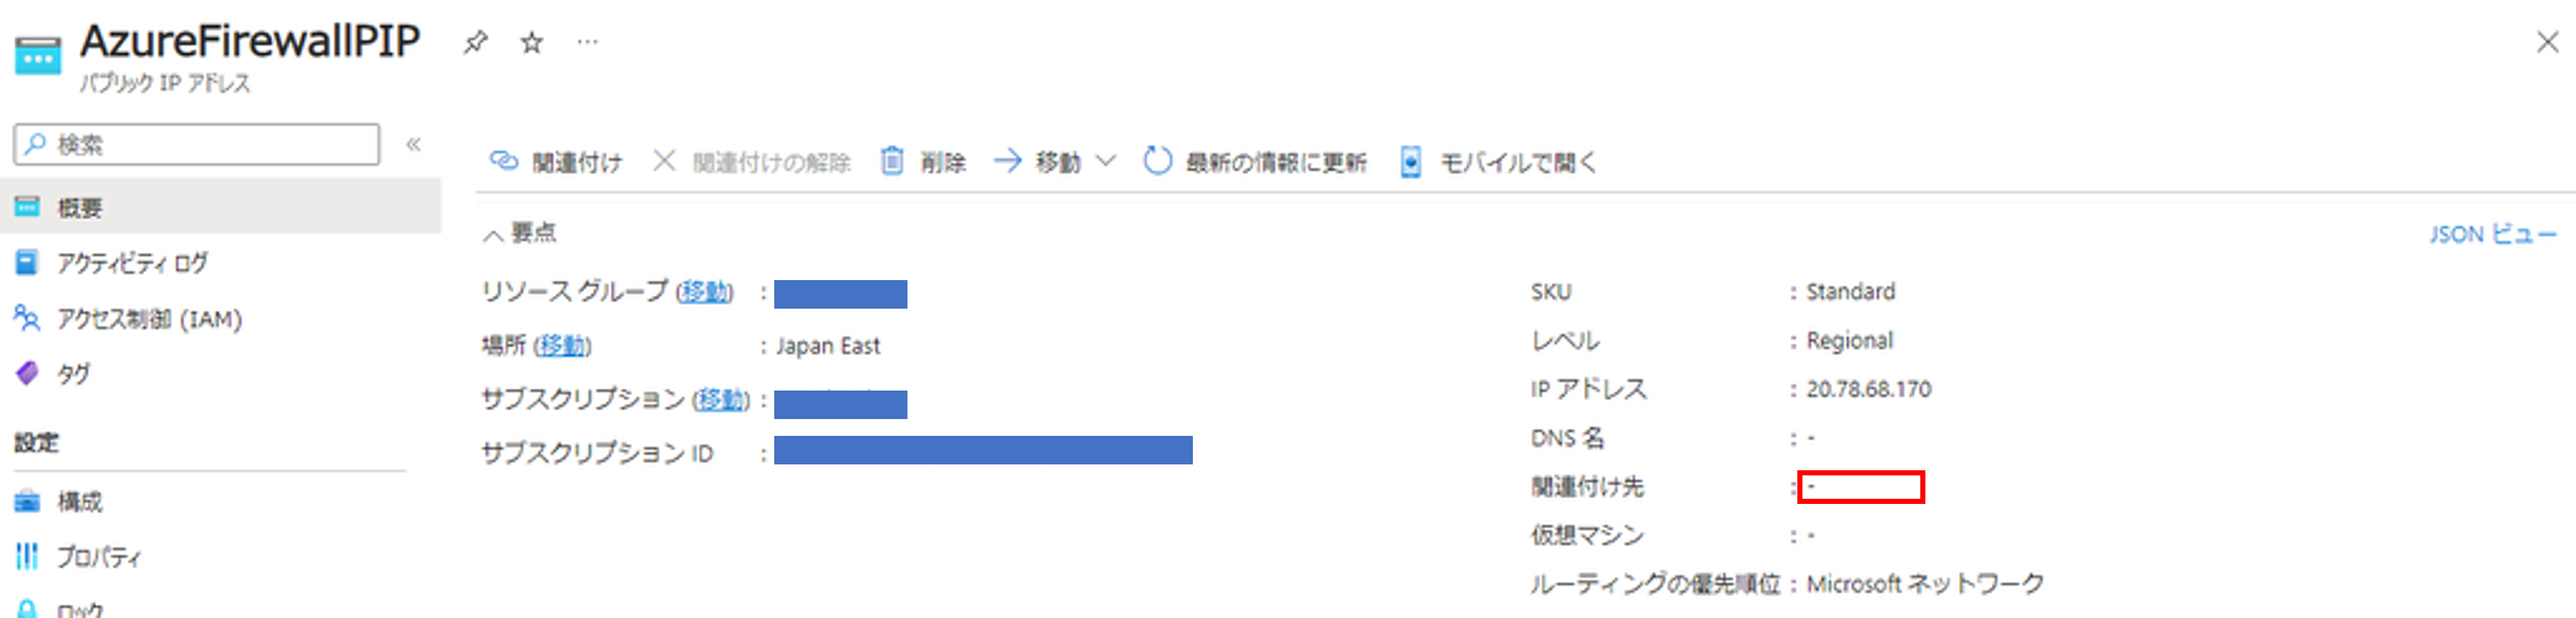
- パブリックIPアドレスの画面
- 関連付け先が表示されない

- 関連付け先が表示されない
- AFW の画面
4. AFW を経由した通信確認
仮想マシンから Google へアクセスする AFWポリシールールを作成。
仮想マシンにログインし、下記コマンドを実行してGoogleにアクセス
curl -I http://www.google.com
- 停止前
- アクセス成功

- アクセス成功
- 停止後
- アクセス失敗

- アクセス失敗
AFW の起動手順
1. Azure Account に接続する
PowerShell で下記コマンドを実行し、認証されたアカウントを使用して Azure 環境に接続
Connect-AzAccount
2. AFW を起動する
下記コマンドを実行し、AFW を起動
$ResourceGroupName = "<リソースグループの名前>"
$AzureFirewallName = "<AFWの名前>"
$VirtualNetworkName = "<仮想マシンの名前>"
$PublicIPName = "<パブリックIPアドレスの名前>"
$azfw = Get-AzFirewall -Name $AzureFirewallName -ResourceGroupName $ResourceGroupName
$vnet = Get-AzVirtualNetwork  -Name $VirtualNetworkName -ResourceGroupName $ResourceGroupName
$publicip = Get-AzPublicIpAddress -Name $PublicIPName -ResourceGroupName $ResourceGroupName
$azfw.Allocate($vnet, $publicip)
Set-AzFirewall -AzureFirewall $azfw
実際の画面

3. Azure Portal から確認
-
起動前
- AFW の画面
- サブネット、パブリックIPアドレス、プライベートIPアドレスが表示されない

- サブネット、パブリックIPアドレス、プライベートIPアドレスが表示されない
- パブリックIPアドレスの画面
- 関連付け先が表示されない
- 関連付け先が表示されない
- AFW の画面
-
起動後
- AFW の画面
- サブネット、パブリックIPアドレス、プライベートIPアドレスが表示されている

- サブネット、パブリックIPアドレス、プライベートIPアドレスが表示されている
- パブリックIPアドレスの画面
- 関連付け先に AFW が表示されている

- 関連付け先に AFW が表示されている
- AFW の画面
4. AFW を経由した通信確認
仮想マシンから Google へアクセスする AFWポリシールールを作成。
仮想マシンにログインし、下記コマンドを実行してGoogleにアクセス
curl -I http://www.google.com
- 起動前
- アクセス失敗
- アクセス失敗
- 起動後
- アクセス成功
- アクセス成功
以上
参考
- https://learn.microsoft.com/ja-jp/azure/firewall/firewall-faq
- https://learn.microsoft.com/ja-jp/powershell/scripting/install/installing-powershell-on-windows?view=powershell-7.4#install-powershell-using-winget-recommended
- https://learn.microsoft.com/ja-jp/powershell/azure/install-az-ps?view=azps-0.10.0#install-the-azure-powershell-module
- https://stackoverflow.com/questions/67933679/get-azpostgresqlfirewallrule-is-not-recognized-as-a-name-of-a-cmdlet-function
- https://learn.microsoft.com/ja-jp/powershell/scripting/install/installing-powershell-on-windows?view=powershell-7.3#install-powershell-using-winget-recommended
- https://learn.microsoft.com/ja-jp/powershell/module/az.accounts/connect-azaccount?view=azps-10.4.1