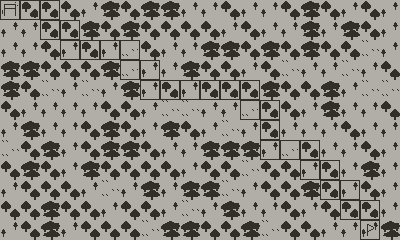
PlaydateにはA*(A star)経路探索アルゴリズムのpathfinder APIがあります。
A*経路検索はUnityなどの他のソフトウェアなどでもあり、
これを使うことで例えば、フィールドがタイルマップ型のシミュレーションゲームで
敵ユニットがプレイヤーまでのルートを算出したりなどすることができます。
今回はこのA*の簡単なサンプルを制作します。
ベースにするのはこちらのパーリンノイズを用いた2Dマップのサンプルプロジェクトです。
概要
Playdateのpathfinder APIでは、idとx・yの位置情報を持つnodeと、そのnodeを管理するgraphでできています。
nodeにはnode同士を繋ぐ接続があり、その接続にはweightがあります。
weightは経路検索の際この重みが軽い方を優先して選ばれます。
今回のサンプルコードではweightを割り振らず、通行できるかできないかだけを実装するものを作ろうと思うため、
playdate.pathfinder.graph.new2DGridで接続の重みが均一になるものにします。また、経路検索の際、斜め移動も含めません。
使用素材
サンプルコード
import "CoreLibs/object"
import "CoreLibs/graphics"
import "CoreLibs/sprites"
import "CoreLibs/timer"

local gfx <const> = playdate.graphics

-- タイル
local tilesize <const> = 20
local tileCol = 400 / tilesize
local tileRow = 240 / tilesize
local tileTable = {
	1,1,1,1,1,1,1,1,1,1, 1,1,1,1,1,1,1,1,1,1,
	1,1,1,1,1,1,1,1,1,1, 1,1,1,1,1,1,1,1,1,1,
	1,1,1,1,1,1,1,1,1,1, 1,1,1,1,1,1,1,1,1,1,
	1,1,1,1,1,1,1,1,1,1, 1,1,1,1,1,1,1,1,1,1,
	1,1,1,1,1,1,1,1,1,1, 1,1,1,1,1,1,1,1,1,1,

	1,1,1,1,1,1,1,1,1,1, 1,1,1,1,1,1,1,1,1,1,
	1,1,1,1,1,1,1,1,1,1, 1,1,1,1,1,1,1,1,1,1,
	1,1,1,1,1,1,1,1,1,1, 1,1,1,1,1,1,1,1,1,1,
	1,1,1,1,1,1,1,1,1,1, 1,1,1,1,1,1,1,1,1,1,
	1,1,1,1,1,1,1,1,1,1, 1,1,1,1,1,1,1,1,1,1,

	1,1,1,1,1,1,1,1,1,1, 1,1,1,1,1,1,1,1,1,1,
	1,1,1,1,1,1,1,1,1,1, 1,1,1,1,1,1,1,1,1,1
}

-- パーリンノイズ
-- cf. https://chrisdownie.net/software/2022/03/31/playdate-perlin-noise/
local repeatValue = 0
local octaves = 5
local persistence = 0.5

-- tableから最小値最大値取得
local function getMinMaxNumTable(table)
	local key, min, max = 1, table[1], table[1]
	for k, v in ipairs(table) do
		if  table[k] < min then
			min = v
		elseif table[k] > max then
			max = v
		end
	end
	return min, max
end

function myGameSetUp()
	-- タイル画像セッティング
	local tileImageTable = gfx.imagetable.new("Images/tile")
	local tileMap = gfx.tilemap.new()
	tileMap:setImageTable(tileImageTable)
	tileMap:setTiles(tileTable,tilesize)
	tileCol, tileRow = tileMap:getSize()

	-- ルート描画用画像
	local startImage = gfx.image.new("Images/start")
	assert( startImage )
	local goalImage = gfx.image.new("Images/goal")
	assert( goalImage )
	local routeImage = gfx.image.new("Images/route")
	assert( routeImage )

	-- タイル
	local perlinNoiseTable = gfx.perlinArray(tileCol * tileRow,
		0.5, 1,
		0.5, 0,
		0, 0,
		repeatValue,
		octaves,
		persistence)
	local min, max = getMinMaxNumTable(perlinNoiseTable)
	local thread = (max - min)/4
	local thread1 = min + thread
	local thread2 = min + thread*2
	local thread3 = min + thread*3
	local thread4 = min + thread*4

	local includedNodes = {}
	for j=1, tileRow do
		for i=1, tileCol do
			local tileIndex = 1
			local index = (j-1)*tileCol + i
			includedNodes[index] = 1 -- 1:通行可能
			if perlinNoiseTable[index] < thread1 then
				tileIndex = 1
			elseif perlinNoiseTable[index] < thread2 then
				tileIndex = 2
			elseif perlinNoiseTable[index] < thread3 then
				tileIndex = 3
			elseif perlinNoiseTable[index] < thread4 then
				tileIndex = 4
				includedNodes[index] = 0 -- 0:通行不可
			end
			tileMap:setTileAtPosition(i, j, tileIndex)
		end
	end

	-- 経路検索
	local graph = playdate.pathfinder.graph.new2DGrid(tileCol, tileRow, false, includedNodes)
	local routeList = graph:findPathWithIDs(1, 239)
	local startNode = graph:nodeWithID(1)
	local goalNode = graph:nodeWithID(239)
	local path = graph:findPath(startNode, goalNode)

	gfx.sprite.setBackgroundDrawingCallback(
		function( x, y, width, height )
			tileMap:draw(0, 0)

			-- ルート描画
			for ii=1, #path do
				local xPos = (path[ii].x-1)*tilesize
				local yPos = (path[ii].y-1)*tilesize
				if ii==1 then
					startImage:draw(xPos, yPos)
				elseif ii==#path then
					goalImage:draw(xPos, yPos)
				else
					routeImage:draw(xPos, yPos)
				end
			end
		end
	)
end

myGameSetUp()

function playdate.update()
	gfx.sprite.update()
	playdate.timer.updateTimers()
end
playdate.pathfinder.graph.new2DGrid(width, height, allowDiagonals, includedNodes) が2Dタイルマップで使いやすいplaydate.pathfinder.graphオブジェクトを生成するものとなっています。
引数はそれぞれ(タイルの横グリッド数, タイルの縦グリッド数, 経路探索に斜めを含めるか, 通行可能かどうかが0、1で入っている総タイル数分の配列) となっています。
サンプルではincludedNodesをパーリンノイズのタイル生成時にincludedNodes[index]で格納しており、1が通行可能、0が通行不可となります。
playdate.pathfinder.graph:findPathWithIDsメソッドは生成したplaydate.pathfinder.graphオブジェクトのスタートタイルID(startNodeId)とゴールタイルID(goalNodeId)を指定することで、タイルのID(nodeId)の配列を取得できます。
playdate.pathfinder.graph:findPathメソッドは生成したplaydate.pathfinder.graphオブジェクトのスタートタイル(startNode)とゴールタイル(goalNode)を指定することで、タイル(node)の配列を取得できます。
タイル(node)は、id, x, yの情報を持っています。今回は後者のタイル(node)の配列を使いたいのでplaydate.pathfinder.graph:findPathを使いました。
あとは背景描画時、タイルの描画を行ったあと、タイル(node)の配列からルート描画を行っています。
実行すると以下のようにルートが描画されるはずです。


