Microsoft Azureの無料アカウントを作ったので中のサービスのいくつかを試してみるよ。今回はAIによる画像認識のComputer Vision。アップロードするかネット上に配置した画像ファイルを元にAzure側で準備したAIで分析をしてくれるAPIサービスです。
IBM Cloudにも同じようなAPIサービスが用意されていたんだけど最近廃止されてしまったので代替サービスを検討中です。
事前チェック
- MacOS Monterey
- Python 3.8.8
- Microsoft Azure Computer Vision (無料アカウントでも利用できます)
- ANACONDA navigator
- JupyterLab
Microsoft Azure Computer Vision API (v3.2)
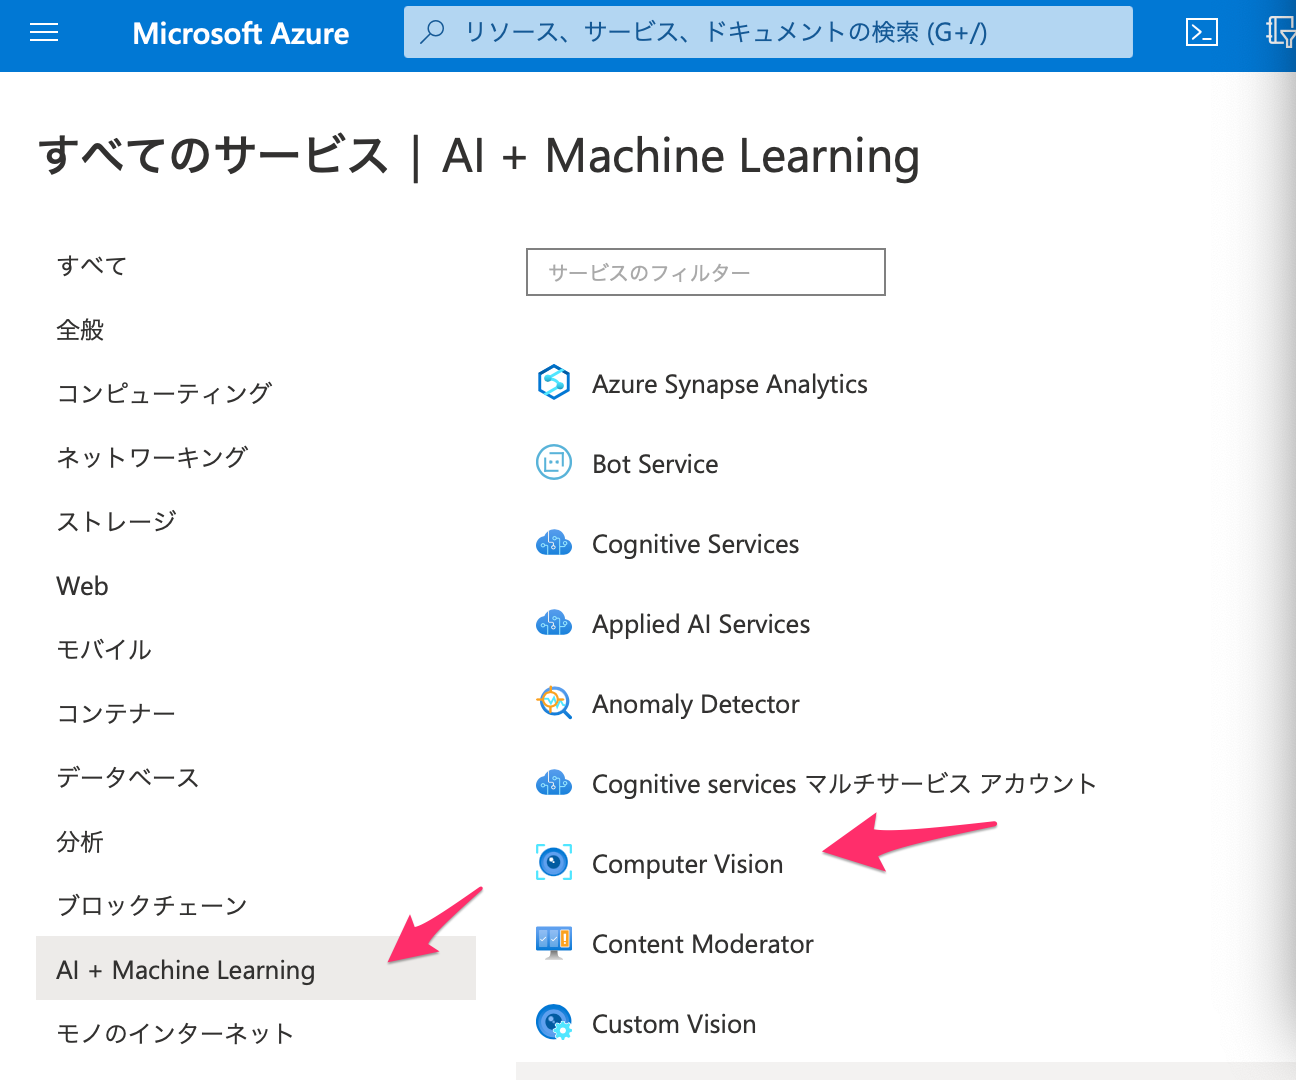
Microsoft Auzreのアカウントを持っていれば、全てのサービス→AI + Machine Learningにメニューがあるのでサービスをアクティベイトしてください。無料で大丈夫です。(利用頻度で課金されるみたいですが今回の利用であれば無料枠で問題ありません)
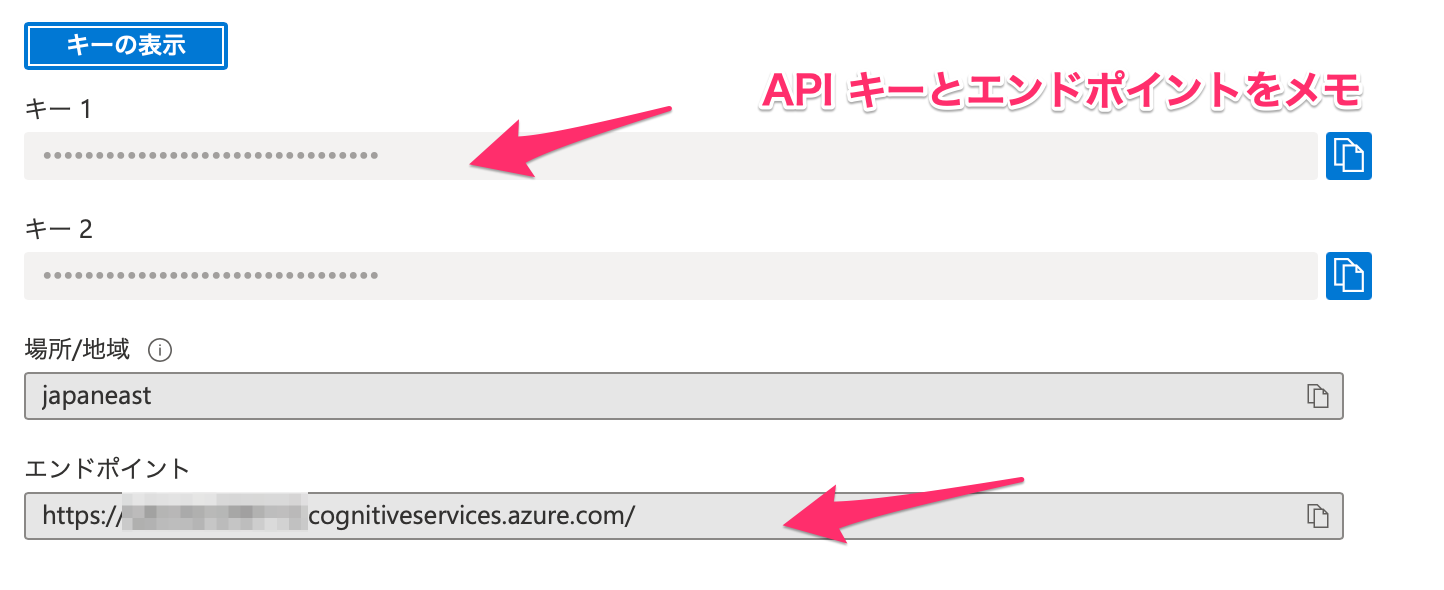
サービスがデプロイされたらComputer VisionのAPIを利用するためのAPIキーと自分のデプロイした環境のエンドポイントをメモしておいてください。左の方のアイコンをクリックするとクリップボード経由でコピーできます。
分析対象の画像を準備するよ
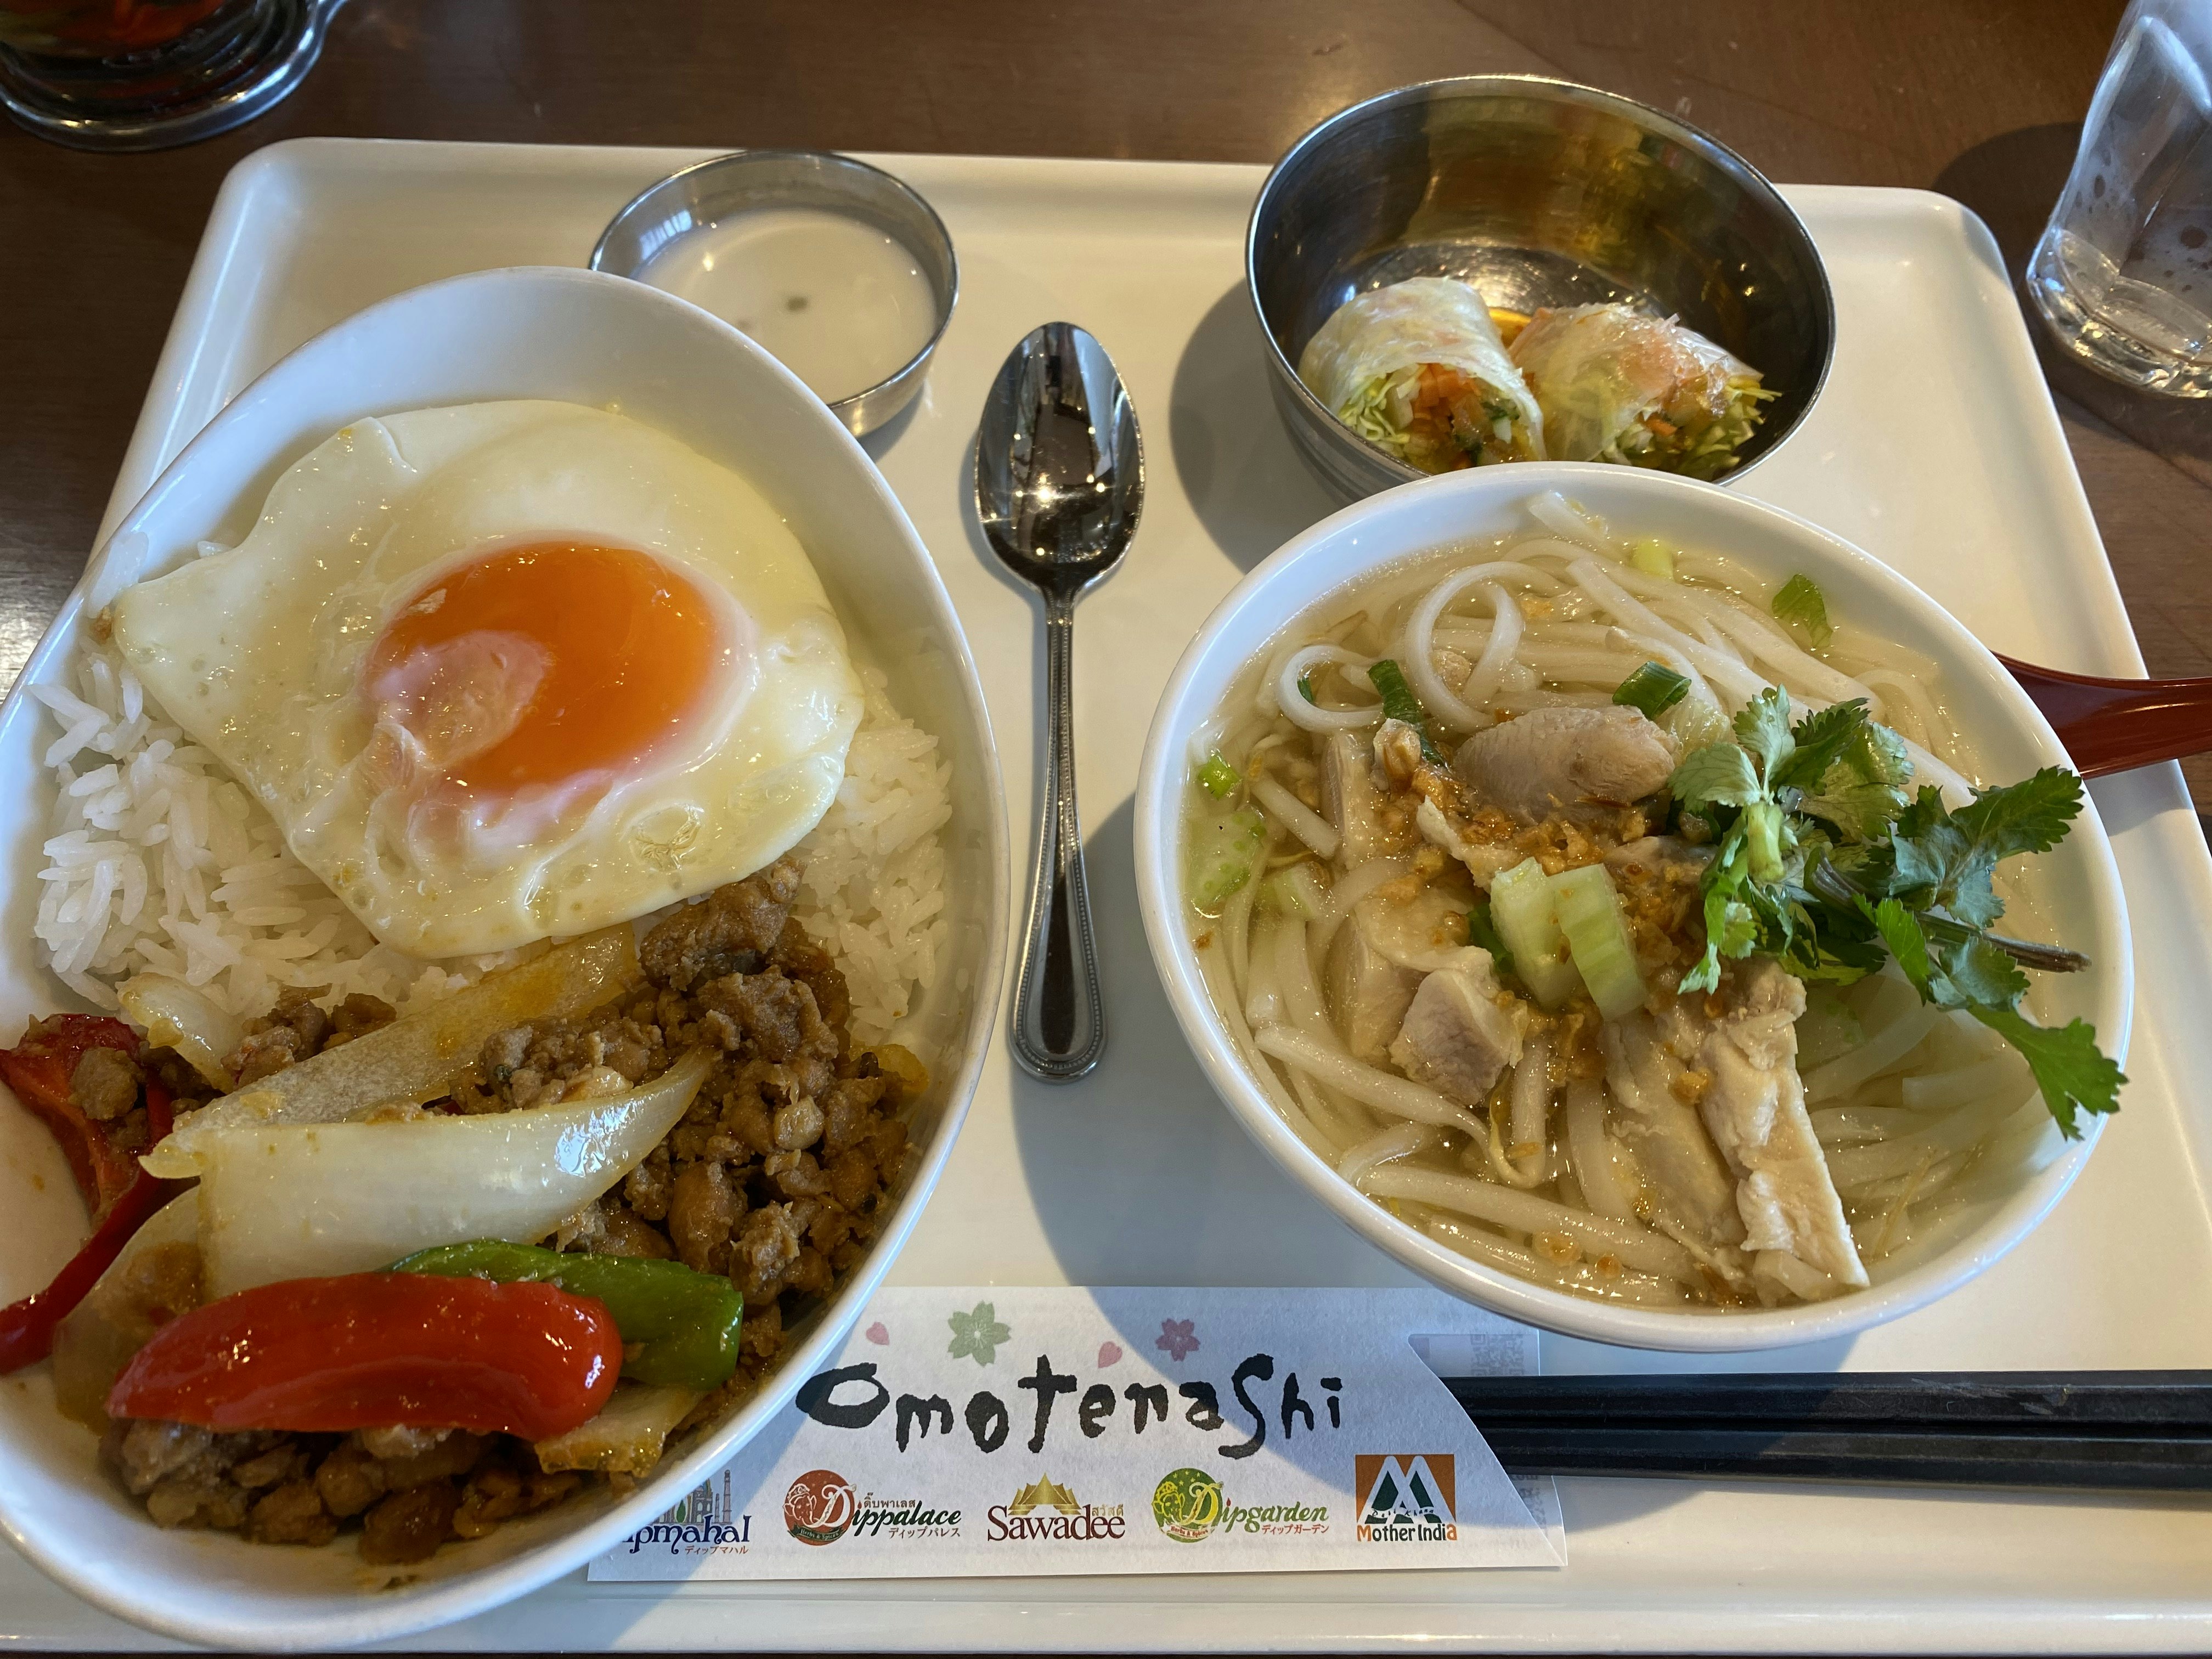
Computer Visionの画像分析はファイルをアップロードする指定と予めインターネット上に配置してある画像の対応ができるんですが今回は下記の画像を予めインターネット上に配置しておきます。飯田橋サクラテラスのタイ料理屋さんです。ランチおすすめ
JupyterLabを使ってPythonから動かしてみるよ
MacにインストールしたAnacondaからJupyterLabを起動してAzureのComputer Vision APIのサンプルプログラムを動かしてみる。
Python サンプルソース
import http.client, urllib.request, urllib.parse, urllib.error, base64,json
headers = {
    # Request headers
    'Content-Type': 'application/json',
    'Ocp-Apim-Subscription-Key': 'ここに自分のデプロイしたAPIキーを記入',
}
params = urllib.parse.urlencode({
    # Request parameters
    'visualFeatures': 'Categories',
    'details': '',
    'language': 'en',
    'model-version': 'latest',
})

# これが分析対象の画像ファイルのURL
URL_STRING="\"https://qiita-image-store.s3.ap-northeast-1.amazonaws.com/0/89268/169d065b-fb95-66c9-bcdf-088fa61e95d5.jpeg\""
# ここはデプロイした自分のAPI用のエンドポイントを記入
END_POINT="XXXXX.cognitiveservices.azure.com"

try:
    conn = http.client.HTTPSConnection(END_POINT)
    conn.request("POST", "/vision/v3.2/analyze?%s" % params, "{\"url\":" + URL_STRING +"}", headers)
    response = conn.getresponse()
    data = response.read()
    print(data)
    conn.close()
except Exception as e:
    print("[Errno {0}] {1}".format(e.errno, e.strerror))

json_dict = json.loads(data)
print(json_dict)

count=0
for count in json_dict["categories"]:
    print(count)
実行結果 その1
ちょっとアップロードした画像どおり、カテゴリは food 99% と認識されていました。一目瞭然なのかな。
{'categories': [{'name': 'food_', 'score': 0.9921875}], 'requestId': 'b3acf84a-f6f9-4bbd-bda4-167a83064d15', 'metadata': {'height': 3024, 'width': 4032, 'format': 'Jpeg'}, 'modelVersion': '2021-05-01'}
{'name': 'food_', 'score': 0.9921875}
パラメータを変更して実行
サンプルソースの2箇所を変更します。最初のプログラムは画像のカテゴリ分析で「フード」と認識されたのですが、画像の中のオブジェクトを分析させます。
params = urllib.parse.urlencode({
    # Request parameters
    'visualFeatures': 'Objects',
    'details': '',
    'language': 'en',
    'model-version': 'latest',
})
count=0
for count in json_dict["objects"]:
    print(count)
実行結果 その2
この結果は画像の中のX,Y座標からwidth, heightの範囲にある物体を認識しています。カップとかボウルとかスプーンもあります。これちょっとおもしろい。
{'rectangle': {'x': 3644, 'y': 0, 'w': 388, 'h': 779}, 'object': 'cup', 'confidence': 0.537, 'parent': {'object': 'Container', 'confidence': 0.542}}
{'rectangle': {'x': 1074, 'y': 234, 'w': 678, 'h': 553}, 'object': 'Bowl', 'confidence': 0.516, 'parent': {'object': 'Tableware', 'confidence': 0.538}}
{'rectangle': {'x': 2260, 'y': 114, 'w': 1092, 'h': 901}, 'object': 'Bowl', 'confidence': 0.844, 'parent': {'object': 'Tableware', 'confidence': 0.844}}
{'rectangle': {'x': 1791, 'y': 572, 'w': 339, 'h': 1422}, 'object': 'Spoon', 'confidence': 0.59, 'parent': {'object': 'Kitchen utensil', 'confidence': 0.795}}
{'rectangle': {'x': 2111, 'y': 905, 'w': 1765, 'h': 1568}, 'object': 'Bowl', 'confidence': 0.74, 'parent': {'object': 'Tableware', 'confidence': 0.748}}
終わりに
Azureのアカウントを作ってみたのでAI関連のサービスを触ってみようと思います。今回試してみたComputer Visionは画像認識機能で結構遊べそうですね。
今度UIを作っていろいろパラメータを触ってみます。


