はじめに
本記事では、ONTAPのイベントログや通知の仕組みであるEvent Management System(EMS)について説明します。
EMSではsyslog標準に基づいたメッセージング機能の提供と、特定のイベントでトリガーされる数千件の事前定義されたメッセージが含まれており、ドット区切りのツリースタイルの命名方式を採用しています。
各イベントには、管理者が適切に対応するための対処策概要が含まれており、問題解決をサポートしてくれます。
また、指定したイベントをメール送信、syslogサーバーへの転送、SNMPトラップによる通知、Webhookアプリケーションに直接送信するよう設定できるため、管理者に対して対応が必要な問題の通知を実施することができます。

何をしたい?できる?
- イベントログと解決策を確認する
- ONTAPで指定したEventのMail通知設定を行う
- ONTAPで指定したEventのSNMP Trap通知設定を行う
- ONTAPで指定したEventのWebhookを利用した通知設定(Teamsへの投稿)を行う
記事における環境情報
本記事では、以下の環境で実施した内容となります。
分かり易くするために、Network構成は単純化しています。
- ONTAP : 9.15.1
- Windows Active Directory環境

設定手順
1. イベントログの確認
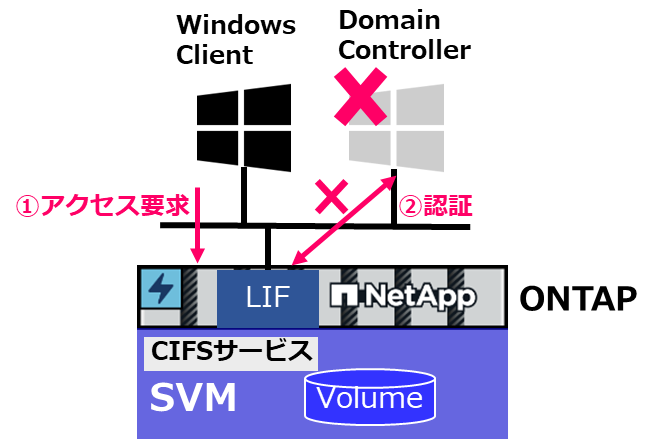
CIFSのアクセス不可の状態となっているタイミングで、ONTAPで出力されるイベントログの確認を実施してみます。
- CIFS環境でDomain Controllerをシャットダウン
- 上記の状態でCIFS用SVMへアクセスの実施
1-1. event log showでログの確認
# 発生しているログの確認
> event log show -node PS-C250-01
Time                Node             Severity      Event
------------------- ---------------- ------------- ---------------------------
9/6/2024 13:54:27   PS-C250-01       ERROR         secd.dns.srv.lookup.failed: DNS server failed to look up service (_ldap._tcp.dc._msdcs.ps-sc.local) for vserver (vs_cifs10) with error (Connection refused).
9/6/2024 13:53:01   PS-C250-01       ERROR         secd.cifsAuth.problem: vserver (vs_cifs10) General CIFS authentication problem. Error: User authentication procedure failed
CIFS SMB2 Share mapping - Client Ip = 192.168.1.1
  [  0 ms] Login attempt by domain user 'PS-SC\user3000' using NTLMv2 style security
  [     3] Failed to connect to 192.168.1.10 for DNS via Source Address 192.168.1.2: Host is down
**[     3] FAILURE: Unable to contact DNS to discover domain controllers.
  [     3] Unable to make a connection (NetLogon:PS-SC.LOCAL), Result: RESULT_ERROR_DNS_CANT_REACH_SERVER
  [     3] CIFS authentication failed
1-2. event catalog showでイベント自体の確認
Errorとなっているイベントをevent catalog showで詳細を表示して、解決策を確認します。
event log showで確認できた、Eventのドット区切りの部分である、secd.dns.srv.lookup.failedや、secd.cifsAuth.problemを指定して確認を実施します。
解決策はCorrective Actionの部分参照します。
# イベントの詳細確認
> event catalog show -message-name secd.dns.srv.lookup.failed

     Message Name: secd.dns.srv.lookup.failed
         Severity: ERROR
      Description: This message occurs when the Domain Name Service (DNS) server fails to look up a service name.
Corrective Action: Make sure that the service name is input correctly and that there are no networking issues preventing the Vserver from communicating with the DNS server.
   SNMP Trap Type: Severity-based
    Is Deprecated: false


> event catalog show -message-name secd.cifsAuth.problem

     Message Name: secd.cifsAuth.problem
         Severity: ERROR
      Description: This message occurs when a CIFS authentication attempt fails for any reason other than an unknown user name or bad password.
Corrective Action: Examine the failure details to determine corrective action. Common failures include the inability to communicate with domain controllers, NIS servers, or LDAP servers due to connectivity or configuration problems.
   SNMP Trap Type: Severity-based
    Is Deprecated: false
2. Mail通知設定の実施
ここでは、ランサムウェア攻撃に関するイベントのみをmail通知設定します。
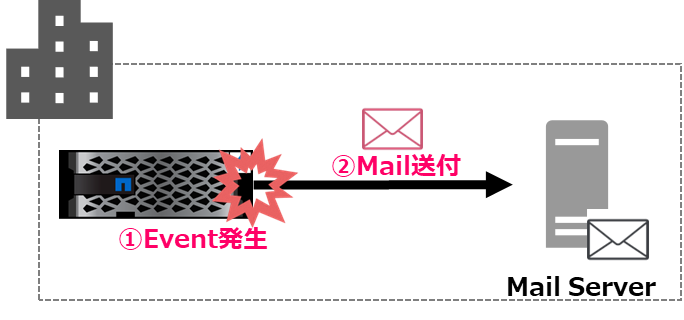
通知にあたっては、以下の手順で実施します。
- イベントの取捨選択をするFilterの作成
- イベントの通知先を決める通知先の定義
- Filterと通知先の紐付け
2-1. 対象のイベントのFilter設定を実施する
ランサムウェア攻撃に関するイベント一覧を確認します。
# ランサムウェアに関するイベントの確認
> event catalog  show -message-name *arw*
Message                          Severity         SNMP Trap Type
-------------------------------- ---------------- -----------------
arw.analytics.ext.report         NOTICE           Severity-based
arw.analytics.high.entropy       ERROR            Severity-based
arw.analytics.probability        ERROR            Severity-based
arw.analytics.report             NOTICE           Severity-based
arw.analytics.suspects           ERROR            Severity-based
arw.auto.switch.enabled          NOTICE           Severity-based
arw.new.file.extn.seen           NOTICE           Severity-based
arw.snapshot.created             NOTICE           Severity-based
arw.volume.state                 NOTICE           Severity-based
arw.vserver.state                NOTICE           Severity-based
callhome.arw.activity.seen       ALERT            Severity-based
11 entries were displayed.
確認できたイベントを送信対象にする為、Filterへのincludeを実施します。
通知するものをincludeに含み、通知しない対象はexcludeとして設定します。
# Filterという器の作成
> event filter create -filter-name test-filter01


# 作成した器にルールの追加(通知イベントの指定)
> event filter rule add -filter-name test-filter01 -type include -message-name callhome.arw.activity.seen -severity ALERT
> event filter rule add -filter-name test-filter01 -type include -message-name arw.* -severity ERROR,NOTICE


# 追加したRuleの確認
> event filter show -filter-name test-filter01
Filter      Rule Rule                                    SNMP Trap
Name        Posn Type     Message Name     Severity      Type      Parameters
----------- ---- -------- ---------------- ------------- --------- -----------
test-filter01
            1    include  callhome.arw.activity.seen ALERT *       *=*
            2    include  arw.*            ERROR, NOTICE *         *=*
            3    exclude  *                *             *         *=*
3 entries were displayed.
2-2. Mail通知の設定
通知先のMailアドレスとMailサーバの設定を実施します。
併せて、どこから送信されたか分かり易くする為、送信元となるアドレスについても定義します。
(送信元アドレスは、ドメイン上に無いユーザや実際にMailboxを用意していないユーザでも問題無い)
# Destination名の作成と通知先Mailアドレス設定
> event notification destination create -name mail-send -email excadmin01@ps-sc.local


# 送付元アドレスとMailサーバの設定
> event config modify -mail-from c250-admin@ps-sc.local -mail-server 192.168.1.100


# 作成したFilterとDestination名の紐付け
> event notification create -filter-name test-filter01 -destinations mail-send


# 設定の確認
> event notification destination show
Name            Type        Destination
--------------  ----------  ---------------------
mail-send       email       excadmin01@ps-sc.local (via "192.168.1.100" from "c250-admin@ps-sc.local", configured in "event config")
snmp-traphost   snmp        - (from "system snmp traphost")
syslog          syslog      1.1.1.1 (port: 123, transport: tcp-encrypted)
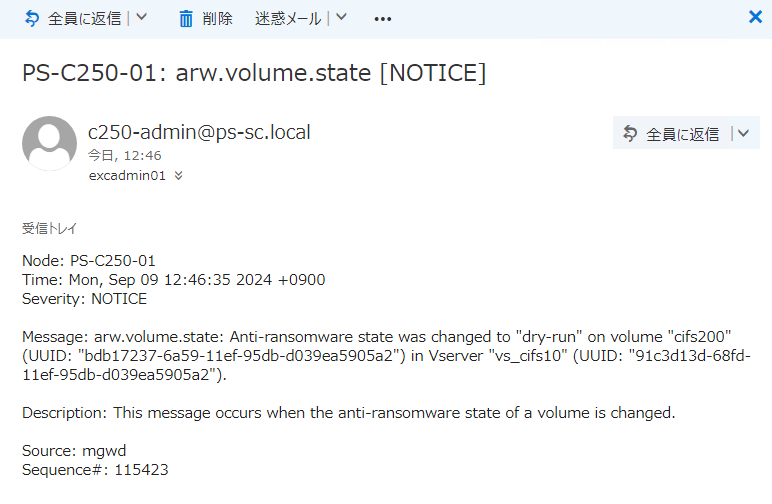
2-3. 通知の確認
ランサムウェア攻撃の学習モードを設定して、Mail通知されるか確認します。
# Volumeに対してランサムウェア攻撃の学習モードを設定
> security anti-ransomware volume dry-run  -vserver vs_cifs10 -volume cifs200
Volume modify successful on volume cifs200 of Vserver vs_cifs10.


# イベントログの確認
> event log show -severity NOTICE
Time                Node             Severity      Event
------------------- ---------------- ------------- ---------------------------
9/9/2024 12:46:35   PS-C250-01       NOTICE        arw.volume.state: Anti-ransomware state was changed to "dry-run" on volume "cifs200" (UUID: "bdb17237-6a59-11ef-95db-d039ea5905a2") in Vserver "vs_cifs10" (UUID: "91c3d13d-68fd-11ef-95db-d039ea5905a2").
(中略)
Mailが通知されている事を確認します。
3. SNMP Trap通知設定の実施
次にVolumeの名前変更や削除に関するイベントのみをSNMP Trapで通知設定してみます。

3-1. 対象のイベントのFilter設定を実施する
Volumeの名前変更や削除に関するイベント一覧を確認します。
# Volumeの削除イベントの確認
> event catalog show -message-name wafl.vvol.destroyed

     Message Name: wafl.vvol.destroyed
         Severity: NOTICE
      Description: This message occurs when a flexible volume is destroyed.
Corrective Action: NONE
   SNMP Trap Type: Severity-based
    Is Deprecated: false


# Volumeの名前変更イベントの確認
> event catalog show -message-name wafl.vvol.renamed

     Message Name: wafl.vvol.renamed
         Severity: INFORMATIONAL
      Description: This message occurs when the administrator renames a flexible volume.
Corrective Action: NONE
   SNMP Trap Type: Severity-based
    Is Deprecated: false
確認できたイベントを送信対象にする為、Filterへのincludeを実施します。
通知するものをincludeに含み、通知しない対象はexcludeとして設定します。
# Filterという器の作成
> event filter create -filter-name test-filter10


# 作成した器にルールの追加
> event filter rule add -filter-name test-filter10 -type include -message-name wafl.vvol.destroyed -severity NOTICE -snmp-trap-type Severity-based

> event filter rule add -filter-name test-filter10 -type include -message-name wafl.vvol.renamed -severity INFORMATIONAL -snmp-trap-type Severity-based


# 追加したRuleの確認
> event filter show -filter-name test-filter10
Filter      Rule Rule                                    SNMP Trap
Name        Posn Type     Message Name     Severity      Type      Parameters
----------- ---- -------- ---------------- ------------- --------- -----------
test-filter10
            1    include  wafl.vvol.destroyed
                                           NOTICE        Severity-based
                                                                   *=*
            2    include  wafl.vvol.renamed
                                           INFORMATIONAL Severity-based
                                                                   *=*
            3    exclude  *                *             *         *=*
3 entries were displayed.
3-2. SNMP Trap設定
通知先のSNMP Manager設定(communityやIP)を実施します。
SNMP TrapのDestination名はsnmp-traphostとして用意されているので、こちらを利用します。
# community名の指定
> system snmp community add -community-name public -type ro

# SNMP ManagerのIP指定
> system snmp traphost add -peer-address 192.168.1.123

# 初期化及び有効化
> system snmp init 1
> system snmp authtrap -authtrap 1

# 作成したFilterとDestination名の紐付け
> event notification create -filter-name test-filter10 -destinations snmp-traphost

# 設定の確認
> event notification destination show
Name            Type        Destination
--------------  ----------  ---------------------
mail-send       email       excadmin01@ps-sc.local (via "192.168.1.100" from "c250-admin@ps-sc.local", configured in "event config")
snmp-traphost   snmp        192.168.1.123 (from "system snmp traphost")
syslog          syslog      192.168.1.125 (port: 123, transport: tcp-encrypted)
3 entries were displayed.
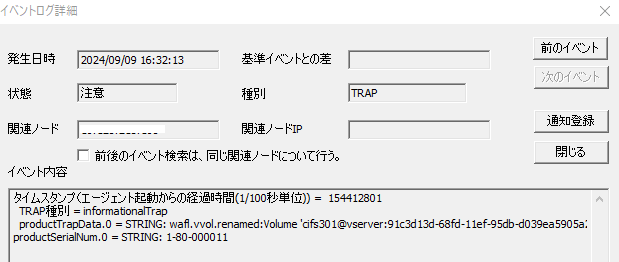
3-3. 通知の確認
Volume名の変更時に、SNMP Trapが送付されている事をSNMP Manager上で確認します。
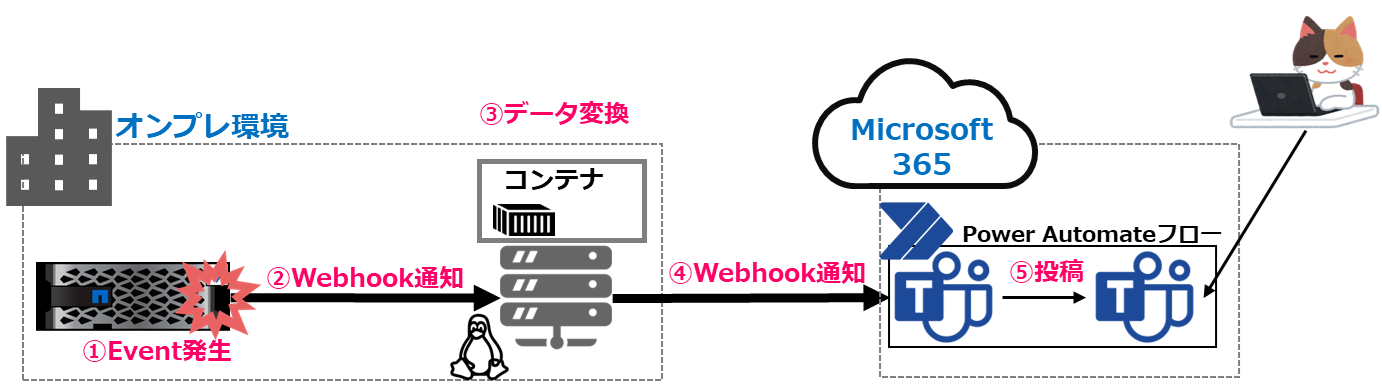
4. Webhookを使った通知設定の実施
SNMP Trap通知の項で利用したVolumeの名前変更や削除に関するイベントに対してWebhookを使った通知を設定してみます。
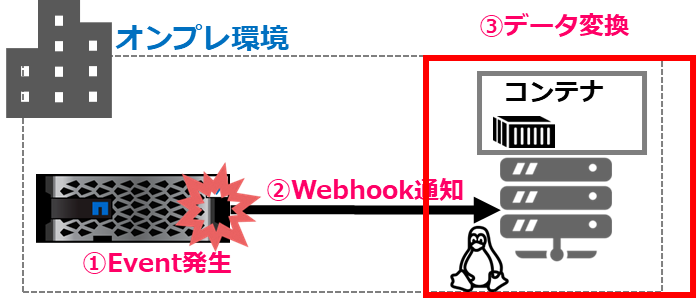
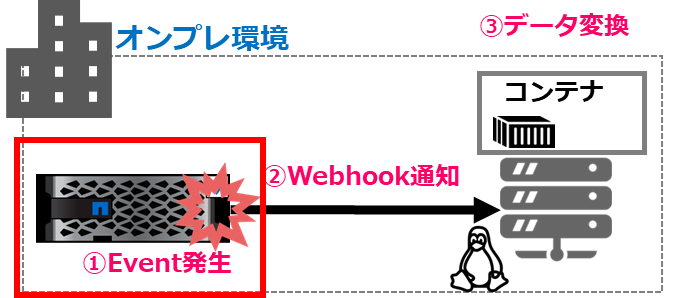
ONTAPからはXML形式のデータが送付される為、本記事では、イベントが発生すると一旦ローカルに用意したコンテナ上でデータを受信してからJSON形式へ変換した後に必要な項目のみ抜粋し、シンプルな内容をMS Teamsに投稿されるように設定します。
インフォメーション
TeamsのIncomming Webhookコネクタが廃止される為、Power Automateを利用します
環境の構築イメージは以下の通りです。
通知先となるURLを確認する必要があるので、環境イメージの右側にあるTeamsの設定から実施してきます。
(コンテナにはTeamsのURL記載が必要となり、ONTAPにはコンテナのURLが必要になる為)
4-1. 投稿先となるチームとチャネルの作成
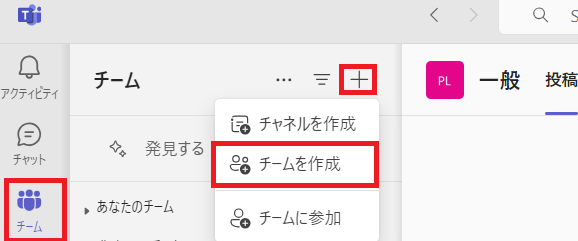
TeamsからEventの投稿先となるチームとチャネルの作成を実施します。

Teamsアプリでチームの一覧を表示させ、上方にある[+]から[チームを作成]を選択します。
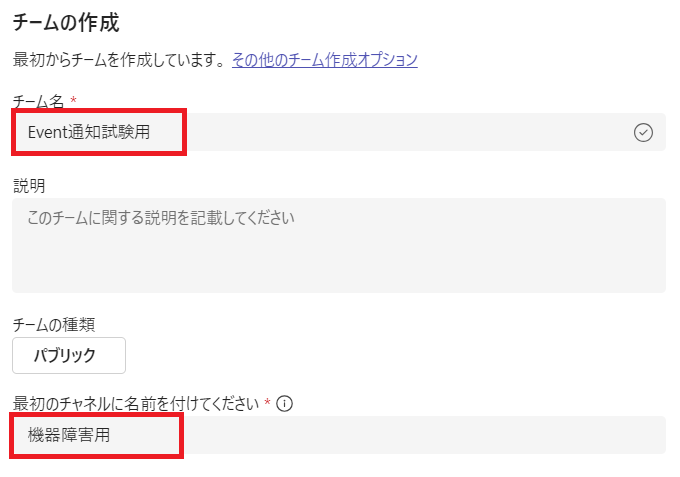
表示された画面でチームの作成を行います。
ここでは、以下の名前で作成しています。
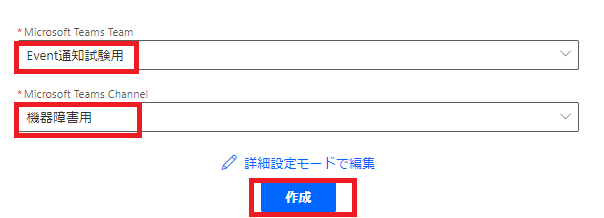
チーム名: Event通知試験用
チャネル名: 機器障害用
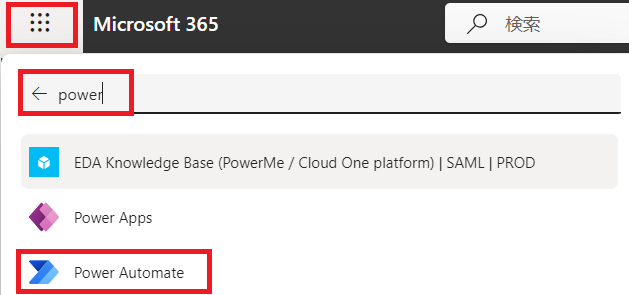
4-2. Teamsで受信するWebhookのフローをPower Automateで作成
Teams の Office 365 コネクタ機能(Incoming WebhookやRSSなど)が廃止される為
Power Automateにあるテンプレートを利用してTeamsで受信するWebhookのフローを作成します。

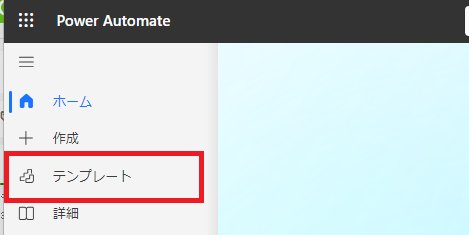
Microsoft 365の画面左側からPower Automateを選択します。
4-2-1. テンプレートの選択
表示された画面左側から[テンプレート]を選択します。
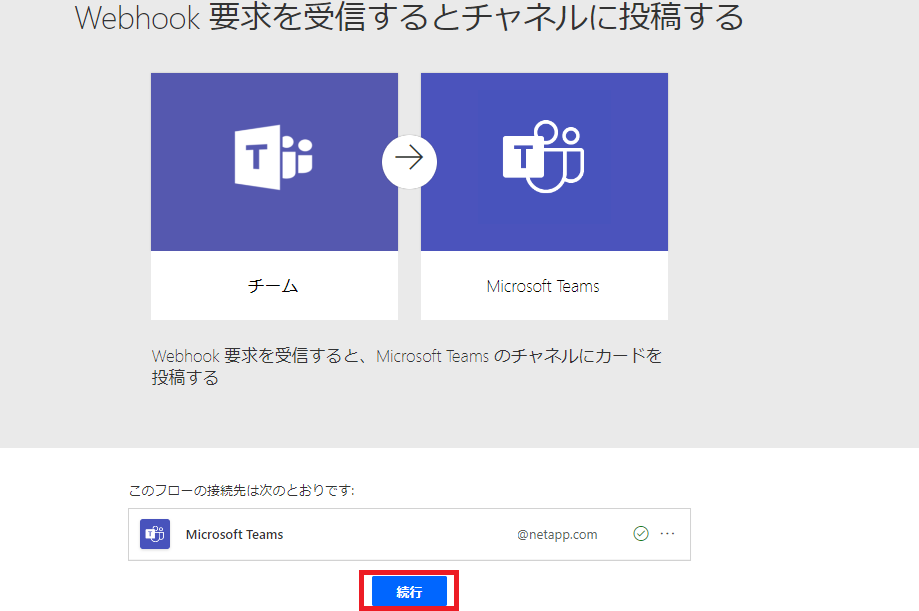
表示された画面で、webhookで検索し、[Webhook要求を受信するとチャネルに投稿する]を選択します。

操作ユーザからの接続が確認できた後、[続行]を選択します。
表示された画面から、作成しておいたチームとチャネルを選択し、[作成]をクリックします。
4-2-2. Webhook用のURLを確認
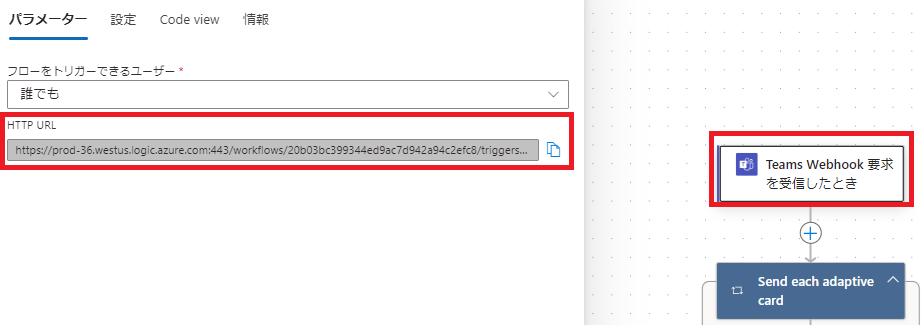
送信先のWebhookのURLを確認する為、表示された画面上方の[編集]をクリックします。
!
表示されたフローで[Teams Webhook要求を受信したとき]をクリックして、左側に表示されHTTP URLを控えておきます。
!
4-3. ONTAPからのWeb hook受信及びデータ変換用コンテナの作成と実行
次にONTAPからのXMLデータをWebhook受信後、Teams向けにXMデータをJSONへ変換後を行いWebhookの再送信を行うコンテナの作成を実施します。
以下の機能を持つコンテナを作成する為に、Linuix上で設定ファイルや実行されるコードを作成します。
生成AIを活用したり、Teamに送付される為のコードサンプルを参考にして作成しています。
- Webhookを受信するサーバを構築する
- 受信したXMLデータをJSONに変換し、必要なデータのみ選択
- 変換したデータの一部を別のWebhookにPOSTする
4-3-1. Dockerfileの作成
Dockerイメージを作成する為、Dockerfileの作成を実施します。
> cat Dockerfile

# ベースイメージとしてPythonを使用
FROM python:3.9-slim

# 作業ディレクトリを設定
WORKDIR /app

# 必要なパッケージをインストール
COPY requirements.txt requirements.txt
RUN pip install --no-cache-dir -r requirements.txt

# アプリケーションのソースコードをコピー
COPY . .

# Flaskサーバーを起動
CMD ["python", "app.py"]
利用するパッケージ一覧をrequirements.txtに記載します。
> cat requirements.txt
Flask
requests
xmltodict
4-3-2. コンテナで実行されるPythonコードの作成
ONTAPから受け取った内容を全てteamsに投げると見難いので、必要な項目のみ抜粋します。
コードのresponse = requests.post('XXXXX', json=payload)のXXXX部分に、先程Power Automationで確認したTeamsのWebhook用のURLを張り付けておきます。
>  cat app.py

from flask import Flask, request, jsonify
import xmltodict
import requests

app = Flask(__name__)

@app.route('/webhook', methods=['POST'])
def handle_webhook():
    # XMLデータを受信
    xml_data = request.data

    # XMLをJSONに変換
    json_data = xmltodict.parse(xml_data)

    # Teamsへの送付に使うnode名やevent名やseverityの内容を抽出
    node = json_data['netapp']['ems-message-info']['node']
    severity = json_data['netapp']['ems-message-info']['severity']
    message = json_data['netapp']['ems-message-info']['message-name']

    # 変換したデータを指定のJSON形式に変換
    payload = {
        "type": "message",
        "attachments": [
            {
                "contentType": "application/vnd.microsoft.card.adaptive",
                "contentUrl": None,
                "content": {
                    "$schema": "http://adaptivecards.io/schemas/adaptive-card.json",
                    "type": "AdaptiveCard",
                    "version": "1.4",
                    "body": [
                        {
                            "type": "TextBlock",
                            "text": f"Node: {node}, Sev: {severity}, EVT: {message}"  # 抽出したデータを挿入
                        }
                    ]
                }
            }
        ]
    }

    # 変換したデータを別のWebhookにPOST(Teamsで確認したURLを貼り付け)
    response = requests.post('https://XXXXX', json=payload)

    # レスポンスを返す
    return jsonify({'status': 'success', 'response': response.text})

if __name__ == '__main__':
    app.run(host='0.0.0.0', port=5000)
3つのファイルが作成されている事を確認します。
> ls
app.py  Dockerfile  requirements.txt
4-3-3. Dockerイメージのビルドとコンテナの起動
ファイルを作成したディレクトリ上で、Dockerイメージを作成します。
> docker build -t webhook-handler .
[+] Building 10.1s (10/10) FINISHED                                                                     docker:default
 => [internal] load build definition from Dockerfile                                                              0.0s
 => => transferring dockerfile: 422B                                                                              0.0s
 => [internal] load metadata for docker.io/library/python:3.9-slim                                                2.1s
 => [internal] load .dockerignore
 (中略)


> docker image ls
REPOSITORY        TAG       IMAGE ID       CREATED          SIZE
webhook-handler   latest    7eff303dab45   36 seconds ago   138MB
コンテナを起動します。
コンテナ起動後はhttp://LinuxのIP:5000/webhook にWebhookを送信できるようになります。
> docker run -p 5000:5000 webhook-handler

 * Serving Flask app 'app'
 * Debug mode: off
WARNING: This is a development server. Do not use it in a production deployment. Use a production WSGI server instead.
 * Running on all addresses (0.0.0.0)
 * Running on http://127.0.0.1:5000
 * Running on http://172.16.0.1:5000
Press CTRL+C to quit
4-4. ONTAP側で通知設定の実施
通知対象はSNMP Trap通知で利用したものを再利用します。(VolumeのRenameや削除で通知)
併せてONTAPでWebhookのURL指定を実施します。
ここではDockerコンテナを通知先に指定します。
# Destination名の作成とWebhookのURL設定
> event notification destination create -name webhook-test -rest-api-url http://192.168.1.220:5000/webhook


# 通知対象Filterの確認
event filter show -filter-name test-filter10
Filter      Rule Rule                                    SNMP Trap
Name        Posn Type     Message Name     Severity      Type      Parameters
----------- ---- -------- ---------------- ------------- --------- -----------
test-filter10
            1    include  wafl.vvol.destroyed
                                           NOTICE        Severity-based
                                                                   *=*
            2    include  wafl.vvol.renamed
                                           INFORMATIONAL Severity-based
                                                                   *=*
            3    exclude  *                *             *         *=*
3 entries were displayed.


# FilterとDestination名の紐付け
> event notification create -filter-name test-filter10 -destinations webhook-test


# 設定の確認
> event notification destination show
Name            Type        Destination
--------------  ----------  ---------------------
snmp-traphost   snmp        - (from "system snmp traphost")
syslog          syslog      192.168.1.125 (port: 123, transport: tcp-encrypted)
webhook-test    rest-api    http://192.168.1.220:5000/webhook
3 entries were displayed.
4-5. 通知の確認
Volumeの名前を変更し、イベントが発生している事を確認します。
# volumeの名前変更
> volume rename -vserver vs_cifs10 -volume cifs301 -newname cifs300
[Job 2225] Job succeeded: Successful

# Eventの確認
> event log show -severity INFORMATIONAL -message-name wafl.vvol.renamed
Time                Node             Severity      Event
------------------- ---------------- ------------- ---------------------------
9/13/2024 18:36:28  PS-C250-01       INFORMATIONAL wafl.vvol.renamed: Volume 'cifs301@vserver:91c3d13d-68fd-11ef-95db-d039ea5905a2' renamed to 'cifs300@vserver:91c3d13d-68fd-11ef-95db-d039ea5905a2'.
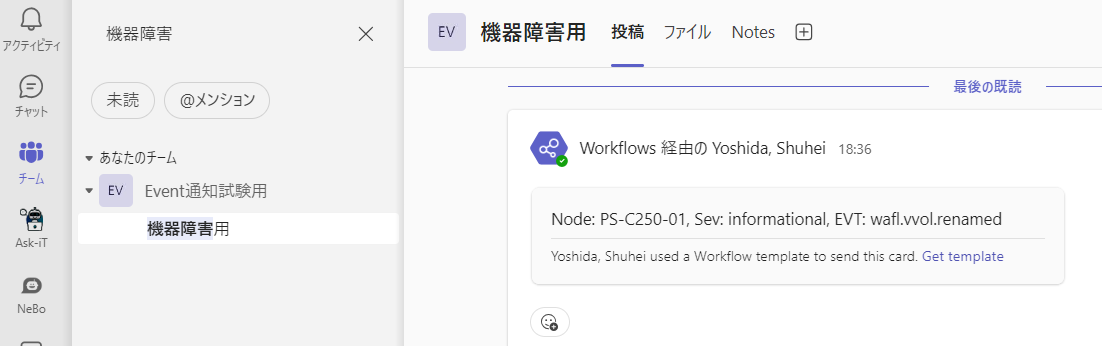
Teamsに通知が投稿される事を確認します。
投稿内容がapp.pyに記載した通り、 node、severity、message-nameに関する内容のみ投稿している事が確認できます。
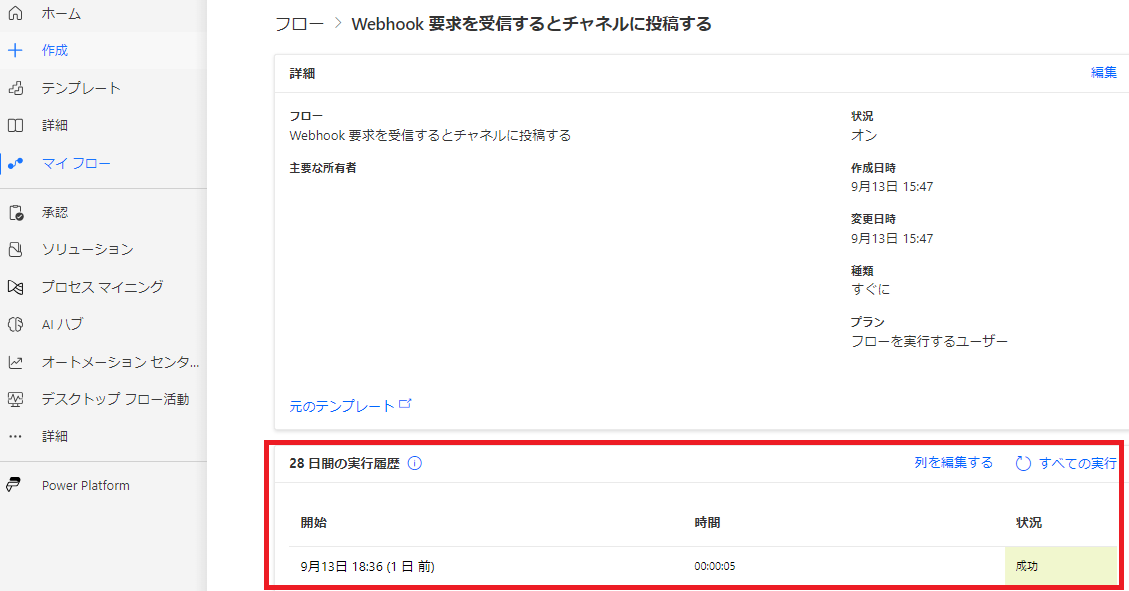
Teamsへの通知が失敗する場合は、Power Automateのマイフローから成否を確認する事ができます。
参考
Webhook利用時にONTAPから送付されるXMLは以下のような内容になります。
<?xml version='1.0' encoding='UTF-8' ?>
<netapp version='1.0' xmlns='http://www.netapp.com/filer/admin'>
    <ems-message-origin>
        <cluster-uuid>9263144f-f5bb-11ee-971c-d039ea5905a2</cluster-uuid>
        <node-uuid>1c8fa4d2-dbe1-11ee-8ef9-d039ea5905a2</node-uuid>
    </ems-message-origin>
    <ems-message-info>
        <node>PS-C250-01</node>
        <message-name>wafl.vvol.renamed</message-name>
        <version>1</version>
        <parameters>
            <parameter>
                <name>oldname</name>
                <value>cifs300</value>
            </parameter>
            <parameter>
                <name>volident1</name>
                <value>@vserver:91c3d13d-68fd-11ef-95db-d039ea5905a2</value>
            </parameter>
            <parameter>
                <name>newname</name>
                <value>cifs301</value>
            </parameter>
            <parameter>
                <name>app</name>
                <value></value>
            </parameter>
            <parameter>
                <name>volident2</name>
                <value>@vserver:91c3d13d-68fd-11ef-95db-d039ea5905a2</value>
            </parameter>
        </parameters>
        <seq-num>116336</seq-num>
        <severity>informational</severity>
        <time>1725954854</time>
        <event>wafl.vvol.renamed: Volume 'cifs300@vserver:91c3d13d-68fd-11ef-95db-d039ea5905a2' renamed to 'cifs301@vserver:91c3d13d-68fd-11ef-95db-d039ea5905a2'.</event>
        <num-suppressed-since-last>0</num-suppressed-since-last>
        <ems-severity>info</ems-severity>
        <event-xml-len>373</event-xml-len>
        <source>vv_config_worker20</source>
    </ems-message-info>
</netapp>
参考及びリンク
FAQ: Overview of Event Management System for ONTAP 9
Configure important EMS events to forward notifications to a webhook application