はじめに
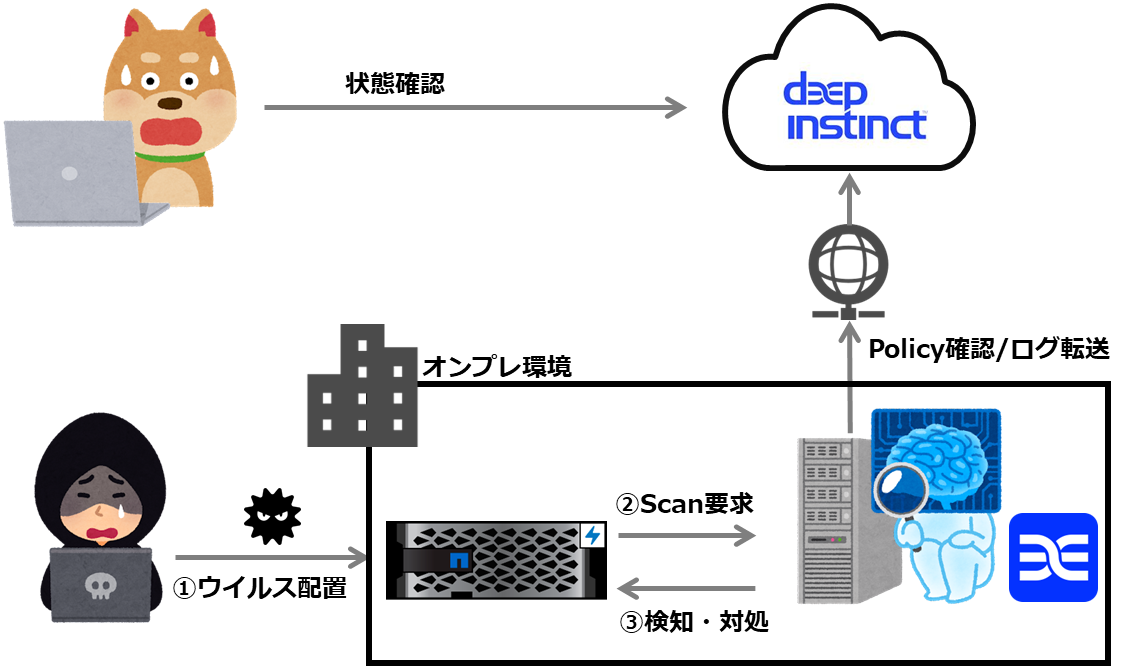
NetApp StorageであるONTAPはシステムをマルウェアやウイルスから保護し、データの安全性を維持する為に外部のVirusScanサーバと連携が出来るSecurity機能を持っています。
2024年1月の段階では、深層学習を利用したDeep Instinctと連携が取れるようになっています。
Deep InstinctはAIを活用する事で、未知のウイルスに対しても予測し防御しますので、次世代型アンチウイルスやEDR(Endpoint Detection and Response)をすり抜けるようなマルウェアに対しても高い検知率で予防が可能となり、感染予防対策を重視した運用が可能になります。
また、検知や隔離が自動化されている為、運用部門の負荷を軽減し、セキュリティ対策に対する総保有コストを最適化することができます。
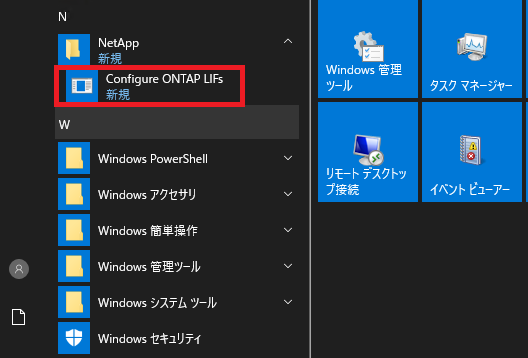
何をしたい?できる?
Deep Instinct社のStorage AgentのInstall
ONTAP側VirusScanの設定
ファイルサイズの違いによるVirusScanサーバのCPU利用率の比較
VirusScanの設定有無によるWrite速度の違いを測定
ONTAPにおけるAntiVirus連携
ONTAPのVirusScanは、サードパーティ製のVirus対策SoftwareとONTAPを組み合わせた機能で、どのファイルを何時Scanするか柔軟に制御する事ができます。
| ベンダー | 製品 |
|---|---|
| Trellix(旧Macfee) | Endpoint Security Storage Protection |
| Broadcom(旧Symantec) | Symantec Protection Engine for Network Attached Storage |
| Trend Micro | ServerProtect for Storage |
| Sentinel One | Threat Detection for NetApp |
| Deep Instinct | Deep Instinct Prevention for Storage |
VirusScan処理は、サードパーティベンダーのVirus対策ソフトウェアをInstallしているサーバ上で実行され、VirusScanサーバにインストールされる ONTAP Antivirus Connectorを使い、ONTAPとVirus対策Software間の通信の処理を実施します。
ONTAPのVirusScanでは、以下のOn-Access ScanとOn-Demand Scanの実行が可能です。
-
On-Access Scan:
ClinetからONTAPへのファイルのOpen, Read, Rename, Closeの際にVirusScan -
On-Demand Scan:
Scan処理をスケジュールに基づいて実行され、ScanしたファイルのScanテータスを更新するため、 SMB 経由で次回にアクセスされた時に(ファイル変更無い場合は)ファイルアクセスレイテンシが低減

記事における環境情報
本記事では、以下の環境で実施した内容となります。
分かり易くするために、Network構成は単純化しています。
- ONTAP : 9.13.1
- Windows Active Directory環境
- VirusScan:Windows Server 2019
(推奨の4core cpu+16GB Memoryで構成)

設定手順
手順内で指定されているSVM名やPool名といったパラメータは、環境により異なるので適宜変更して下さい。
1. Deep Instinctの管理コンソール内の操作
事前にテナント払い出しをDeep Instinct社側で実施頂く必要があります。
1-1. Deep Instinctの管理コンソールへログイン
用意されたテナントへWebブラウザを使いアクセスします。


1-2. Protected Storage作成及びPolicy適用
画面左側の[Asset]から[Protected Storage]を選択し、
表示された画面の右上から[Create Protected Storage]をクリックします。
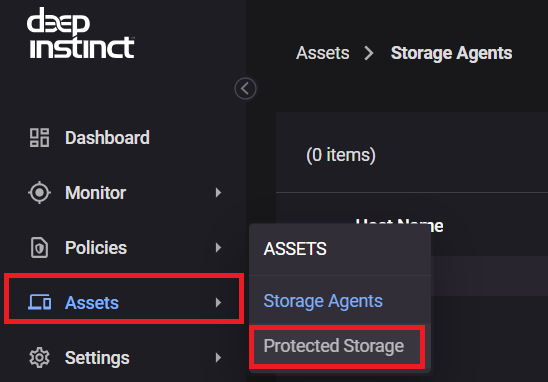

表示された画面で任意のProtected Storage名を入力、
VenderはNetAPP(VScan)を選択し、PolicyもDefaultのものを選択します。
個別にPolicy作成は実施しない手順例です。

1-3. Storage AgentのDownload
画面左側の[Setting]から[Deproyment]を選択します。

表示された画面の[Download Installation File]からStorage AgentのDownloadを実施します。

表示画面ではInstall時に必要なTokenが確認でき、作成したProtected Storageを選択すると画面下方にInstall時に利用するパラメータを確認する事ができます。

2. Storage AgentとのONTAP Antivirus ConnectorのInstall
用意したVirus Scanサーバに、Deep Instinct Prevention for StorageのStorage Agentと
ONTAP Antivirus ConnectorのInstallを実施します。
2-1. Deep Instinct Prevention for StorageのStorage Agent Install
Downloadしたexeファイルをクリックし、Installを実行します。
表示された画面では、管理コンソールからStorage AgentをDownloadする際に画面下方で確認できるFQDN、Token、IDを入力します。

Installが成功すると、管理コンソール上でConectivity StatusがOnlineとなっているStorage agentの表示が確認できるようになります。

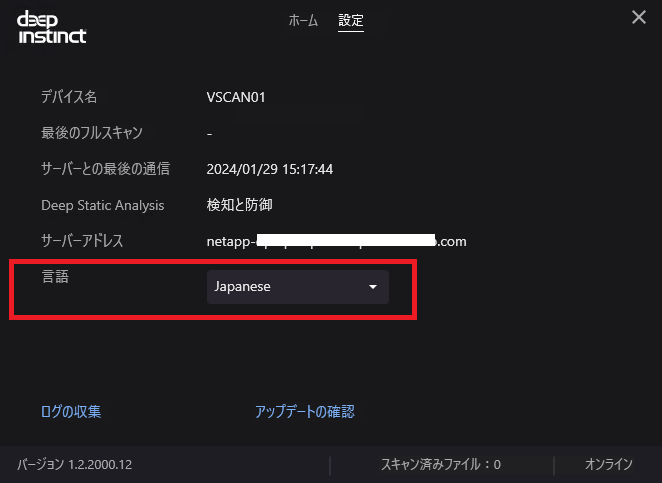
また、Windowsの画面右下のアイコンを右クリックして[コンソールの表示]を選択し、
表示された画面からコンソールを日本語表示に切り替える事もできます。

2-2. ONTAP Antivirus Connector (AVConnector)のInstall
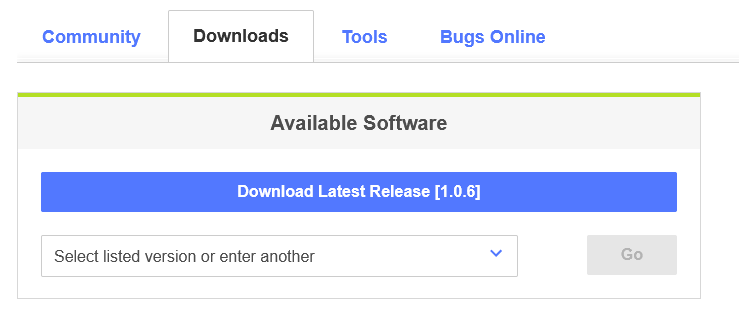
ONTAP Antivirus Connector(AVConnector)を取得する為、NetAppのサポートサイトにログインし、画面上方の[DOWNLOADS]=>[Downloads]を選択します。

表示された画面で、ONTAP Antivirus Connectorを選択します。

利用されているONTAPがサポートされているものを取得します。

次にStorage AgentをInstallしたサーバに対してONTAP Antivirus Connector(AVConnector)のInstallを実施します。
Install時に入力するアカウントはONTAPで設定する特権ユーザと同じにします。


AVConnectorでSVMの管理LIFのIPとvsadminという管理ユーザを登録する為、ONTAP上で対象SVMのvsadminを指定できるようにパスワード設定とアカウントのアンロックを実施します。
vsadminへのPassword設定やUnLockを未実施の環境でのみ必要となります。
> security login show -vserver dpinst_cifs

Vserver: dpinst_cifs
                                                                 Second
User/Group                 Authentication                 Acct   Authentication
Name           Application Method        Role Name        Locked Method
-------------- ----------- ------------- ---------------- ------ --------------
vsadmin        http        password      vsadmin          yes    none
vsadmin        ontapi      password      vsadmin          yes    none
vsadmin        ssh         password      vsadmin          yes    none
3 entries were displayed.

##Passwordの設定
> security login password  -vserver dpinst_cifs -username vsadmin

Enter a new password:
Enter it again:

##アカウントのUnlock
> security login unlock -vserver dpinst_cifs -username vsadmin

> security login show -vserver dpinst_cifs

Vserver: dpinst_cifs
                                                                 Second
User/Group                 Authentication                 Acct   Authentication
Name           Application Method        Role Name        Locked Method
-------------- ----------- ------------- ---------------- ------ --------------
vsadmin        http        password      vsadmin          no     none
vsadmin        ontapi      password      vsadmin          no     none
vsadmin        ssh         password      vsadmin          no     none
3 entries were displayed.
次にAVConnectorでSVMの管理LIFと管理アカウントの登録を実施します。
本記事で利用するSVMのNetwork構成は以下の通りです。
> network interface show -vserver dpinst_cifs
            Logical    Status     Network            Current       Current Is
Vserver     Interface  Admin/Oper Address/Mask       Node          Port    Home
----------- ---------- ---------- ------------------ ------------- ------- ----
dpinst_cifs
            data01       up/up    192.168.10.150/24  PS-8200cl-01  a0a     true
            mgmt         up/up    192.168.10.149/24  PS-8200cl-01  a0a     true
2 entries were displayed.

3. ONTAP側のVirus Scan設定の実施
次にONTAP側の設定を実施します。
3-1. Scanner Poolの作成
Virus ScanサーバをIPかFQDNで入力し、特権ユーザはAVConnectorのInstall時に指定したアカウントを利用します。
> vserver vscan scanner-pool create -vserver dpinst_cifs -scanner-pool pool01 -hostnames 192.168.10.151 -privileged-users ps-sc\vscanadmin
3-2. Scanner Policyの適用
Scanner Policyを適用する事で、Scanner Poolがアクティブ化されます。
> vserver vscan scanner-pool apply-policy -vserver dpinst_cifs -scanner-pool pool01 -scanner-policy primary

> vserver vscan scanner-pool show -vserver dpinst_cifs -scanner-pool pool01

                                    Vserver: dpinst_cifs
                               Scanner Pool: pool01
                             Applied Policy: primary
                             Current Status: on
         Cluster on Which Policy Is Applied: PS-8200cl
                  Scanner Pool Config Owner: vserver
       List of IPs of Allowed Vscan Servers: 192.168.10.151
List of Host Names of Allowed Vscan Servers: 192.168.10.151
                   List of Privileged Users: ps-sc\vscanadmin
scanner-policyは本記事のようなVscan Serversが1台構成のような場合はPrimaryを指定します。(切り替え先としての設定では無いので)
| scanner-policy | 説明 |
|---|---|
| Primary | scanner-poolをActive化する |
| Secondary | Primaryのscanner-poolに設定したVscan Serverが1つも接続されていない場合にのみActive化 |
| Idle | scanner-poolを非Activeにする |
3-3. On-Access Scanの設定
ClinentからCIFS経由でファイルのOpen, Read, Rename, Closeの度にVirus Checkを実⾏させるために、On-Access Scanの設定を行います。
コマンド例では、CIFSのファイルで最大5GBまでのファイルのScanを行い、PNGファイル(拡張子がpng)についてはVirus Checkの対象外という設定例となります。
> vserver vscan on-access-policy create -vserver dpinst_cifs -policy-name testpolicy01 -protocol CIFS -filters scan-ro-volume -max-file-size 5GB -file-ext-to-exclude "png"
Virus Scan処理をトリガーするSMB共有での処理の定義(vscan-fileop-profile)を確認します。
> cifs share show -vserver dpinst_cifs -share-name cifs01 -fields vscan-fileop-profile
vserver     share-name vscan-fileop-profile
----------- ---------- --------------------
dpinst_cifs cifs01     standard
| Profile | 説明 |
|---|---|
| no-scan | なし |
| Standard | open, close, rename |
| Strict | open, read, close, rename |
| Write only | close(修正ファイルのみ) |
作成したOn-Access ScanのPolicyを有効化します。
デフォルトでdefault_CIFSというPolicyが有効化されているので、デフォルトのものを無効化して作成したPolicyを有効化します。
> vserver vscan on-access-policy disable -vserver dpinst_cifs -policy-name default_CIFS

> vserver vscan on-access-policy enable  -vserver dpinst_cifs -policy-name testpolicy01
3-4. On-Demand Scanの設定
Virus Scan処理をスケジュールに基づいて実行できるようにOn-Demand Scanの設定を実施します。
> > vserver vscan on-demand-task create -vserver dpinst_cifs -task-name test-tesk01 -scan-paths "/cifs01" -report-directory "/report" -schedule daily -max-file-size 5GB -file-ext-to-exclude "png"


> vserver vscan on-demand-task show -vserver dpinst_cifs -task-name test-tesk01

                           Vserver: dpinst_cifs
                         Task Name: test-tesk01
                List of Scan Paths: /cifs01
             Report Directory Path: /report
                      Job Schedule: daily
Max File Size Allowed for Scanning: 5GB
            File Paths Not to Scan: -
       File Extensions Not to Scan: png
           File Extensions to Scan: *
      Scan Files with No Extension: true
           Request Service Timeout: 5m
                    Cross Junction: true
               Directory Recursion: true
                     Scan Priority: low
                  Report Log Level: info
        Expiration Time for Report: 0s
3-5. SVMへのVirus Scanの有効化
> vserver vscan enable -vserver dpinst_cifs
4. クライアントからファイルアクセス時の挙動確認
WindowsクライアントからVirus Scan対象のCIFS共有へファイル作成を行います。

Virus Scanサーバのコンソール画面でScanが動作する事を確認します。

Cloud上の管理コンソールでも確認する事ができます。

参考1:ファイルサイズによるVirus Scanサーバの負荷確認
クラウド上で定義されているPolicyでは、Defaultで200MBまでのファイルまでScanを行う設定となっているので、100M~1KBのファイルサイズをコピーした時のVirusScanサーバにおけるCPU利用率を比較してみた所、1MB以上ではファイルサイズの大きい方が高負荷になる傾向が確認できました。
100MB x 10

10MB x 100

1MB x 1000

100KB x 10000

10KB x 100000

1KB x 1000000

参考2:ファイルサイズによるCopy時間の比較
以下は、ONTAP側でqos statistics volume performance showコマンドを利用し、アクセス対象のVolumeでIOPSが発生している時間を測定した結果となります。
| 対象ファイル | VirusScan無効時のCopy時間 | VirusScan有効時のCopy時間 |
|---|---|---|
| 100MB x10 | 5秒 | 6秒 |
| 10MB x100 | 6秒 | 7秒 |
| 1MB x1000 | 14秒 | 20秒 |
| 100KB x10000 | 80秒 | 112秒 |
参考及びリンク
What are the supported Vscan (Antivirus) vendors for ONTAP?
ONTAPのSecurity機能
About NetApp virus scanning
Deep Instict