はじめに
SnapMirrorは、NetApp社の提供するStorageであるONTAPのデータ保護技術の一部で、データのレプリケーション機能になります。SnapMirrorを使用すると、データセンター、リモートオフィス、およびラウド環境間でデータを効率的に移動および管理できます。
特にセキュリティの基礎対応としてBackupの取得については、Backupは3個以上、2種媒体以上、1個は遠い場所(3-2-1 ルール)というものがありますがSnapMirrorを利用することで、殆ど同じ設定操作で環境を構築することが可能となります。
本記事では、オンプレミス環境でSnapMirrorによるReplicationを実施する手順について記載します。
なお、SnapMirror利用時のベストプラクティスはSnapMirror configuration and best practices guide for ONTAP 9を参照下さい。

何をしたい?できる?
- ONTAPのCluster間でSnapMirror関係の構築
- Volume間におけるSnapMirrorの設定を行う
SnapMirrorの設定の流れ
本記事では、ONTAPの初期構築が実施済でNAS用のSVMがMirror元に構築している状態を前提にしています。
記事における環境情報
本記事では、以下の環境で実施した内容となります。
- Windows Server 2019
- ONTAP : 9.13.1
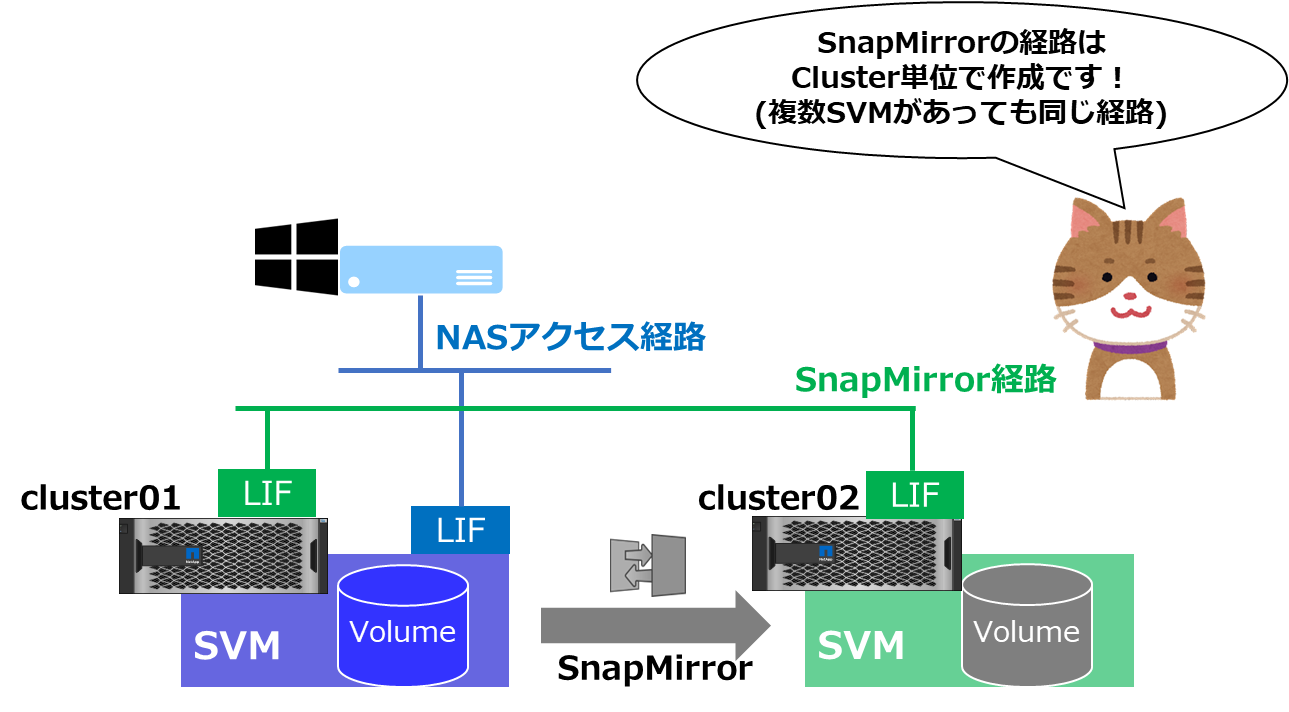
環境のイメージとしては以下の通り
Source(本番) Cluster01側 => Destination(DR) Cluster02側という方向で転送します。

実施手順
1. Interclustetr LIF作成
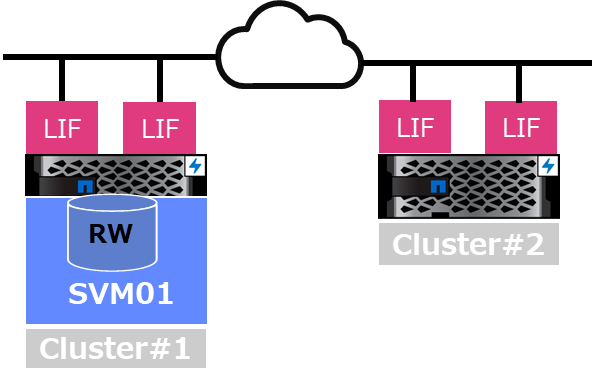
SnapMirror用の通信経路の設定しますが、Node毎に1つずつ必要になります。
本記事の環境例だとCluster1とCluster2のそれぞれ2Node構成になるので、4つのIPを付与する形になります。 (cluster1に2つ/cluster2に2つ)。

データ転送はVolumeを構成するAggregateを管理するNodeのLIFから実施されます。
# Cluster#2側の設定例
> network interface create -vserver cluster2 -lif int10 -service-policy default-intercluster -address 192.168.0.240 -netmask 255.255.255.0 -home-node cluster2-01 -home-port e0e

> network interface create -vserver cluster2 -lif int20 -service-policy default-intercluster -address 192.168.0.241 -netmask 255.255.255.0 -home-node cluster2-02 -home-port e0e


> network interface show -service-policy default-intercluster
            Logical    Status     Network            Current       Current Is
Vserver     Interface  Admin/Oper Address/Mask       Node          Port    Home
----------- ---------- ---------- ------------------ ------------- ------- ----
cluster2
            int10        up/up    192.168.0.240/24   cluster2-01   e0e     true
            int20        up/up    192.168.0.241/24   cluster2-02   e0e     true
2 entries were displayed.
2. Cluster Peer関係の構築
各ClusterにloginしてPeer関係の構築を実施します。
CLI実行後にパスフレーズを入力しますが、クラスタ間で合わせる形になります。

既にCluster peer作成済の場合は、本手順は割愛して下さい。
# Cluster#1から実施(Cluster#2のIntercluserLIFのIPを指定)
> cluster peer create -address-family ipv4 -peer-addrs 192.168.0.240,192.168.0.241 -applications snapmirror

Notice: Use a generated passphrase or choose a passphrase of 8 or more characters. To ensure the authenticity of the peering
        relationship, use a phrase or sequence of characters that would be hard to guess.

Enter the passphrase:
Confirm the passphrase:

Notice: Now use the same passphrase in the "cluster peer create" command in the other cluster.


# Cluster#2から実施(Cluster#1のIntercluserLIFのIPを指定)
> cluster peer create -address-family ipv4 -peer-addrs 192.168.0.121,192.168.0.122 -applications snapmirror

Notice: Use a generated passphrase or choose a passphrase of 8 or more characters. To ensure the authenticity of the peering
        relationship, use a phrase or sequence of characters that would be hard to guess.

Enter the passphrase:
Confirm the passphrase:


> cluster peer show
Peer Cluster Name         Cluster Serial Number Availability   Authentication
------------------------- --------------------- -------------- --------------
cluster1                  1-80-000011           Available      ok
3. Destination(DR)側のVolumeをホストするSVMの作成
Mirror先となる、Destination Volumeを所有する為のSVM作成を実施します。

# Cluster#2側で実施
> vserver create -vserver svm02 -subtype default -rootvolume svm02_root -aggregate aggr01_node1
[Job 157] Job succeeded:
Vserver creation completed.
4. SVMのPeer関係を作成
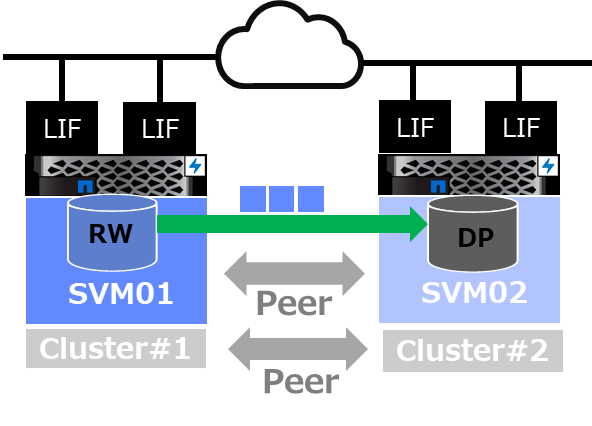
作成したDestination(DR)側SVMとPeer関係を構築します。
また、SVM Peer Createを実施してない方で、acceptコマンドを実行が必要になります。

# Cluster#1側で実施
> vserver peer create -vserver svm01 -peer-vserver svm02 -applications snapmirror -peer-cluster cluster2


# Cluster#2側で実施
> vserver peer accept -vserver svm02 -peer-vserver svm01

> vserver peer show
            Peer        Peer                           Peering        Remote
Vserver     Vserver     State        Peer Cluster      Applications   Vserver
----------- ----------- ------------ ----------------- -------------- ---------
svm02       svm01       peered       cluster1          snapmirror     svm01
5. SnapMirrrorのDestination(DR)側のVolume作成
Destination(DR)側のSVMにData Protecction用のVolumeを作成します。(TypeがDP)

# Cluster#2側で実施
> volume create -vserver svm02 -volume vol100_dr -state online -type DP -space-guarantee none -size 10g -aggregate aggr01_node1


> volume show -vserver svm02
Vserver   Volume       Aggregate    State      Type       Size  Available Used%
--------- ------------ ------------ ---------- ---- ---------- ---------- -----
svm02     svm02_root   aggr01_node1 online     RW         20MB    18.64MB    1%
svm02     vol100_dr    aggr01_node1 online     DP         10GB    10.00GB    0%
2 entries were displayed.
6. SnapMirror関係の作成
Destination(DR)側のClusterからMirror元とMirror先の関係性を構築します。
関係性の構築においてはSVMとVolumeを含めて指定が必要になります。

指定するPolicyは本記事では、ユーザが作成したSnapshotとSnapMirror用のsnapshotの両方が転送されるMirrorAllSnapshotsを指定しています。
| Policy名 | 説明 | 転送されるSnapshot |
|---|---|---|
| MirrorLatest | 容量効率に優れたバックアップ | SnapMirrorの最新Snapshot |
| MirrorAllSnapshots | 旧DP形式と同等なバックアップ | SnapMirror+ユーザ用Snapshot |
# Cluster#2側で実施
> snapmirror create -source-path svm01:vol100 -destination-path svm02:vol100_dr -policy MirrorAllSnapshots


> snapmirror show -vserver svm02
                                                                       Progress
Source            Destination Mirror  Relationship   Total             Last
Path        Type  Path        State   Status         Progress  Healthy Updated
----------- ---- ------------ ------- -------------- --------- ------- --------
svm01:vol100
            XDP  svm02:vol100_dr
                              Uninitialized
                                      Idle           -         true    -
7. SnapMirrorの初期転送
Destination(DR)側のClusterから操作を実行します。
転送時間はVolumeに格納されたデータ量で変わってきますが、状態がSnapmirroredになれば初期転送完了となります。

# Cluster#2側で実施
> snapmirror initialize -destination-path svm02:vol100_dr

> snapmirror show -vserver svm02
                                                                       Progress
Source            Destination Mirror  Relationship   Total             Last
Path        Type  Path        State   Status         Progress  Healthy Updated
----------- ---- ------------ ------- -------------- --------- ------- --------
svm01:vol100
            XDP  svm02:vol100_dr
                              Snapmirrored
                                      Idle           -         true    -

> snapmirror show -vserver svm02 -fields total-transfer-bytes
source-path  destination-path total-transfer-bytes
------------ ---------------- --------------------
svm01:vol100 svm02:vol100_dr  1112992929


# Destination(DR)側のVolumeにSnapMirror用以外のSnsphotが転送されている事を確認
> snapshot show -vserver svm02 -volume vol100_dr
                                                                 ---Blocks---
Vserver  Volume   Snapshot                                  Size Total% Used%
-------- -------- ------------------------------------- -------- ------ -----
svm02    vol100_dr
                  daily.2023-12-28_0010                    192KB     0%    0%
                  hourly.2023-12-28_0605                   184KB     0%    0%
                  hourly.2023-12-28_0705                   184KB     0%    0%
                  hourly.2023-12-28_0805                   184KB     0%    0%
                  hourly.2023-12-28_0905                   184KB     0%    0%
                  hourly.2023-12-28_1005                   184KB     0%    0%
                  hourly.2023-12-28_1105                   184KB     0%    0%
                  snapmirror.7bbd98b0-a546-11ee-ae86-0050568196fb_2154890293.2023-12-28_112643
                                                           136KB     0%    0%
8 entries were displayed.
8. 差分転送のスケジュールを指定
Clusterで作成済のスケジュールを利用して差分転送の実行時間を指定します。
(job schedule showの内容を利用)

# Cluster#2側で実施
> job schedule show
Cluster Vserver  Name        Type      Description
------- -------- ----------- --------- ---------------------------------------
cluster2
        cluster2
                 10min       cron      @:00,:10,:20,:30,:40,:50
                 12-hourly   cron      @0:15,12:15
                 5min        cron      @:00,:05,:10,:15,:20,:25,:30,:35,:40,:45,:50,:55
                 6-hourly    cron      @0:15,6:15,12:15,18:15
                 8hour       cron      @2:15,10:15,18:15
                 Application Templates ASUP Dump interval Every 1d
                 Auto Balance Aggregate Scheduler interval Every 1h
                 Balanced Placement Model Cache Update interval Every 7m30s
                 daily       cron      @0:10
                 hourly      cron      @:05
                 monthly     cron      1@0:20
(中略)


> snapmirror modify -destination-path svm02:vol100_dr -schedule daily


> snapmirror show -destination-path svm02:vol100_dr -fields schedule
source-path  destination-path schedule
------------ ---------------- --------
svm01:vol100 svm02:vol100_dr  daily
参考及びリンク
SnapMirror configuration and best practices guide for ONTAP 9
