はじめに
CentOS7にSambaをインストールして、Windows PCから接続、共有フォルダを作ることを目的とします。
Sambaとは
- Windowsでのファイル共有などを実現するOSSのこと
- SMB/CIFSプロトコルを扱う
- ファイルサーバ機能、プリントサーバ機能、WINSサーバ機能、ドメインコントローラ、ADメンバーサーバなどが提供できる
Sambaのインストール
# yum install -y samba samba-common
# yum list installed samba*
Loaded plugins: fastestmirror
Loading mirror speeds from cached hostfile
 * base: ftp.iij.ad.jp
 * extras: ftp.iij.ad.jp
 * updates: mirror.pregi.net
Installed Packages
samba.x86_64                                                                                4.9.1-6.el7                                                                    @base
samba-client-libs.x86_64                                                                    4.9.1-6.el7                                                                    @base
samba-common.noarch                                                                         4.9.1-6.el7                                                                    @base
samba-common-libs.x86_64                                                                    4.9.1-6.el7                                                                    @base
samba-common-tools.x86_64                                                                   4.9.1-6.el7                                                                    @base
samba-libs.x86_64
主要なデーモンはsmbdとnmbd
| デーモン | 提供機能 |
|---|---|
| smbd | ファイルやプリンタの共有、認証など |
| nmbd | ブラウズ機能、NetBIOS名前解決、WINSサーバなど |
| winbindd | Winbind機能 |
利用するポート
| ポート番号 | 説明 |
|---|---|
| 137/udp | NetBIOS名前解決やブラウジング |
| 138/udp | NetBIOS名前解決やドメインログオン |
| 139/tcp | ファイル共有(下記の場合以外) |
| 445/tcp | ファイル共有(Windows2000以降でMicrosoft Direct Hosting SMBを利用している場合) |
Sambaの設定
/etc/samba/smb.confを以下の通り編集する
(プリンタ関連の項目はコメントアウトしています)
smb.conf
# 全体の設定
# globalセクションを変更した場合、Sambaの再起動が必要
[global]
	workgroup = SAMBA
	security = user
	server role = AUTO
	server string = SAMBA SERVER Version %v
	netbios name = testsamba
	passdb backend = tdbsam
	dos charset = CP932
	wins support = yes
#	printing = cups
#	printcap name = cups
	load printers = no
	disable spoolss = yes
#	cups options = raw

# 共有定義
# globalセクションの設定を上書きする
[homes] # ユーザの各ホームディレクトリの共有設定
        comment = Home Directories
        valid users = %S, %D%w%S
        browseable = No
        read only = No
        inherit acls = Yes

[share]
	comment = Share Folder for All Users
	path = /home/share/
	browseable = yes
	read only = no

# [printers] #共有プリンタに関する設定
#	comment = All Printers
#	path = /var/tmp
#	printable = Yes
#	create mask = 0600
#	browseable = No

# [print$] # $をつけると隠し共有となる(browseable=No とするのと同じ)
#	comment = Printer Drivers
#	path = /var/lib/samba/drivers
#	write list = @printadmin root
#	force group = @printadmin
#	create mask = 0664
#	directory mask = 0775
主な項目の説明は以下の通り
| 項目 | 説明 |
|---|---|
| workgroup | Sambaサーバが所属するワークグループ名、ドメイン名 |
| security | 認証方式の指定(標準設定はuserで共有ディレクトリへアクセスする際にユーザー名とパスワードを使う) |
| server role | 動作モード(デフォルトはAUTOでsecurityパラメータに従う) |
| server string | ネットワークコンピュータ一に表示される情報 |
| netbios name | ファイルサーバー名の設定 |
| passdb backend | Sambaのパスワードデータベースの形式 |
| dos charset | Windows側の文字コード設定 |
| wins support | WINSサーバとして使う場合Yesとする |
| valid users | アクセス可能なユーザを指定(%Sはアクセスしてきたユーザ名に置き換わる変数) |
| browseable | ブラウジングした時に表示されるかどうか(直接共有名を指定すればアクセスは可能) |
| writable/read only | 書き込みを許可するかどうかの設定 |
| path | 共有ディレクトリのパスを指定 |
設定ファイルの構文チェック
# testparm -s
rlimit_max: increasing rlimit_max (1024) to minimum Windows limit (16384)
Registered MSG_REQ_POOL_USAGE
Registered MSG_REQ_DMALLOC_MARK and LOG_CHANGED
Load smb config files from /etc/samba/smb.conf
rlimit_max: increasing rlimit_max (1024) to minimum Windows limit (16384)
Processing section "[homes]"
Processing section "[smbdir]"
Loaded services file OK.
Server role: ROLE_STANDALONE

# Global parameters
[global]
	disable spoolss = Yes
(以下、省略)
Sambaユーザの作成
security = userと設定した場合、Linuxユーザとは別に、Samba利用者用のアカウントの作成、Linuxユーザとの対応づけが必要となる。
Sambaユーザ情報の保存先はpassdb backendで指定する。
pdbeditコマンドでSambaユーザの管理ができる。
Linuxユーザの作成
# useradd smbuser
# passwd smbuser

作成したLinuxユーザをSambaユーザに追加、その後確認
# pdbedit -a -u smbuser -f "Samba test user"
new password:
retype new password:
Unix username:        smbuser
NT username:
Account Flags:        [U          ]
User SID:             S-1-5-21-3272614810-3792975194-1072556796-1000
Primary Group SID:    S-1-5-21-3272614810-3792975194-1072556796-513
Full Name:            Samba test user
Home Directory:       \\testsamba\smbuser
HomeDir Drive:
Logon Script:
Profile Path:         \\testsamba\smbuser\profile
Domain:               TESTSAMBA
Account desc:
Workstations:
Munged dial:
Logon time:           0
Logoff time:          Wed, 06 Feb 2036 15:06:39 UTC
Kickoff time:         Wed, 06 Feb 2036 15:06:39 UTC
Password last set:    Sat, 26 Oct 2019 11:01:36 UTC
Password can change:  Sat, 26 Oct 2019 11:01:36 UTC
Password must change: never
Last bad password   : 0
Bad password count  : 0
Logon hours         : FFFFFFFFFFFFFFFFFFFFFFFFFFFFFFFFFFFFFFFFFF

[root@comsec-cent01 samba]# pdbedit -L
smbuser:1001:Samba test user
共有フォルダの用意
# mkdir /home/share
# chmod 0777 /home/share/
# chown nobody:nobody /home/share/
# ll /home/
total 0
drwxrwxrwx 2 nobody   nobody    32 Oct 27 03:54 share
drwx------ 2 smbuser  smbuser   90 Oct 27 03:41 smbuser
Windowsからの共有フォルダ接続
接続するWindowsクライアント側でhostsファイルを修正する。
Windows10の場合は、C:\Windows\System32\drivers\etc\hosts にある。
以下のようにhostsに行追加する。この場合は接続先をsmbdirという名前にしている。
x.x.x.x(sambaサーバのIPアドレス) smbdir
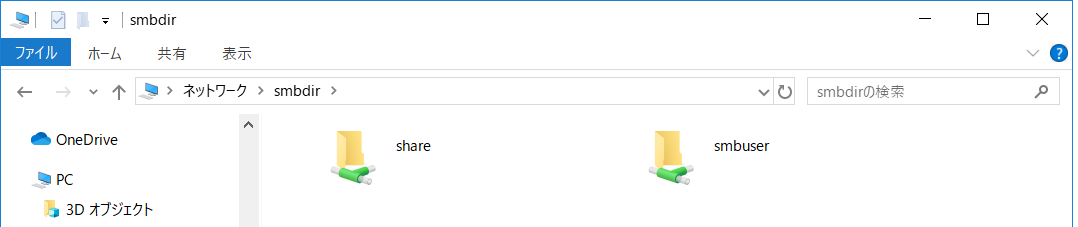
Windowsのエクスプローラーで\\設定した接続先でアクセスする。

ユーザ名、パスワードを求められるのでpdbeditコマンドで登録したユーザの情報を入力すると、
以下の通り、[share]セクションで定義したフォルダと、[homes]セクションで定義したユーザのホームディレクトリ(この場合はsmbuserでログインしたので,smbuserフォルダ)が確認できる。
Windows側で各フォルダ内にファイルを作成してみると、sambaサーバ側でも以下の通り、ファイルが作成されているのがわかる。
# ll /home/share/
total 0
-rwxr--r-- 1 smbuser smbuser 0 Oct 27 03:54 test_share_win.txt

# ll /home/smbuser/
total 0
-rwxr--r-- 1 smbuser smbuser 0 Oct 27 03:41 test_win_1027_01.txt