はじめに
X-Rayを実際に使ったことがなく、資格取得程度の知識しかないので触ってみました。
ちょうど職場で、Java(SpringBoot)を使ったLambdaを構築していて、何故か遅い部分を調査する際に使えないかな?と思ったのがきっかけです。
早速、やってみる。
準備(テストソース)
pythonでAPIから住所を取得し、DynamoDBへの保存および、SNSトピックへ通知を行うソースを準備しました。
import os
import json
import boto3
import urllib.request
from datetime import datetime

# AWS クライアントの初期化
dynamodb = boto3.resource('dynamodb')
sns = boto3.client('sns')

# 環境変数から設定を読み込み
TABLE_NAME = os.environ['TABLE_NAME']
SNS_TOPIC_ARN = os.environ['SNS_TOPIC_ARN']
TARGET_URL = "https://zipcloud.ibsnet.co.jp/api/search?zipcode=7830060"

class ApiClient:
    def __init__(self, target_url):
        self.target_url = target_url

    def fetch_data(self):
        """APIからデータを取得する"""
        try:
            with urllib.request.urlopen(self.target_url) as response:
                response_data = response.read()
                return json.loads(response_data.decode('utf-8'))
        except urllib.error.URLError as e:
            raise Exception(f"API通信エラー: {str(e)}")
        except json.JSONDecodeError as e:
            raise Exception(f"JSONパースエラー: {str(e)}")
        except Exception as e:
            raise Exception(f"予期せぬエラー: {str(e)}")

class MonitoringService:
    def __init__(self, target_url, table_name, sns_topic_arn):
        self.api_client = ApiClient(target_url)
        self.table = dynamodb.Table(table_name)
        self.sns_topic_arn = sns_topic_arn

    def check_service(self):
        try:
            # APIクライアントを使用してデータを取得
            response_body = self.api_client.fetch_data()

            # 結果の保存
            self.save_result(response_body)

            # 結果の通知
            self.notify_status(response_body)

            return {
                'statusCode': 200,
                'body': json.dumps({
                    'message': 'Monitoring completed successfully',
                    'response_body': response_body
                }, ensure_ascii=False)
            }

        except Exception as e:
            raise e

    def save_result(self, response_body):
        # DynamoDBへの保存
        item = {
            'timestamp': str(datetime.now()),
            'response_body': json.dumps(response_body, ensure_ascii=False)
        }
        self.table.put_item(Item=item)

    def notify_status(self, response_body):
        # SNS通知の送信
        message = f"""
        API実行結果
        URL: {self.api_client.target_url}
        時刻: {datetime.now()}

        レスポンスボディ:
        {json.dumps(response_body, ensure_ascii=False, indent=2)}
        """

        sns.publish(
            TopicArn=self.sns_topic_arn,
            Message=message,
            Subject='API実行結果'
        )

def lambda_handler(event, context):
    service = MonitoringService(TARGET_URL, TABLE_NAME, SNS_TOPIC_ARN)
    return service.check_service()
X-Ray SDK未使用状態
X-Rayの提供する機能を十分に利用するには、X-Ray SDKを使ったコーディングが必要なのですが、まずはX-Ray SDKを使わず、Lambdaサービストレースのみを有効にした状態で動作確認してみました。

この状態だと、処理の全体所用時間や、コールドスタート時の起動処理である、initや、 ランタイムの終了処理に時間である、Overheadのみが個別に確認できます。


これだけだと、ログ見ればわかる内容ばかりなので、あまり有意義ではないかもですね。
REPORT RequestId: 49cc409d-4804-49b0-ae33-0432c31fcebb Duration: 2455.47 ms Billed Duration: 2456 ms Memory Size: 128 MB Max Memory Used: 84 MB Init Duration: 585.63 ms
XRAY TraceId: 1-679144e0-54e8508c6233db233193cfc2 SegmentId: 5a0bc1d1f3ba4822 Sampled: true
X-Ray SDK使用(セグメント未使用)
次にX-Ray SDKを使ってみます。
patch_all()だけ対応してみました。
from aws_xray_sdk.core import xray_recorder
from aws_xray_sdk.core import patch_all

# X-Ray SDKの初期化
patch_all()
patch_all()は、 X-Ray SDK for Pythonが対応したライブラリにパッチを適用し、サブセグメントとして情報を提供してくれる機能です。
この状態だと、boto3ライブラリがDynamoDBやSNSといった項目で詳細情報を提供してくれるようになりました。
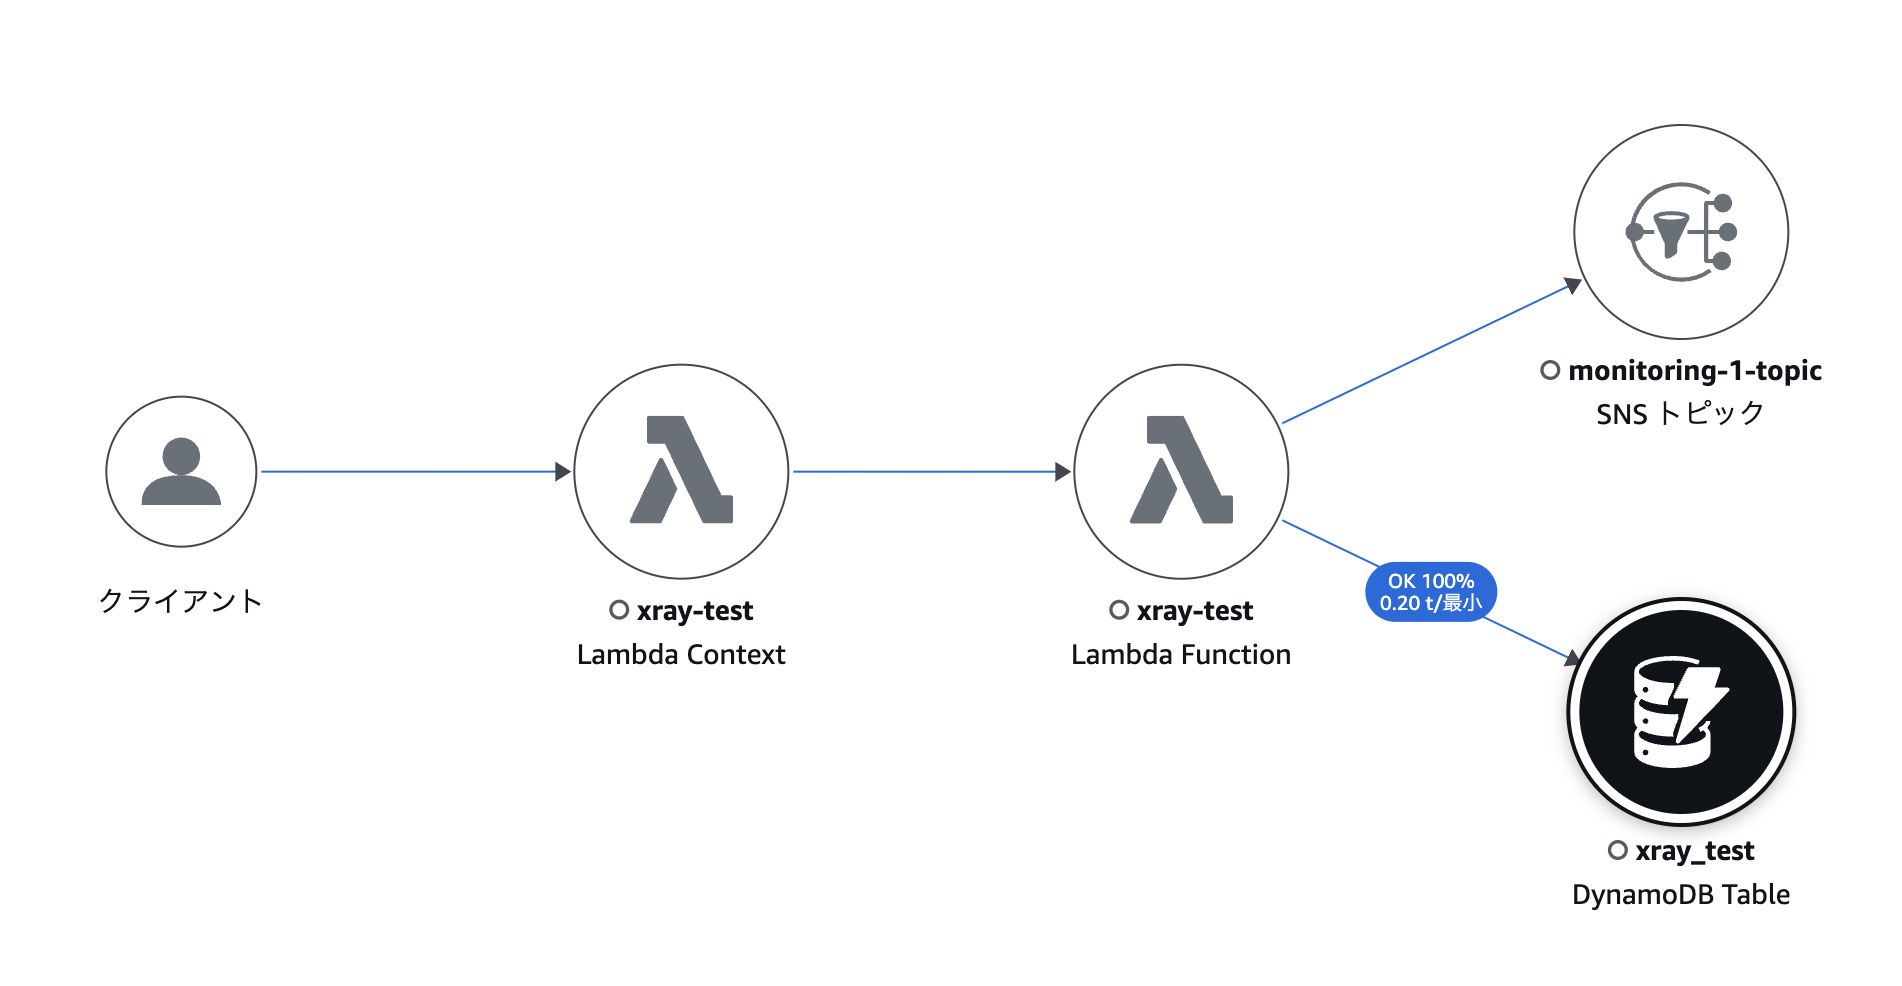

DynamoDBの場合、対象テーブルや、テーブルに対してどんな操作をしたかなどもわかります。

X-Ray SDK使用(セグメント使用)
最後に、自前でセグメント、サブセグメントを使ったバージョンです。
メソッド単位や、自身で個別に測定したい範囲で性能を観測することができます。
諸々組み込んだソースは以下です。
import os
import json
import boto3
import urllib.request
from aws_xray_sdk.core import xray_recorder
from aws_xray_sdk.core import patch_all
from datetime import datetime

# X-Ray SDKの初期化
patch_all()

# AWS クライアントの初期化
dynamodb = boto3.resource('dynamodb')
sns = boto3.client('sns')

# 環境変数から設定を読み込み
TABLE_NAME = os.environ['TABLE_NAME']
SNS_TOPIC_ARN = os.environ['SNS_TOPIC_ARN']
TARGET_URL = "https://zipcloud.ibsnet.co.jp/api/search?zipcode=7830060"

class ApiClient:
    def __init__(self, target_url):
        self.target_url = target_url

    @xray_recorder.capture('api_request')
    def fetch_data(self):
        """APIからデータを取得する"""
        try:
            with urllib.request.urlopen(self.target_url) as response:
                response_data = response.read()
                return json.loads(response_data.decode('utf-8'))
        except urllib.error.URLError as e:
            raise Exception(f"API通信エラー: {str(e)}")
        except json.JSONDecodeError as e:
            raise Exception(f"JSONパースエラー: {str(e)}")
        except Exception as e:
            raise Exception(f"予期せぬエラー: {str(e)}")

class MonitoringService:
    def __init__(self, target_url, table_name, sns_topic_arn):
        subsegment = xray_recorder.begin_subsegment('MonitoringService Init')
        self.api_client = ApiClient(target_url)
        self.table = dynamodb.Table(table_name)
        self.sns_topic_arn = sns_topic_arn
        xray_recorder.end_subsegment()

    @xray_recorder.capture('check_service')
    def check_service(self):
        try:
            # APIクライアントを使用してデータを取得
            response_body = self.api_client.fetch_data()

            # 結果の保存
            self.save_result(response_body)

            # 結果の通知
            self.notify_status(response_body)

            return {
                'statusCode': 200,
                'body': json.dumps({
                    'message': 'Monitoring completed successfully',
                    'response_body': response_body
                }, ensure_ascii=False)
            }

        except Exception as e:
            raise e

    @xray_recorder.capture('save_to_dynamodb')
    def save_result(self, response_body):
        # DynamoDBへの保存
        item = {
            'timestamp': str(datetime.now()),
            'response_body': json.dumps(response_body, ensure_ascii=False)
        }
        self.table.put_item(Item=item)

    @xray_recorder.capture('send_sns')
    def notify_status(self, response_body):
        # SNS通知の送信
        message = f"""
        API実行結果
        URL: {self.api_client.target_url}
        時刻: {datetime.now()}

        レスポンスボディ:
        {json.dumps(response_body, ensure_ascii=False, indent=2)}
        """

        sns.publish(
            TopicArn=self.sns_topic_arn,
            Message=message,
            Subject='API実行結果'
        )

def lambda_handler(event, context):
    service = MonitoringService(TARGET_URL, TABLE_NAME, SNS_TOPIC_ARN)
    return service.check_service()
この状態で、X-Rayトレースを見てみると、SNS・DynamoDBに加え、各メソッドごとに指定したセグメント、特定処理部分のセブセグメントまでしっかりとトレースできています!

余談
Python版のX-Ray SDKaws_xray_sdk.coreですが、boto3みたいに標準搭載ではないので、layerでの対応が必要でしたので、下記Powertools for AWS Lambdaのlayerを使っています。
arn:aws:lambda:ap-northeast-1:017000801446:layer:AWSLambdaPowertoolsPythonV3-python38-x86_64:5
最後に
やっと実装のイメージを掴むことができました!
今までどこが遅いのんだろ?って調べる時はデバッグ用のコードを仕込んでいましたが、X-Rayを使った方法でも良いかもですね。