はじめに
こんにちは!
Spring Boot 2とAngularを用いて、アプリを作っていこうと思います。
本ハンズオンの趣旨は、アプリ作りを通していろんな技術やツールに触れてみることです。
ですので、それぞれの技術やツールについて深掘りした説明はありません。
気になるところは各自で勉強してくださいね!
日々の勉強は大事だぞ!!(最近の自分に目を背けながら)
このハンズオンで触れた技術について学ぶためのおすすめ書籍やサイトなどは、随時紹介させて頂きます。
事前準備
ハンズオンを進める上で、次の事前準備が必要です。
・Java 8のインストール
・Gitのインストール
また、必須ではないですが、以下のIDEがインストールされていると望ましいです。
・IntelliJ IDEA
IntelliJ IDEAについて
IntelliJ IDEAはEclipseと同じ統合開発環境(IDE)です。
昨今のJava開発においては、IDEの利用は必須だと思います。
Eclipseは有名なIDEですが、僕の好みはIntelliJ IDEAで、最近の開発ではもっぱらこちらを使っています。
プロジェクトに導入する場合は、次の書籍から入門すればいいかと思います。
IntelliJ IDEAハンズオン ――基本操作からプロジェクト管理までマスター
大まかな流れ
ハンズオンは計2回に分けて行います。
第1回が本内容で、サーバーサイド側のWeb API実装を行います。
第2回はフロントエンド側です。1
今回のハンズオンでは、次の流れでアプリを作成していきます。
- アプリの概要説明
- Spring Bootプロジェクトの作成
- Gradleのマルチプロジェクト化
- ドメインモデルの実装
- Web APIの実装
- Swagger UIの導入
- エラーハンドリングとバリデーションの実装
- Actuatorの紹介
- Githubを用いたOAuth2セキュリティ認証
- FlywayとH2DBを用いたデータベース構築
- DBeaverの紹介
- MyBatis GeneratorによるDAOの自動生成
- MyBatisを用いたデータベースアクセス
なお、出来上がりのソースコードはGitHubにあります。
では、張り切っていきましょう!
アプリの概要説明
今回作成するアプリは、武器鍛治職人のための便利アプリです。
名前を武器鍛治ツールとします。
「あ、はい」と反応した方、フレンズになりましょう!
武器鍛治職人は、ドラクエXで武器を作るキャラクターのことです。2
素材となるアイテムを使って、武器を作ります。
例えば、「せいどうのつるぎ」を作るには、「どうのこうせき」が3つ、「てっこうせき」が1つ必要となります。
職人には、職人ギルド依頼という日替わりクエストがあります。
ギルドのギルドマスターに依頼の武器を作って収めると、ゴールドと職人経験値がもらえます。
このクエストをこなす際、「武器を作るのにどの素材が必要か」をメモするのが大変なんですね。
そこで、それをサポートする便利アプリを作ろうと思います。
本アプリに対する要件
本アプリに対する要件は次のとおりです。
『職人ギルド依頼を効率よくこなすことが出来るため、次の機能がシステム(アプリ)に用意されていること。』
- 依頼された武器作成に必要な素材がみれること
- 武器に必要な素材の内容(レシピ)を登録・編集・削除できること
- レシピの編集は、許可されたユーザのみが実施できること
このように、システムに対する要望をまとめたものが要件定義と呼ばれるものです。
なお、要件定義の一つ上に、要求定義というものがあります。
要件定義は、システムに対して要望する機能を纏めたものですが、要求定義はシステムを使うことで、実現したい内容(要求)です。例えば、
『武器鍛治職人レベルをカンストしたい。そのために、武器鍛治ツールを使ってレベル上げをサポートする。』
であれば、このアプリである程度の要望を満たすことが出来るでしょう。
一方で、
『武器鍛治でお金儲けしたい。』
であれば、今のドラクエXの状況を考えると、武器鍛治以外で頑張った方がいいかもしれません。3
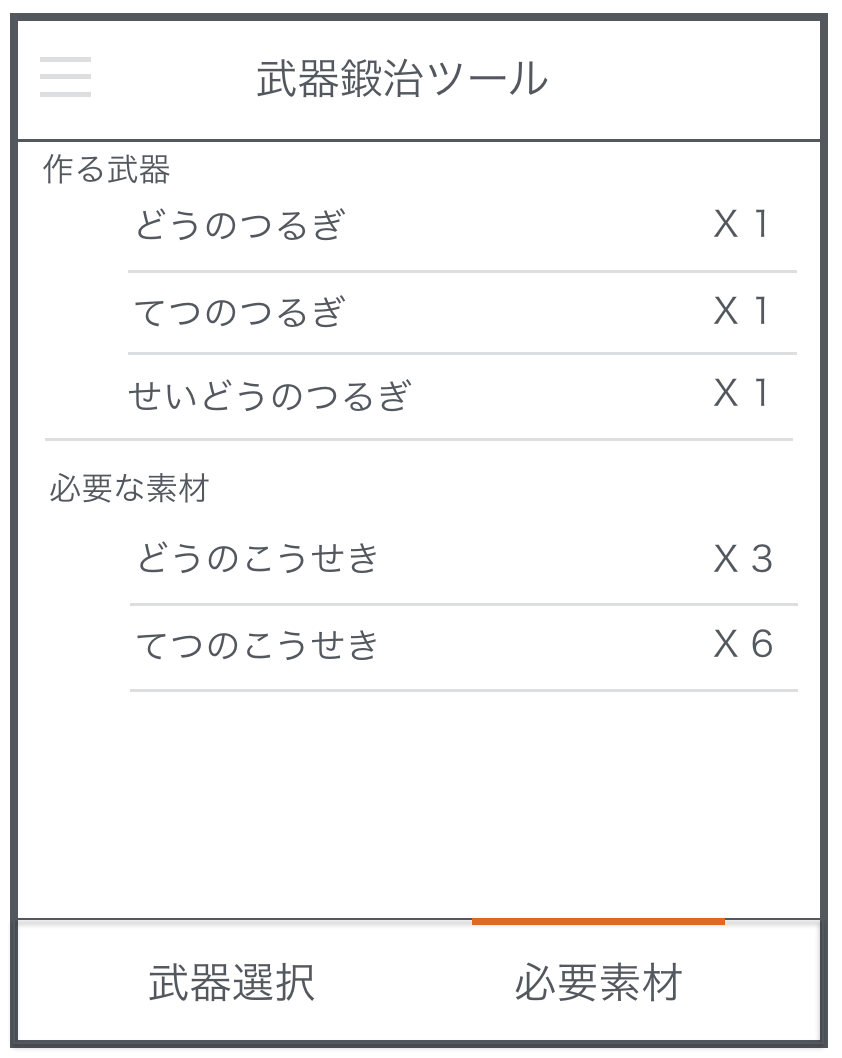
画面イメージ
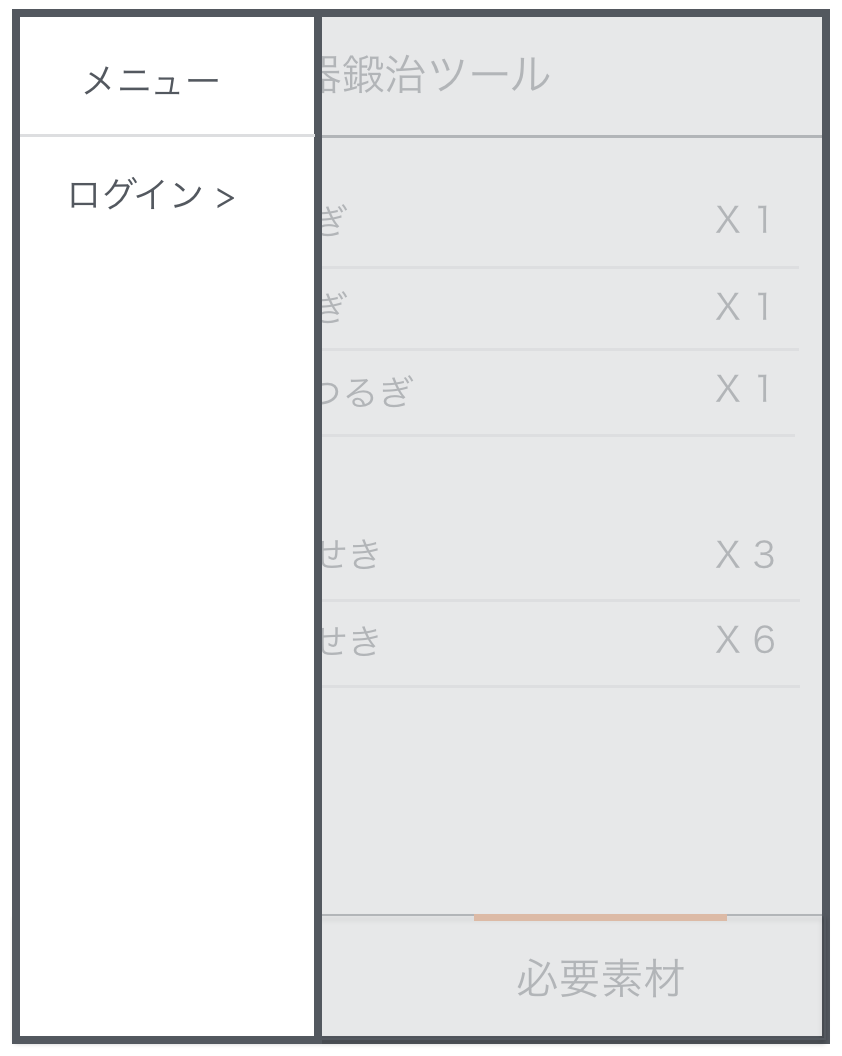
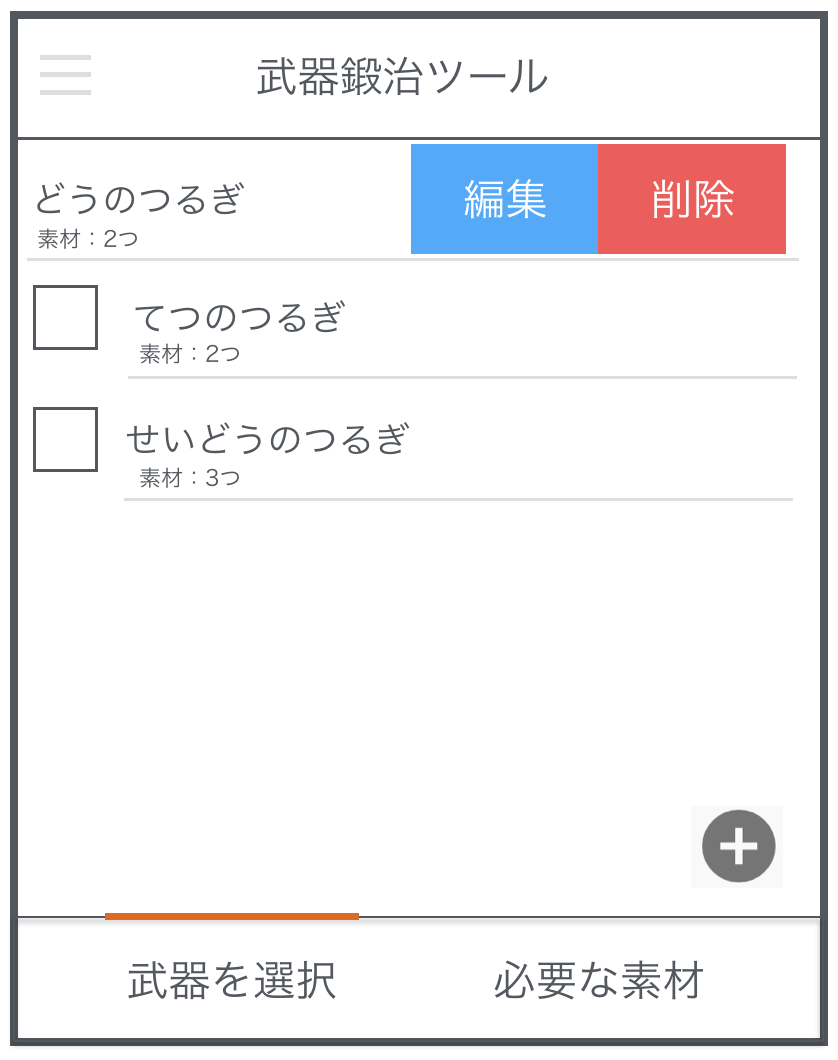
こちらが作成する画面のイメージです。
画面イメージがあると、「何を作ろうとしているか」がイメージしやすいですね。
仕事で要件を詰めるときはもちろんのこと、個人でアプリを作る場合も、画面イメージやモックアップを作ってイメージを掴むのは、いい手法だと思います。
アプリケーション構成
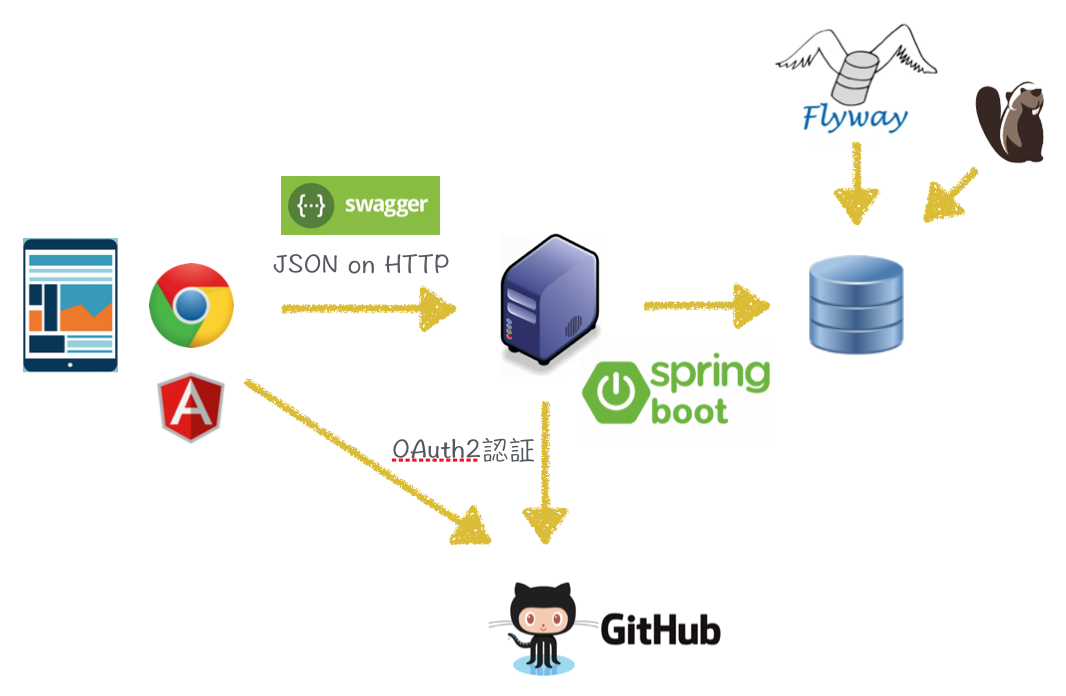
こちらが今回のアプリケーション構成をボックス&ライン図で表したものです。
ボックス&ライン図は、UMLのような厳密なルールがないので曖昧なところがありますが、全体イメージを大まかに捉えることが出来ます。
Spring Bootプロジェクトの作成
では、サーバーサイド側のWeb APIを実装していきましょう。
まずは最初にプロジェクトのディレクトリを作成します。
$ mkdir kajitool
$ cd kajitool
$ git init
gitについて
みなさん、gitを使っていますか?
本プロジェクトでは、gitを使って変更を管理していきます。
gitは習得の少し勉強が必要ですが、覚えるととても便利なSCM(ソフトウェア構成管理)ツールです。
今から勉強しようという方には、こちらの本をおすすめしますね!
いちばんやさしいGit&GitHubの教本 人気講師が教えるバージョン管理&共有入門
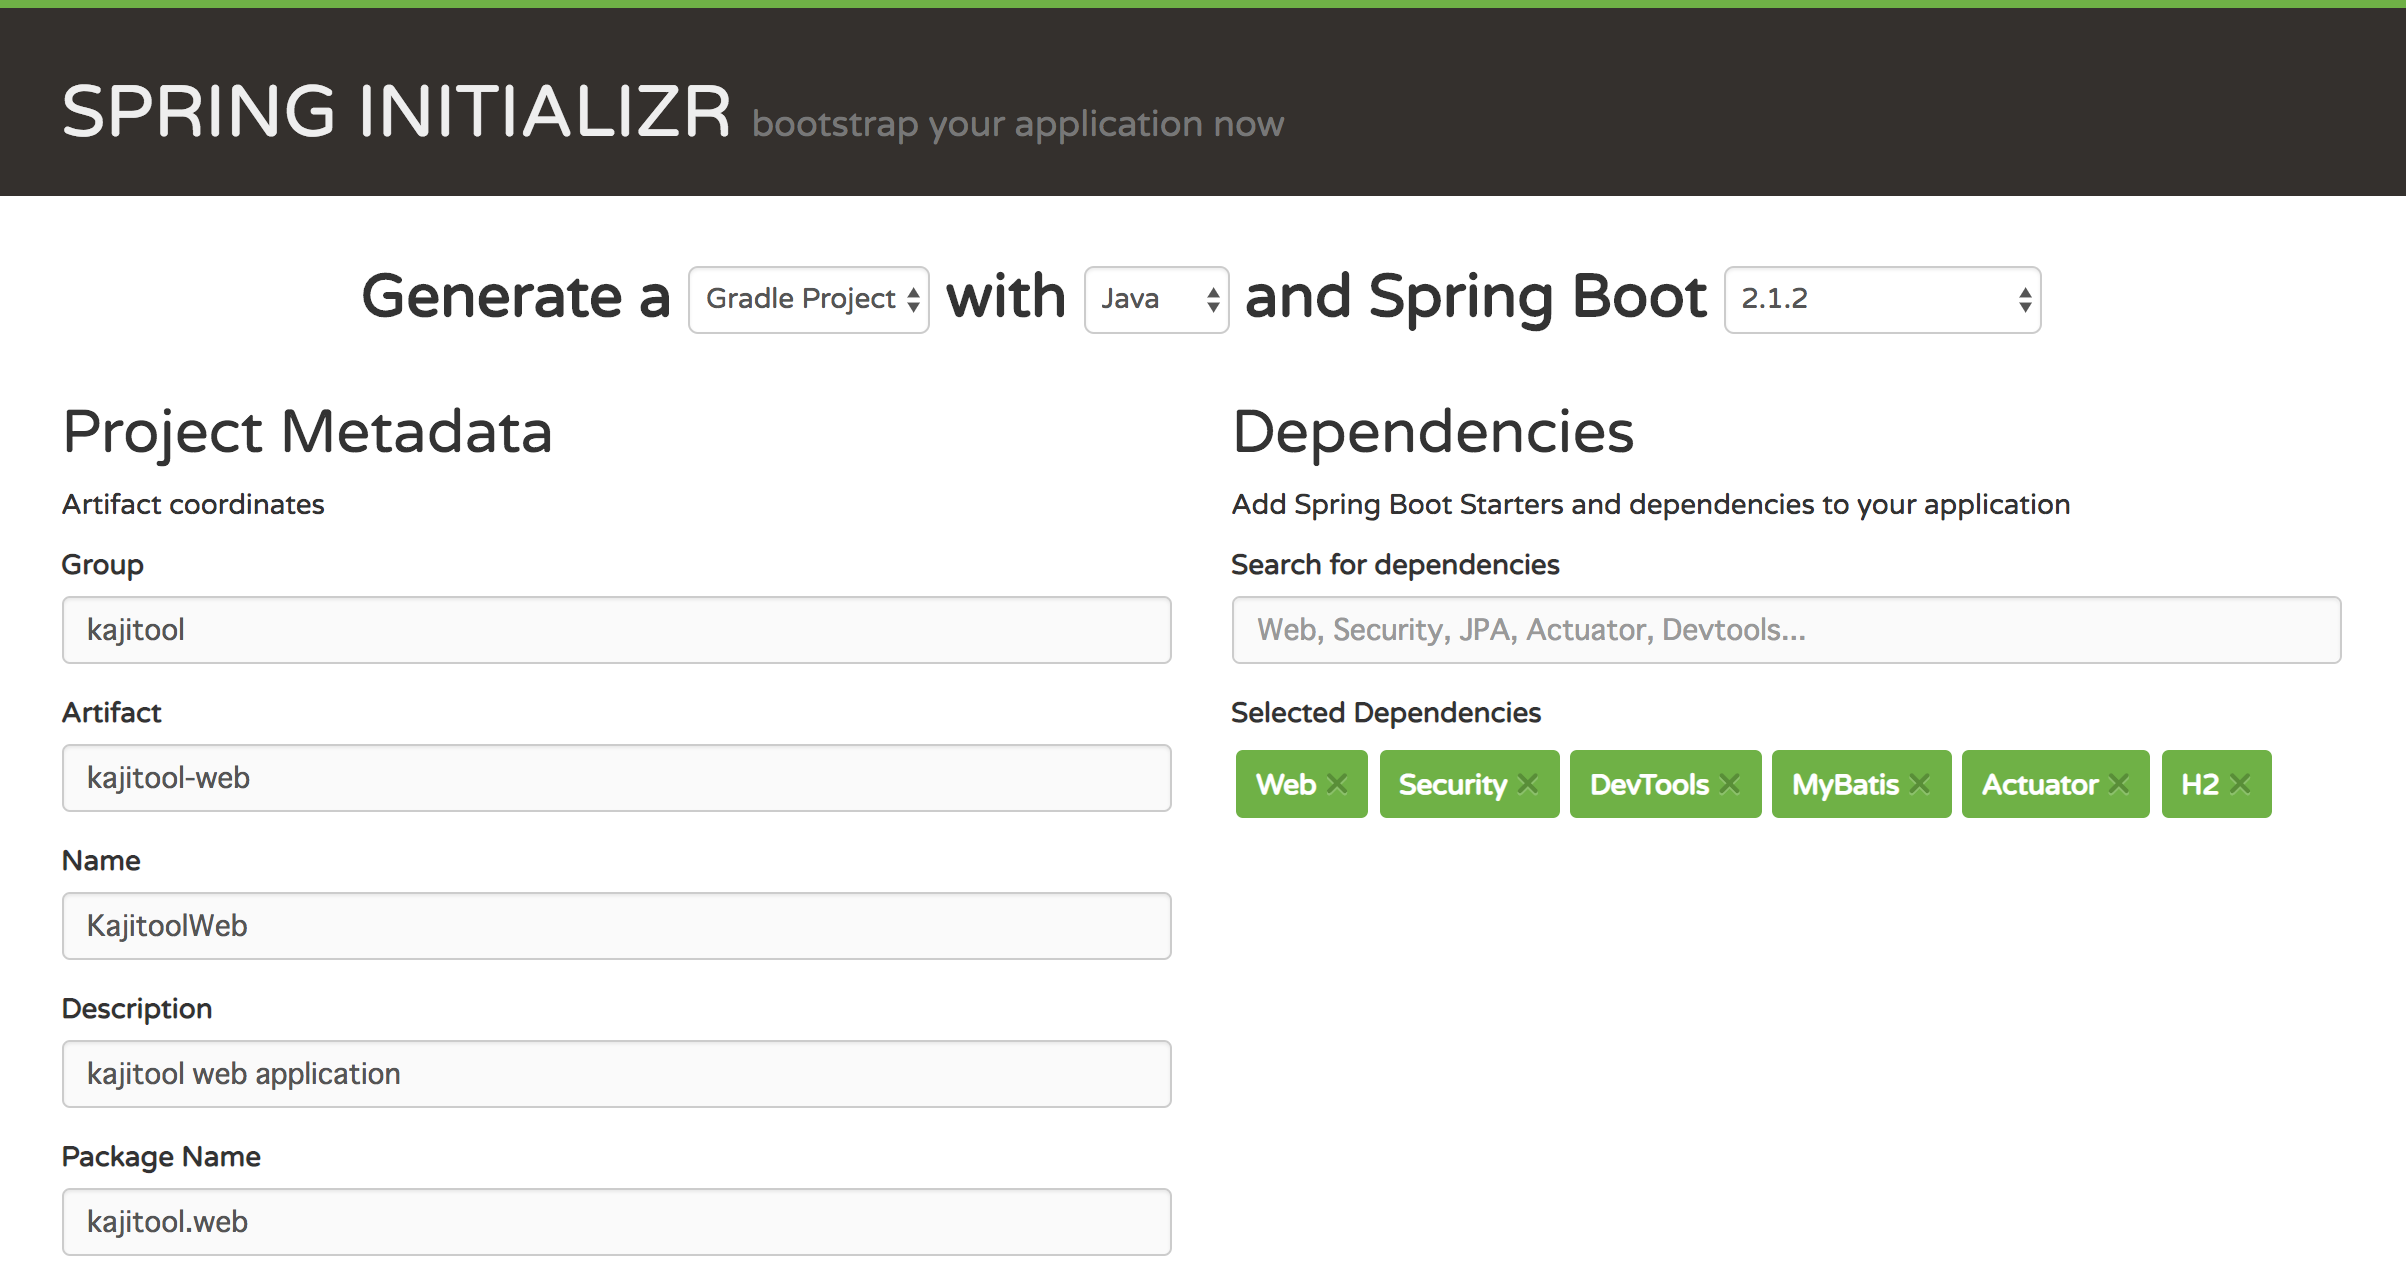
続いて、Spring Bootプロジェクトの雛形を作成します。
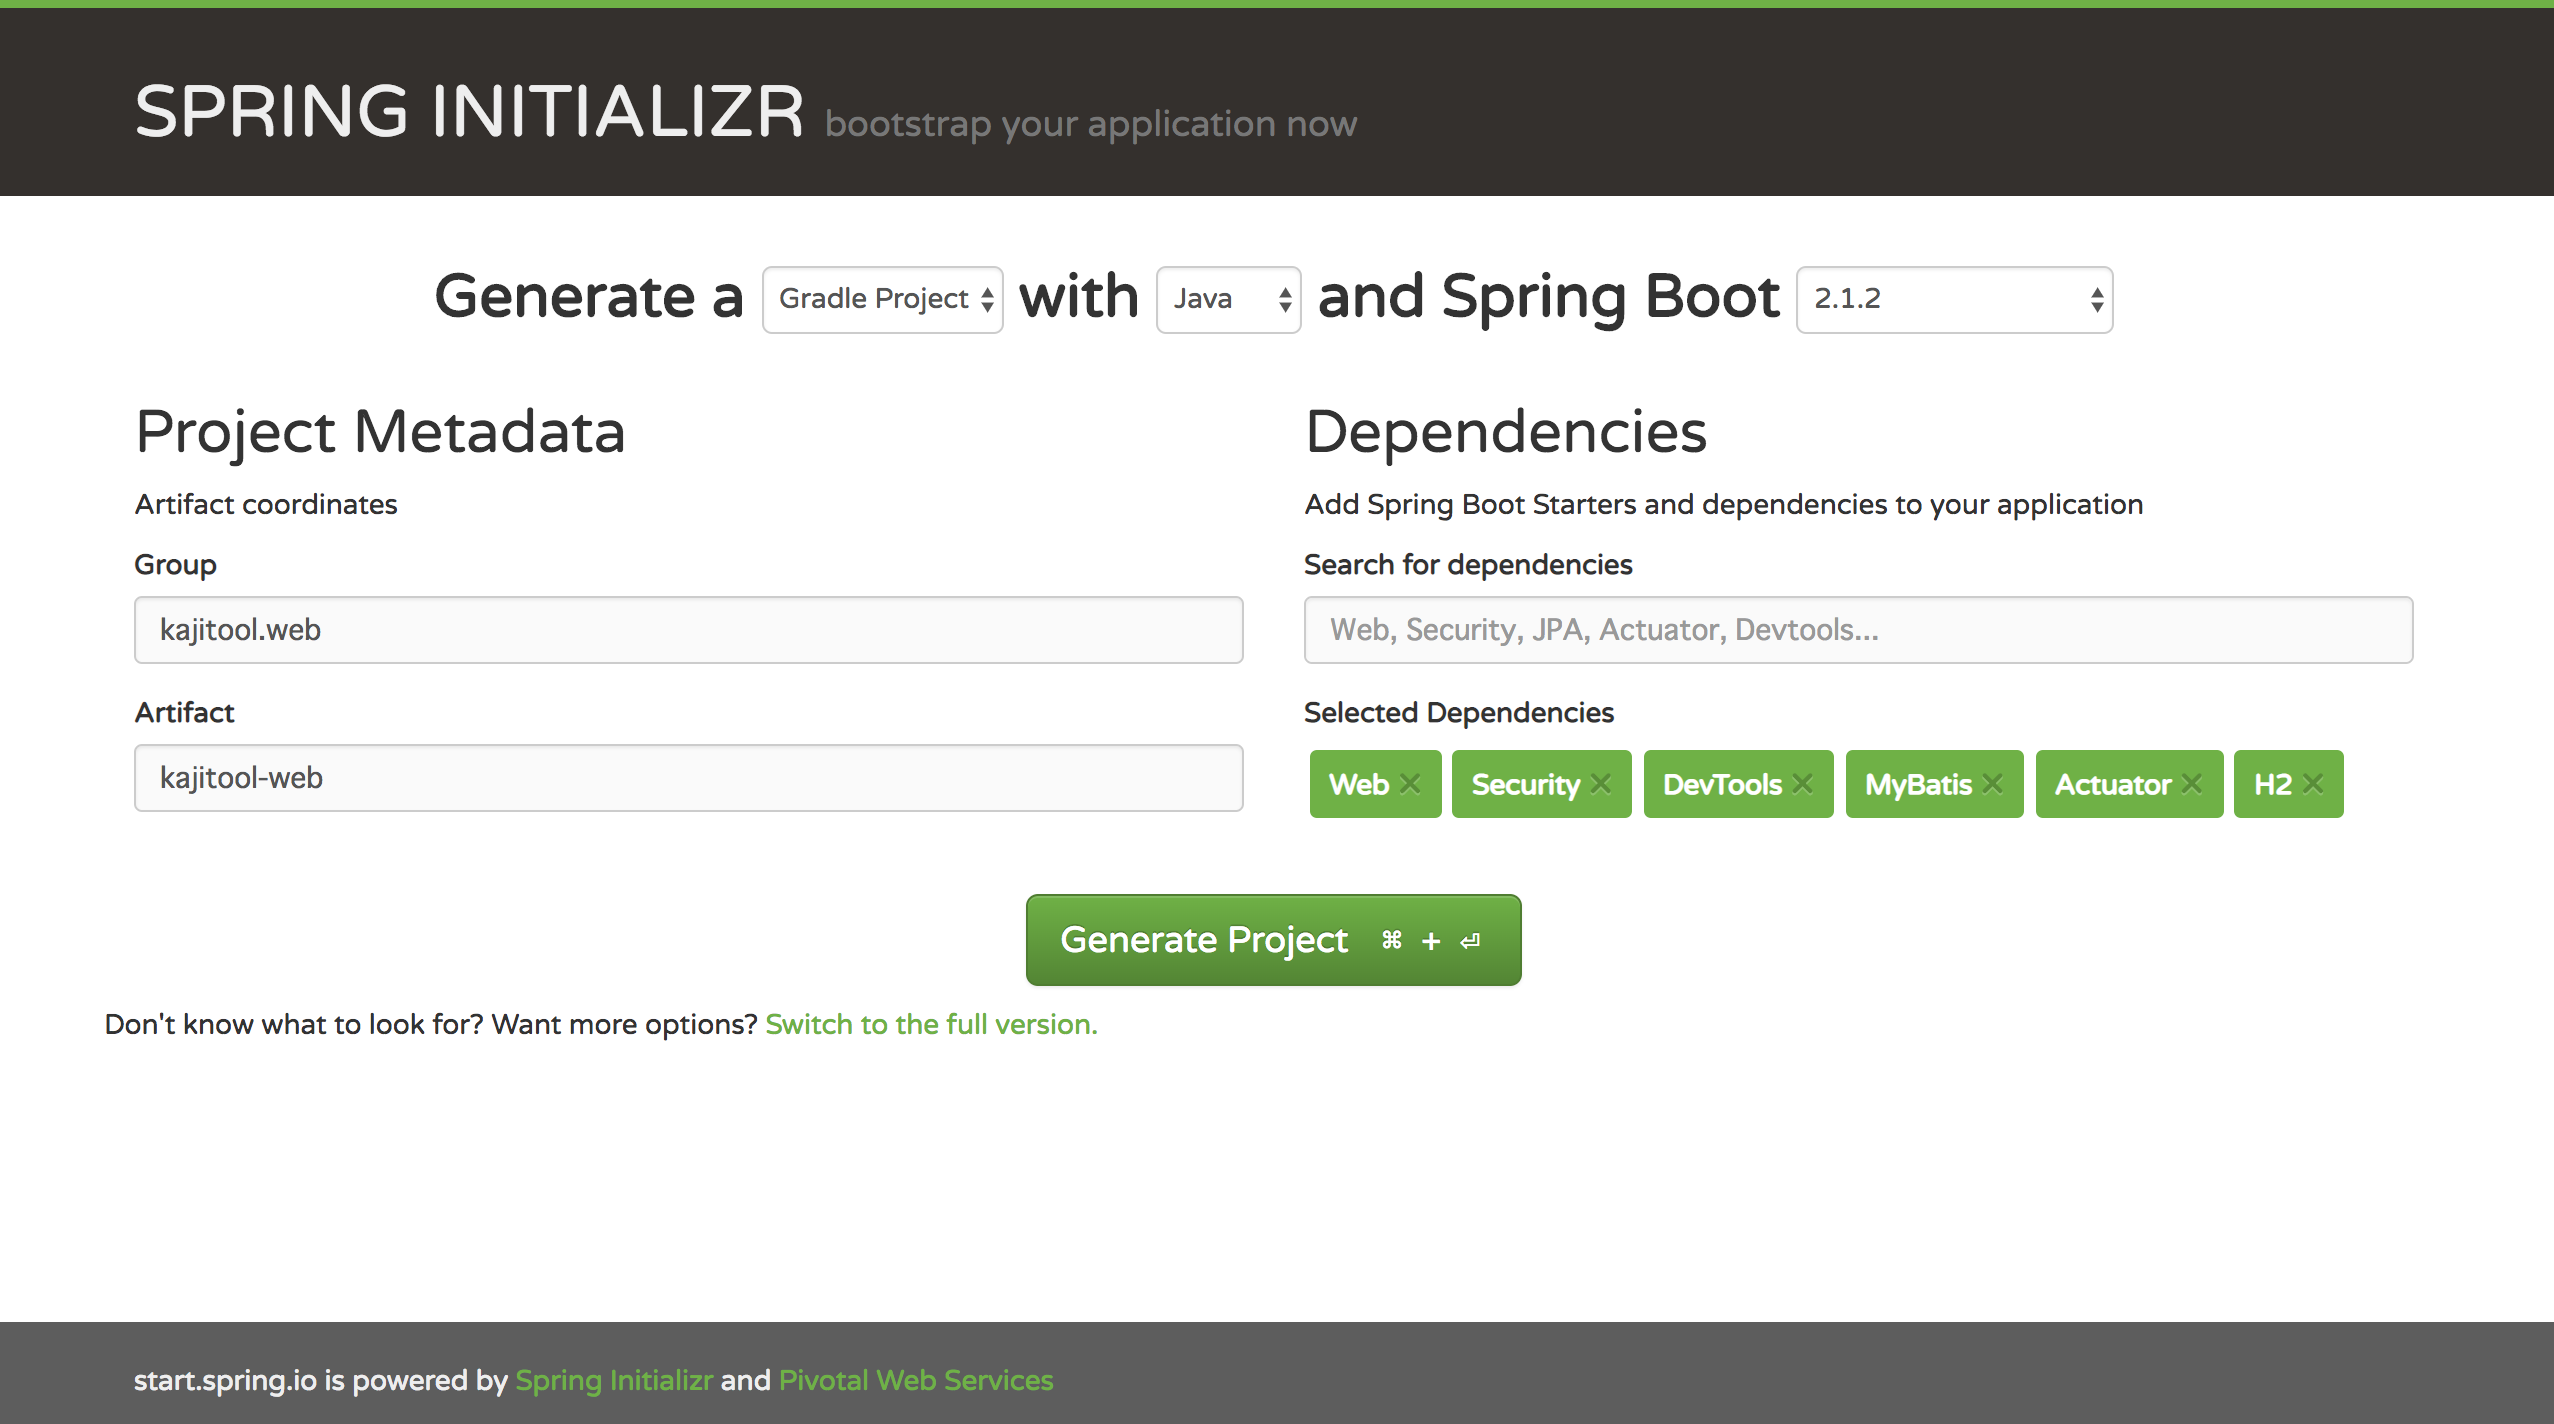
今回は、Spring Initializrと呼ばれるサービスを用います。
次のURLにアクセスして、画面に必要項目を入力することで、素早くSpringプロジェクトの雛形を生成できます。
「Switch to the full version.」をクリックして、次の内容を入力してプロジェクトを生成してください。
-
[Group]:kajitool -
[Artifact]:kajitool-web -
[Name]:KajitoolWeb -
[Description]:kajitool web application -
[Package Name]:kajitool.web -
[Selected Dependencies]:Web, Security, DevTools, MyBatis, Actuator, H2
生成してダウンロードした「kajitool-web.zip」を、kajitoolディレクトリ配下において解凍してください。tarコマンドで解凍する場合、次の通りとなります。
$ tar -xzvf kajitool-web.zip
$ rm kajitool-web.zip
ちなみに、同様の操作をcurlコマンドでも行えます。
> curl https://start.spring.io/starter.zip \
-d applicationName=KajitoolWeb \
-d artifactId=kajitool-web \
-d dependencies=web,security,devtools,mybatis,actuator,h2 \
-d description="kajitool web application" \
-d groupId=kajitool \
-d name=kajitool-web \
-d packageName=kajitool.web \
-d type=gradle-project \
-d baseDir=kajitool-web | tar -xzvf -
次のコマンドでヘルプも見れます。便利ですね!
> curl start.spring.io
では、作成したプロジェクトを動かしてみましょう!
$ cd kajitool-web/
$ ./gradlew bootrun
次のURLにブラウザでアクセスして、ログイン画面が出れば成功です。
なお、ログイン画面のユーザは「user」、パスワードは起動時のコンソールに
     :
Using generated security password: 80df0943-ae51-4811-8742-d7cc00bf6d5c
     :
のように出力されていますので、そちらを使用してください。
ここまで出来たら、コミットしましょう!
CTRL+Cで起動しているwebアプリを終了し、kajitoolディレクトリに戻って、次のgitコマンドを実行してください。
$ cd ..
$ git add .
$ git commit -m "create kajitool-web"
Springフレームワークについて
Springは、今やJava言語で開発する上でのデファクトスタンダードとなるフレームワークです。
歴史が長く安定性があり、次々と新技術を取り入れる先進性もあります。
Springは便利ですが、とても大きなフレームワークです。一朝一夕で学べるものではありません。
学ぶ場合は次の書籍を推奨します。
はじめてのSpring Boot
[改訂新版]Spring入門 ――Javaフレームワーク・より良い設計とアーキテクチャ
Spring徹底入門 Spring FrameworkによるJavaアプリケーション開発
いずれも少し古い本ですが、Springの仕組みを知る上では今でも有効な書籍だと思います。
Gradleのマルチプロジェクト化
今後の変更に備えてプロジェクトをマルチプロジェクトに変更します。
次のコマンドを実行し、gradleの実行環境をプロジェクトのルートに移します。
$ mv kajitool-web/gradle .
$ mv kajitool-web/gradlew .
$ mv kajitool-web/gradlew.bat .
次にsettings.gradleファイルを削除します。
$ rm kajitool-web/settings.gradle
プロジェクトルートに次のファイルを作成します。
subprojects {
    repositories {
        mavenCentral()
    }
}
include 'kajitool-web'
.gradle

.idea
*.iws
*.iml
*.ipr
out/
最後に、kajitool-web/build.gradleから次の部分を削除します。
- repositories {
-     mavenCentral()
- }
最終的なプロジェクトの構成は次のようになっていると思います。
kajitool
  │  .gitignore
  │  build.gradle
  │  gradlew
  │  gradlew.bat
  │  settings.gradle
  │
  ├─.gradle
  ├─gradle
  └─kajitool-web
      │  .gitignore
      │  build.gradle
      │
      └─src
ここまで出来たら、コミットしましょう!
$ git add .
$ git commit -m "to multi project"
Gradleについて
Gradleは、Mavenと並ぶJavaの2大ビルドツールです。
Mavenと比べて柔軟性がある一方で、習得コストはやや高めに感じます。
体系的に学ぶ場合は次の書籍を推奨します。
Gradle徹底入門 次世代ビルドツールによる自動化基盤の構築
少し古い本ですが、プロジェクトでGradleを使う場合は手元に置いておくといいかと思います。
ドメインモデルの実装
ドメインモデルは、アプリのコアとなるモデル構造です。
具体的にそれは何か?
という話は、難しいのでここでは取り扱いません。
このアプリでは、ドメインモデルに加えて次のモデルを定義します。
- エンティティモデル
- ドメインモデル
- ビューモデル
エンティティモデルは、データベースのテーブル構造を表すモデルです。このアプリでは、MyBatis Generatorというツールを用いて後ほど自動生成します。
ビューモデルは、画面の表示内容から求まる参照用モデルです。画面要件や性能上の理由により、必要に応じて定義します。
本アプリのWeb APIでは、ドメインモデルとビューモデルをインタフェースのモデルとして扱い、エンティティは扱わないルールとします。
システム設計について
システム設計、難しいですね。
システム設計は全てのプロジェクトで正解となるものはなく、それぞれのシステムの前提条件やプロジェクト特性やチーム・アーキテクト自身の実力などに左右されながら最適解を探るものだと考えています。
とはいえ、一般的に有効な設計手法はあるので、勉強したい方には次の本をおすすめします。
現場で役立つシステム設計の原則 ~変更を楽で安全にするオブジェクト指向の実践技法
書籍『現場で役立つシステム設計の原則』の『画面とドメインオブジェクトを連動させる(p.209)』によると、「ドメインオブジェクトをそのまま画面の表示にも使う」とあります。画面の関心事と、ドメインオブジェクトで表現する関心事は一致するのが基本だからです。
一方で、同書籍の(p.211)にも書かれているとおり、ビュー専用のオブジェクトを用意したほうがいい場合もあります。例えば、基幹業務で用いられる業務画面などに多いです。このような画面は、意思決定のための参考情報を表示するため、慣れによる現行踏襲、単なるお客さんの趣向などの理由により、1つの画面に複数の関心ごとが混在していることが多いです。そういった場合に、参照用のビューモデルを用いるといいでしょう。
今回のこのアーキテクチャ構成は、レイヤ化アーキテクチャを元に少しアレンジしたものです。
対象アプリに対しては、やや重厚な構成となっていますが、それはハンズオンの趣旨からくるものです。
最適なアーキテクチャは、アプリケーションの特性やプロジェクト・チームの状況に応じて異なります。
その時に応じた最適なアーキテクチャを採用してくださいね。
Material(素材)はマスタデータとして提供します。そのため、更新に必要な更新キー(version)や更新日時は存在しません。
一方、Recipe(レシピ)とRecipeDetail(レシピ明細)は、この2つのモデルをモノの単位として考えます。ですので、RecipeDetail(レシピ明細)には、更新キー(version)や更新日時は存在しません。
RecipeListView(レシピ一覧)は、ビューモデルです。参照用モデルのため、このモデルを使った更新機能は提供しません。
では、次のクラスを追加してください。
なお、分かりやすさを優先して、setter/getterは省略しています。
各自で追加してください。
Material(素材)
package kajitool.web.domain.model;

public class Material {
    private long id;
    private String name;
}
Recipe(レシピ)
package kajitool.web.domain.model;

import java.util.Date;
import java.util.List;

public class Recipe {
    private Long id;
    private String name;
    private int version;
    private Date updatedAt;
    private List<RecipeDetail> recipeDetails;
}
RecipeDetail(レシピ明細)
package kajitool.web.domain.model;

public class RecipeDetail {
    private Long id;
    private long recipeId;
    private long materialId;
    private int quantity;
}
RecipeListView(レシピ一覧)
package kajitool.web.view.model;

public class RecipeListView {
    private Long id;
    private String name;
    private int materialCount;
}
ここまで出来たら、コミットしましょう!
$ git add .
$ git commit -m "create domain model"
Web APIの実装
では、Web APIの実装にうつりましょう。
まずは、Materialを取得できるサービスを作ります。
package kajitool.web.service.material;

import kajitool.web.domain.model.Material;
import org.springframework.stereotype.Service;
import org.springframework.transaction.annotation.Transactional;

import java.util.Arrays;
import java.util.List;

@Service
@Transactional
public class MaterialService {
    private static final List<Material> materials = Arrays.asList(
            new Material() {{
                setId(1); setName("どうのこうせき");
            }},
            new Material() {{
                setId(2); setName("てっこうせき");
            }},
            new Material() {{
                setId(3); setName("ぎんのこうせき");
            }}
    );
    public List<Material> findAll() {
        return materials;
    }
}
サービスをトランザクションの開始ポイントとします。
まだデータベースにアクセスしていませんが、Transactionalアノテーションをつける事で、トランザクションを開始出来ます。
次に、リソースクラスを作りましょう。
package kajitool.web.controller;

import kajitool.web.domain.model.Material;
import kajitool.web.service.material.MaterialService;
import org.springframework.http.ResponseEntity;
import org.springframework.web.bind.annotation.GetMapping;
import org.springframework.web.bind.annotation.RequestMapping;
import org.springframework.web.bind.annotation.RestController;

import java.util.List;

@RestController
@RequestMapping("/api/v1/material")
public class MaterialResource {
    private final MaterialService service;
    public MaterialResource(final MaterialService service) {
        this.service = service;
    }
    @GetMapping("/")
    public ResponseEntity<List<Material>> getAll() {
        return ResponseEntity.ok(service.findAll());
    }
}
リソースクラスには、Web APIを呼び出すURLを定義します。
関心事を分離するために、リソースクラスには業務ロジックを記述せず、サービスを呼び出すだけに留めましょう。
実際に動かしてみましょう。
とそのまえに、毎回BASIC認証のパスワードを探すのが面倒なので、固定パスワードを設定しましょう。
次の修正をapplication.propertiesに加えてください。
spring.security.user.name=user
spring.security.user.password=user
では、実行して動作を確認してみましょう。
$ ./gradlew :kajitool-web:bootrun
次のURLにブラウザでアクセスしてください。
ブラウザでjson形式のデータが表示されれば成功です!
[
  {
    id: 1,
    name: "どうのこうせき"
  },
  {
    id: 2,
    name: "てっこうせき"
  },
  {
    id: 3,
    name: "ぎんのこうせき"
  }
]
同様に、Recipeサービスも作成します。
RecipeはMaterialと違って、データの作成、編集、削除も行えますので、Materialサービスに比べて複雑です。最終的にデータはデータベースに格納しますが、ここでは一旦、メモリ内で保持するように実装します。
package kajitool.web.service.recipe;

import kajitool.web.domain.model.Recipe;
import org.springframework.stereotype.Service;
import org.springframework.transaction.annotation.Transactional;

import java.util.Map;
import java.util.Optional;
import java.util.concurrent.ConcurrentHashMap;
import java.util.concurrent.atomic.AtomicLong;

@Service
@Transactional
public class RecipeService {
    private final AtomicLong sequence = new AtomicLong();
    private final Map<Long, Recipe> map = new ConcurrentHashMap<>();

    public Recipe create(final Recipe recipe) {
        recipe.setId(sequence.incrementAndGet());
        map.put(recipe.getId(), recipe);
        return recipe;
    }
    public Optional<Recipe> findById(final long id) {
        return Optional.ofNullable(map.get(id));
    }
    public Recipe save(final Recipe recipe) {
        return map.replace(recipe.getId(), recipe);
    }
    public void remove(final long id, final int version) {
        map.remove(id);
    }
}
続いてリソースクラスも作成しましょう。
package kajitool.web.controller;

import kajitool.web.domain.model.Recipe;
import kajitool.web.service.recipe.RecipeService;
import org.springframework.http.ResponseEntity;
import org.springframework.web.bind.annotation.*;

import java.net.URI;

@RestController
@RequestMapping("/api/v1/recipe")
public class RecipeResource {
    private final RecipeService service;

    public RecipeResource(RecipeService service) {
        this.service = service;
    }
    @PostMapping("/create")
    public ResponseEntity<Void> create(@RequestBody final Recipe recipe) {
        Recipe created = service.create(recipe);
        return ResponseEntity.created(
                URI.create("/api/v1/recipe/" + created.getId())
        ).build();
    }
    @GetMapping("/{id}")
    public ResponseEntity<Recipe> get(@PathVariable final long id) {
        return service.findById(id)
                .map(ResponseEntity::ok)
                .orElse(ResponseEntity.notFound().build());
    }
    @PutMapping("/save")
    public ResponseEntity<Void> save(@RequestBody final Recipe recipe) {
        service.save(recipe);
        return ResponseEntity.ok().build();
    }
    @DeleteMapping("/{id}")
    public ResponseEntity<Void> delete(
            @PathVariable final long id,
            @RequestParam("version") final int version) {
        service.remove(id, version);
        return ResponseEntity.ok().build();
    }
}
RecipeListViewのサービスとコントローラを作成します。
ここでは簡単に雛形のみを作成します。
package kajitool.web.service.recipelist;

import kajitool.web.view.model.RecipeListView;
import org.springframework.stereotype.Service;
import org.springframework.transaction.annotation.Transactional;

import java.util.Collections;
import java.util.List;

@Service
@Transactional
public class RecipeListViewService {
    public List<RecipeListView> findAll() {
        return Collections.emptyList();
    }
}
package kajitool.web.controller;

import kajitool.web.service.recipelist.RecipeListViewService;
import kajitool.web.view.model.RecipeListView;
import org.springframework.http.ResponseEntity;
import org.springframework.web.bind.annotation.GetMapping;
import org.springframework.web.bind.annotation.RequestMapping;
import org.springframework.web.bind.annotation.RestController;

import java.util.List;

@RestController
@RequestMapping("/api/v1/recipe_list_view")
public class RecipeListViewResource {
    private final RecipeListViewService service;

    public RecipeListViewResource(RecipeListViewService service) {
        this.service = service;
    }
    @GetMapping("")
    public ResponseEntity<List<RecipeListView>> getAll() {
        return ResponseEntity.ok(service.findAll());
    }
}
では、実行してみましょう。
$ ./gradlew :kajitool-web:bootrun
エラーが出ずに無事起動出来たらOKとします。
ここまで出来たら、コミットしましょう!
$ git add .
$ git commit -m "create Web API"
Swagger UIの導入
HTTP GETリクエストであれば、ブラウザからURLを指定して実行できるので、動作確認は簡単です。しかし、POSTやPUT、DELETEとなると、ブラウザからの動作確認は難しくなりますね。
そこで、Swagger UIを導入しましょう。
これを導入することで、ブラウザからの動作確認が簡単に実現出来ます。
導入は簡単です。
次の依存性関係を追加して、
dependencies {
+       implementation 'io.springfox:springfox-swagger2:2.9.2'
+       implementation 'io.springfox:springfox-swagger-ui:2.9.2'
+
次のJavaコンフィグを追加してください。
package kajitool.web.config;

import com.google.common.base.Predicate;
import org.springframework.context.annotation.Bean;
import org.springframework.context.annotation.Configuration;
import springfox.documentation.spi.DocumentationType;
import springfox.documentation.spring.web.plugins.Docket;
import springfox.documentation.swagger2.annotations.EnableSwagger2;

import static com.google.common.base.Predicates.containsPattern;
import static com.google.common.base.Predicates.or;

@Configuration
@EnableSwagger2
public class SwaggerConfig {
    @Bean
    public Docket document() {
        return new Docket(DocumentationType.SWAGGER_2)
                .select().paths(paths()).build();
    }
    private Predicate<String> paths() {
        return or(containsPattern("/api*"));
    }
}
では、実行して動作を確認してみましょう。
$ ./gradlew bootrun
次のURLにブラウザでアクセスしてください。
このような画面が出れば成功です。
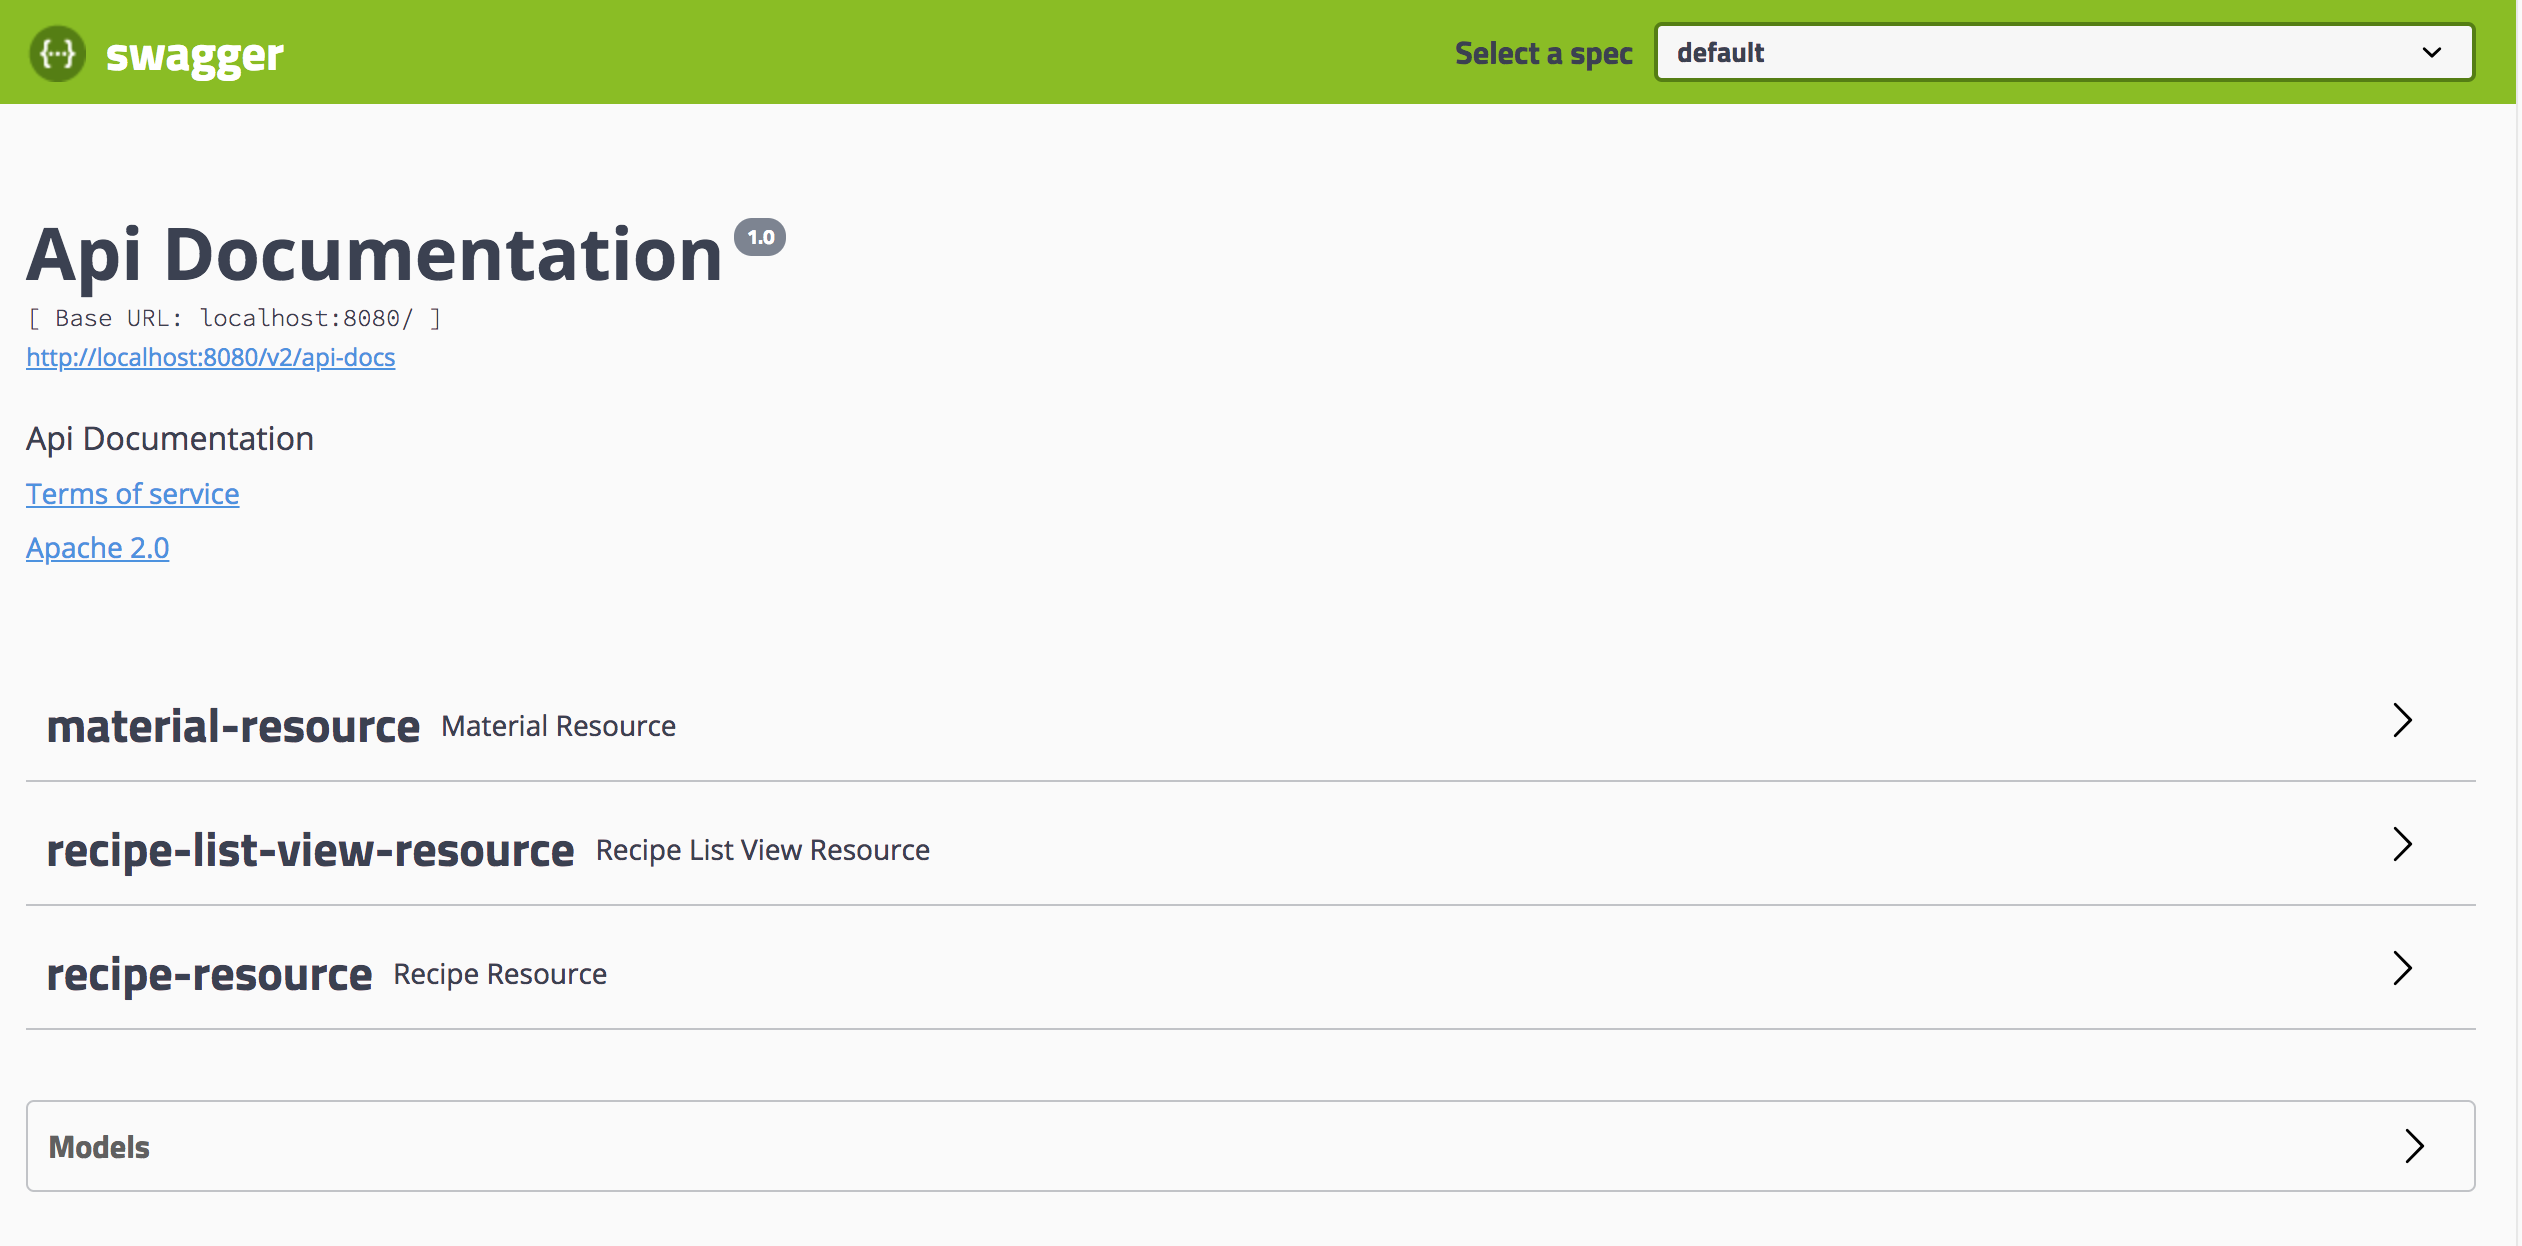
では、色々と試してみてください。
便利ですね。ところが、レシピを作成しようとすると、HTTPステータスの403が返ってきます。これはなぜかというと、CSRF対策のセキュリティ機能がデフォルトで有効になっており、Swagger UIとうまく連携出来ていないからです。
そこで、CSRFトークンをCookieにのせるように変更します。
次のJavaコンフィグを追加してから再起動してください。
package kajitool.web.config;

import org.springframework.context.annotation.Configuration;
import org.springframework.security.config.annotation.web.builders.HttpSecurity;
import org.springframework.security.config.annotation.web.configuration.EnableWebSecurity;
import org.springframework.security.config.annotation.web.configuration.WebSecurityConfigurerAdapter;
import org.springframework.security.web.csrf.CookieCsrfTokenRepository;

@Configuration
@EnableWebSecurity
public class WebSecurityConfig extends WebSecurityConfigurerAdapter {
    @Override
    protected void configure(HttpSecurity http) throws Exception {
        http.csrf().csrfTokenRepository(
                CookieCsrfTokenRepository.withHttpOnlyFalse());
    }
}
レシピの登録がうまくできれば成功です!
ここまで出来たら、コミットしましょう!
$ git add .
$ git commit -m "add swagger ui"
エラーハンドリングとバリデーションの実装
エラーハンドリングを実装をします。
サービスでエラーが発生した場合、実行時例外(RuntimeException)を投げると、トランザクションがロールバックされます。チェック例外(Exception)を継承したクラスだと、トランザクションがロールバックされないので注意してください。まずは、サービスでエラーが発生した際に、エラー内容を格納するクラスを定義します。
package kajitool.web.service.common;

import java.util.List;

public class ServiceMessage {
    private final String code;
    private final String message;
    private final List<?> details;

    public ServiceMessage(final String code,
                          final String message) {
        this.code = code;
        this.message = message;
        this.details = null;
    }
    public ServiceMessage(final String code,
                          final String message,
                          final List<?> details) {
        this.code = code;
        this.message = message;
        this.details = details;
    }
    public String getCode() {
        return code;
    }
    public String getMessage() {
        return message;
    }
    public List<?> getDetails() {
        return details;
    }
}
次にスローする例外を定義します。
package kajitool.web.service.common;

public class ServiceException extends RuntimeException {

    private final ServiceMessage serviceMessage;

    public ServiceException(
            final ServiceMessage serviceMessage) {
        this.serviceMessage = serviceMessage;
    }
    public ServiceException(
            final ServiceMessage serviceMessage,
            final Throwable cause) {
        this.serviceMessage = serviceMessage;
    }
    public ServiceMessage getServiceMessage() {
        return serviceMessage;
    }
}
例外処理の実装には、ControllerAdviceアノーテーションを用いると便利です。
次の実装を追加してください。
package kajitool.web.controller.error;

import kajitool.web.service.common.ServiceException;
import kajitool.web.service.common.ServiceMessage;
import org.springframework.http.HttpStatus;
import org.springframework.http.ResponseEntity;
import org.springframework.web.bind.annotation.ControllerAdvice;
import org.springframework.web.bind.annotation.ExceptionHandler;
import org.springframework.web.context.request.WebRequest;
import org.springframework.web.servlet.mvc.method.annotation.ResponseEntityExceptionHandler;

@ControllerAdvice
public class AppExceptionHandler extends ResponseEntityExceptionHandler {

    @ExceptionHandler(ServiceException.class)
    public ResponseEntity<Object> handleAppServiceException(
            final ServiceException ex, final WebRequest request) {
        return super.handleExceptionInternal(
                ex,
                ex.getServiceMessage(),
                null,
                HttpStatus.BAD_REQUEST,
                request);
    }
    @ExceptionHandler(Exception.class)
    public ResponseEntity<Object> handleAllException(
            final Exception ex, final WebRequest request) {
        return super.handleExceptionInternal(
                ex,
                new ServiceMessage("fatal", "Internal error."),
                null,
                HttpStatus.INTERNAL_SERVER_ERROR,
                request);
    }
}
Springのバリデーションチェックには、Bean Validationを用いるのが一般的ですが、モデルにアノテーションを宣言するスタイルは、モデルとバリデーション処理が密結合しているようで、僕はあまり好きではありません。
そこで、Java用Validatorライブラリの"YAVI"(ヤヴァイ)を用いたいと思います。
詳しい内容は、こちらの記事を参照してください。
Java用Validatorライブラリ"YAVI"(ヤヴァイ)の紹介
まずは、依存関係にYAVIのライブラリを追加します。
dependencies {
	implementation 'io.springfox:springfox-swagger2:2.9.2'
	implementation 'io.springfox:springfox-swagger-ui:2.9.2'
+	implementation 'am.ik.yavi:yavi:0.2.2'
次に、レシピのバリデーションを定義します。
コードの説明はありませんが、直感的に読めると思います!
package kajitool.web.service.recipe;

import am.ik.yavi.builder.ValidatorBuilder;
import am.ik.yavi.core.ConstraintGroup;
import am.ik.yavi.core.ConstraintViolation;
import am.ik.yavi.core.ConstraintViolations;
import am.ik.yavi.core.Validator;
import kajitool.web.domain.model.Recipe;
import kajitool.web.domain.model.RecipeDetail;
import kajitool.web.service.common.ServiceException;
import kajitool.web.service.common.ServiceMessage;

import java.util.stream.Collectors;

public final class RecipeValidator {

    private enum Group implements ConstraintGroup {
        CREATE, UPDATE
    }

    private static final Validator<RecipeDetail> recipeDetailValidator
            = ValidatorBuilder.<RecipeDetail>of()
            .constraint(RecipeDetail::getQuantity, "validator", c -> c.greaterThan(0))
            .constraintOnGroup(Group.CREATE, b ->
                    b.constraint(RecipeDetail::getId, "id", c -> c.isNull()))
            .constraintOnGroup(Group.UPDATE, b ->
                    b.constraint(RecipeDetail::getId, "id", c -> c.notNull()))
            .build();

    private static final Validator<Recipe> recipeValidator
            = ValidatorBuilder.<Recipe>of()
            .constraint(Recipe::getName, "name", c -> c.notBlank()
                    .lessThanOrEqual(100))
            .constraint(Recipe::getRecipeDetails, "recipeDetails", c -> c.notNull()
                    .greaterThan(0))
            .forEach(Recipe::getRecipeDetails, "recipeDetails", recipeDetailValidator)
            .constraintOnGroup(Group.CREATE, b ->
                    b.constraint(Recipe::getId, "id", c -> c.isNull()))
            .constraintOnGroup(Group.UPDATE, b ->
                    b.constraint(Recipe::getId, "id", c -> c.notNull()))
            .build();

    public static void validateOnCreate(final Recipe recipe) {
        recipeValidator.validate(recipe, Group.CREATE)
                .throwIfInvalid(RecipeValidator::toServiceException);
    }

    public static void validateOnUpdate(final Recipe recipe) {
        recipeValidator.validate(recipe, Group.UPDATE)
                .throwIfInvalid(RecipeValidator::toServiceException);
    }

    private static ServiceException toServiceException(
            final ConstraintViolations v) {
        ServiceMessage msg = new ServiceMessage(
                "validation",
                "validation faild.",
                v.violations()
                        .stream()
                        .map(ConstraintViolation::message)
                        .collect(Collectors.toList()));
        return new ServiceException(msg);
    }
}
では、サービスにバリデーションを追加しましょう。
バリデーションはコントローラ層で実装するべきでは?という疑問もありそうですが、コントローラ層の責務は外部インタフェースとのプロトコル変換に留めて、バリデーションはサービスの責務としました。
public class RecipeService {
             :
    public Recipe create(final Recipe recipe) {
+        RecipeValidator.validateOnCreate(recipe);
             :

    public Recipe save(final Recipe recipe) {
+        RecipeValidator.validateOnUpdate(recipe);
             :
}
ここまで出来たら、コミットしましょう!
$ git add .
$ git commit -m "error handling & validation"
Actuatorの紹介
ところで、現在BASIC認証が無効になっているのに気づいた人はいるでしょうか?
実は、先ほどSwagger UIを導入した際に、WebSecurityConfigクラスを追加したことで、Spring BootのAutoConfigureで提供されていたDefaultConfigurerAdapterクラスの設定が無効になりました。
次のソースが、AutoConfigureでDefaultConfigurerAdapterを定義していたところです。
@Configuration
@ConditionalOnClass(WebSecurityConfigurerAdapter.class)
@ConditionalOnMissingBean(WebSecurityConfigurerAdapter.class)
@ConditionalOnWebApplication(type = Type.SERVLET)
public class SpringBootWebSecurityConfiguration {

	@Configuration
	@Order(SecurityProperties.BASIC_AUTH_ORDER)
	static class DefaultConfigurerAdapter extends WebSecurityConfigurerAdapter {

	}

}
ConditionalOnMissingBeanアノーテーションの判定が変わったことにより、SpringBootWebSecurityConfigurationの設定が無効になりました。
さらにWebSecurityConfigクラスがconfigureメソッドを上書きしたことで、BASIC認証が無効となってしまいました。
このように、Spring Bootを扱う際は、AutoConfigureの動作を理解し、それとうまく付き合う必要があります。AutoConfigureはとても便利な機能です。しかし、注意しないと予期せぬ設定変更が生じるところは少し怖いですね。
そこでActuatorの紹介です!
Actuatorを利用することでアプリケーションの設定や状態確認が行えます。
Actuatorについては、「Spring Bootプロジェクトの作成」時にすでに導入しています。次のように依存関係に追加するだけで、Actuatorが有効になります。
implementation 'org.springframework.boot:spring-boot-starter-actuator'
試しに、次のURLにアクセスしてください。
{
    status: "UP"
}
のように、アプリケーションの起動状態が確認できます。
Actuatorにはたくさんの機能が用意されていますが、デフォルトでは/infoと/healthしか公開されていません。
そこで、次の設定で全てのエンドポイントを有効にします。
management.endpoints.web.exposure.include=*
以下のURLにアクセスすると、どの設定がどういう理由で有効・無効になったかが確認出来ます。
Actuatorには他にも様々な便利なエンドポイントがあります。
次のURLで確認出来ますので、開発や運用の際に活用しましょう!
ここまで出来たら、コミットしましょう!
$ git add .
$ git commit -m "include actuator endpoints"
Githubを用いたOAuth2セキュリティ認証
現在、BASIC認証が無効になっています。
認証は、ほぼ全てのシステムで必要になることが多く、ある程度のシステム規模になるとその機能は多岐にわたります。
ですので、認証機能そのものを外出ししたいです。
そこで、Githubを用いたOAuth2セキュリティ認証を採用しましょう。
まずは、OAuth2の機能を組み込みます。次の依存関係を追加してください。
dependencies {
            :
+       implementation 'org.springframework.security:spring-security-oauth2-client'
+       implementation 'org.springframework.security:spring-security-oauth2-jose'
            :
}
次にセキュリティの設定で、OAuth2ログインを有効にします。
さらに、認証が必要なAPIをPOST、PUT、DELETEの編集出来る機能のみに絞りました。
@Configuration
@EnableWebSecurity
public class WebSecurityConfig
        extends WebSecurityConfigurerAdapter {

    @Override
    protected void configure(HttpSecurity http) throws Exception {
+        // @formatter:off
        http.csrf().csrfTokenRepository(
                CookieCsrfTokenRepository.withHttpOnlyFalse())
+        .and().oauth2Login()
+        .and().authorizeRequests()
+            .mvcMatchers(HttpMethod.POST, "/api/**/*").authenticated()
+            .mvcMatchers(HttpMethod.PUT, "/api/**/*").authenticated()
+            .mvcMatchers(HttpMethod.DELETE, "/api/**/*").authenticated()
+            .anyRequest().permitAll()
+        ;
+        // @formatter:on
    }
}
Creating an OAuth Appを参考にアプリケーションをGitHubに登録し、client-idとclient-secretを入手します。
ここでは、次の登録をしました。
[Application name]: oauth-login-demo
[Homepage UR]: http://localhost:8080/
[Authorization callback URL]: http://localhost:8080/
最後に、application.propertiesに入手したclient-idとclient-secretを登録してください。
spring.security.oauth2.client.registration.github.client-id=[input oauth2 client-id]
spring.security.oauth2.client.registration.github.client-secret=[input oauth2 client-secret]
これで認証機能を外出し出来ました!
参照には認証は不要で、編集する際に認証が必要となります。
なお、Proxy経由でインターネットに接続している場合は、この記事の後ろにある「おまけ〜Proxyの設定〜」を行ってください。
次のURLにアクセスすると、GitHub認証と連携ができます!
ここまで出来たら、コミットしましょう!
$ git add .
$ git commit -m "github oauth2"
FlywayとH2DBを用いたデータベース構築
さてさて、長々とWeb APIを実装してきましたが、未だにデータベースとすら連携出来ていません。大変ですね、システム開発って!
では、ようやくデータベースを構築していきたいと思います。
今回のハンズオンでは、手軽にH2 Databaseを用いてデータベースを構築します。
H2 Databaseとは、JavaのSQLデーターベスです。フットプリントが軽く、主に単体環境でのテスト用データベースとして用いられることが多いです。
その導入のお手軽さが今回のハンズオンでの導入理由です。
データベースマイグレーションツールには、Flywayを用います。
データベースマイグレーションツールとは、データベース構成のバージョンを管理するものです。システムを運用していると、機能追加や変更によるアプリケーション変更(エンハンス)に伴い、データベースも変更されていきます。データベースの変更も、アプリケーション同様にバージョン管理しようというのが、データベースマイグレーションツールの役割です。
なお、Spring BootにはH2やFlywayを用いてデータベースを自動構築する機能が備わっておりますが、今回はそちらを使用しません。この機能は簡易的な機能であり、本格的にシステムを構築する場合は、データベースマイグレーションツールは独立して用いたほうがいいと考えているからです。
では、kajitool-flywayというサブプロジェクトを作成します。
ルートプロジェクトのディレクトリ上で、次のコマンドを実行してください。
$ mkdir kajitool-flyway
次に、kajitool-flywayディレクトリに次のgradleファイルを追加します。
buildscript {
    dependencies {
        classpath 'com.h2database:h2:1.4.197'
    }
}

plugins {
    id "org.flywaydb.flyway" version "5.2.4"
}

flyway {
    url = "jdbc:h2:file:$rootDir/kajitool-h2db/db"
    user = 'sa'
}
ルートプロジェクトにあるsettings.gradleにkajitool-flywayプロジェクトを追加します。
include 'kajitool-web', 'kajitool-flyway'
データベースを構築するSQLファイルを次のディレクトリに配置します。
kajitool-flyway/src/main/resources/db/migration
create table RECIPE (
    ID bigint not null,
    NAME varchar(100) not null,
    VERSION int not null,
    UPDATED_AT datetime not null,
    PRIMARY KEY (ID)
);

create table RECIPE_DETAIL (
    ID bigint not null,
    RECIPE_ID bigint not null,
    MATERIAL_ID bigint not null,
    QUANTITY int not null,
    PRIMARY KEY (ID),
);

create index I1__RECIPE_DETAIL on RECIPE_DETAIL (RECIPE_ID);

create table MATERIAL (
    ID bigint not null,
    NAME varchar(100) not null,
    PRIMARY KEY (ID)
);

alter table RECIPE_DETAIL
  add constraint FK__RECIPE_DETAIL__RECIPE_ID
  foreign key (RECIPE_ID) references RECIPE (ID);

alter table RECIPE_DETAIL
  add constraint FK__RECIPE_DETAIL__MATERIAL_ID
  foreign key (MATERIAL_ID) references MATERIAL (ID);
create sequence RECIPE__ID_SEQ;
create sequence RECIPE_DETAIL__ID_SEQ;
insert into MATERIAL values(1, 'どうのこうせき');
insert into MATERIAL values(2, 'てつのこうせき');
insert into MATERIAL values(3, 'ぎんのこうせき');
最後に、ルートプロジェクトで次のコマンドを実行してください。
$ ./gradlew :kajitool-flyway:flywayMigrate
これで、ルートプロジェクトのkajitool-h2dbというディレクトリに、データベースが出来ました。
次のコマンドを実行すると、データベースマイグレーションの情報が確認出来ます。
$ ./gradlew :kajitool-flyway:flywayInfo

> Task :kajitool-flyway:flywayInfo
Schema version: 1.3
+-----------+---------+------------------+------+---------------------+---------+
| Category  | Version | Description      | Type | Installed On        | State   |
+-----------+---------+------------------+------+---------------------+---------+
| Versioned | 1.1     | Create tables    | SQL  | 2019-01-20 14:48:39 | Success |
| Versioned | 1.2     | Create sequences | SQL  | 2019-01-20 14:48:39 | Success |
| Versioned | 1.3     | Create data      | SQL  | 2019-01-20 14:48:39 | Success |
+-----------+---------+------------------+------+---------------------+---------+
db.mv.dbファイルがそのデータベースファイルそのものです。データベースはgit管理したくないので、git管理から対象外にしましょう。
      :
  out/
+ kajitool-h2db/
ここまで出来たら、コミットしましょう!
$ git add .
$ git commit -m "database migrate by flyway"
Flywayについて
Flyway便利ですね。僕のプロジェクトでは、MyBatis Migrationというツールを用いていますが、どちらも同じようなツールです。
データベースを適切に管理することは、大規模システム開発を成功に導く上で重要です。
Flywayについてもっと知りたい方は、次の記事などいいのではないでしょうか。
DBeaverの紹介
システム開発をしていると、色んなデータベースツールを扱う必要になります。各自、それぞれお好みのツールがあるかと思います。例えば、Oracleデータベースを扱う時の僕の好みのツールは、SI Object Browserです。
とはいえ、データベースは様々であり、汎用的なツールが欲しいです。
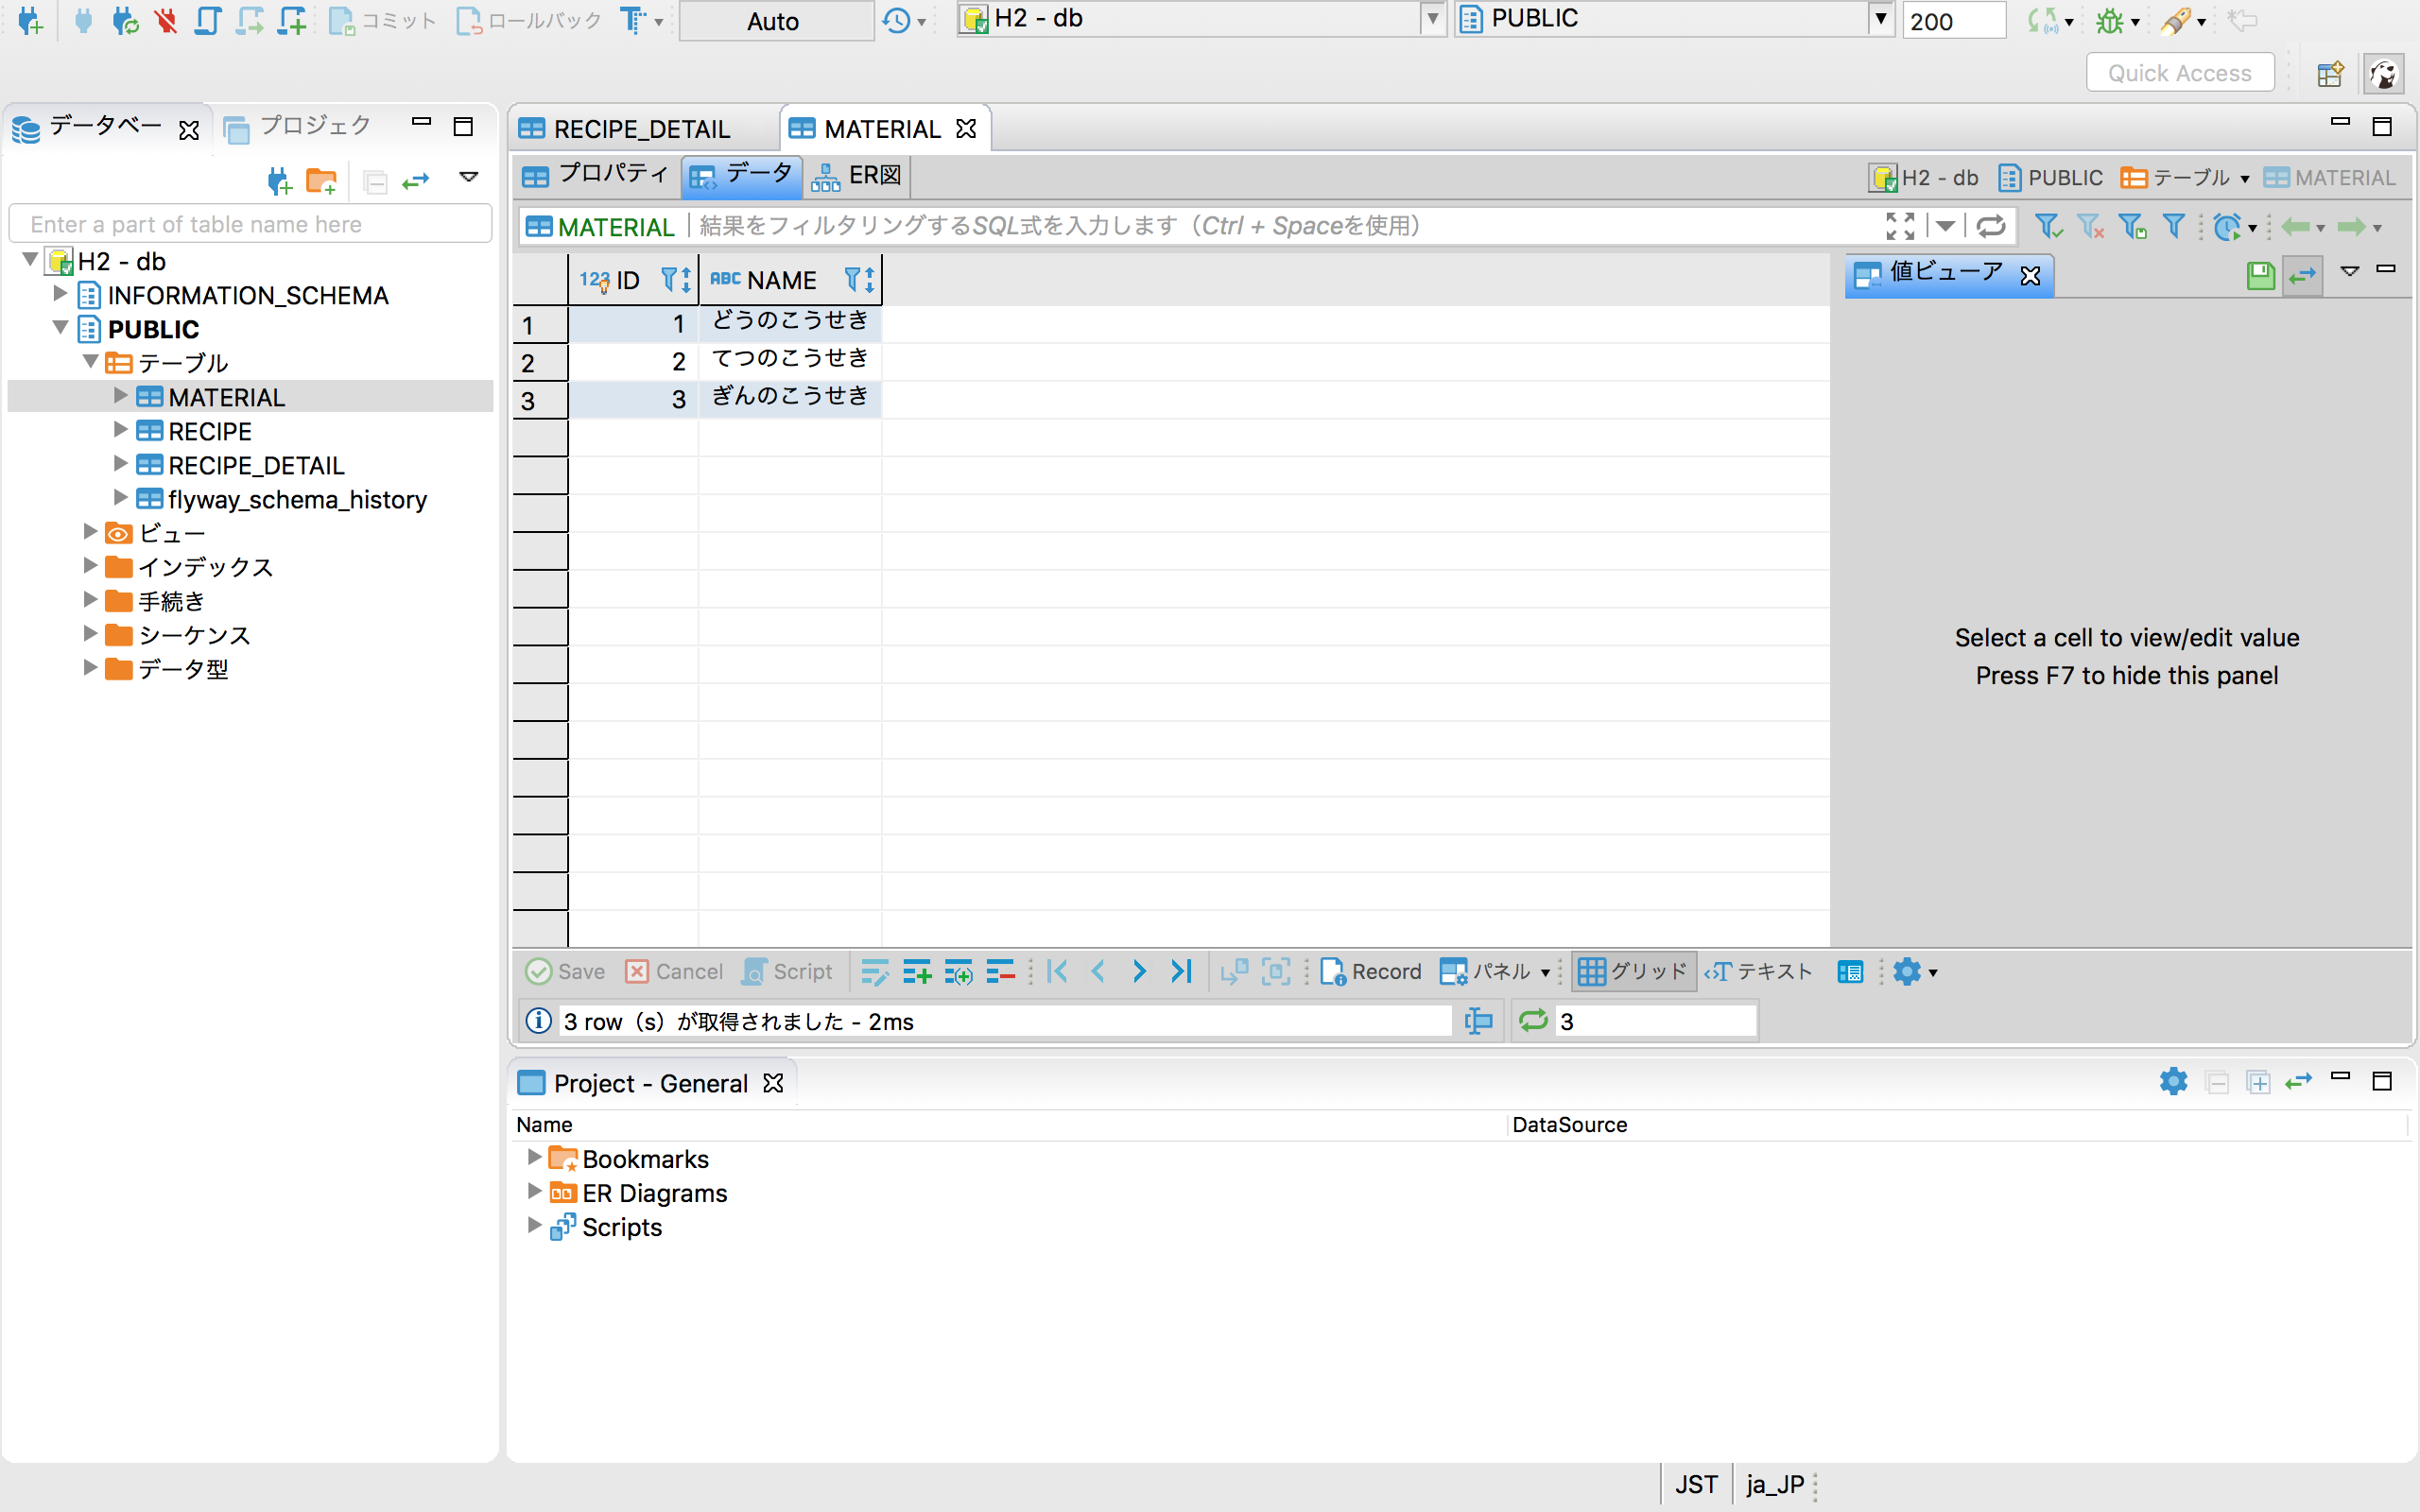
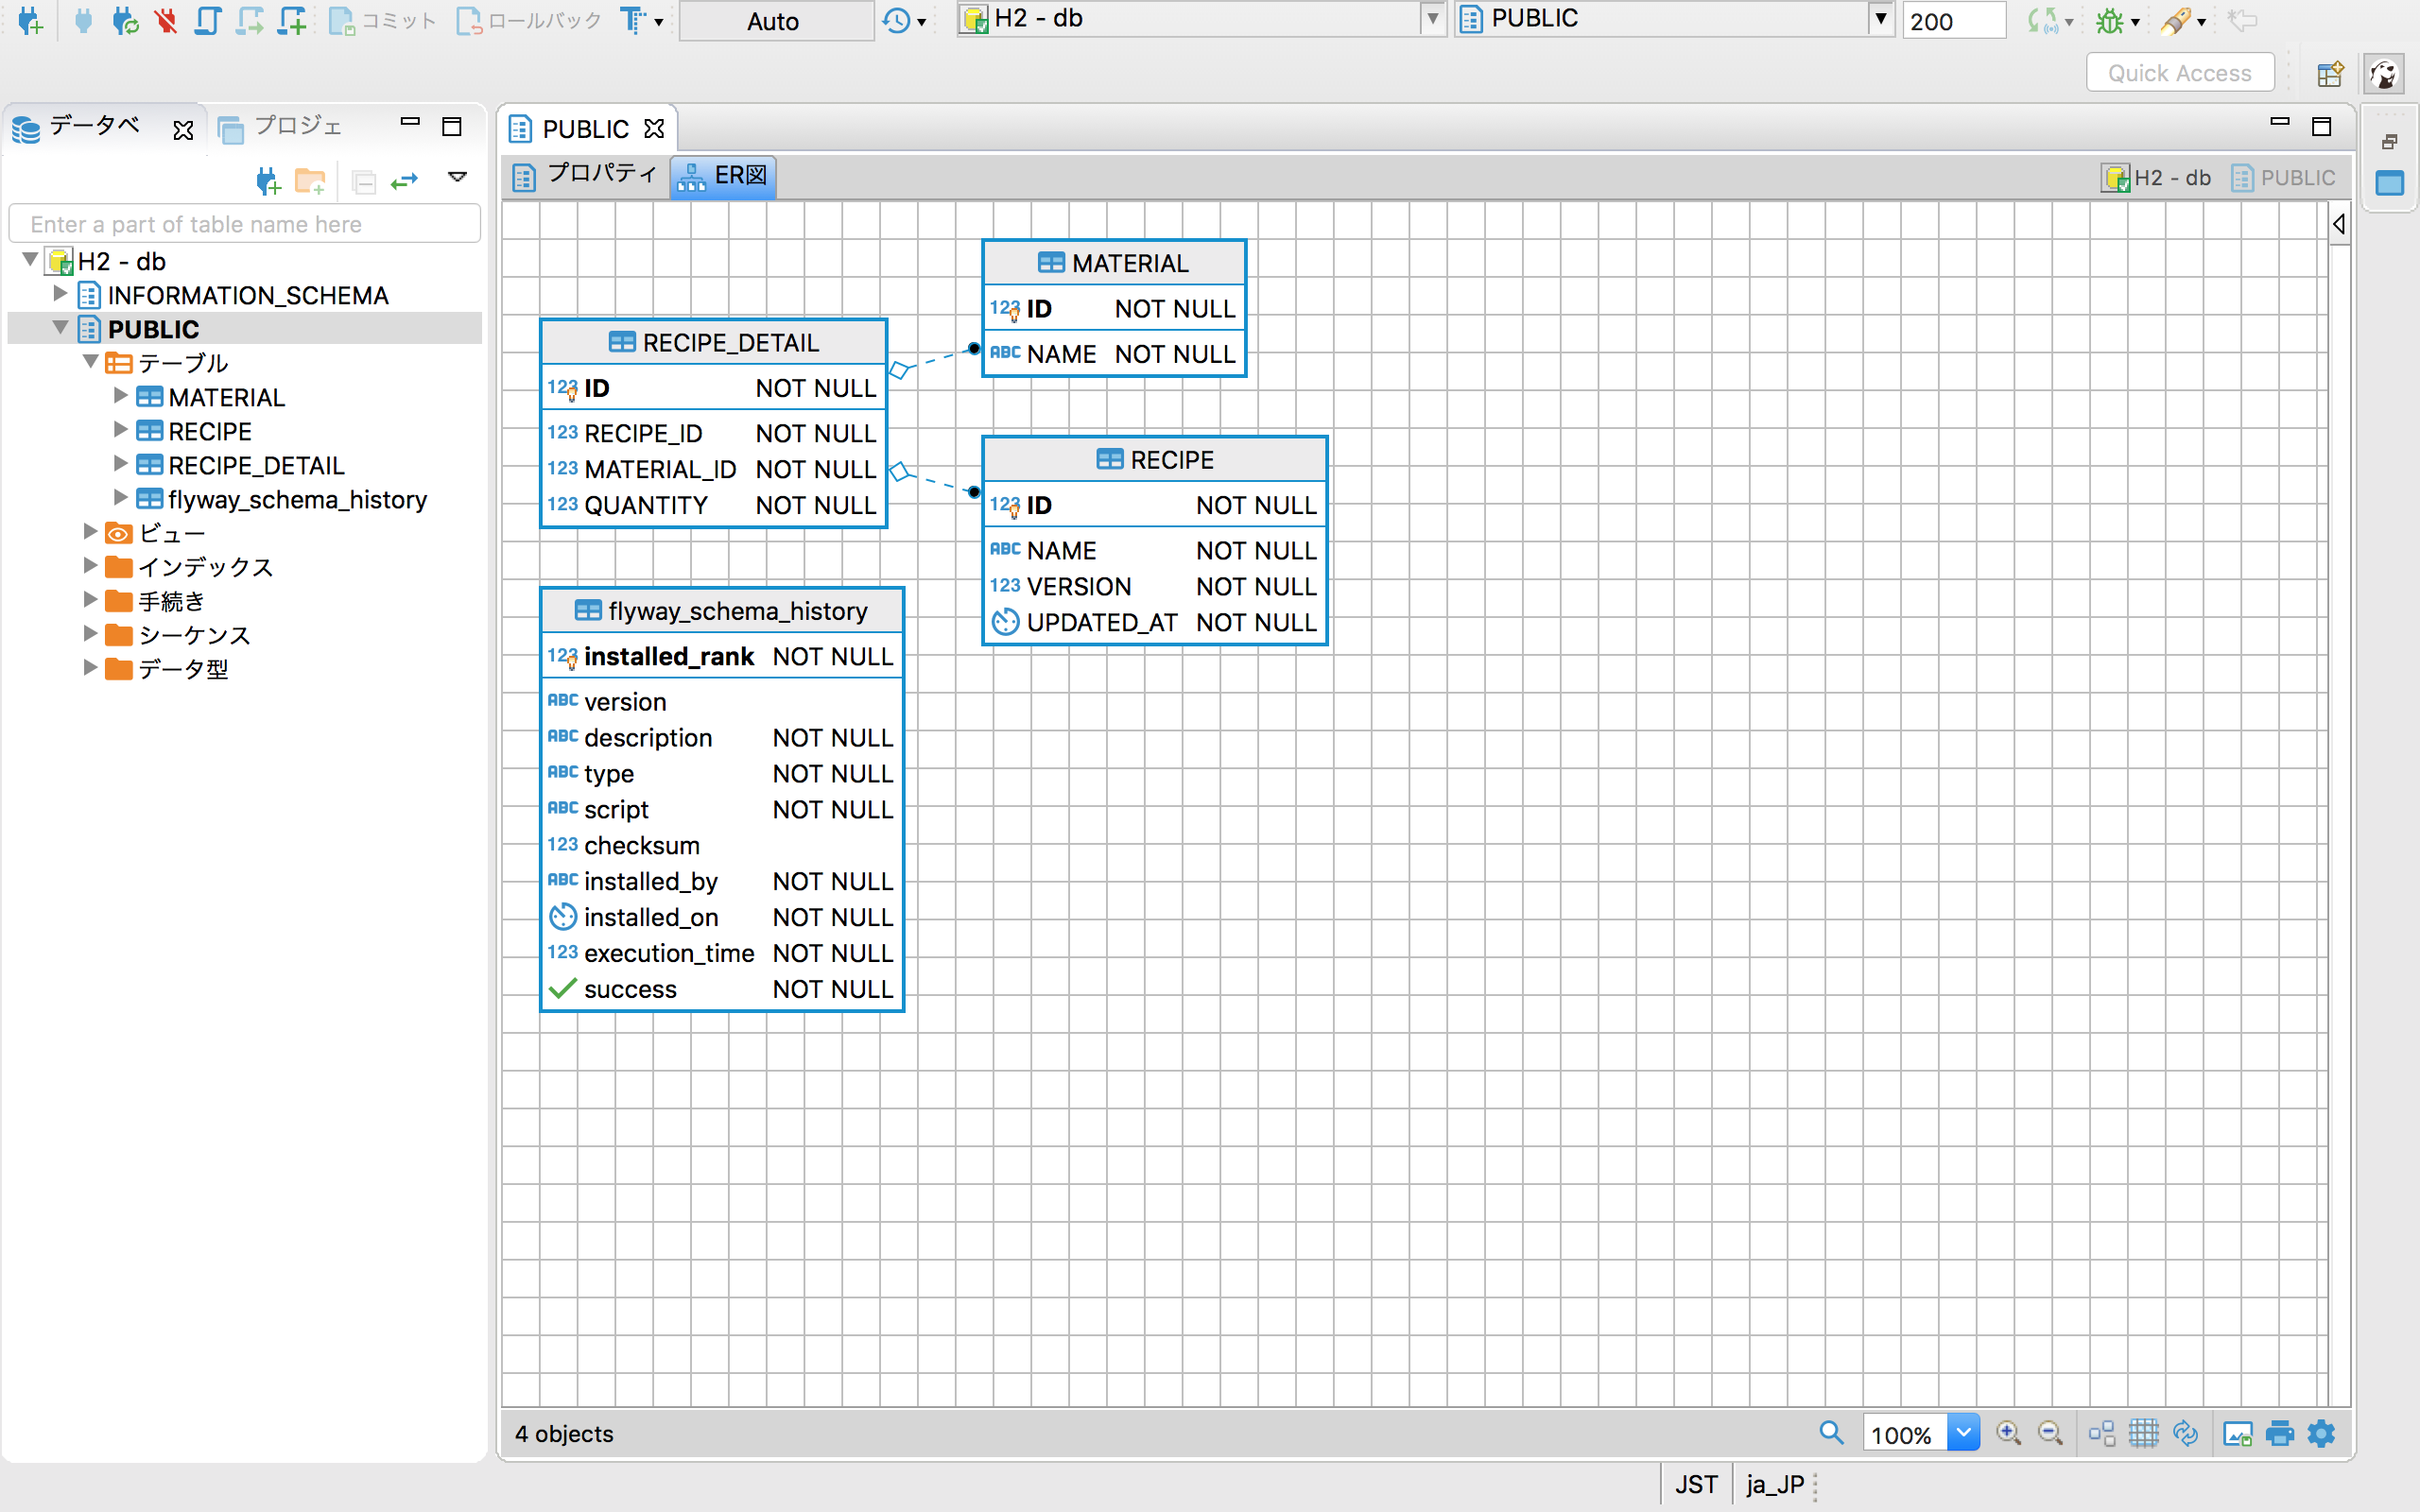
最近は、「DBeaver」と呼ばれるツールを活用しています。Eclipseベースで開発されているGUIツールのようですが、JDBC接続出来る全てのデータベースに対応しているので、汎用的で扱いやすいです。
例えば、先ほど作成したデータベースの内容とER図の例です。
このようにデータベースをGUIで操作でき、また接続に必要なJDBCドライバを自動でダウンロードする機能を備えていたりとなかなか使い勝手もいいので、ここでご紹介させて頂きます。
MyBatis GeneratorによるDAOの自動生成
ようやくデータベースも出来ました!では、いよいよデータベースアクセス部品を作成しましょう。
データベースアクセスとして、MyBatisを用います。MyBatisはO/R Mapperというよりは、SQL Mapperと呼ばれる代物です。SQLを活用したい性質のシステムを開発する場合において、Domaと並び有効な選択肢となります。
今回の規模であれば、そのままMyBatisを用いて手組みのシステムを作成しても構いませんが、ある程度の規模になると、手組みでデータベースアクセス部品を用意するのは非常にコストがかかります。そこで、MyBatis Generatorと呼ばれるツールを用いて、DAO(データベースアクセスオブジェクト)を自動生成しましょう。
まずは、kajitool-daoサブプロジェクトを生成します。
$ mkdir kajitool-dao
次に、kajitool-daoディレクトリに次のgradleファイルを追加します。
apply plugin: 'java'

configurations {
    gentool
}

sourceSets {
    main {
        java {
            srcDir 'src/gen/java'
        }
    }
}

task cleanGen(type: Delete, description:'delete generated sources.', group:'Gen') {
    delete "$projectDir/src/gen/java"
}

task gen(type: JavaExec, description:'generate sources', group:'Gen', dependsOn: [cleanGen]) {
    classpath = configurations.gentool
    main = 'org.mybatis.generator.api.ShellRunner'
    maxHeapSize = '512m'
    args '-configfile', 'genConfig.xml'
} doFirst {
    file("$projectDir/src/gen/java/kajitool/").mkdirs()
}

dependencies {
    gentool 'com.h2database:h2:1.4.197'
    gentool 'org.mybatis.generator:mybatis-generator-core:1.3.6'
    implementation 'org.mybatis:mybatis:3.4.5'
    runtimeOnly 'com.h2database:h2:1.4.197'
}
自動生成の指示書となる、XMLファイルを追加します。
<?xml version="1.0" encoding="UTF-8"?>
<!DOCTYPE generatorConfiguration
PUBLIC "-//mybatis.org//DTD MyBatis Generator Configuration 1.0//EN"
"http://mybatis.org/dtd/mybatis-generator-config_1_0.dtd">

<generatorConfiguration>
  <context id="kajitool-dao" targetRuntime="MyBatis3">
    <property name="javaFileEncoding" value="UTF-8" />

    <!-- MyBatis Generator Plugin -->
    <plugin type="org.mybatis.generator.plugins.CaseInsensitiveLikePlugin" />
    <plugin type="org.mybatis.generator.plugins.SerializablePlugin" />
    <plugin type="org.mybatis.generator.plugins.ToStringPlugin" />

    <commentGenerator>
      <property name="suppressDate" value="true" />
    </commentGenerator>

    <jdbcConnection
      driverClass="org.h2.Driver"
      connectionURL="jdbc:h2:file:../kajitool-h2db/db"
      userId="sa" password="">
    </jdbcConnection>

    <javaModelGenerator
      targetPackage="kajitool.dao.model" targetProject="src/gen/java" />

    <javaClientGenerator type="ANNOTATEDMAPPER"
      targetPackage="kajitool.dao.mapper" targetProject="src/gen/java" />

    <table schema="PUBLIC" tableName="RECIPE" domainObjectName="RecipeEntity"/>
    <table schema="PUBLIC" tableName="RECIPE_DETAIL" domainObjectName="RecipeDetailEntity"/>
    <table schema="PUBLIC" tableName="MATERIAL" domainObjectName="MaterialEntity"/>
  </context>
</generatorConfiguration>
ルートプロジェクトにあるsettings.gradleにkajitool-daoプロジェクトを追加します。
include 'kajitool-web', 'kajitool-flyway', 'kajitool-dao'
次のコマンドを実行しましょう!
$ ./gradlew :kajitool-dao:gen
kajitool-dao/src/gen/javaディレクトリ配下に、自動生成ソースが出来上がっていれば成功です。
自動生成ソースには、シーケンス番号を取得する部品がありません。そこで、シーケンス番号を取得する部品を追加しましょう。
package kajitool.dao.mapper;

import org.apache.ibatis.annotations.Param;
import org.apache.ibatis.annotations.Select;

public interface SequenceMapper {

    @Select("SELECT ${sequenceName}.NEXTVAL")
    long nextval(@Param("sequenceName") String sequenceName);
}
次のコマンドを実行してビルドが成功すればOKです!
$ ./gradlew :kajitool-dao:build
ビルド結果はgit管理したくないので、git管理から対象外にしましょう。
/build/
ここまで出来たら、コミットしましょう!
$ git add .
$ git commit -m "generate source by mybatis generator"
MyBatisを用いたデータベースアクセス
ようやくデータベースとの連携です。
まずは素材の取得という簡単なところから、実装していきましょう!
kajitool-webプロジェクトのbuild.gradleにkajitool-daoプロジェクトの依存性を追加します。また、エンティティモデルとドメインモデルの変換に、MapStructと呼ばれるBean Mappingライブラリを用いようと思いますので、それも追加します。
+ plugins {
+	id 'net.ltgt.apt' version '0.20'
+ }

apply plugin: 'java'
      :
dependencies {
      :
+	implementation project(":kajitool-dao")
+	implementation 'org.mapstruct:mapstruct:1.2.0.Final'
+	implementation 'org.mapstruct:mapstruct-jdk8:1.2.0.Final'
	implementation 'io.springfox:springfox-swagger2:2.9.2'
      :
	testImplementation 'org.springframework.security:spring-security-test'

+	annotationProcessor 'org.mapstruct:mapstruct-processor:1.2.0.Final'
次に、MyBatisのJavaコンフィグを追加します。この設定を追加することで、kajitool.dao.mapperパッケージにあるインタフェースがSQL Mapperとして自動的に登録されます。
package kajitool.web.config;

import org.mybatis.spring.annotation.MapperScan;
import org.springframework.context.annotation.Configuration;

@Configuration
@MapperScan("kajitool.dao.mapper")
public class MyBatisConfig {
}
MaterialRepositoryクラスを追加します。リポジトリは、ドメインオブジェクトの永続化を請け負います。ですので、ドメインオブジェクトとエンティティオブジェクトの変換もこのクラスの責務とします。この変換には、先ほど話したとおり、MapStructと呼ばれるBean Mappingライブラリを用います。
package kajitool.web.domain.repository;

import kajitool.dao.mapper.MaterialEntityMapper;
import kajitool.dao.model.MaterialEntity;
import kajitool.dao.model.MaterialEntityExample;
import kajitool.web.domain.model.Material;
import org.mapstruct.Mapper;
import org.mapstruct.factory.Mappers;
import org.springframework.stereotype.Repository;

import java.util.List;
import java.util.stream.Collectors;

@Repository
public class MaterialRepository {
    @Mapper
    public interface MaterialMap {
        MaterialMap INSTANCE = Mappers.getMapper( MaterialMap.class );
        Material toModel(MaterialEntity materialEntity);
    }

    private final MaterialEntityMapper materialMapper;

    public MaterialRepository(final MaterialEntityMapper materialMapper) {
        this.materialMapper = materialMapper;
    }
    public List<Material> selectAll() {
        return materialMapper.selectByExample(new MaterialEntityExample())
                .stream()
                .map(MaterialMap.INSTANCE::toModel)
                .collect(Collectors.toList());
    }
}
MaterialServiceからMaterialRepositoryを使うように修正します。
@Service
@Transactional
public class MaterialService {
    private final MaterialRepository repository;

    public MaterialService(final MaterialRepository repository) {
        this.repository = repository;
    }
    public List<Material> findAll() {
        return repository.selectAll();
    }
}
最後に、application.propertiesにデータベース接続設定を追加します。
spring.datasource.url=jdbc:h2:file:../kajitool-h2db/db
spring.datasource.username=sa
spring.datasource.password=
spring.datasource.driverClassName=org.h2.Driver
これで出来ました。次のコマンドを実行してWebアプリケーションを起動しましょう。
$ ./gradlew :kajitool-web:bootRun
次のURLにアクセスし、ブラウザで素材のjson形式データが表示されれば成功です!
ここまで出来たら、一旦コミットしましょう!
$ git add .
$ git commit -m "first database access"
では、一番難しいだろうレシピのリポジトリを作成していきます!
ソースコードが長いので、分割して説明していきますね。
レシピのリポジトリは、レシピとレシピ明細を1つの単位として扱います。下のソースコードは、レシピとレシピ明細のエンティティモデルの変換をMapStructで行うためのインタフェースを宣言しています。
@Repository
public class RecipeRepository {
    @Mapper
    public interface RecipeMap {
        RecipeMap INSTANCE = Mappers.getMapper(RecipeMap.class);
        RecipeEntity toEntity(Recipe recipe);
        @Mappings({
                @Mapping(target = "recipeDetails", ignore = true)
        })
        Recipe toModel(RecipeEntity recipeEntity);
    }
    @Mapper
    public interface RecipeDetailMap {
        RecipeDetailMap INSTANCE = Mappers.getMapper(RecipeDetailMap.class);
        RecipeDetailEntity toEntity(RecipeDetail recipeDetail);
        RecipeDetail toModel(RecipeDetailEntity recipeDetailEntity);
    }
          :
}
レシピとレシピ明細のSQL Mapperを、コンストラクタインジェクションしています。また、シーケンス番号はリポジトリ内で払い出すため、シーケンスのSQL Mapperをインジェクションしています。
@Repository
public class RecipeRepository {
          :
    private final RecipeEntityMapper recipeMapper;
    private final RecipeDetailEntityMapper recipeDetailMapper;
    private final SequenceMapper sequenceMapper;

    public RecipeRepository(
            final RecipeEntityMapper recipeMapper,
            final RecipeDetailEntityMapper recipeDetailMapper,
            final SequenceMapper sequenceMapper) {
        this.recipeMapper = recipeMapper;
        this.recipeDetailMapper = recipeDetailMapper;
        this.sequenceMapper = sequenceMapper;
    }
          :
レシピのIDからレシピを取得しているのが次のソースです。データベースよりレシピとレシピ明細を取得して、レシピのドメインモデルに変換しています。
@Repository
public class RecipeRepository {
          :
    public Optional<Recipe> selectById(long id) {
        Optional<Recipe> optionalRecipe = Optional.ofNullable(
                recipeMapper.selectByPrimaryKey(id))
                .map(RecipeMap.INSTANCE::toModel);

        optionalRecipe.ifPresent(recipe -> {
            List<RecipeDetail> recipeDetails =
                    recipeDetailMapper.selectByExample(
                            new RecipeDetailEntityExample() {{
                                createCriteria().andRecipeIdEqualTo(id);
                            }})
                            .stream()
                            .map(RecipeDetailMap.INSTANCE::toModel)
                            .collect(Collectors.toList());
            recipe.setRecipeDetails(recipeDetails);
        });
        return optionalRecipe;
    }
          :
レシピの追加と更新が次のソースです。追加処理の中で、IDを採番しています。更新は、削除して追加で実現しています。
@Repository
public class RecipeRepository {
          :
    public Recipe create(final Recipe recipe) {
        if (recipe.getId() == null) {
            recipe.setId(sequenceMapper.nextval("RECIPE__ID_SEQ"));
        }
        recipe.setVersion(recipe.getVersion() + 1);
        recipe.setUpdatedAt(new Date());
        recipeMapper.insertSelective(RecipeMap.INSTANCE.toEntity(recipe));
        recipe.getRecipeDetails().forEach(detail -> {
            if (detail.getId() == null) {
                detail.setId(sequenceMapper.nextval("RECIPE_DETAIL__ID_SEQ"));
            }
            detail.setRecipeId(recipe.getId());
            recipeDetailMapper.insertSelective(RecipeDetailMap.INSTANCE.toEntity(detail));
        });
        return recipe;
    }

    public Recipe update(final Recipe recipe) {
        remove(recipe.getId(), recipe.getVersion());
        return create(recipe);
    }
          :
最後に削除処理です。レシピが存在する場合のみ削除処理をしています。先に明細から削除しているのは、参照制約のエラーが発生しないようにする為です。また、削除時に更新キーとなるバージョンを含めることで、楽観的排他制御も実現しています。
@Repository
public class RecipeRepository {
          :
    public void remove(final long id, final int version) {
        if (recipeMapper.selectByPrimaryKey(id) == null) {
            return;
        }
        recipeDetailMapper.deleteByExample(new RecipeDetailEntityExample() {{
            createCriteria()
                    .andRecipeIdEqualTo(id);
        }});
        int count = recipeMapper.deleteByExample(new RecipeEntityExample() {{
            createCriteria()
                    .andIdEqualTo(id)
                    .andVersionEqualTo(version);
        }});
        // 排他チェック
        if (count == 0) {
            throw new OptimisticLockingFailureException(
                    String.format("recipe id = [%d]", id));
        }
    }
}
完全版のソースコードはこちらです。面倒な方は、こちらを貼り付けてくださいね。
package kajitool.web.domain.repository;

import kajitool.dao.mapper.RecipeDetailEntityMapper;
import kajitool.dao.mapper.RecipeEntityMapper;
import kajitool.dao.mapper.SequenceMapper;
import kajitool.dao.model.RecipeDetailEntity;
import kajitool.dao.model.RecipeDetailEntityExample;
import kajitool.dao.model.RecipeEntity;
import kajitool.dao.model.RecipeEntityExample;
import kajitool.web.domain.model.Recipe;
import kajitool.web.domain.model.RecipeDetail;
import org.mapstruct.Mapper;
import org.mapstruct.Mapping;
import org.mapstruct.Mappings;
import org.mapstruct.factory.Mappers;
import org.springframework.dao.OptimisticLockingFailureException;
import org.springframework.stereotype.Repository;

import java.util.Date;
import java.util.List;
import java.util.Optional;
import java.util.stream.Collectors;

@Repository
public class RecipeRepository {

    @Mapper
    public interface RecipeMap {
        RecipeMap INSTANCE = Mappers.getMapper(RecipeMap.class);

        RecipeEntity toEntity(Recipe recipe);

        @Mappings({
                @Mapping(target = "recipeDetails", ignore = true)
        })
        Recipe toModel(RecipeEntity recipeEntity);
    }

    @Mapper
    public interface RecipeDetailMap {
        RecipeDetailMap INSTANCE = Mappers.getMapper(RecipeDetailMap.class);

        RecipeDetailEntity toEntity(RecipeDetail recipeDetail);

        RecipeDetail toModel(RecipeDetailEntity recipeDetailEntity);
    }

    private final RecipeEntityMapper recipeMapper;
    private final RecipeDetailEntityMapper recipeDetailMapper;
    private final SequenceMapper sequenceMapper;

    public RecipeRepository(
            final RecipeEntityMapper recipeMapper,
            final RecipeDetailEntityMapper recipeDetailMapper,
            final SequenceMapper sequenceMapper) {
        this.recipeMapper = recipeMapper;
        this.recipeDetailMapper = recipeDetailMapper;
        this.sequenceMapper = sequenceMapper;
    }

    public Optional<Recipe> selectById(long id) {
        Optional<Recipe> optionalRecipe = Optional.ofNullable(
                recipeMapper.selectByPrimaryKey(id))
                .map(RecipeMap.INSTANCE::toModel);

        optionalRecipe.ifPresent(recipe -> {
            List<RecipeDetail> recipeDetails =
                    recipeDetailMapper.selectByExample(
                            new RecipeDetailEntityExample() {{
                                createCriteria().andRecipeIdEqualTo(id);
                            }})
                            .stream()
                            .map(RecipeDetailMap.INSTANCE::toModel)
                            .collect(Collectors.toList());
            recipe.setRecipeDetails(recipeDetails);
        });
        return optionalRecipe;
    }

    public Recipe create(final Recipe recipe) {
        if (recipe.getId() == null) {
            recipe.setId(sequenceMapper.nextval("RECIPE__ID_SEQ"));
        }
        recipe.setVersion(recipe.getVersion() + 1);
        recipe.setUpdatedAt(new Date());
        recipeMapper.insertSelective(RecipeMap.INSTANCE.toEntity(recipe));
        recipe.getRecipeDetails().forEach(detail -> {
            if (detail.getId() == null) {
                detail.setId(sequenceMapper.nextval("RECIPE_DETAIL__ID_SEQ"));
            }
            detail.setRecipeId(recipe.getId());
            recipeDetailMapper.insertSelective(RecipeDetailMap.INSTANCE.toEntity(detail));
        });
        return recipe;
    }

    public Recipe update(final Recipe recipe) {
        remove(recipe.getId(), recipe.getVersion());
        return create(recipe);
    }

    public void remove(final long id, final int version) {
        if (recipeMapper.selectByPrimaryKey(id) == null) {
            return;
        }
        recipeDetailMapper.deleteByExample(new RecipeDetailEntityExample() {{
            createCriteria()
                    .andRecipeIdEqualTo(id);
        }});
        int count = recipeMapper.deleteByExample(new RecipeEntityExample() {{
            createCriteria()
                    .andIdEqualTo(id)
                    .andVersionEqualTo(version);
        }});
        // 排他チェック
        if (count == 0) {
            throw new OptimisticLockingFailureException(
                    String.format("recipe id = [%d]", id));
        }
    }
}
楽観的排他が発生した場合に、OptimisticLockingFailureException例外をスローしていますので、そのエラー処理を追加しましょう。AppExceptionHandlerクラスに次の処理を追加してください。
    @ExceptionHandler(OptimisticLockingFailureException.class)
    public ResponseEntity<Object> handleOptimisticLockingFailureException(
            final OptimisticLockingFailureException ex, final WebRequest request) {
        return super.handleExceptionInternal(
                ex,
                new ServiceMessage("error", "Optimistic error."),
                null,
                HttpStatus.BAD_REQUEST,
                request);
    }
では、最後にサービスを修正します。こちらはサービスを呼び出すだけで簡単ですね。
@Service
@Transactional
public class RecipeService {
    private final RecipeRepository recipeRepository;

    public RecipeService(RecipeRepository recipeRepository) {
        this.recipeRepository = recipeRepository;
    }
    public Recipe create(final Recipe recipe) {
        RecipeValidator.validateOnCreate(recipe);
        return recipeRepository.create(recipe);
    }
    public Optional<Recipe> findById(final long id) {
        return recipeRepository.selectById(id);
    }
    public Recipe save(final Recipe recipe) {
        RecipeValidator.validateOnUpdate(recipe);
        return recipeRepository.update(recipe);
    }
    public void remove(final long id, final int version) {
        recipeRepository.remove(id, version);
    }
}
Swaggerの画面を使って、レシピの登録や更新、削除が出来ることを確認してください。
うまく出来たら、コミットしましょう!
$ git add .
$ git commit -m "implement recipe crud"
さて、最後にレシピビューのリポジトリを追加します。ビューモデルは参照用のモデルであり、画面の関心毎を多く反映しているモデルです。また、性能上の理由により作成することもあります。
ビューモデルのデータを取得にはSQL機能をフル活用したい場合が多く、将来的な変更も多く予想される為、しなやかな変更が出来るよう、SQL Mapperはviewパッケージ内で定義することにします。
package kajitool.web.view.mapper;

import kajitool.web.view.model.RecipeListView;
import org.apache.ibatis.annotations.Select;

import java.util.List;

public interface RecipeListViewMapper {
    @Select(" SELECT " +
            "   ID as id, " +
            "   NAME as name, " +
            "   select count(*) from RECIPE_DETAIL as D where D.RECIPE_ID = RECIPE.ID as materialCount " +
            " from RECIPE ")
    List<RecipeListView> selectAll();
}
MyBatisにSQL Mapperを認識させる為に、MapperScanにkajitool.web.view.mapperパッケージを追加します。
@Configuration
@MapperScan({"kajitool.dao.mapper", "kajitool.web.view.mapper"})
public class MyBatisConfig {
}
リポジトリは、SQL Mapperを呼び出すだけのものです。
「リポジトリはいるのか?」と感じるかもしれませんが、プログラム構造の統一性や、テストのしやすさを考慮し、サービスがSQL Mapperに直接依存しない為にリポジトリを定義しています。
package kajitool.web.view.repository;

import kajitool.web.view.mapper.RecipeListViewMapper;
import kajitool.web.view.model.RecipeListView;
import org.springframework.stereotype.Repository;

import java.util.List;

@Repository
public class RecipeListViewRepository {
    private final RecipeListViewMapper recipeListViewMapper;

    public RecipeListViewRepository(final RecipeListViewMapper recipeListViewMapper) {
        this.recipeListViewMapper = recipeListViewMapper;
    }
    public List<RecipeListView> selectAll() {
        return recipeListViewMapper.selectAll();
    }
}
最後に、レシピビューのサービスを修正しましょう!
package kajitool.web.service.recipelist;

import kajitool.web.view.model.RecipeListView;
import kajitool.web.view.repository.RecipeListViewRepository;
import org.springframework.stereotype.Service;
import org.springframework.transaction.annotation.Transactional;

import java.util.List;

@Service
@Transactional
public class RecipeListViewService {
    private final RecipeListViewRepository recipeListViewRepository;

    public RecipeListViewService(
            final RecipeListViewRepository recipeListViewRepository) {
        this.recipeListViewRepository = recipeListViewRepository;
    }
    public List<RecipeListView> findAll() {
        return recipeListViewRepository.selectAll();
    }
}
Swaggerの画面を使って、レシピビューの取得が出来ることを確認してください。
うまく出来たら、コミットしましょう!
$ git add .
$ git commit -m "implement recipe view"
MyBatisについて
MyBatis、実は海外ではあまり人気がないみたいですが、日本では割と人気のライブラリです。
HibernateのようなO/Rマッパーと比べて、SQLを活用しやすく直感的なところがいいと考えています。
レガシーなデータベースを扱う場合は、こちらやDomaのようなSQLを活用できるツールを採用したほうが、トラブルは少ないと思います。
MyBatisに入門する場合は、こちらの記事をおすすめします。
おまけ〜Proxyの設定〜
残念ながらインターネットにProxy経由で接続する環境で作業している場合、GitHubとのOAuth2認証がエラーとなります。その場合は次の内容を追加してください。
まずは、application.propertiesにプロキシの設定を追加します。
          :
application.proxy.host=[your proxy host]
application.proxy.port=[your proxy port]
application.proxy.user=[your proxy user]
application.proxy.password=[your proxy password]
次に、HttpClientライブラリを依存関係に追加します。
          :
+	implementation 'org.apache.httpcomponents:httpclient'
	runtimeOnly 'org.springframework.boot:spring-boot-devtools'
          :
最後に、WebSecurityConfigクラスの内容を次の通りに書き換えます。
@Configuration
@EnableWebSecurity
public class WebSecurityConfig extends WebSecurityConfigurerAdapter {
    @Autowired
    private ClientHttpRequestFactory requestFactory;

    @Override
    protected void configure(HttpSecurity http) throws Exception {
        // @formatter:off
        http.csrf().csrfTokenRepository(
                CookieCsrfTokenRepository.withHttpOnlyFalse())
        .and().oauth2Login()
                .tokenEndpoint()
                    .accessTokenResponseClient(buildAccessTokenResponseClient())
                .and()
                .userInfoEndpoint()
                    .userService(buildUserService())
        .and()
        .and().authorizeRequests()
            .mvcMatchers(HttpMethod.POST, "/api/**/*").authenticated()
            .mvcMatchers(HttpMethod.PUT, "/api/**/*").authenticated()
            .mvcMatchers(HttpMethod.DELETE, "/api/**/*").authenticated()
            .anyRequest().permitAll()
        ;
        // @formatter:on
    }

    private DefaultAuthorizationCodeTokenResponseClient buildAccessTokenResponseClient() {

        DefaultAuthorizationCodeTokenResponseClient client =
                new DefaultAuthorizationCodeTokenResponseClient();
        RestTemplate restTemplate = new RestTemplate(
                Arrays.asList(
                        new FormHttpMessageConverter(),
                        new OAuth2AccessTokenResponseHttpMessageConverter()));
        restTemplate.setErrorHandler(new OAuth2ErrorResponseErrorHandler());
        restTemplate.setRequestFactory(requestFactory);
        client.setRestOperations(restTemplate);

        return client;
    }

    private DefaultOAuth2UserService buildUserService() {
        DefaultOAuth2UserService userService = new DefaultOAuth2UserService();
        RestTemplate restTemplate2 = new RestTemplate();
        restTemplate2.setRequestFactory(requestFactory);
        userService.setRestOperations(restTemplate2);

        return userService;
    }

    @Bean
    public ClientHttpRequestFactory requestFactory(
            @Value("${application.proxy.host}") String host,
            @Value("${application.proxy.port}") int port,
            @Value("${application.proxy.user}") String user,
            @Value("${application.proxy.password}") String password) {

        HttpClientBuilder builder = HttpClientBuilder.create();
        builder.setProxy(new HttpHost(host, port));

        if (StringUtils.hasText(user) && StringUtils.hasText(password)) {
            BasicCredentialsProvider provider = new BasicCredentialsProvider();
            provider.setCredentials(
                    new AuthScope(host, port),
                    new UsernamePasswordCredentials(user, password));
            builder.setDefaultCredentialsProvider(provider);
        }
        return new HttpComponentsClientHttpRequestFactory(builder.build());
    }
}
まとめ
まとめられないw
飲みに行きましょう!
おつかれさまでした!! 🍻(´∀`*v)
-
~~こちらの資料はまだありません。無事完成することを祈ってください。~~出来ました!よかったよー。ハンズオン資料 - Spring Boot 2とAngularでアプリ作成 (2/2) ↩
-
職人には、武器以外にも防具や道具、さいほうや錬金といった様々な種類があります。 ↩
-
防衛軍や白箱といった、ゴールドを支払わなくても強い武器を手に入れることが出来る仕組みが導入されたので ↩

