RecyclerViewと合わせて使うことで複雑なレイアウトのリストやアコーディオンを持つリストなど
凝ったUIを簡単に実装することができます。
この記事で使ったレイアウトファイルは最後にコード載せているのでコピペして使ってください。
この記事で作成した サンプルコードはこちら
※DataBindingを使ってます。
インストール
アプリレベルのBuild.gradleで
build.gradle
dependency {

    // 省略

    // Epoxy
    implementation 'com.airbnb.android:epoxy:2.19.0'
    implementation 'com.airbnb.android:epoxy-databinding:2.19.0'
    kapt 'com.airbnb.android:epoxy-processor:2.19.0'  // <- Kotlinの場合
}
必要なもの
- Epoxyを適用するRecyclerView(EpoxyRecyclerView)
- RecyclerViewで表示するリストアイテムのCustomView(ファイル名にPrefixを付けると実装が楽)
- Epoxyを使って表示するCustomViewを指定するファイル(後述)
- TypedEpoxyControllerを継承したクラス
Epoxyを使って表示するCustomViewを指定するファイル
package-info.java
// レイアウトファイルにPrefix(例:epoxy_view_holder)をつけていないと全て記述することになる
@EpoxyDataBindingPattern(rClass = R.class, layoutPrefix = "epoxy_view_holder")
package package名;  // <- アプリのパッケージ名

import com.airbnb.epoxy.EpoxyDataBindingPattern;
このファイルをApplicationクラスのファイルと同じ場所に置く。
TypedEpoxyControllerを継承したクラス
このクラスでリストの表示やタップイベントなどを管理することになる。
実装の流れ
- EpoxyRecyclerViewをセットする
- RecyclerViewで表示するリストアイテムを作る
epoxy_view_holder_text_header.xmlepoxy_view_holder_text_item.xml
- package-info.javaを追加
- TypedEpoxyControllerを継承したクラスを実装する
- 4.で実装したクラスを1.のEpoxyRecyclerViewにsetController()で渡す
1.と2.はこの記事の最後にコード載せているので参照してください。
3.は上記の通りです
4. TypedEpoxyControllerを継承したクラスを実装する
-
buildModels()に表示したいデータのリストを渡す。 -
buildModels()内で上から表示したい順に自作したCustomViewの***BindingModel_をaddする。
SimpleEpoxyListController.kt
class SimpleEpoxyListController
    : Typed2EpoxyController<List<String>, List<String>>() {

    override fun buildModels(
        headers: List<String>?,
        items: List<String>?
    ) {

        headers ?: return
        items ?: return

        // 1つ目のSection Header
        TextHeaderBindingModel_()
            .id(headers[0], 0.toLong())
            .text(headers[0])
            .addTo(this)

        // 1つ目のitemリスト
        items.forEachIndexed { indexItem, text ->

            TextItemBindingModel_()
                .id("TextItemBindingModel_0", indexItem.toLong())
                .text(text)
                .addTo(this)
        }

        // 2つ目のSection Header
        TextHeaderBindingModel_()  // <- 1つ目のSection Header
            .id(headers[1], 1.toLong())
            .text(headers[1])
            .addTo(this)

        // 2つ目のitemリスト
        items.forEachIndexed { indexItem, text ->

            TextItemBindingModel_()
                .id("TextItemBindingModel_1", indexItem.toLong())
                .text(text)
                .addTo(this)
        }
    }
}
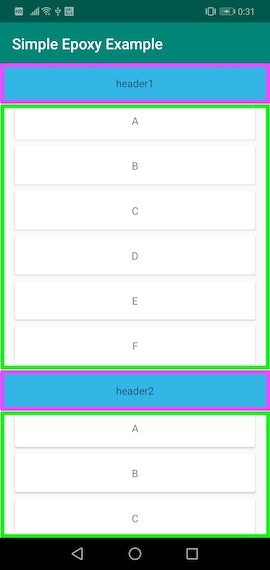
上記の例だとこんな感じの画面になります。
5. TypedEpoxyControllerをEpoxyRecyclerViewにsetController()で渡す
SimpleEpoxyFragment.kt
    // 省略

    override fun onCreateView(
        inflater: LayoutInflater, container: ViewGroup?,
        savedInstanceState: Bundle?
    ): View? {

        // 省略

        val controller = SimpleEpoxyListController()

        // setData()でデータを渡すとbuildModels()が呼ばれる
        controller.setData(
            listOf(
                "header1","header2"
            ),
            listOf(
                "A","B","C","D","E","F"
            )
        )

        // EpoxyRecyclerViewに4.で自作したTypedEpoxyControllerを継承したControllerをセット
        binding.simpleTextEpoxyRecyclerView.setController(controller)

        return binding.root
    }
この記事で使ったレイアウトファイル
fragment_simple_epoxy.xml
<?xml version="1.0" encoding="utf-8"?>
<layout xmlns:android="http://schemas.android.com/apk/res/android"
        xmlns:app="http://schemas.android.com/apk/res-auto">

    <android.support.constraint.ConstraintLayout
            android:layout_width="match_parent"
            android:layout_height="match_parent">

        <com.airbnb.epoxy.EpoxyRecyclerView
                android:id="@+id/simpleTextEpoxyRecyclerView"
                android:layout_width="0dp"
                android:layout_height="0dp"
                app:layout_constraintTop_toTopOf="parent"
                app:layout_constraintStart_toStartOf="parent"
                app:layout_constraintEnd_toEndOf="parent"
                app:layout_constraintBottom_toBottomOf="parent"/>
    </android.support.constraint.ConstraintLayout>
</layout>
epoxy_view_holder_text_header.xml
<?xml version="1.0" encoding="utf-8"?>
<layout
        xmlns:app="http://schemas.android.com/apk/res-auto"
        xmlns:android="http://schemas.android.com/apk/res/android">

    <data>
        <variable
                name="text"
                type="String"/>
    </data>

    <android.support.constraint.ConstraintLayout
            android:layout_width="match_parent"
            android:layout_height="wrap_content">

        <TextView
                android:id="@+id/textSimpleHeader"
                android:layout_width="0dp"
                android:layout_height="50dp"
                android:text="@{text}"
                android:gravity="center"
                android:background="@android:color/holo_blue_light"
                app:layout_constraintTop_toTopOf="parent"
                app:layout_constraintStart_toStartOf="parent"
                app:layout_constraintBottom_toBottomOf="parent"
                app:layout_constraintEnd_toEndOf="parent"/>

    </android.support.constraint.ConstraintLayout>
</layout>
epoxy_view_holder_text_item.xml
<?xml version="1.0" encoding="utf-8"?>
<layout
        xmlns:app="http://schemas.android.com/apk/res-auto"
        xmlns:android="http://schemas.android.com/apk/res/android">

    <data>
        <variable
                name="text"
                type="String"/>
    </data>

    <android.support.constraint.ConstraintLayout
            android:layout_width="match_parent"
            android:layout_height="wrap_content">


        <android.support.v7.widget.CardView
                android:id="@+id/textCard"
                android:layout_width="0dp"
                android:layout_height="wrap_content"
                android:layout_marginBottom="10dp"
                android:layout_marginStart="20dp"
                android:layout_marginEnd="20dp"
                app:layout_constraintTop_toTopOf="parent"
                app:layout_constraintStart_toStartOf="parent"
                app:layout_constraintBottom_toBottomOf="parent"
                app:layout_constraintEnd_toEndOf="parent">

            <TextView
                    android:id="@+id/textSimple"
                    android:layout_width="100dp"
                    android:layout_height="50dp"
                    android:layout_gravity="center"
                    android:text="@{text}"
                    android:gravity="center"
                    app:layout_constraintTop_toTopOf="parent"
                    app:layout_constraintStart_toStartOf="parent"
                    app:layout_constraintBottom_toBottomOf="parent"
                    app:layout_constraintEnd_toEndOf="parent"/>
        </android.support.v7.widget.CardView>
    </android.support.constraint.ConstraintLayout>
</layout>
今回の記事は以上です。