VPP(Vector Packet Processing)とは、Ciscoが開発した高速でスケーラブルなネットワークスタックで、x86、ARMなどのアーキテクチャのLinuxのユーザ空間で実行されます。VPPはL1の機能の多くにDPDK(Data Plane Development Kit)のドライバとライブラリを使用しますが、これらは、VPPのプラグインとして分離されています。現在は、FD.ioプロジェクトのオープンソースとして公開されています。
ここでは、モバイルネットワークを構成するU-PlaneのUPF(5G)ならびにPGW-U(4G)にVPPを適用したtravelping/upg-vppを元にしたoai-cn5g-upf-vppをホストOSでネイティブにビルド、インストールする手順と構成について簡単に説明します。VPP-UPFにより、U-Planeのデータネットワークの高速化を図れると期待しています。
なお、本記事はOpen5GSおよびfree5GCでVPP-UPFを使用するための準備として書きました。 元々のOAIの使用ではUPFの情報をNRFに登録して動作させていますが、こちらではOpen5GS、free5GCと連携させる都合、NRFに登録せずに動作させています。
VPP-UPFとData Network Gatewayの簡単な概要
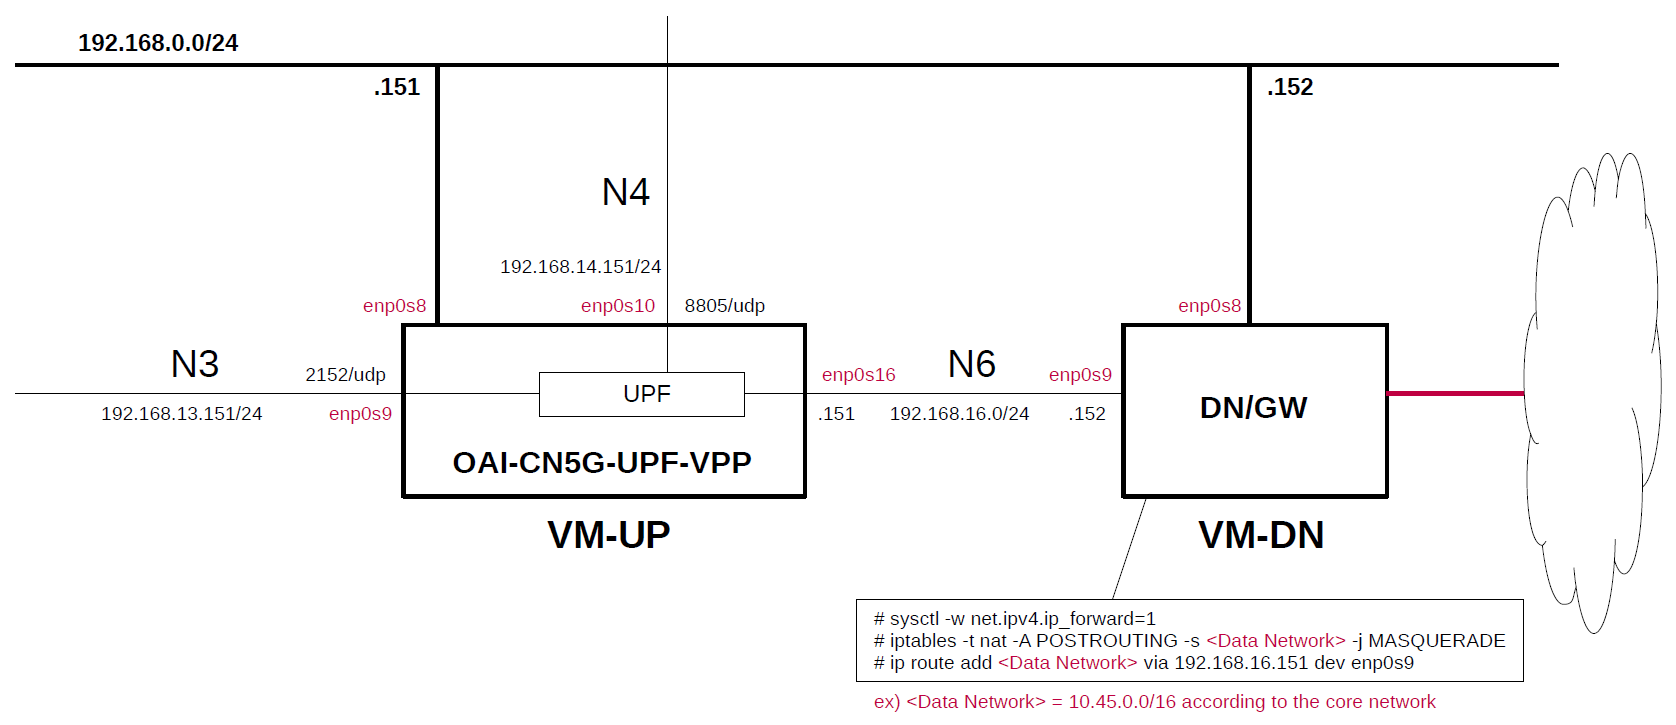
U-Planeを中心としたVPP-UPFとData Network Gatewayの簡単な構成について説明します。この構成は Virtualbox VMに構築されることに注意して下さい。 このため、仮想NICでは性能が出ないことが考えられますが、本記事が物理NICを使用する際の設定の参考になれればと思います。
このシミュレーション環境は以下の条件を満たす最小構成になります。
- 1つのUPFとData Network Gateway
構築したシミュレーション環境は以下の通りです。
使用したVPP-UPFは以下になります。
- VPP-UPF - OpenAir CN 5G for UPF v1.5.1 (2023.06.14) - https://gitlab.eurecom.fr/oai/cn5g/oai-cn5g-upf-vpp
各VMは以下の通りです。
| VM | SW & Role | IP address | OS | CPU (Min) |
Memory (Min) |
HDD (Min) |
|---|---|---|---|---|---|---|
| VM-UP | OpenAir CN 5G for UPF |
192.168.0.151/24 | Ubuntu 22.04 |
2 | 8GB | 20GB |
| VM-DN | Data Network Gateway |
192.168.0.152/24 | Ubuntu 22.04 |
1 | 1GB | 10GB |
各VMのネットワークインターフェースは以下の通りですが、この内、DPDKの制御下に入るデバイスを有効(UP)しないで下さい。これらのインターフェースについてはVPP-UPFのinit.confファイルにIPアドレスと合わせて設定しており、VPP-UPF起動時にこれらのデバイスは有効になります。
| VM | Device | Network Adapter |
IP address | Interface | Under DPDK |
|---|---|---|---|---|---|
| VM-UP | enp0s3 | NAT(default) | 10.0.2.15/24 | (VM default NW) | -- |
| enp0s8 | Bridged Adapter | 192.168.0.151/24 | (Mgmt NW) | -- | |
| enp0s9 | NAT Network | 192.168.13.151/24 | N3 | x | |
| enp0s10 | NAT Network | 192.168.14.151/24 | N4 | x | |
| enp0s16 | NAT Network | 192.168.16.151/24 | N6 | x | |
| VM-DN | enp0s3 | NAT(default) | 10.0.2.15/24 | (VM default NW) | -- |
| enp0s8 | Bridged Adapter | 192.168.0.152/24 | (Mgmt NW) | -- | |
| enp0s9 | NAT Network | 192.168.16.152/24 | N6 | -- |
5GのNF間のインターフェースの内、N3、N4、N6については、VirtualboxのNATネットワークで以下の通りに設定しました。
| Network Name | Network CIDR |
|---|---|
| N3 | 192.168.13.0/24 |
| N4 | 192.168.14.0/24 |
| N6 | 192.168.16.0/24 |
Virtualbox GUIツールは、1つのVMに最大4つのネットワークアダプタを登録できます。なお、VM-UPにはネットワークアダプタを5つ登録するため、GUIツールでは残り1つを登録できません。この場合、次のようにvboxファイルを直接編集し、残りのネットワークアダプタを登録します。
例)
--- upf-vpp-dpdk-10.vbox.orig   2023-06-12 20:53:32.344961102 +0900
+++ upf-vpp-dpdk-10.vbox        2023-06-13 21:57:19.777484821 +0900
@@ -68,7 +68,12 @@
           </DisabledModes>
           <NATNetwork name="N4"/>
         </Adapter>
-        <Adapter slot="8" MACAddress="0800272F0298" cable="false"/>
+        <Adapter slot="8" enabled="true" MACAddress="0800272F0298" type="82540EM">
+          <DisabledModes>
+            <InternalNetwork name="intnet"/>
+          </DisabledModes>
+          <NATNetwork name="N6"/>
+        </Adapter>
         <Adapter slot="9" MACAddress="080027A0C784" cable="false"/>
         <Adapter slot="10" MACAddress="080027C6438A" cable="false"/>
         <Adapter slot="11" MACAddress="080027594595" cable="false"/>
VM-UPにOAI UPF(VPP-UPF)を構築
OAI UPF(VPP-UPF)の構築については以下を参照して下さい。
- VPP-UPF - OpenAir CN 5G for UPF v1.5.1 (2023.06.14) - https://gitlab.eurecom.fr/oai/cn5g/oai-cn5g-upf-vpp/-/blob/master/docs/INSTALL_ON_HOST.md
OAI UPF(VPP-UPF)をgit clone
# git clone https://gitlab.eurecom.fr/oai/cn5g/oai-cn5g-upf-vpp.git
# cd oai-cn5g-upf-vpp
# git checkout develop
全てのVPPプラグインをビルドするように設定を変更
dpdkとupfの各プラグインのみをビルドするパッチを適用しないようにパッチファイルの名前を変更します。
# cd oai-cn5g-upf-vpp/scripts/patches
# mv build_selected_plugins.patch build_selected_plugins.patch_not_use
oai-cn5g-upf-vpp/build/scripts/build_helper.upfを編集
upg-vppのstable/1.2ブランチを使用するように変更し、ビルドされた全てのvppプラグインをインストールするように変更します。
--- build_helper.upf.orig       2023-07-09 08:19:54.945596895 +0900
+++ build_helper.upf    2023-07-09 09:55:03.435811764 +0900
@@ -122,11 +122,11 @@

 add_Travelping_upf_plugin(){
   GIT_URL=https://github.com/travelping/upg-vpp.git
-  GIT_BRANCH=master
+  GIT_BRANCH=stable/1.2
   echo_info "Cloning Travelping UPG plugin"
   pushd $OPENAIRCN_DIR/
   git clone -b $GIT_BRANCH $GIT_URL
-  cd $OPENAIRCN_DIR/upg-vpp && git checkout -f 1f047425c5c99db44c2e599ad1dfd767d426cce8
+  cd $OPENAIRCN_DIR/upg-vpp
   mkdir -p -- $OPENAIRCN_DIR/vpp/patches
   cp -rf $OPENAIRCN_DIR/upg-vpp/upf/ $OPENAIRCN_DIR/vpp/src/plugins/
   cp -rf $OPENAIRCN_DIR/upg-vpp/vpp-patches/* $OPENAIRCN_DIR/vpp/patches
@@ -153,9 +153,7 @@
   $SUDO cp -rf $OPENAIRCN_DIR/vpp/build-root/install-vpp-native/vpp/bin/vppctl /bin/
   echo_info "Copied binaries to /bin"
   # Copying necessary libraries
-#  $SUDO cp -rf $OPENAIRCN_DIR/vpp/build-root/install-vpp-native/vpp/lib/vpp_plugins /usr/lib/x86_64-linux-gnu/vpp_plugins/
-  $SUDO cp -rf $OPENAIRCN_DIR/vpp/build-root/install-vpp-native/vpp/lib/vpp_plugins/upf_plugin.so /usr/lib/x86_64-linux-gnu/vpp_plugins/
-  $SUDO cp -rf $OPENAIRCN_DIR/vpp/build-root/install-vpp-native/vpp/lib/vpp_plugins/dpdk_plugin.so /usr/lib/x86_64-linux-gnu/vpp_plugins/
+  $SUDO cp -rf $OPENAIRCN_DIR/vpp/build-root/install-vpp-native/vpp/lib/vpp_plugins /usr/lib/x86_64-linux-gnu/vpp_plugins/
   $SUDO cp -rf $OPENAIRCN_DIR/vpp/build-root/install-vpp-native/vpp/lib/libvppinfra.so.21.01.1 /usr/lib/x86_64-linux-gnu/
   $SUDO cp -rf $OPENAIRCN_DIR/vpp/build-root/install-vpp-native/vpp/lib/libvnet.so.21.01.1 /usr/lib/x86_64-linux-gnu/
   $SUDO cp -rf $OPENAIRCN_DIR/vpp/build-root/install-vpp-native/vpp/lib/libvlibmemory.so.21.01.1 /usr/lib/x86_64-linux-gnu/
VPP-UPFの依存関係をインストール
# cd oai-cn5g-upf-vpp/build/scripts
# ./build_vpp_upf -I -f
VPP-UPFをビルド
# cd oai-cn5g-upf-vpp/build/scripts
# ./build_vpp_upf -c -V
VM-UPにDPDK対応VPP-UPFをセットアップ
DPDK対応VPP-UPFのセットアップについては、以下を参照して下さい。
- VPP-UPF - OpenAir CN 5G for UPF v1.5.1 (2023.06.14) - https://gitlab.eurecom.fr/oai/cn5g/oai-cn5g-upf-vpp/-/blob/master/docs/VPP_UPG_WITH_DPDK.md
dpdk-devbind.pyをインストール
# wget https://raw.githubusercontent.com/DPDK/dpdk/main/usertools/dpdk-devbind.py -O /usr/local/bin/dpdk-devbind.py
# chmod +x /usr/local/bin/dpdk-devbind.py
kernelモジュールuio_pci_genericの読み込み
# modprobe uio_pci_generic
現状のインターフェースを確認
# lshw -c network -businfo
Bus info          Device      Class       Description
=====================================================
pci@0000:00:03.0  enp0s3      network     82540EM Gigabit Ethernet Controller
pci@0000:00:08.0  enp0s8      network     82540EM Gigabit Ethernet Controller
pci@0000:00:09.0  enp0s9      network     82540EM Gigabit Ethernet Controller
pci@0000:00:0a.0  enp0s10     network     82540EM Gigabit Ethernet Controller
pci@0000:00:10.0  enp0s16     network     82540EM Gigabit Ethernet Controller
enp0s9/enp0s10/enp0s16インターフェイスをDPDK互換ドライバuio_pci_genericにバインド
# dpdk-devbind.py -b uio_pci_generic  0000:00:09.0  --force
# dpdk-devbind.py -b uio_pci_generic  0000:00:0a.0  --force
# dpdk-devbind.py -b uio_pci_generic  0000:00:10.0  --force
DPDKバインドを確認
enp0s9/enp0s10/enp0s16がLinux kernelの管理下から外れたことを確認します。
# lshw -c network -businfo
Bus info          Device      Class       Description
=====================================================
pci@0000:00:03.0  enp0s3      network     82540EM Gigabit Ethernet Controller
pci@0000:00:08.0  enp0s8      network     82540EM Gigabit Ethernet Controller
pci@0000:00:09.0              network     82540EM Gigabit Ethernet Controller
pci@0000:00:0a.0              network     82540EM Gigabit Ethernet Controller
pci@0000:00:10.0              network     82540EM Gigabit Ethernet Controller
enp0s9/enp0s10/enp0s16に対応した0000:00:09.0/0000:00:0a.0/0000:00:10.0の各デバイスがDPDK互換ドライバを使用するように変更されたことを確認します。
# dpdk-devbind.py -s

Network devices using DPDK-compatible driver
============================================
0000:00:09.0 '82540EM Gigabit Ethernet Controller 100e' drv=uio_pci_generic unused=e1000,vfio-pci
0000:00:0a.0 '82540EM Gigabit Ethernet Controller 100e' drv=uio_pci_generic unused=e1000,vfio-pci
0000:00:10.0 '82540EM Gigabit Ethernet Controller 100e' drv=uio_pci_generic unused=e1000,vfio-pci

Network devices using kernel driver
===================================
0000:00:03.0 '82540EM Gigabit Ethernet Controller 100e' if=enp0s3 drv=e1000 unused=vfio-pci,uio_pci_generic *Active*
0000:00:08.0 '82540EM Gigabit Ethernet Controller 100e' if=enp0s8 drv=e1000 unused=vfio-pci,uio_pci_generic *Active*

No 'Baseband' devices detected
==============================

No 'Crypto' devices detected
============================

No 'DMA' devices detected
=========================

No 'Eventdev' devices detected
==============================

No 'Mempool' devices detected
=============================

No 'Compress' devices detected
==============================

No 'Misc (rawdev)' devices detected
===================================

No 'Regex' devices detected
===========================
設定ファイルを作成
/root/openair-upfディレクトリを作成し、各設定ファイルを置きます。
/root/openair-upf/startup.conf
unix {
  nodaemon
  log /tmp/vpp.log
  full-coredump
  gid vpp
  interactive
  cli-listen /run/vpp/cli.sock
  exec /root/openair-upf/init.conf
}

api-trace {
  on
}

cpu {
  main-core 0
  corelist-workers 1
}

api-segment {
  gid vpp
}

dpdk {
  dev 0000:00:09.0 {name n3}
  dev 0000:00:0a.0 {name n4}
  dev 0000:00:10.0 {name n6}
}

plugins {
    path /usr/lib/x86_64-linux-gnu/vpp_plugins/
    plugin ikev2_plugin.so { disable }
    plugin dpdk_plugin.so { enable }
    plugin upf_plugin.so { enable }
}
例えば、4つのCPUコアを用意し、CPUコア(#0)をmain-coreに割り当て、3つのCPUコア(#1-3)をcorelist-workersに割り当てる場合、startup.confファイルを以下のように設定します。
cpu {
  main-core 0
  corelist-workers 1-3
}
その結果、3つのCPUコアの使用率はそれぞれ100%(合計300%)になります。以下はtopコマンドの表示例です。
top - 22:52:57 up 4 min,  4 users,  load average: 2.73, 1.22, 0.47
Tasks: 151 total,   2 running, 149 sleeping,   0 stopped,   0 zombie
%Cpu(s): 75.2 us,  0.2 sy,  0.0 ni, 24.5 id,  0.0 wa,  0.0 hi,  0.0 si,  0.0 st
MiB Mem :   7935.3 total,   6126.9 free,   1170.5 used,    638.0 buff/cache
MiB Swap:      0.0 total,      0.0 free,      0.0 used.   6524.8 avail Mem

    PID USER      PR  NI    VIRT    RES    SHR S  %CPU  %MEM     TIME+ COMMAND
   1204 root      20   0   82.2g 981656  29860 R 302.0  12.1   5:48.50 vpp_main <--
    102 root      20   0       0      0      0 I   0.3   0.0   0:00.11 kworker/2:1-events
...
/root/openair-upf/init.conf
network instanceをinternetに設定します。
set interface ip table n6 0
set interface mtu 9000 n6
set interface ip address n6 192.168.16.151/24
set interface state n6 up

set interface ip table n4 0
set interface mtu 9000 n4
set interface ip address n4 192.168.14.151/24
set interface state n4 up

set interface ip table n3 0
set interface mtu 9000 n3
set interface ip address n3 192.168.13.151/24
set interface state n3 up

ip route add 0.0.0.0/0 table 0 via 192.168.16.152 n6

upf pfcp endpoint ip 192.168.14.151 vrf 0

upf node-id fqdn 192.168.14.151

upf nwi name internet vrf 0

upf specification release 16

upf gtpu endpoint ip 192.168.13.151 nwi internet teid 0x000004d2/2
User Plane IP Resource Informationは3GPP Release 16.3で削除されたため、UPFと連携するSMFがUser Plane IP Resource Informationに対応していない場合、代わりに、上記のinit.confに記述したように、以下の行を追加することで、VPP-UPFからのPFCP Association Setup ResponseのUP Function featuresにFTUP: Supportedが設定されるようになります。Open5GS SMFと連携する場合、必要な設定になります。
upf specification release 16
VM-UPでDPDK対応VPP-UPFを実行
# /usr/bin/vpp -c /root/openair-upf/startup.conf
dpdk             [warn  ]: not enough DPDK crypto resources
dpdk/cryptodev   [warn  ]: dpdk_cryptodev_init: Not enough cryptodevs
    _______    _        _   _____  ___
 __/ __/ _ \  (_)__    | | / / _ \/ _ \
 _/ _// // / / / _ \   | |/ / ___/ ___/
 /_/ /____(_)_/\___/   |___/_/  /_/

vpp#
VPPでインターフェイスを確認
startup.confで定義したn3/n4/n6の各インターフェースがDPDKのインターフェースとしてUPしていることが確認できます。
vpp# show hardware-interfaces
              Name                Idx   Link  Hardware
local0                             0    down  local0
  Link speed: unknown
  local
0: format_dpdk_device:590: rte_eth_dev_rss_hash_conf_get returned -95
n3                                 1     up   n3
  Link speed: 1 Gbps
  Ethernet address 08:00:27:bd:c2:88
  Intel 82540EM (e1000)
    carrier up full duplex mtu 9000
    flags: admin-up pmd maybe-multiseg tx-offload intel-phdr-cksum rx-ip4-cksum
    Devargs:
    rx: queues 1 (max 1), desc 1024 (min 32 max 4096 align 8)
    tx: queues 1 (max 1), desc 1024 (min 32 max 4096 align 8)
    pci: device 8086:100e subsystem 8086:001e address 0000:00:09.00 numa 0
    max rx packet len: 16128
    promiscuous: unicast off all-multicast on
    vlan offload: strip off filter off qinq off
    rx offload avail:  vlan-strip ipv4-cksum udp-cksum tcp-cksum vlan-filter
                       jumbo-frame scatter keep-crc
    rx offload active: ipv4-cksum jumbo-frame scatter
    tx offload avail:  vlan-insert ipv4-cksum udp-cksum tcp-cksum multi-segs
    tx offload active: udp-cksum tcp-cksum multi-segs
    rss avail:         none
    rss active:        none
    tx burst function: eth_em_xmit_pkts
    rx burst function: eth_em_recv_scattered_pkts
0: format_dpdk_device:590: rte_eth_dev_rss_hash_conf_get returned -95

n4                                 2     up   n4
  Link speed: 1 Gbps
  Ethernet address 08:00:27:37:37:0c
  Intel 82540EM (e1000)
    carrier up full duplex mtu 9000
    flags: admin-up pmd maybe-multiseg tx-offload intel-phdr-cksum rx-ip4-cksum
    Devargs:
    rx: queues 1 (max 1), desc 1024 (min 32 max 4096 align 8)
    tx: queues 1 (max 1), desc 1024 (min 32 max 4096 align 8)
    pci: device 8086:100e subsystem 8086:001e address 0000:00:0a.00 numa 0
    max rx packet len: 16128
    promiscuous: unicast off all-multicast on
    vlan offload: strip off filter off qinq off
    rx offload avail:  vlan-strip ipv4-cksum udp-cksum tcp-cksum vlan-filter
                       jumbo-frame scatter keep-crc
    rx offload active: ipv4-cksum jumbo-frame scatter
    tx offload avail:  vlan-insert ipv4-cksum udp-cksum tcp-cksum multi-segs
    tx offload active: udp-cksum tcp-cksum multi-segs
    rss avail:         none
    rss active:        none
    tx burst function: eth_em_xmit_pkts
    rx burst function: eth_em_recv_scattered_pkts

n6                                 3     up   n6
  Link speed: 1 Gbps
  Ethernet address 08:00:27:2f:02:98
  Intel 82540EM (e1000)
    carrier up full duplex mtu 9000
    flags: admin-up pmd maybe-multiseg tx-offload intel-phdr-cksum rx-ip4-cksum
    Devargs:
    rx: queues 1 (max 1), desc 1024 (min 32 max 4096 align 8)
    tx: queues 1 (max 1), desc 1024 (min 32 max 4096 align 8)
    pci: device 8086:100e subsystem 8086:001e address 0000:00:10.00 numa 0
    max rx packet len: 16128
    promiscuous: unicast off all-multicast on
    vlan offload: strip off filter off qinq off
    rx offload avail:  vlan-strip ipv4-cksum udp-cksum tcp-cksum vlan-filter
                       jumbo-frame scatter keep-crc
    rx offload active: ipv4-cksum jumbo-frame scatter
    tx offload avail:  vlan-insert ipv4-cksum udp-cksum tcp-cksum multi-segs
    tx offload active: udp-cksum tcp-cksum multi-segs
    rss avail:         none
    rss active:        none
    tx burst function: eth_em_xmit_pkts
    rx burst function: eth_em_recv_scattered_pkts

upf-nwi-internet                   4     up   upf-nwi-internet
  Link speed: unknown
  GTPU
vpp#
vpp# show interface address
local0 (dn):
n3 (up):
  L3 192.168.13.151/24
n4 (up):
  L3 192.168.14.151/24
n6 (up):
  L3 192.168.16.151/24
upf-nwi-internet (up):
vpp#
PFCP(8805/udp)とGTP-U(2152/udp)の各ポートが開いていることが確認できます。
vpp# show udp punt
IPV4 UDP ports punt : 2152, 8805
IPV6 UDP ports punt : 2152
vpp#
VM-DNでData Network Gatewayを設定
まず、/etc/sysctl.confファイルの次の行のコメントを解除し、OSに反映させます。
net.ipv4.ip_forward=1
# sysctl -p
次に、NAPTとVPP-UPFのN6 IPアドレスへのルーティングを設定します。
# iptables -t nat -A POSTROUTING -s <DN> -j MASQUERADE
# ip route add <DN> via 192.168.16.151 dev enp0s9
コア網に応じて<DN>を設定します。
例) 10.45.0.0/16
以上で、DPDKによるVPP-UPFの構築が完了しました。これにより、VPP-UPFをOpen5GSおよびfree5GCのC-Planeと連携できるようになります。
最後に
ご参考までに、VPP-UPFを5GのUPFとして使用する設定例は以下の通りです。
また、4GのPGW-Uとして使用する設定例は以下の通りです。
最後に、元記事はGithubに書いたものです。
主な変更履歴
- [2023.09.05] 初版。