この記事はSwift愛好会 Advent Calendar 2017の15日目のものです!
チャット画面はチャットアプリだけではなくSNSのDM画面や、カスタマーサポートの画面など、様々なところで利用されることがあると思います。
今回はそのチャット画面の実装のサンプルをご紹介します。
間違っているところやベストプラクティスでない場合がありますので、
その際は是非コメントにお願い致します!
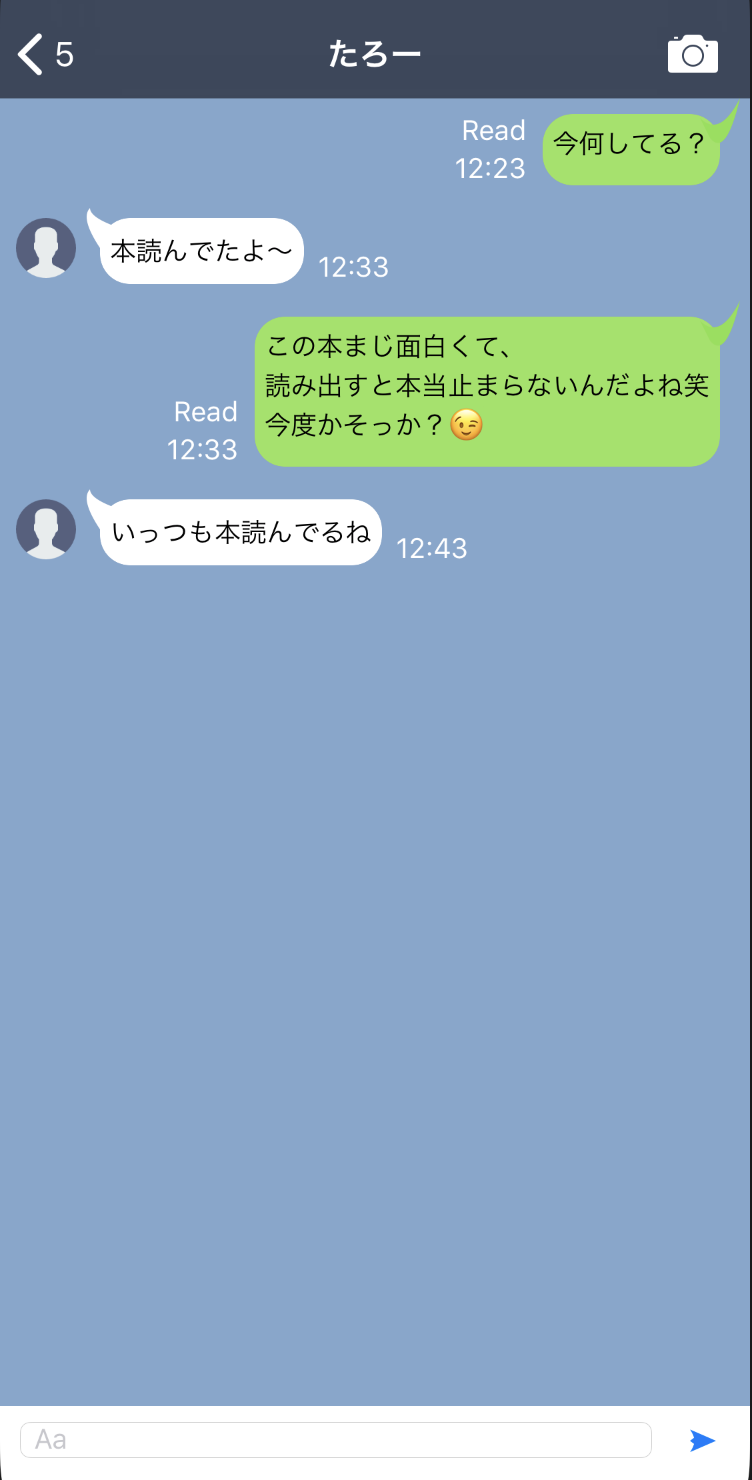
見た目
ソースコード
以下の通りに作成しても、ナビゲーションバーはつきませんのでご了承ください⚠
import UIKit

class ChatRoomViewController: UIViewController {

	@IBOutlet weak var tableView: UITableView!

	var bottomView: ChatRoomInputView! //画面下部に表示するテキストフィールドと送信ボタン

	var chats: [ChatEntity] = []

	override func viewDidLoad() {
		super.viewDidLoad()
		setupUI()
	}

	override func didReceiveMemoryWarning() {
		super.didReceiveMemoryWarning()
	}

	override func viewWillDisappear(_ animated: Bool) {
		super.viewWillDisappear(animated)
	}

	override func viewWillAppear(_ animated: Bool) {
		super.viewWillAppear(animated)
	}

	override var canBecomeFirstResponder: Bool {
		return true
	}

	override var inputAccessoryView: UIView? {
		return bottomView //通常はテキストフィールドのプロパティに設定しますが、画面を表示している間は常に表示したいため、ViewControllerのプロパティに設定します
	}
}

extension ChatRoomViewController {
	func setupUI() {
		self.view.backgroundColor = UIColor(red: 113/255, green: 148/255, blue: 194/255, alpha: 1)
		tableView.backgroundColor = UIColor(red: 113/255, green: 148/255, blue: 194/255, alpha: 1)

		tableView.separatorColor = UIColor.clear // セルを区切る線を見えなくする
		tableView.estimatedRowHeight = 10000 // セルが高さ以上になった場合バインバインという動きをするが、それを防ぐために大きな値を設定
		tableView.rowHeight = UITableViewAutomaticDimension // Contentに合わせたセルの高さに設定
		tableView.allowsSelection = false // 選択を不可にする
		tableView.keyboardDismissMode = .interactive // テーブルビューをキーボードをまたぐように下にスワイプした時にキーボードを閉じる

		tableView.register(UINib(nibName: "YourChatViewCell", bundle: nil), forCellReuseIdentifier: "YourChat")
		tableView.register(UINib(nibName: "MyChatViewCell", bundle: nil), forCellReuseIdentifier: "MyChat")

		self.bottomView = ChatRoomInputView(frame: CGRect(x: 0, y: 0, width: self.view.frame.width, height: 70)) // 下部に表示するテキストフィールドを設定
		let chat1 = ChatEntity(text: "text1", time: "10:01", userType: .I)
		let chat2 = ChatEntity(text: "text2", time: "10:02", userType: .You)
		let chat3 = ChatEntity(text: "text3", time: "10:03", userType: .I)
		chats = [chat1, chat2, chat3]

	}
}

extension ChatRoomViewController: UITableViewDataSource {
	func numberOfSections(in tableView: UITableView) -> Int {
		return 1
	}

	func tableView(_ tableView: UITableView, numberOfRowsInSection section: Int) -> Int {
		return self.chats.count
	}

	func tableView(_ tableView: UITableView, cellForRowAt indexPath: IndexPath) -> UITableViewCell {
		let chat = self.chats[indexPath.row]
		if chat.isMyChat() {
			let cell = tableView.dequeueReusableCell(withIdentifier: "MyChat") as! MyChatViewCell
			cell.clipsToBounds = true //bound外のものを表示しない
			// Todo: isRead
			cell.updateCell(text: chat.text, time: chat.time, isRead: true)
			return cell
		} else {
			let cell = tableView.dequeueReusableCell(withIdentifier: "YourChat") as! YourChatViewCell
			cell.clipsToBounds = true
			cell.updateCell(text: chat.text, time: chat.time)
			return cell
		}
	}
}

extension ChatRoomViewController: UITableViewDelegate {
	func tableView(_ tableView: UITableView, didSelectRowAt indexPath: IndexPath) {
		print(indexPath)
	}

	func tableView(_ tableView: UITableView, estimatedHeightForRowAt indexPath: IndexPath) -> CGFloat {
		return 10
	}
}
import UIKit

class ChatRoomInputView: UIView {

	@IBOutlet weak var chatTextField: UITextField!
	@IBOutlet weak var sendButton: UIButton!

	override init(frame: CGRect) {
		super.init(frame: frame)
		self.setFromXib()
	}

	required init?(coder aDecoder: NSCoder) {
		super.init(coder: aDecoder)
		self.setFromXib()
	}

	func setFromXib() {
		let nib = UINib.init(nibName: "ChatRoomInputView", bundle: nil)
		let view = nib.instantiate(withOwner: self, options: nil).first as! UIView
		self.addSubview(view)// Storyboardから読み込んだレイアウトでビューを重ねて表示
	}
}
import Foundation
import UIKit

public class ChatEntity {
	var text = ""
	var time = ""
	var userType: UserType

	public init(text: String, time: String, userType: UserType) {
		self.text = text
		self.time = time
		self.userType = userType
	}

	public func isMyChat() -> Bool {
		return userType == .I
	}
}

public enum UserType {
	case I
	case You
}
import UIKit

class MyChatViewCell: UITableViewCell {

	@IBOutlet weak var textView: UITextView!
	@IBOutlet weak var timeLabel: UILabel!
	@IBOutlet weak var readLabel: UILabel!

	@IBOutlet weak var textViewWidthConstraint: NSLayoutConstraint!

	override func awakeFromNib() {
		super.awakeFromNib()
		self.backgroundColor = UIColor.clear
		self.textView.layer.cornerRadius = 15 // 角を丸める
		addSubview(MyBalloonView(frame: CGRect(x: Int(frame.size.width+30), y: 0, width: 30, height: 30))) //吹き出しのようにするためにビューを重ねる
	}

	override func setSelected(_ selected: Bool, animated: Bool) {
		super.setSelected(selected, animated: animated)
	}
}

extension MyChatViewCell {
	func updateCell(text: String, time: String, isRead: Bool) {
		self.textView?.text = text
		self.timeLabel?.text = time
		self.readLabel?.isHidden = !isRead

		let frame = CGSize(width: self.frame.width - 8, height: CGFloat.greatestFiniteMagnitude)
		var rect = self.textView.sizeThatFits(frame)
		if(rect.width<30){
			rect.width=30
		}
		textViewWidthConstraint.constant = rect.width//テキストが短くても最小のビューの幅を30とする
	}
}
import UIKit

class YourChatViewCell: UITableViewCell {

	@IBOutlet weak var textView: UITextView!
	@IBOutlet weak var timeLabel: UILabel!
	@IBOutlet weak var textViewWidthConstraint: NSLayoutConstraint!

	override func awakeFromNib() {
		super.awakeFromNib()
		self.backgroundColor = UIColor.clear
		self.textView.layer.cornerRadius = 15// 角を丸める
		self.addSubview(YourBalloonView(frame: CGRect(x: textView.frame.minX-10, y: textView.frame.minY-10, width: 50, height: 50)))//吹き出しのようにするためにビューを重ねる
	}

	override func setSelected(_ selected: Bool, animated: Bool) {
		super.setSelected(selected, animated: animated)
		// Configure the view for the selected state
	}

}

extension YourChatViewCell {
	func updateCell(text: String, time: String) {
		self.textView?.text = text
		self.timeLabel?.text = time

		let frame = CGSize(width: self.frame.width, height: CGFloat.greatestFiniteMagnitude)
		var rect = self.textView.sizeThatFits(frame)
		if(rect.width<30){
			rect.width=30
		}
		textViewWidthConstraint.constant = rect.width//テキストが短くても最小のビューの幅を30とする
	}
}
import UIKit

class MyBalloonView: UIView {

	override init(frame: CGRect) {
		super.init(frame: frame)
		self.backgroundColor = UIColor.clear
	}

	required init?(coder aDecoder: NSCoder) {
		super.init(coder: aDecoder)
	}

	override func draw(_ rect: CGRect) {
		let line = UIBezierPath()//吹き出しの口部分を描画
		UIColor(red: 133/255, green: 226/255, blue: 73/255, alpha: 1.0).setFill()
		UIColor.clear.setStroke()
		line.move(to: CGPoint(x: 0, y: 10))
		line.addQuadCurve(to: CGPoint(x: 20, y: 0), controlPoint: CGPoint(x: 10, y: 20))
		line.addQuadCurve(to: CGPoint(x: 5, y: 20), controlPoint: CGPoint(x: 13, y: 30))
		line.close()
		line.fill()
		line.stroke()
	}
}
import UIKit

class YourBalloonView: UIView {

	override init(frame: CGRect) {
		super.init(frame: frame)
		self.backgroundColor = UIColor.clear
	}

	required init?(coder aDecoder: NSCoder) {
		super.init(coder: aDecoder)
	}

	override func draw(_ rect: CGRect) {
		let line = UIBezierPath()//吹き出しの口部分を描画
		UIColor.white.setFill()
		UIColor.clear.setStroke()
		line.move(to: CGPoint(x: 20, y: 15))
		line.addQuadCurve(to: CGPoint(x: 5, y: 5), controlPoint: CGPoint(x: 5, y: 10))
		line.addQuadCurve(to: CGPoint(x: 10, y: 25), controlPoint: CGPoint(x: 0, y: 10))
		line.close()
		line.fill()
		line.stroke()
	}
}
Xib
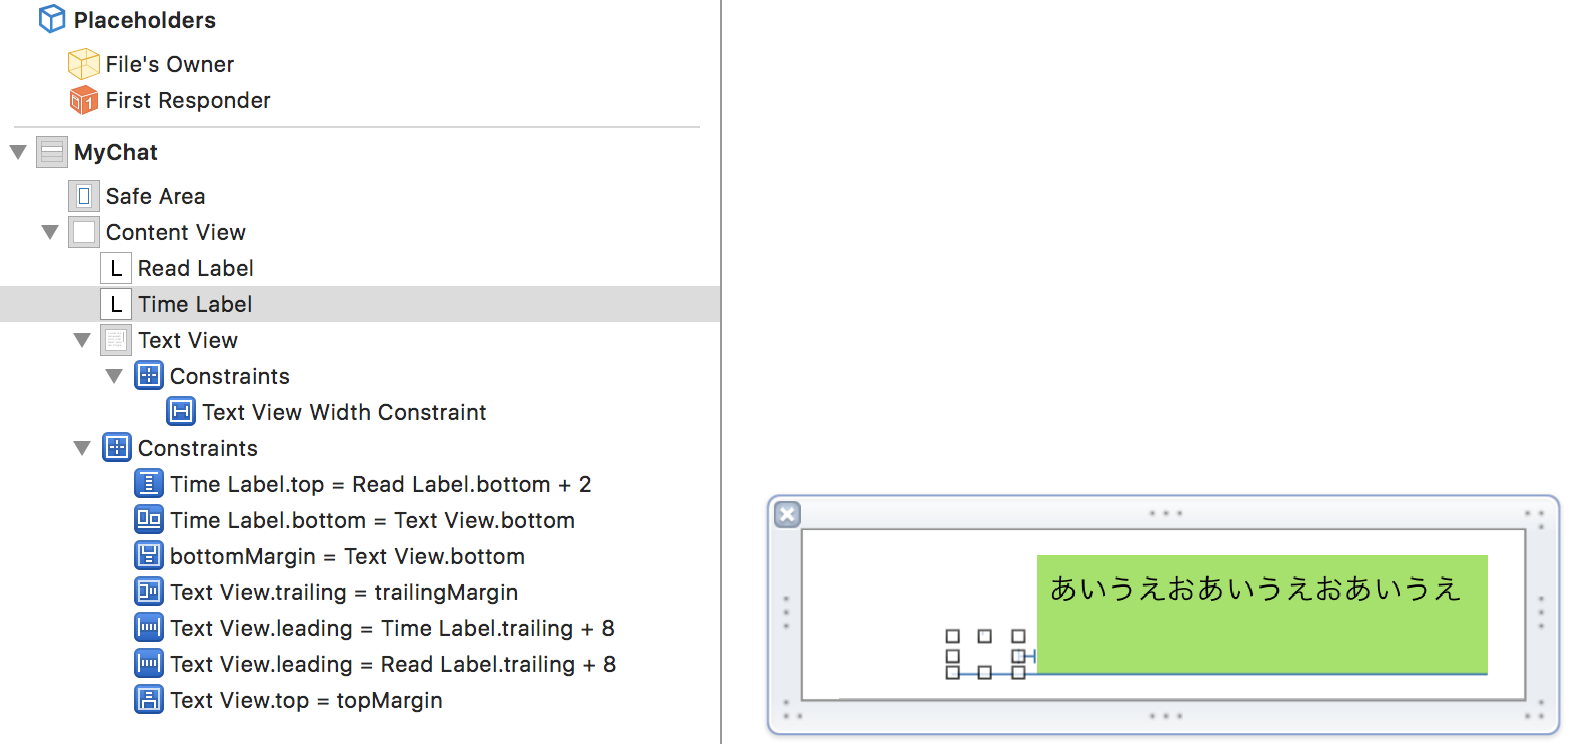
MyChatViewCell.xib
ポイント
セルのCustom ClassにMyChatViewCellを設定します

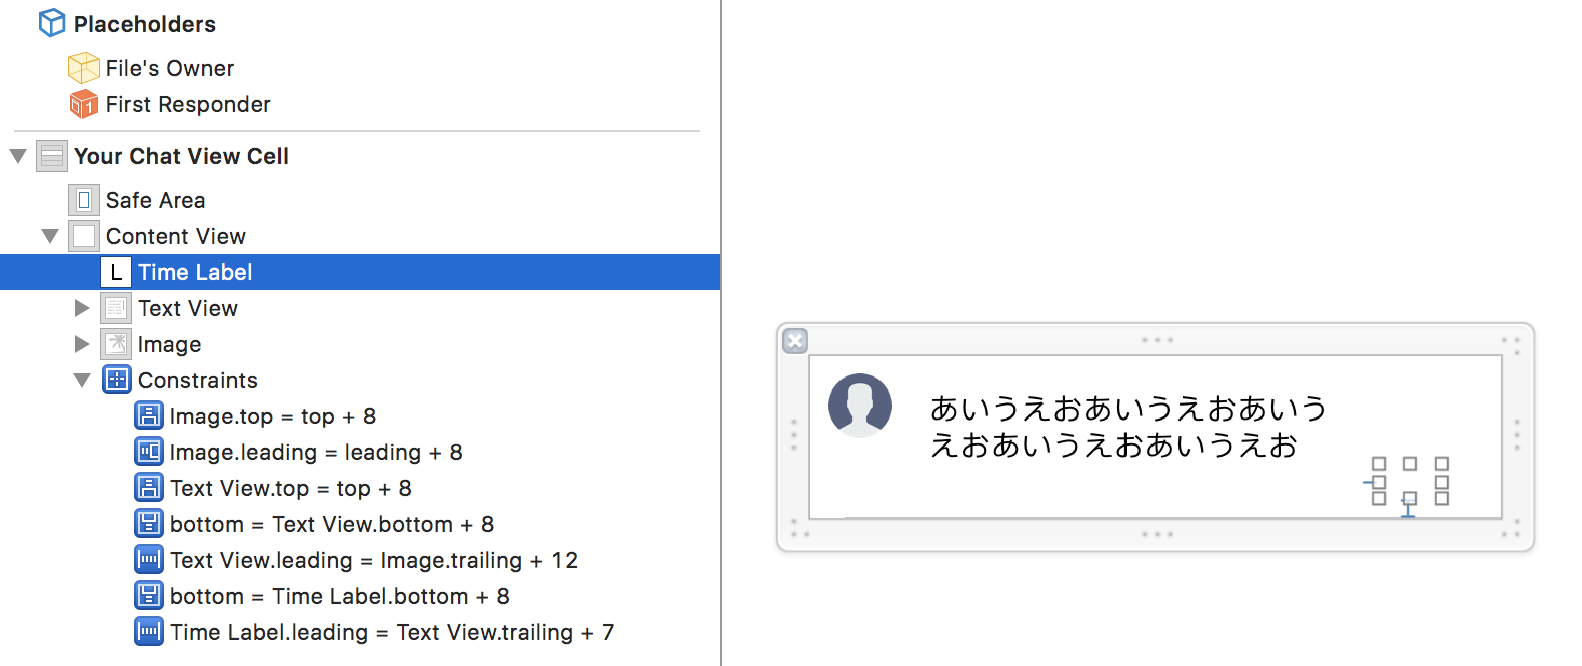
YourChatViewCell.xib
セルのCustom ClassにYourChatViewCellを設定します

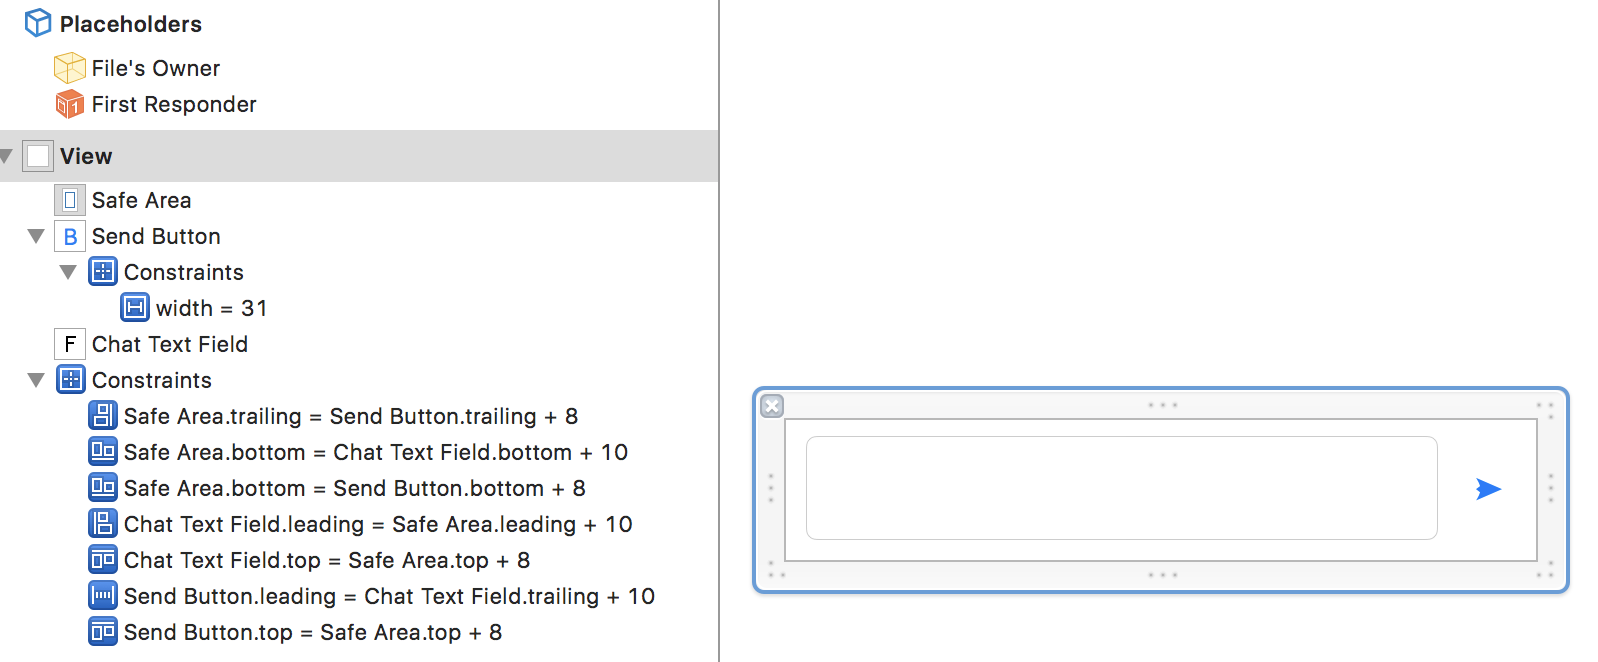
ChatRoomInputView.xib
おわりに
長くなってしまいましたが、このようLINEのようなUIを作ることができます。
また、今回のソースコードはリポジトリとしてGitHubにあげています
Swift愛好会に参加した事があるのは1回だけですがノリと勢いでアドベントカレンダーに参加してしまいました笑
できるだけ恥ずかしくないようにテーマをしっかりしたものに設定したつもりでしたが、
趣旨とそれてしまっていたらすみません🙌🏻
Xibのレイアウトについてはスクリーンショットで伝わるようにしたつもりですが、
もし不明な点があればぜひ聞いてください!
ちなみに、LINEの再現のプロジェクトを個人的に進めています(大したものではありませんが)
バグは結構ありますが、現状ではリアルタイムでのチャットとビデオ通話ができるようになっています。
もし興味がある方が居たらこちらもご覧ください!
(今回のソースに出ていなかったNavigationBarもこちらでは実装しています!)
最後までお読み頂きありがとうございました!!
明日16日目は@gotou015さんです!
よろしくお願いします😆

