2024/12/11 importブロックを使った取り込み方法(v1.5以上限定)を追記しました。
この記事を書いた背景
- クラウド環境は本当は最初からTerraform(を含むIaC)で作りたいけど、どうしても最初は手で作ってしまうこと、ありますよね。
- そして、それを後からTerraformに取り込みたくなることありますよね。
- Terraformはimportコマンドによるリソースの取り込みをできたりするけど、OracleCloudInfrastructure(以下OCI)でのTerraformマネージドサービスであるResourceManagerではサポートしていないよね。(2024/12/3時点)
- 何とかしてみて取り込んでみよう。
ResourceManagerとは?
- OCIで提供されているTerraformのマネージドサービス。
リソース・マネージャの概要 - Terraformのコードさえアップロードすれば、Terraformのインストール/プロバイダの準備など何も不要でTerraformを使い始められる便利なサービス。
- 一方で、applyやplan、destroy相当程度の処理しかサポートしておらず、細かいコマンドを実行ができないため、Terraform構築済み環境を手で触った場合のフォローが難しい。
Terraformバージョンによる取り込み方法の違い
-
Terraformは、v1.5からimportブロックをサポートしています。
tfファイル中に記載することで、既存リソースを取り込むことをできるようにする機能で、importコマンドを利用できないResourceManagerでも、importブロックは利用可能です。 -
importブロックを使ったほうが簡単に取り込めます。
-
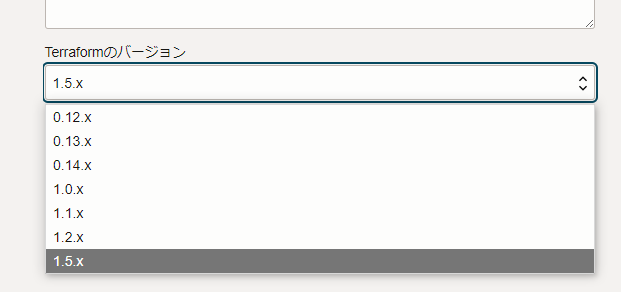
ResourceManagerでは、スタックを作成/編集する際に、Terraformのバージョンを選択/変更することが出来ます。
この選択肢に1.5.xが出てくる場合は利用可能/変更可能です。
(筆者利用環境では2024年半ばから利用できています。)

公式ドキュメント上はバージョンアップに関する互換性はあるようです。
-
本記事では以下の2パターンを記載します。
- v1.5以上を利用可能な環境 : importブロックを使った方法
- v1.5未満しか利用できない環境(選択肢にないor既存versionから変更できない) : 状態ファイルを直接編集する方法
importブロックを使った手順 (Terraform v1.5以上を利用可能な場合)
以下の手順で進めます。
- 取り込み予定のリソースと同等のリソースを構築できるTerraformコードを用意する。
- Terraformコードにimportブロックを追加する。
- 計画(plan)を実行し、状態ファイルが想定通り取り込まれる(予定である)ことを確認する。
- 適用(apply)を実行し、取り込みを行う。
- importブロックを削除する。
1. Terraformコードを用意する
-
取り込み対象と同等のリソースを構築できるTerraformコードをまず用意する。
(後続工程で、「このTerraformコードで作ったリソース」という扱いにするため) -
本記事では以下の構成を取り込む前提とする
- for_eachを使わずに作るvcn
- for_eachを使って作るサブネット*2
-
以下、サンプルのコード (変数ファイル、tfファイル)
terraform.tfvars# 変数定義 vcn = { display_name = "some_vcn_name" cidr_blocks = [ "xx.xx.xx.xx/yy" ] } subnets = { some_subnet_1 = { cidr_block = "xx.xx.xx.xx/yy" } some_subnet_2 = { cidr_block = "xx.xx.xx.xx/yy" } }torikomi.tf# 初期化部分 terraform { required_version = ">= 1.5" # 1.5以上を指定すること required_providers { oci = { version = ">= 5" } } } provider "oci" { tenancy_ocid = var.tenancy_ocid region = var.region } # 変数宣言部分 variable "tenancy_ocid" { type = string description = "テナンシ―のOCID(スタックから自動取得可能)" } variable "region" { type = string description = "リージョンのOCID(スタックから自動取得可能)" } variable "compartment_ocid" { type = string description = "コンパートメントのOCID(スタックから自動取得可能)" } variable "vcn" { type = object({ display_name = string cidr_blocks = list(string) }) description = "VCNに関する情報" } variable "subnets" { type = map(object({ cidr_block = string })) description = "サブネットに関する情報" } # リソースブロック部分 resource "oci_core_vcn" "this" { #Required compartment_id = var.compartment_ocid #Optional cidr_blocks = var.vcn.cidr_blocks display_name = var.vcn.display_name } resource "oci_core_subnet" "this" { for_each = var.subnets #Required cidr_block = each.value.cidr_block compartment_id = var.compartment_ocid vcn_id = oci_core_vcn.this.id #Optional display_name = each.key }
2. importブロックを追加する
-
取り込みたい対象リソースのOCIDを事前に取得しておく。
(Web画面から確認、OCI-CLIを使って確認、等) -
- で作成したコードにimportブロックを追加する。
引数は以下の通り。
-
to: importブロックで取り込み対象とするリソースを作る予定のリソースブロックの種別/名前。ここに記載したリソースブロックで作ったことになる。 -
id: 前述で確認した取り込み対象のリソースのOCID
- で作成したコードにimportブロックを追加する。
-
以下サンプル。1.のコードに以下を追加する。
torikomi.tf### 中略 ### # importブロック部分 # VCNの取り込み import { id = "ocid1.vcn.oc8.ap-tokyo-1.xxxxxxxxxxxxxxxxxxxxxxxxxxxxxxxxxxxxxxxxxxx" # some_vcn_nameのOCIDを指定 to = oci_core_vcn.this # toの部分に対象リソースを作ることになるリソースブロックの種別/名前を記載 } # サブネットの取り込み import { id = "ocid1.vcn.oc8.ap-tokyo-1.xxxxxxxxxxxxxxxxxxxxxxxxxxxxxxxxxxxxxxxxxxx" # some_subnet_1のOCIDを指定 to = oci_core_subnet.this["some_subnet_1"] # リソースをfor_eachで作ろうとしているので、キーを指定する } import { id = "ocid1.vcn.oc8.ap-tokyo-1.xxxxxxxxxxxxxxxxxxxxxxxxxxxxxxxxxxxxxxxxxxx" # some_subnet_2のOCIDを指定 to = oci_core_subnet.this["some_subnet_2"] # リソースをfor_eachで作ろうとしているので、キーを指定する }v1.5では、importブロックに変数が利用できないため、本記事ではOCIDや名前を直接記載している。
v1.6以降では、importブロックに変数やfor_eachを利用できるため、インポート用のOCIDなどをmapで定義し、for_eachでループを回すこともできる。リソース種別によってはOCIDを持たないリソースもあり。
どのリソースが特殊パターンなのかは、実践してTry&Errorするしかない。- loadbalancerの下に作成するバックエンドなどは、一般的なOCIDは割り当てられておらず、loadbalancerのOCID+名前で生成される独特のフォーマットとなる。
(サンプルをコードで作成してみて、その状態ファイルを確認してみること)
- loadbalancerの下に作成するバックエンドなどは、一般的なOCIDは割り当てられておらず、loadbalancerのOCID+名前で生成される独特のフォーマットとなる。
3. 計画(plan)を実行し、状態ファイルが想定通り取り込まれる(予定である)ことを確認する。
コード内容に問題がなければ、以下のようなログが出て、取り込みたいリソースがwill be importedという内容で表示される。
Getting providers from registry and/or custom terraform providers
Initializing provider plugins...
- Reusing previous version of hashicorp/oci from the dependency lock file
- Installing hashicorp/oci v6.19.0...
- Installed hashicorp/oci v6.19.0 (unauthenticated)
Terraform has been successfully initialized!
You may now begin working with Terraform. Try running "terraform plan" to see
any changes that are required for your infrastructure. All Terraform commands
should now work.
If you ever set or change modules or backend configuration for Terraform,
rerun this command to reinitialize your working directory. If you forget, other
commands will detect it and remind you to do so if necessary.
oci_core_vcn.this: Preparing import... [id=ocid1.vcn.oc8.ap-tokyo-1.xxxxxxxxxxxxx]
oci_core_vcn.this: Refreshing state... [id=ocid1.vcn.oc8.ap-tokyo-1.xxxxxxxxxxxxx]
oci_core_subnet.this["some_subnet_1"]: Preparing import... [id=ocid1.subnet.oc8.ap-tokyo-1.xxxxxxxxxxxxx]
oci_core_subnet.this["some_subnet_2"]: Preparing import... [id=ocid1.subnet.oc8.ap-tokyo-1.xxxxxxxxxxxxx]
oci_core_subnet.this["some_subnet_1"]: Refreshing state... [id=ocid1.subnet.oc8.ap-tokyo-1.xxxxxxxxxxxxx]
oci_core_subnet.this["some_subnet_2"]: Refreshing state... [id=ocid1.subnet.oc8.ap-tokyo-1.xxxxxxxxxxxxx]
Terraform will perform the following actions:
  # oci_core_subnet.this["some_subnet_2"] will be imported
    resource "oci_core_subnet" "this" {
        cidr_block                 = "xx.xx.xx.xx/yy"
        (---中略---)
    }
  # oci_core_subnet.this["some_subnet_1"] will be imported
    resource "oci_core_subnet" "this" {
        cidr_block                 = "xx.xx.xx.xx/yy"
        (---中略---)
    }
  # oci_core_vcn.this will be imported
    resource "oci_core_vcn" "this" {
        cidr_blocks              = ["xx.xx.xx.xx/yy" ]
        (---中略---)
    }
Plan: 3 to import, 0 to add, 0 to change, 0 to destroy.
4. 適用(apply)を実行し、取り込みを行う。
適用(apply)を実行し、取り込みを確定させる。
5. importブロックを削除する
取り込み完了後は、importブロックは不要となるため、コードから削除する。
状態ファイルを直接編集する手順 (Terraform v1.5未満しか利用できない場合)
以下の手順で進めます。
- 取り込み予定のリソースと同等のリソースを構築できるTerraformコードを用意する。
- 状態ファイルに既存リソースの情報を追記する。
- 状態ファイルをインポートする。
- Planを流し、状態ファイルが想定通り取り込まれる(予定である)ことを確認する。
- Applyを実行し、状態ファイルを更新する。
1. Terraformコードを用意する
- 「importブロックを使った手順」と同様のため割愛。
- ただし、
required_versionについては利用可能な適切な値に修正しておくこと。
2. 状態ファイルに既存のリソースの情報を記載する。
-
- 作成したコードにあわせた状態ファイルを作成する。
- 以下の2パターンを記載する。
- 新規スタックに取り込む場合
- 既存スタックに取り込む場合
- 上記いずれのパターンにおいても、取り込みたい対象リソースのOCIDを事前に取得しておく。
(Web画面から確認、OCI-CLIを使って確認、等)
新規スタックに取り込む場合
-
インポート用状態ファイルのサンプルは以下の通り。
フォーマットはjsonインポート用状態ファイルサンプル{ "version": 4, "terraform_version": "1.5", "resources": [ { "module": "module.vcn", "mode": "managed", "type": "oci_core_vcn", "name": "this", "provider": "provider[\"registry.terraform.io/hashicorp/oci\"]", "instances": [ { "attributes": { "id": "ocid1.vcn.oc8.ap-tokyo-1.xxxxxxxxxxxxxxxxxxxxxxxxxxxxxxxxxxxxxxxxxxx" } } ] }, { "module": "module.subnets", "mode": "managed", "each": "map", "type": "oci_core_subnet", "name": "this", "provider": "provider[\"registry.terraform.io/hashicorp/oci\"]", "instances": [ { "index_key": "subnet_name_1", "attributes": { "id": "ocid1.subnet.oc8.ap-tokyo-1.xxxxxxxxxxxxxxxxxxxxxxxxxxxxxxxxxxxxxxxxxxx" } }, { "index_key": "subnet_name_2", "attributes": { "id": "ocid1.subnet.oc8.ap-tokyo-1.xxxxxxxxxxxxxxxxxxxxxxxxxxxxxxxxxxxxxxxxxxx" } } ] } ] } -
以下、同様の内容で解説付き版。
以下例はjson中にコメントが書いてあるが、実際のJSONファイルにはコメントが書けず、エラーが出ている。
便宜上記載しているだけなので、実物には書かないこと。インポート用状態ファイルサンプル(コメント付きバージョン){ // TerraformStateファイル自体のバージョン // 筆者の環境は2024/12/2時点で4。 // 他のスタックの状態ファイルのバージョンを参考に付与するとよい。 "version": 4, // Terraform自体のバージョン。 // 筆者環境で2024/12/2時点でOCI/ResourceManagerで利用可能な最新版は1.5。 // 細かい数字は実際にサンプルコードを使ってスタックを実行し、その状態ファイルを確認するのがよい。 // terraformのコードにも書くところがあるためそれと合わせること。 // terraform { required_version = ">=1.4" } のような記載。 "terraform_version": "1.4", // ここからリソースの情報 "resources": [ // VCN分の情報 { // 該当リソース(ここはVCN)を作成するはずのResourceブロックの名前。 // module: (モジュールを使っている場合は)モジュールの名前。モジュールを使っていない場合はエントリ不要。 // mode: リソースの場合は「managed」。(データの場合は「data」になる) // type: 該当のリソースブロック種別 // name: 該当のリソースブロックにつけている名前。 // イメージがわかない場合は、サンプルコードで作った状態ファイルを確認するとよい。 "module": "module.vcn", "mode": "managed", "type": "oci_core_vcn", "name": "this", // providerの場所。利用するversionによって内容が異なるため、サンプルスタックの状態ファイルを見て確認すること。 "provider": "provider[\"registry.terraform.io/hashicorp/oci\"]", // 作成した実リソースの情報 // 以下に記載の通り、attributes->id で、取り込みたい実リソースのOCIDだけを記載すればOK "instances": [ { "attributes": { "id": "ocid1.vcn.oc8.ap-tokyo-1.xxxxxxxxxxxxxxxxxxxxxxxxxxxxxxxxxxxxxxxxxxx" } } ] }, // サブネット分 { // VCNと基本的には同様で、実際にsubnetを作るコードの状態に合わせて記載する。 // for_eachの場合は 「each:map」の部分が追加で必要。 "module": "module.subnets", "mode": "managed", "each": "map", "type": "oci_core_subnet", "name": "this", "provider": "provider[\"registry.terraform.io/hashicorp/oci\"]", // for_eachで作る場合は、ここにループ分のリソースを記載する。(この例では2つ) // for_eachを使わない場合と異なり、「index_key」にfor_eachのkeyの値を入れておく必要がある。 "instances": [ { "index_key": "subnet_name_1", "attributes": { "id": "ocid1.subnet.oc8.ap-tokyo-1.xxxxxxxxxxxxxxxxxxxxxxxxxxxxxxxxxxxxxxxxxxx" } }, { "index_key": "subnet_name_2", "attributes": { "id": "ocid1.subnet.oc8.ap-tokyo-1.xxxxxxxxxxxxxxxxxxxxxxxxxxxxxxxxxxxxxxxxxxx" } } ] } ] }リソース種別によっては上記と少しルールが異なる場合もあり。
どのリソースが特殊パターンなのかは、実践してTry&Errorするしかない。-
oci_logging_logリソースであれば、OCIDに加えて、所属しているロググループのOCID(log_group_id)も必要 - loadbalancerの下に作成するバックエンドなどは、一般的なOCIDは割り当てられておらず、loadbalancerのOCID+名前で生成される独特のフォーマットとなる。
(サンプルをコードで作成してみて、その状態ファイルを確認してみること)
-
既存のスタックに取り込む場合
-
以下の順序で作業を行う。
-
新規スタックの場合は0から状態ファイルを書く必要があるが、既存スタックの場合は、既存スタックの状態ファイルをダウンロードした上で、新規スタック時の対応と同じように情報を追記/更新していく。
-
既存スタックの状態ファイルをダウンロードすると、以下のような体裁となっている。
既存スタックの状態ファイル(編集前){ "version": 4, "terraform_version": "1.5.7", "serial": 51, "lineage": "xxxxxxxx-xxxx-xxxx-xxxx-xxxxxxxxxxxx", "outputs": {}, "resources": [ { "module": "module.some_module", "mode": "managed", "type": "some_resource_type", "name": "this", "provider": "provider[\"registry.terraform.io/hashicorp/oci\"]", "instances": [ { "index_key": "some_display_name", "schema_version": 0, "attributes": { "some_param": "xxxxxx", "display_name": "xxxxxx", "id": "xxxxxxxxxxx" . . . } } ] } ] } -
上記に対して以下のように編集を加える
既存スタックの状態ファイル(編集後){ "version": 4, "terraform_version": "1.5.7", "serial": 53, "lineage": "xxxxxxxx-xxxx-xxxx-xxxx-xxxxxxxxxxxx", "outputs": {}, "resources": [ { "module": "module.some_module", "mode": "managed", "type": "some_resource_type", "name": "this", "provider": "provider[\"registry.terraform.io/hashicorp/oci\"]", "instances": [ { "index_key": "some_display_name", "schema_version": 0, "attributes": { "some_param": "xxxxxx", "display_name": "xxxxxx", "id": "xxxxxxxxxxx" . . . } } ] }, { "module": "module.vcn", "mode": "managed", "type": "oci_core_vcn", "name": "this", "provider": "provider[\"registry.terraform.io/hashicorp/oci\"]", "instances": [ { "attributes": { "id": "ocid1.vcn.oc8.ap-tokyo-1.xxxxxxxxxxxxxxxxxxxxxxxxxxxxxxxxxxxxxxxxxxx" } } ] }, { "module": "module.subnets", "mode": "managed", "each": "map", "type": "oci_core_subnet", "name": "this", "provider": "provider[\"registry.terraform.io/hashicorp/oci\"]", "instances": [ { "index_key": "subnet_name_1", "attributes": { "id": "ocid1.subnet.oc8.ap-tokyo-1.xxxxxxxxxxxxxxxxxxxxxxxxxxxxxxxxxxxxxxxxxxx" } }, { "index_key": "subnet_name_2", "attributes": { "id": "ocid1.subnet.oc8.ap-tokyo-1.xxxxxxxxxxxxxxxxxxxxxxxxxxxxxxxxxxxxxxxxxxx" } } ] } ] } -
対応内容は以下の通り。
- resourceのリストに、「新規スタックを追加の場合」と同様の内容を追記する。
- リストの追加なので、カンマの過不足に注意すること。
- serialの数値を2加算する。(上記例では51->53)
- serialは、該当のスタックに対する実行回数のようなもの。
- resourceのリストに、「新規スタックを追加の場合」と同様の内容を追記する。
- 上記以外の部分は触らない。必要な内容だけを追加すること。
- JSONとして適切なフォーマットになるように気を付けること。
- 特にfor_eachのリソース追加時にカンマ記載忘れがよくある。
- formatterなどを使ってvalidかどうか確認するのがベター。
3. 状態ファイルをインポートする
stackで状態ファイルをインポートする。
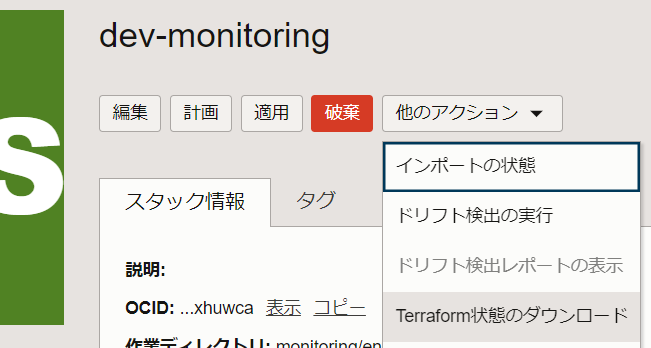
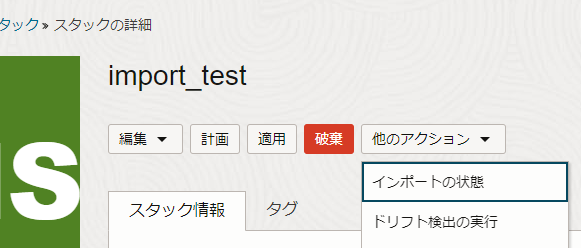
該当スタックの詳細から、「他のアクション」->「インポートの状態」
4. 計画(plan)を流し、状態ファイルが想定通り取り込まれる(予定である)ことを確認する。
- stateファイルをインポートした状態で計画(plan)を流すと、以下のようなログが出力される。(VCNのstateファイルをインポートした例)
OCID以外の該当の情報が「+」マークで取り込まれていることを確認する。module.vcn.oci_core_vcn.this: Refreshing state... [id=ocid1.vcn.oc8.ap-tokyo-1.xxxxxxxxxxxxxxxxxxxxxxxxxxx] Note: Objects have changed outside of Terraform Terraform detected the following changes made outside of Terraform since the last "terraform apply": # module.vcn.oci_core_vcn.this has changed ~ resource "oci_core_vcn" "this" { + byoipv6cidr_blocks = [] + cidr_blocks = [ + "xx.xx.xx.xx/yy", ] + compartment_id = "ocid1.compartment.oc8..xxxxxxxxxxxxxxxxxx" + default_dhcp_options_id = "ocid1.dhcpoptions.oc8.ap-tokyo-1.xxxxxxxxxxxxxxxxxxx" + default_route_table_id = "ocid1.routetable.oc8.ap-tokyo-1.xxxxxxxxxxxxxxxxxx" + default_security_list_id = "ocid1.securitylist.oc8.ap-tokyo-1.xxxxxxxxxxxxxxx" + defined_tags = {} + display_name = "some_display_name" + dns_label = "some_dns_label" + freeform_tags = {} id = "ocid1.vcn.oc8.ap-tokyo-1.xxxxxxxxxxxxxxxxxxxxxxxxx" + ipv6cidr_blocks = [] + ipv6private_cidr_blocks = [] + is_ipv6enabled = false + state = "AVAILABLE" + time_created = "2022-08-30 05:37:45.016 +0000 UTC" + vcn_domain_name = "some_dns_label.oraclevcn.com" } Unless you have made equivalent changes to your configuration, or ignored the relevant attributes using ignore_changes, the following plan may include actions to undo or respond to these changes. ───────────────────────────────────────────────────────────────────────────── Terraform used the selected providers to generate the following execution plan. Resource actions are indicated with the following symbols: - 上記ログの後半に、applyしたらどうなるか、というログも出力される(これは通常のTerraformのplanと同じ)
もし、1.で開発したコードと、2.の工程で取り込んだリソースの内容に差分があったままApplyを実行した場合、(当然のことながら)実機の状態は1.で開発しているコードの状態に収束する。
つまり、最悪の場合、1.のコード開発工程を飛ばして2でリソースを取り込んでapplyしてしまうと、2.で取り込んだリソースがすべてdestroyされる。
4.のplanの段階で、1.のコードと2.のリソース取り込みの差分に想定外がないことは、重々確認しておくこと。
5. 適用(apply)を実行し、状態ファイルを更新する。
- 適用(apply)を実行することで、4.のplanで表示されていた取り込み内容が、実際に状態ファイルに記載される。
- 4.で記載した通り、applyをすると現時点の状態ファイルの内容をコードの内容で上書きしてしまうため、不備がないことを慎重に確認したうえで実行すること。
最後に
なるべく最初からTerraformで作りましょう!

