はじめに
本記事で紹介する機能はプレビュー段階であるため、Microsoft Azure プレビューの追加使用条件 に同意した上で使用するようにしてください。
最近 (2023/03) Static Web Apps のデータベース接続という機能がパブリックプレビューになりました。
データベース接続機能を使用すると、バックエンド側のコードを一切書かずに、RESTやGraphQLのエンドポイントを通じて、データベースのテーブルやエンティティに対してCRUD操作や組み込みの認証を行うことができます。
Azure Cosmos DB, Azure SQL, Azure Database for MySQL, Azure Database for PostgreSQLなどのさまざまなデータベースタイプをサポートしています。
Data API Builder というエンジン (こちらもプレビュー版) が使われているようです。
今回はこの機能を使って Cosmos DB への接続を試してみたいと思います。
まずはローカルで動かしてみる
公式のチュートリアルを参考に動かしてみます。
設定ファイル作成
Static Web Apps CLI を使用して DB 接続用の設定ファイルの雛形を作成できます。
- データベースの種類
- Cosmos DB (NoSQL)
- データベース名
swadb-demo
- 接続文字列
@env('COSMOSDB_CONNECTION_STRING')- ※
@env()は環境変数を参照
npx swa db init \
    --database-type cosmosdb_nosql \
    --cosmosdb_nosql-database swadb-demo \
    --connection-string "@env('COSMOSDB_CONNECTION_STRING')"

Welcome to Azure Static Web Apps CLI (1.1.1)

[swa] Creating database connections configuration folder swa-db-connections
[swa] Creating staticwebapp.database.config.json configuration file
Information: Microsoft.DataApiBuilder 0.6.13+32fc03f4fe439d02aef454f10cc58e50d0d29f79
Information: User provided config file: staticwebapp.database.config.json
Warning: Configuration option --rest.path is not honored for cosmosdb_nosql since it does not support REST yet.
Information: Config file generated.
Information: SUGGESTION: Use 'dab add [entity-name] [options]' to add new entities in your config.
Warning: Configuration option --rest.path is not honored for cosmosdb_nosql since it does not support REST yet.
Cosmos DB の NoSQL モデルではまだ REST をサポートしておらず GraphQL のみ対応となっているようです。
実行すると以下のフォルダーとファイルが出来上がります。
swa-db-connections/
├── staticwebapp.database.config.json
└── staticwebapp.database.schema.gql
それぞれ見てみましょう。
staticwebapp.database.config.json
staticwebapp.database.config.json (全体)
{
  "$schema": "https://github.com/Azure/data-api-builder/releases/download/v0.6.13/dab.draft.schema.json",
  "data-source": {
    "database-type": "cosmosdb_nosql",
    "options": {
      "database": "swadb-demo",
      "schema": "staticwebapp.database.schema.gql"
    },
    "connection-string": "@env('COSMOSDB_CONNECTION_STRING')"
  },
  "runtime": {
    "graphql": {
      "allow-introspection": true,
      "enabled": true,
      "path": "/graphql"
    },
    "host": {
      "mode": "production",
      "cors": {
        "origins": [],
        "allow-credentials": false
      },
      "authentication": {
        "provider": "StaticWebApps"
      }
    }
  },
  "entities": {}
}
ブロックごとに見ていきます。
まずはデータソースの設定ですね。
コマンドで指定した値が設定されています。
schema は GraphQL のスキーマファイルです。先ほど一緒に作成されたファイルを参照しています。
  "data-source": {
    "database-type": "cosmosdb_nosql",
    "options": {
      "database": "swadb-demo",
      "schema": "staticwebapp.database.schema.gql"
    },
    "connection-string": "@env('COSMOSDB_CONNECTION_STRING')"
  },
ランタイム (REST、GraphQL) 毎の設定です。
Cosmos DB (NoSQL) では REST が未対応なので、GraphQL の設定のみとなっています。
REST、GraphQL の ON/OFF も切り替えられるみたいです。
allow-introspection が true になっていると、スキーマ定義を参照することができます。
true にしておくことで、GraphQL Code Generator 等のツールでタイプ定義を自動生成できるので嬉しいですね。
  "runtime": {
    "graphql": {
      "allow-introspection": true,
      "enabled": true,
      "path": "/graphql"
    },
GraphQL Code Generator の設定例
import type { CodegenConfig } from '@graphql-codegen/cli'

const config: CodegenConfig = {
  overwrite: true,
  // Data API Builder のエンドポイントを指定
  // Static Web Apps 経由のエンドポイント(http://localhost:4280/data-api/graphql)だと
  // 認証設定している場合に弾かれてしまう
  schema: 'http://localhost:5000/graphql',
  generates: {
    'src/gql/': {
      preset: 'client',
      plugins: [],
    },
  },
}

export default config
ホストの設定です。
CORS や 認証プロバイダの設定があります。
認証プロバイダは Static Web Apps では StaticWebApps 固定になります。
    "host": {
      "mode": "production",
      "cors": {
        "origins": [],
        "allow-credentials": false
      },
      "authentication": {
        "provider": "StaticWebApps"
      }
    }
データベースのエンティティの設定です。(Cosmos DB で言うと item)
ここは自分で設定する必要があります。
後で設定するので一旦先に進みます。
"entities": {}
staticwebapp.database.schema.gql
GraphQL のスキーマ定義ファイルです。
最初は書き方のサンプルがあるだけですね。
"""
Add your CosmosDB NoSQL database schema in this file

For example:

type Book @model {
  id: ID
  title: String
}

"""
設定ファイル編集
staticwebapp.database.config.json
先ほど空だった entities を設定します。
  "entities": {
    "User": {
      "source": "users",
      "permissions": [
        {
          "role": "anonymous",
          "actions": ["*"]
        }
      ]
    }
  }
User という名前のエンティティを作成します。
source は Cosmos DB のコンテナ名。
permissions でロールベースのアクセス制御を設定することができます。
actions では、create、read、update、delete、およびワイルドカード(*) を指定できます。
この例では "すべてのユーザーがすべての操作を実行可能" としています。
ちなみに entities は Data API Builder のコマンドで追加することもできます。
(↑を追加する場合)
# Static Web Apps CLI をインストールすると
# ~/.swa/dataApiBuilder/<バージョン番号>/Microsoft.DataApiBuilder にインストールされる
# Data API Builder 単体でインストールしている場合は dab コマンドが使える
~/.swa/dataApiBuilder/0.6.13/Microsoft.DataApiBuilder add User \
  --source users \
  --permissions 'anonymous:*' \
  --config swa-db-connections/staticwebapp.database.config.json
staticwebapp.database.schema.gql
上記 entities の設定に合わせて、User というモデルを定義しました。
@model ディレクティブを付けることで、Data API Builder が自動的にスキーマ定義を作ってくれます。
(付けないとエラーになります)
type User @model {
  id: ID!
  name: String!
  age: Int!
}
自動生成されるスキーマには基本的な CRUD 操作が含まれています。
| No. | タイプ | 名前 | 概要 |
|---|---|---|---|
| 1 | Query | users | 一覧取得 |
| 2 | Query | user_by_pk | プライマリキーを指定して取得 |
| 3 | Mutation | createUser | 作成 |
| 4 | Mutation | updateUser | 更新 |
| 5 | Mutation | deleteUser | 削除 |
生のスキーマ定義(長いよ)
"""
The `@defer` directive may be provided for fragment spreads and inline fragments to inform the executor to delay the execution of the current fragment to indicate deprioritization of the current fragment. A query with `@defer` directive will cause the request to potentially return multiple responses, where non-deferred data is delivered in the initial response and data deferred is delivered in a subsequent response. `@include` and `@skip` take precedence over `@defer`.
"""
directive @defer(
  """
  If this argument label has a value other than null, it will be passed on to the result of this defer directive. This label is intended to give client applications a way to identify to which fragment a deferred result belongs to.
  """
  label: String

  """
  Deferred when true.
  """
  if: Boolean
) on FRAGMENT_SPREAD | INLINE_FRAGMENT

"""
The `@stream` directive may be provided for a field of `List` type so that the backend can leverage technology such as asynchronous iterators to provide a partial list in the initial response, and additional list items in subsequent responses. `@include` and `@skip` take precedence over `@stream`.
"""
directive @stream(
  """
  If this argument label has a value other than null, it will be passed on to the result of this stream directive. This label is intended to give client applications a way to identify to which fragment a streamed result belongs to.
  """
  label: String

  """
  The initial elements that shall be send down to the consumer.
  """
  initialCount: Int! = 0

  """
  Streamed when true.
  """
  if: Boolean
) on FIELD

"""
The `@oneOf` directive is used within the type system definition language
 to indicate:

 - an Input Object is a Oneof Input Object, or
 - an Object Type's Field is a Oneof Field.
"""
directive @oneOf on INPUT_OBJECT

directive @authorize(
  """
  The name of the authorization policy that determines access to the annotated resource.
  """
  policy: String

  """
  Roles that are allowed to access the annotated resource.
  """
  roles: [String!]

  """
  Defines when when the resolver shall be executed.By default the resolver is executed after the policy has determined that the current user is allowed to access the field.
  """
  apply: ApplyPolicy! = BEFORE_RESOLVER
) repeatable on SCHEMA | OBJECT | FIELD_DEFINITION

"""
A directive to indicate the type maps to a storable entity not a nested entity.
"""
directive @model(
  """
  Underlying name of the database entity.
  """
  name: String
) on OBJECT

"""
A directive to indicate the relationship between two tables
"""
directive @relationship(
  """
  The name of the GraphQL type the relationship targets
  """
  target: String

  """
  The relationship cardinality
  """
  cardinality: String
) on FIELD_DEFINITION | INPUT_FIELD_DEFINITION

"""
A directive to indicate the primary key field of an item.
"""
directive @primaryKey(
  """
  The underlying database type.
  """
  databaseType: String
) on FIELD_DEFINITION

"""
The default value to be used when creating an item.
"""
directive @defaultValue(value: DefaultValue) on FIELD_DEFINITION

"""
Indicates that a field is auto generated by the database.
"""
directive @autoGenerated on FIELD_DEFINITION

enum OrderBy {
  ASC
  DESC
}

input DefaultValue {
  Byte: Byte
  Short: Short
  Int: Int
  Long: Long
  String: String
  Boolean: Boolean
  Single: Single
  Float: Float
  Decimal: Decimal
  DateTime: DateTime
  ByteArray: ByteArray
}

"""
Add your CosmosDB NoSQL database schema in this file

For example:

type Book @model {
  id: ID
  title: String
}
"""
type User {
  id: ID!
  name: String!
  age: Int!
}

"""
Order by input for User GraphQL type
"""
input UserOrderByInput {
  """
  Order by options for id
  """
  id: OrderBy

  """
  Order by options for name
  """
  name: OrderBy

  """
  Order by options for age
  """
  age: OrderBy

  """
  Conditions to be treated as AND operations
  """
  and: [UserOrderByInput]

  """
  Conditions to be treated as OR operations
  """
  or: [UserOrderByInput]
}

"""
Input type for adding ID filters
"""
input IdFilterInput {
  """
  Equals
  """
  eq: ID

  """
  Not Equals
  """
  neq: ID

  """
  Not null test
  """
  isNull: Boolean
}

"""
Input type for adding String filters
"""
input StringFilterInput {
  """
  Equals
  """
  eq: String

  """
  Contains
  """
  contains: String

  """
  Not Contains
  """
  notContains: String

  """
  Starts With
  """
  startsWith: String

  """
  Ends With
  """
  endsWith: String

  """
  Not Equals
  """
  neq: String

  """
  Case Insensitive
  """
  caseInsensitive: Boolean = false

  """
  Not null test
  """
  isNull: Boolean
}

"""
Input type for adding Int filters
"""
input IntFilterInput {
  """
  Equals
  """
  eq: Int

  """
  Greater Than
  """
  gt: Int

  """
  Greater Than or Equal To
  """
  gte: Int

  """
  Less Than
  """
  lt: Int

  """
  Less Than or Equal To
  """
  lte: Int

  """
  Not Equals
  """
  neq: Int

  """
  Not null test
  """
  isNull: Boolean
}

"""
Filter input for User GraphQL type
"""
input UserFilterInput {
  """
  Filter options for id
  """
  id: IdFilterInput

  """
  Filter options for name
  """
  name: StringFilterInput

  """
  Filter options for age
  """
  age: IntFilterInput

  """
  Conditions to be treated as AND operations
  """
  and: [UserFilterInput]

  """
  Conditions to be treated as OR operations
  """
  or: [UserFilterInput]
}

type Query {
  """
  Get a list of all the User items from the database
  """
  users(
    """
    The number of items to return from the page start point
    """
    first: Int

    """
    A pagination token from a previous query to continue through a paginated list
    """
    after: String

    """
    Filter options for query
    """
    filter: UserFilterInput

    """
    Ordering options for query
    """
    orderBy: UserOrderByInput
  ): UserConnection!

  """
  Get a User from the database by its ID/primary key
  """
  user_by_pk(id: ID, _partitionKeyValue: String): User
}

"""
The return object from a filter query that supports a pagination token for paging through results
"""
type UserConnection {
  """
  The list of items that matched the filter
  """
  items: [User!]!

  """
  A pagination token to provide to subsequent pages of a query
  """
  endCursor: String

  """
  Indicates if there are more pages of items to return
  """
  hasNextPage: Boolean!
}

type Mutation {
  """
  Creates a new User
  """
  createUser(
    """
    Input representing all the fields for creating User
    """
    item: CreateUserInput!
  ): User

  """
  Updates a User
  """
  updateUser(
    """
    One of the ids of the item being updated.
    """
    id: ID!

    """
    One of the ids of the item being updated.
    """
    _partitionKeyValue: String!

    """
    Input representing all the fields for updating User
    """
    item: UpdateUserInput!
  ): User

  """
  Delete a User
  """
  deleteUser(
    """
    One of the ids of the item being deleted.
    """
    id: ID!

    """
    One of the ids of the item being deleted.
    """
    _partitionKeyValue: String!
  ): User
}

"""
Input type for creating User
"""
input CreateUserInput {
  """
  Input for field id on type CreateUserInput
  """
  id: ID!

  """
  Input for field name on type CreateUserInput
  """
  name: String!

  """
  Input for field age on type CreateUserInput
  """
  age: Int!
}

"""
Input type for updating User
"""
input UpdateUserInput {
  """
  Input for field id on type UpdateUserInput
  """
  id: ID!

  """
  Input for field name on type UpdateUserInput
  """
  name: String!

  """
  Input for field age on type UpdateUserInput
  """
  age: Int!
}

enum ApplyPolicy {
  BEFORE_RESOLVER
  AFTER_RESOLVER
}

"""
The `Byte` scalar type represents non-fractional whole numeric values. Byte can represent values between 0 and 255.
"""
scalar Byte

"""
The `Short` scalar type represents non-fractional signed whole 16-bit numeric values. Short can represent values between -(2^15) and 2^15 - 1.
"""
scalar Short

"""
The `Long` scalar type represents non-fractional signed whole 64-bit numeric values. Long can represent values between -(2^63) and 2^63 - 1.
"""
scalar Long

"""
IEEE 754 32 bit float
"""
scalar Single

"""
The built-in `Decimal` scalar type.
"""
scalar Decimal

"""
The `DateTime` scalar represents an ISO-8601 compliant date time type.
"""
scalar DateTime

scalar ByteArray
Cosmos DB の準備
Cosmos DB アカウント、データベース、コンテナを作成します。
- Cosmos DB アカウント名
- <任意のアカウント名>
- データベース名
- swadb-demo
- コンテナ名
- users
また、Static Web Apps からアクセスできるようにするため、ネットワーク設定で下記いずれかを設定します。
- すべてのネットワーク
- 選択したネットワーク
- パブリック Azure データセンター内からの接続を受け入れる
ここではローカルからも接続したいので、「すべてのネットワーク」を選択しました。
ローカル開発の場合は接続文字列が必要になるので、「キー」メニューで「プライマリ接続文字列」を控えておきます。
az コマンドで作成する場合
# リソースグループは作成されている前提

resourceGroup=<リソースグループ名>
cosmosdbAccount=<Cosmos DB アカウント名>
cosmosdbDbName=swadb-demo
cosmosdbContainer=users
cosmosdbPartitionKey=/id

# Cosmos DB アカウント作成
echo Creating $cosmosdbAccount ...
az cosmosdb create \
    --name $cosmosdbAccount \
    --resource-group $resourceGroup \
    --enable-public-network true \
    --capabilities EnableServerless

# Cosmos DB のデータベース作成
echo
echo Creating $cosmosdbDbName in $cosmosdbAccount ...
az cosmosdb sql database create \
    --account-name $cosmosdbAccount \
    --name $cosmosdbDbName \
    --resource-group $resourceGroup

# Cosmos DB のコンテナ作成
echo Creating $cosmosdbContainer in $cosmosdbDbName ...
az cosmosdb sql container create \
    --account-name $cosmosdbAccount \
    --database-name $cosmosdbDbName \
    --name $cosmosdbContainer \
    --partition-key-path "$cosmosdbPartitionKey" \
    --resource-group $resourceGroup

# Cosmos DB の接続文字列取得
cosmosdbConnectionString=$(
    az cosmosdb keys list --type connection-strings \
        --name $cosmosdbAccount \
        --resource-group $resourceGroup \
        --query 'connectionStrings[0].connectionString' \
        --output tsv
)

echo
echo Cosmos DB Connection String:
echo "    $cosmosdbConnectionString"
最後に出力される Cosmos DB Connection String の値を控えておきます。
環境変数の設定
上記で取得した Cosmos DB の接続文字列を環境変数に設定します。
(プロジェクトルートに配置した .env ファイルに記載しておいても読み込んでくれました)
export COSMOSDB_CONNECTION_STRING="AccountEndpoint=https://<Cosmos DB アカウント名>.documents.azure.com:443/;AccountKey=xxxxxxxxxxxxxxxxxxxxxxxxxxxxxxxxxxxxxxxxxxxxxxxxxxxxxxxxxxxxxxxxxxxxxxxxxxxxxxxxxxxxxxxx;"
アプリの起動
--data-api-location オプションを指定してコマンドを実行します。
npx swa start --data-api-location swa-db-connections
動作確認
CRUD のリクエストを投げてレスポンスを表示するだけのアプリを作って確認します。
API のエンドポイントは http://localhost:4280/data-api/graphql となります。
細かい実装方法は割愛します。
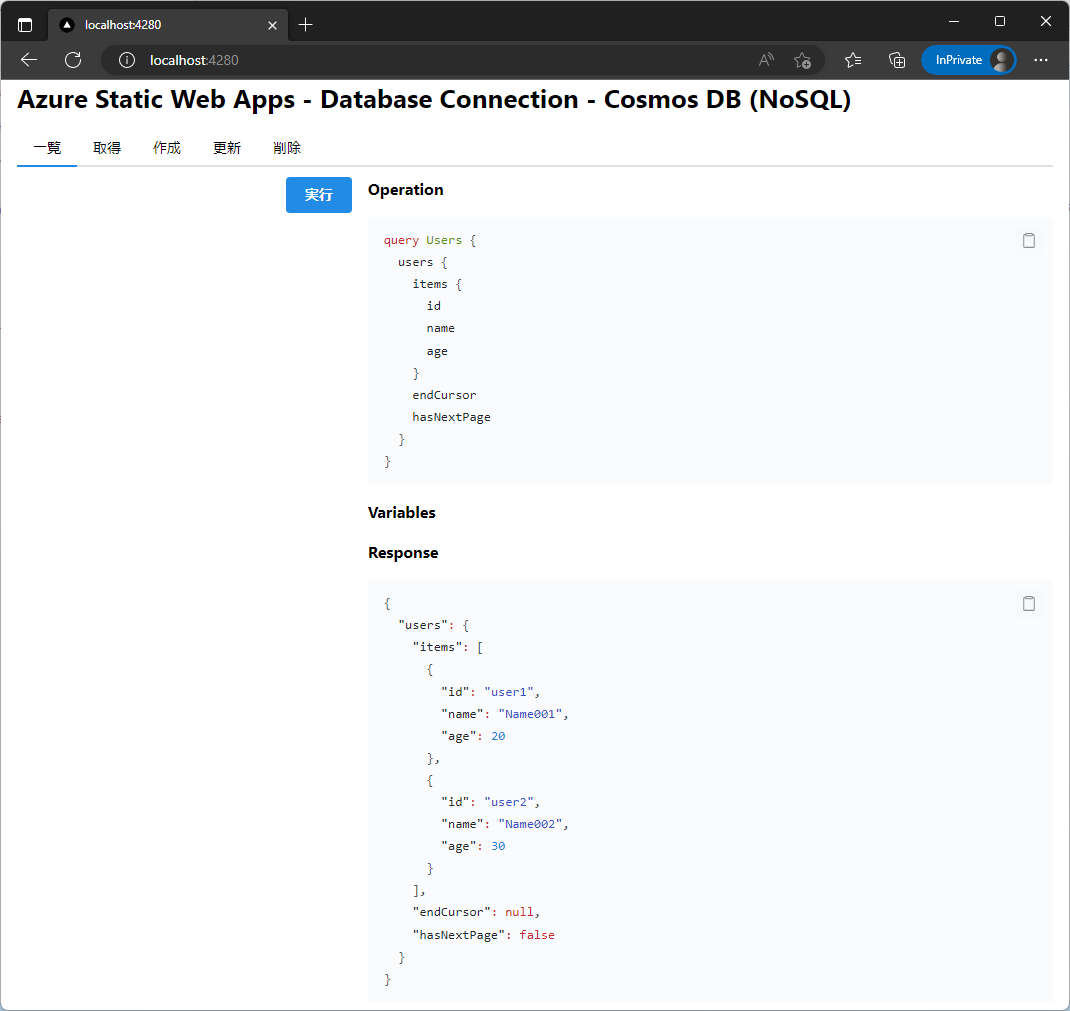
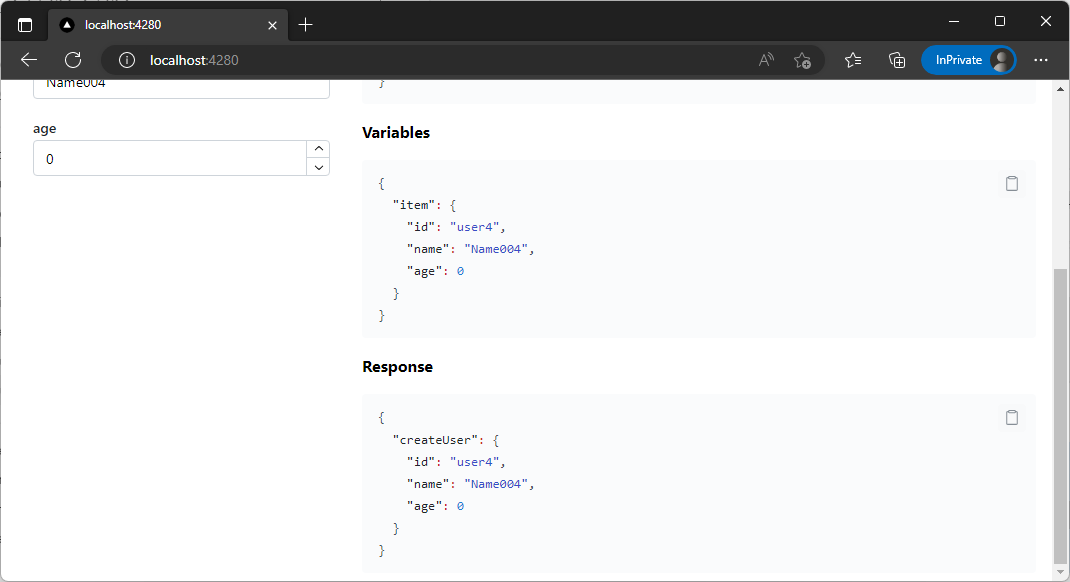
DB の初期状態
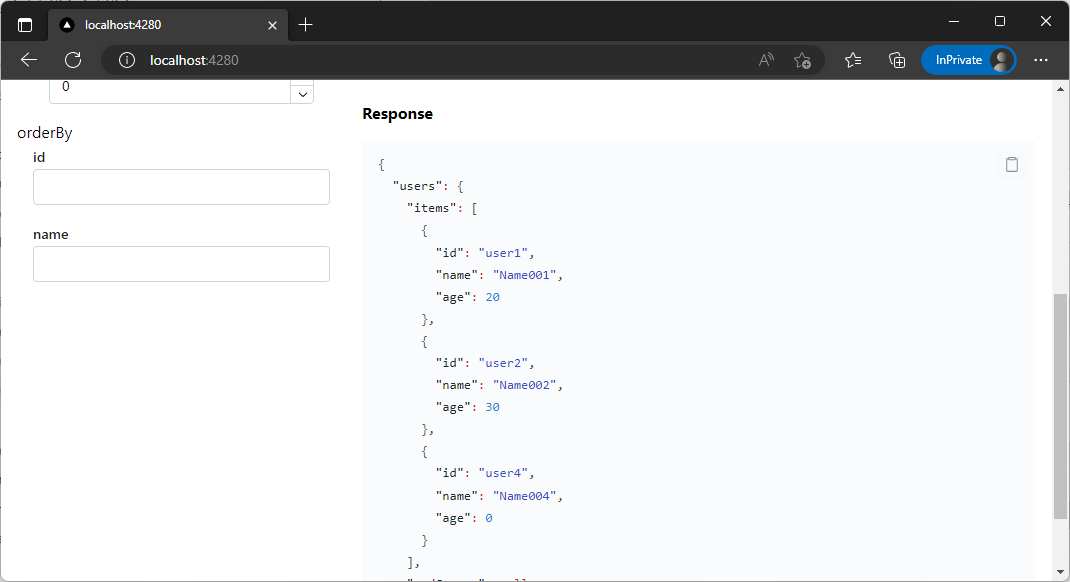
一覧取得
users クエリを使います。
ページングにも対応しているようです。
/** 一覧 */
const listUsers: SendRequest<QueryUsersArgs> = async ({ filter, orderBy }) => {
  const query = gql`
    query Users {
      users {
        items {
          id
          name
          age
        }
        endCursor
        hasNextPage
      }
    }
  `

  return sendRequest(query)
}
また、フィルターでの絞り込みや、ソートの指定も可能となっています。
[2023/04/26 現在]
ローカルで実行する場合、最新版(0.6.13)の Data API Builder だとフィルターが使えないというバグがあるため、次のリリースが来るまでは以下の回避策をとる必要があります。
https://github.com/Azure/data-api-builder/discussions/1423#discussioncomment-5589783
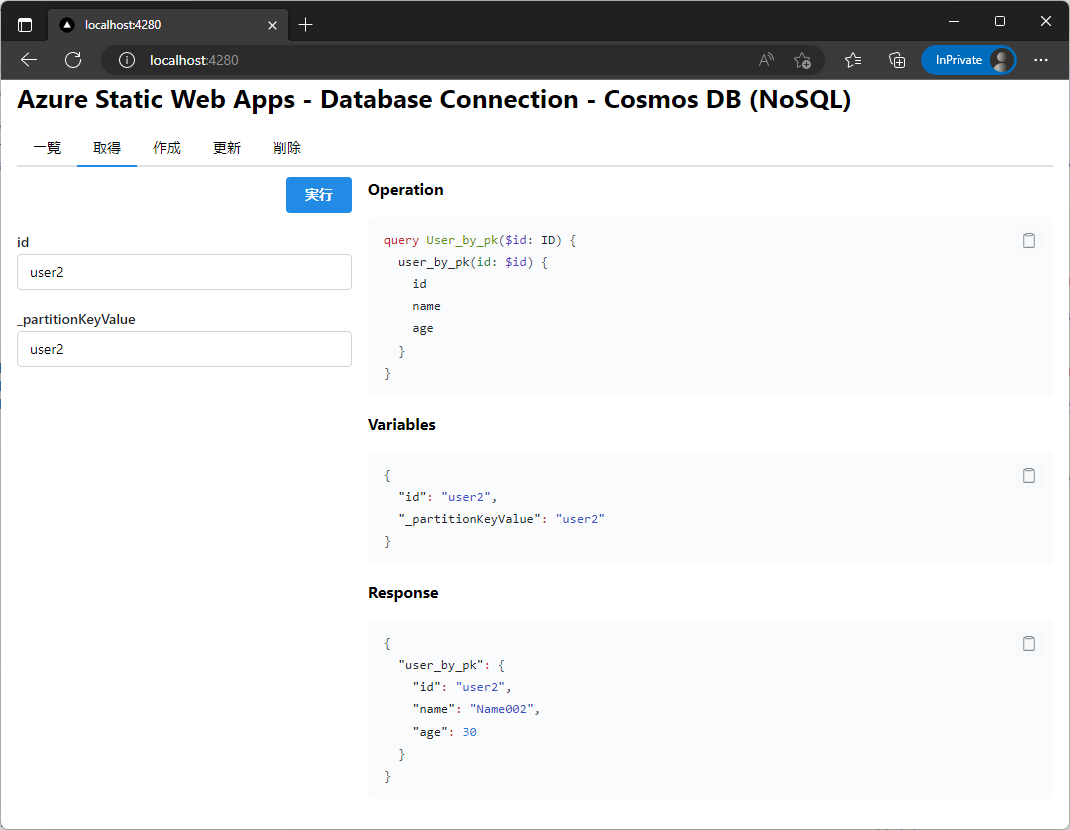
プライマリキーを指定して取得
user_by_pk クエリを使います。
/** キーを指定して取得 */
const getUser: SendRequest<QueryUser_By_PkArgs> = async ({ id, _partitionKeyValue }) => {
  const query = gql`
    query User_by_pk($id: ID) {
      user_by_pk(id: $id) {
        id
        name
        age
      }
    }
  `

  const variables: QueryUser_By_PkArgs = {
    id,
    _partitionKeyValue,
  }

  return sendRequest(query, variables)
}
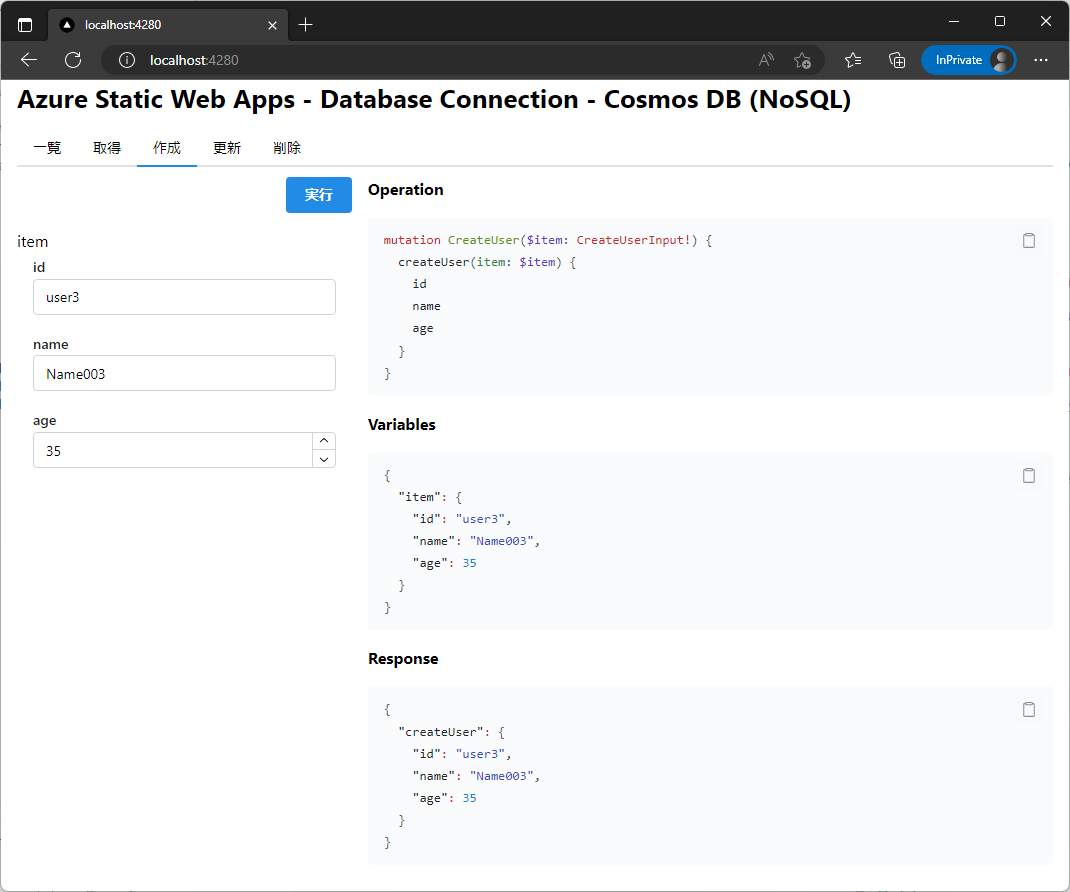
登録
createUser ミューテーションを使います。
/** 登録 */
const createUser: SendRequest<MutationCreateUserArgs> = async ({ item }) => {
  const mutation = gql`
    mutation CreateUser($item: CreateUserInput!) {
      createUser(item: $item) {
        id
        name
        age
      }
    }
  `

  const variables: MutationCreateUserArgs = {
    item,
  }

  return sendRequest(mutation, variables)
}
更新
updateUser ミューテーションを使います。
/** 更新 */
const updateUser: SendRequest<MutationUpdateUserArgs> = async ({
  id,
  _partitionKeyValue,
  item,
}) => {
  const mutation = gql`
    mutation UpdateUser($id: ID!, $_partitionKeyValue: String!, $item: UpdateUserInput!) {
      updateUser(id: $id, _partitionKeyValue: $_partitionKeyValue, item: $item) {
        id
        name
        age
      }
    }
  `

  const variables: MutationUpdateUserArgs = {
    id,
    _partitionKeyValue,
    item,
  }

  return sendRequest(mutation, variables)
}
削除
deleteUser ミューテーションを使います。
/** 削除 */
const deleteUser: SendRequest<MutationDeleteUserArgs> = async ({ id, _partitionKeyValue }) => {
  const mutation = gql`
    mutation DeleteUser($id: ID!, $_partitionKeyValue: String!) {
      deleteUser(id: $id, _partitionKeyValue: $_partitionKeyValue) {
        id
        name
        age
      }
    }
  `

  const variables: MutationDeleteUserArgs = {
    id,
    _partitionKeyValue,
  }

  return sendRequest(mutation, variables)
}
アクセス制御の確認
現在は特にアクセス制限がかかっていない状態なので、制限を追加してみます。
staticwebapp.database.config.json を編集します。
  "entities": {
    "User": {
      "source": "users",
      "permissions": [
        {
-         "role": "anonymous",
+         "role": "admin",
          "actions": ["*"]
        },
+       {
+         "role": "user",
+         "actions": ["read"]
+       }
      ]
    }
  }
admin ロールのユーザーは [全操作] 可能
user ロールのユーザーは [読み取り] のみ可能
としました。
・・・と、ここで上手くアクセス制御できずに小一時間ハマりました。
anonymous と authenticated (システムロール)では制御されるけど、それ以外のカスタムロールだと制御できない・・・
そして公式ドキュメントにちゃんと書いてあった・・・
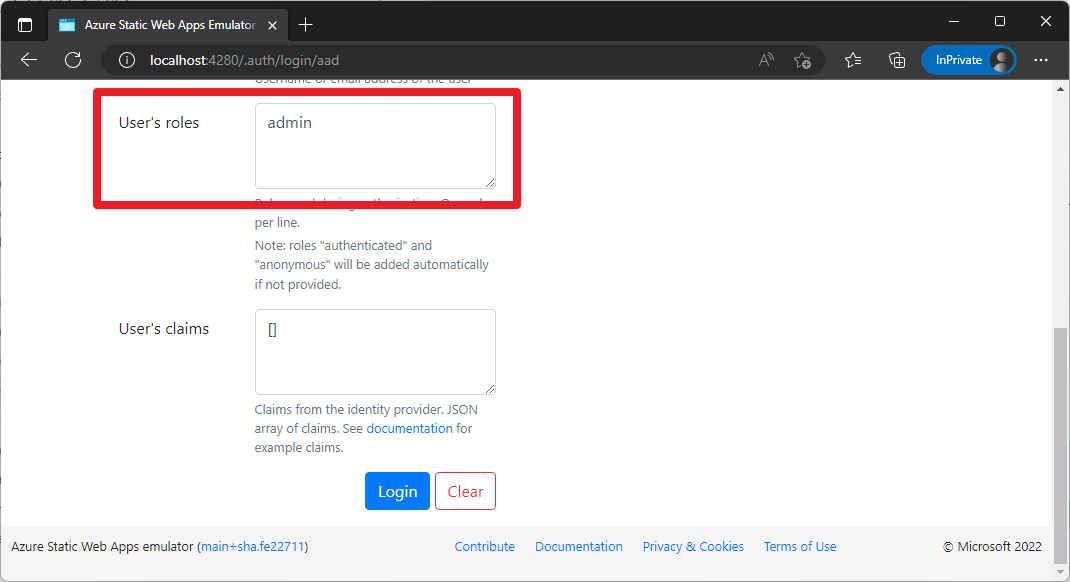
X-MS-API-ROLE: admin のようにロールを指定するリクエストヘッダーを付ける必要がありました。
If X-MS-API-ROLE is not specified for an authenticated request, the request is assumed to be evaluated in the context of the authenticated system role.
付いていない場合はシステムロール (未ログインなら anonymous、ログイン済みなら authenticated) とみなされるようです。
(ドキュメントはちゃんと読みましょうね・・・!)
ちなみに X-MS-API-ROLE ヘッダーには1つのロールしか指定できません。
admin と user が一緒に渡ってきたら、強い方の権限で判断する、みたいなことにはなりません。
admin ロールの場合
user ロールの場合
スキーマ定義の確認方法
Banana Cake Pop 等の GraphQL 向け IDE で確認するのがわかりやすいと思います。
そういった Web サービスからアクセスさせたい場合は、staticwebapp.database.config.json で CORS の許可設定を追加しておく必要があります。
    "host": {
      "mode": "production",
      "cors": {
-       "origins": [],
+       "origins": ["https://eat.bananacakepop.com"],
        "allow-credentials": false
      },
      ・・・
   }
Banana Cake Pop で見た場合
※Static Web Apps で認証設定している場合は、エンドポイントを http://localhost:5000/graphql に設定しないと弾かれてしまいます
Azure へのデプロイ
デプロイ
ローカルで動かすことができたので、Azure 環境にデプロイしてみます。
今回はリモートリポジトリからのデプロイではなく、Static Web Apps CLI でデプロイしました。
デプロイ方法は以下の記事を参考にしてください。
Cosmos DB のリンク
デプロイできたら Cosmos DB を Static Web Apps にリンクさせます。
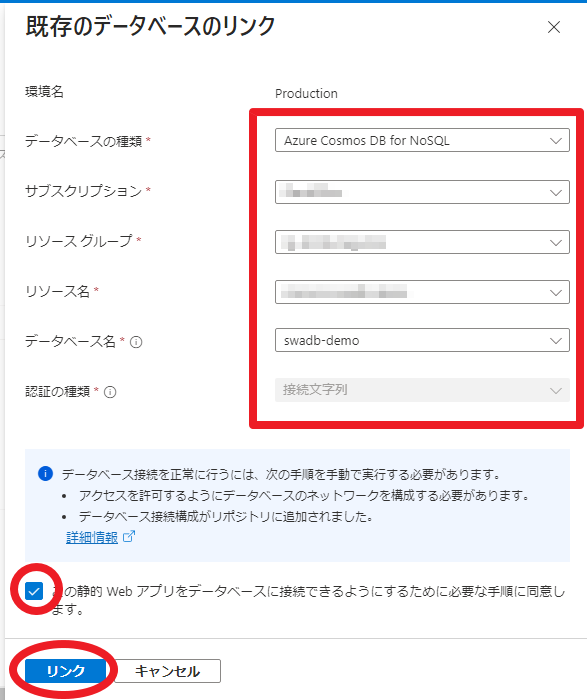
Static Web Apps のリソース画面で データベース接続(プレビュー) > 既存のデータベースのリンク を選択。

先ほど作成した Cosmos DB の情報を入力してリンクします。
認証の種類は接続文字列の他にマネージドIDが選べます。
ここでは接続文字列を選択しました。(というか Free プランだと接続文字列しか選択できない)
マネージドIDを選ぶには、Static Web Apps のホスティングプランを「Standard」に設定して、IDを有効にする必要があります
az コマンドで設定する場合
resourceGroup=<リソースグループ>
swaName=<Static Web Apps リソース名>
cosmosdbAccount=<Cosmos DB アカウント名>

# Static Web Apps 作成
echo
echo Creating $swaName ...
az staticwebapp create \
    --name $swaName \
    --resource-group $resourceGroup \
    --sku Free

# Cosmos DB の ID 取得
cosmosdbId=$(
    az cosmosdb show \
        --name $cosmosdbAccount \
        --resource-group $resourceGroup \
        --query id \
        --output tsv
)

# Cosmos DB へのリンク設定
echo
echo Creating Database Connection to $cosmosdbAccount ...
az staticwebapp dbconnection create \
    --db-resource-id "$cosmosdbId" \
    --name $swaName \
    --resource-group $resourceGroup
まとめ
バックエンドのコードを一切書かずに Cosmos DB を操作することができました。
単純な CRUD しかないアプリであれば、もう自分で Function 実装する必要がなくなりそうです。
また、Data API Builder は Static Web Apps だけでなくオンプレミスやコンテナでも使用することができるようなので、使い方を抑えておけば API の開発効率が上がりますね。
今回は GraphQL のみだったので、他のデータベースサービスとの連携で REST についても試してみたいと思います。


