はじめに
毎月発生するタスクに、注文スケジュールの月を更新する作業があったため、自動で更新できるようにLiquidで改修してみました。
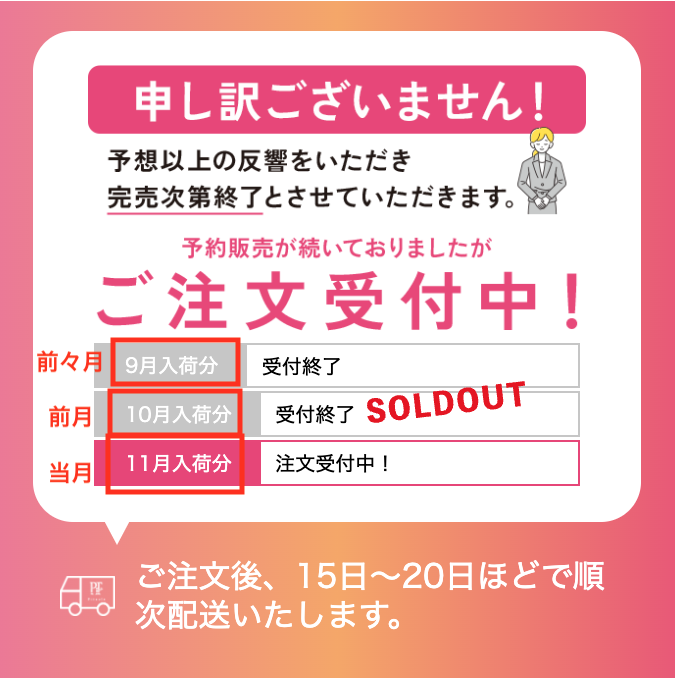
当月が11月の場合、注文受付中のステータスは11月になり、受付終了は9、10月になります。
当月→注文受付中、前月・前々月→受付終了といった形です。
実際のコード
<div class="reservation">
    <div class="reservation__blowing">
        <div class="reservation__text">
            <img loading="lazy"
            src="https://ec-force.s3.amazonaws.com/bacchus/uploads/pitsole/img/v001/reservation_text.png"
            alt="">
        </div>
        <div class="reservation__schedule">
            <ul class="reservation__schedule-list">
                <li class="reservation__schedule-list__item"><span class="reservation__monthly-arrival">{{ month_before_last }}月入荷分</span>受付終了</li>
                <li class="reservation__schedule-list__item"><span class="reservation__monthly-arrival">{{ last_month }}月入荷分</span>受付終了</li>
                <li class="reservation__schedule-list__item is_accepting"><span class="reservation__monthly-arrival">{{ this_month }}月入荷分</span>注文受付中!</li>
            </ul>
        </div>
    </div>
    <div class="reservation__shipping">
        <p class="reservation__shipping__text">ご注文後、15日~20日ほどで順次配送いたします。</p>
    </div>
    <div class="reservation__note">
        <ul class="reservation__note__list">
            {% if is_switch_holiday %}
                <li class="reservation__note__list__item">倉庫休業中の出荷予定についてのお知らせなど</li>
            {% endif %}
        </ul>
    </div>
</div>
{% comment %}注文スケジュール{% endcomment %}
{% capture this_month %}{{ "now" | date: "%-m" }}{% endcapture %}
{% capture last_month %}{{ this_month | minus:1 }}{% endcapture %}
{% capture month_before_last %}{{ this_month | minus:2 }}{% endcapture %}

{% if this_month == '1' %}
    {% assign last_month = '12' %}
    {% assign month_before_last = '11' %}
{% elsif this_month == '2' %}
    {% assign last_month = '1' %}
    {% assign month_before_last = '12' %}
{% endif %}
コード解説
当月を取得する
当月を軸に、引き算をして前月・前々月を表示するため、まずは当月を取得する必要があります。
現在の時刻を取得するにはnowもしくはtodayを使い、|(パイプ)でdateと繋げることで、表示形式を設定します。
今回は月のみ取得するため、{{ "now" | date: "%-m" }}と記述します。
取得した月は、this_monthという変数に格納して、引き算や出力する際に使用していきます。
{% capture this_month %}{{ "now" | date: "%-m" }}{% endcapture %}
captureとは
captureは、Liquidで変数宣言をするためのタグです。同じ変数宣言のタグにassignがありますが、captureはHTMLやLiquidの複雑なコードも代入でき、より汎用性のあるコードを書くことができます。assignにHTMLやLiquidのコードを書いてしまうと、そのまま文字列として吐き出されてしまいます。
{% comment %}例{% endcomment %}
{% assign sweets = '<p>cake</p>' %}
{% comment %}表示結果:<p>cake</p>{% endcomment %}

{% capture sweets %}<p>cake</p>{% endcapture %}
{% comment %}表示結果:cake{% endcomment %}
当月から引き算して前月・前々月を取得する
this_monthに格納した当月から引き算をして前月・前々月を取得します。
Liquidの引き算は、|minus:[number]で計算します。計算結果は、それぞれlast_month、month_before_lastに格納していきます。
{% capture last_month %}{{ this_month | minus:1 }}{% endcapture %}
{% capture month_before_last %}{{ this_month | minus:2 }}{% endcapture %}
計算結果がマイナスになるケース
当月が1月・2月の場合は、計算結果にマイナスの値が入ってしまうため、固定値を代入します。Liquidのif文を使って条件分岐し、変数宣言には固定値を文字列で代入するため、assignを使用しています。
{% if this_month == '1' %}
    {% assign last_month = '12' %}
    {% assign month_before_last = '11' %}
{% elsif this_month == '2' %}
    {% assign last_month = '1' %}
    {% assign month_before_last = '12' %}
{% endif %}
計算結果を表示する
計算結果を表示するため、{{}}(出力タグ)を使って変数を記述します。
出力タグにいれることによって、変数に格納された値が表示されます。
<div class="reservation__schedule">
    <ul class="reservation__schedule-list">
        <li class="reservation__schedule-list__item"><span class="reservation__monthly-arrival">{{ month_before_last }}月入荷分</span>受付終了</li>
        <li class="reservation__schedule-list__item"><span class="reservation__monthly-arrival">{{ last_month }}月入荷分</span>受付終了</li>
        <li class="reservation__schedule-list__item is_accepting"><span class="reservation__monthly-arrival">{{ this_month }}月入荷分</span>注文受付中!</li>
    </ul>
</div>
さいごに
jsで複雑になりがちなコードも、Liquidを使用することによって初学者でも簡単にコーディングすることができて、非常に便利です。js前の入門に使用してみるのもいいなと思いました。