実行環境
Ubuntu 16.04
Python 3.7
opencv-python 4.1.0.25
概要
中国が開発したAPI「Face++」を用いて、顔認識をしてみる。
手順は以下の通り。
①アカウント登録
②利用するAPIを取得
③デモの確認
④プログラム
⑤顔認識
①アカウント登録
まず、Face++を利用するためにアカウント登録する必要がある。
公式ページで登録を行い、自分のAPI KeyとAPI Secretをゲットする。
これらが各APIを利用する際に必要となる。
作成したAPI KeyとAPI SecretはFace++の Apps/API Key で確認できる。

②利用するAPIを取得
今回作成した顔認識プログラムで利用するAPIは3種類。
いずれもFacial Recognitionというグループに存在し、
顔を識別するためにDetect APIとSearch API、顔を登録するためにFaceSet Create API を用いる。
各APIのパラメータなどは公式のAPI referenceで確認できる。
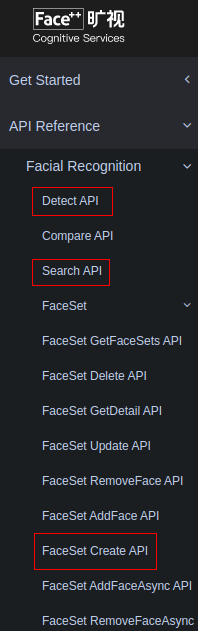
今回、赤枠内のAPIを使用する。
③デモの確認
Search APIなどはFace++の公式ページでデモがあるため、どのような出力が得られるのか見てみよう。
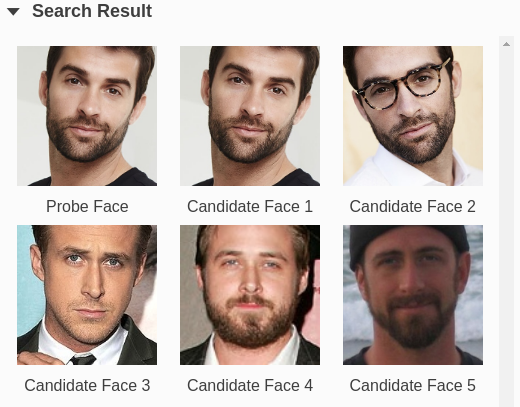
上図の**Probe Faceが比較元となる画像で、
類似度が高い順にデータベースの画像からCandidate Face**が選ばれる。
(作成する顔認識プログラムでは、Probe Faceを未知の入力画像とし、
Candidate Faceを認識したい人物の画像として用意しておく。)
各画像の比較結果はJSONファイルとして出力される。
{
  "time_used": 420,
  "thresholds": {
    "1e-3": 62.327,
    "1e-5": 73.975,
    "1e-4": 69.101
  },
  "faces": [
    {
      "face_token": "8d25b53edf9e20bad18bebe3b0c8e06c",
      "face_rectangle": {
        "width": 252,
        "top": 170,
        "height": 252,
        "left": 102
      }
    }
  ],
  "results": [
    {
      "confidence": 97.076,
      "user_id": "",
      "face_token": "8323ce719cb1129e4abf4ada1129cbc9"
    },
    {
      "confidence": 93.254,
      "user_id": "",
      "face_token": "fd6c81b63615b62b8506f33a6748fd95"
    },
    {
      "confidence": 66.15,
      "user_id": "",
      "face_token": "192672385b603e6b54cf884cd019a620"
    },
    {
      "confidence": 63.826,
      "user_id": "",
      "face_token": "34bbf05899b53968dcee620aa06a35e7"
    },
    {
      "confidence": 57.875,
      "user_id": "",
      "face_token": "ee6cbca281f449d3ed6040ca63b4c52c"
    }
  ],
  "image_id": "+b1mqy/4tPkV6QMTyRVGyA==",
  "request_id": "1573608536,e6ac4f2a-62fb-40a9-890b-696eba9a32a1"
}
resultsキーの各要素がProbe FaceとCandidate Faceとの比較結果を表している。
2枚の画像の類似度は**"confidence"**として出力される。
上の結果を見ると、Candidate Face1のconfidenceは97.076、
Candidate Face2のconfidenceは93.254であり、高い類似度になっている。
それ以外の結果は、類似度70を下回っている。
この類似度を利用し、顔認識プログラムを作成する。
④プログラム
顔認識のプログラムは以下の通り。
APIの使い方については下記URLを参考にした。
https://github.com/Doarakko/api-challenge/tree/master/facepp-api
import time
import re
import base64
import requests
import glob
import cv2

API_KEY = '自分のAPI Key'
API_SECRET = '自分のAPI Secret'

# 顔を検出するAPI
def detect_image(img):
    endpoint = 'https://api-us.faceplusplus.com'
    response = requests.post(
        endpoint + '/facepp/v3/detect',
        {
            'api_key': API_KEY,
            'api_secret': API_SECRET,
            'image_base64': img,
        }
    )
    # 1秒スリープ
    time.sleep(1)
    # レスポンスのステータスコードが200以外の場合
    if response.status_code != 200:
        print('[Error] ')
        return -1
    resources = response.json()
    return resources

# 顔を識別するAPI
def search_image(img,face_set):
    endpoint = 'https://api-us.faceplusplus.com'
    res, dst_data = cv2.imencode('.jpg', img)
    img_base64 = base64.b64encode(dst_data)
    # 顔検出APIにリクエストを送る
    faces=detect_image(img_base64)
    for face in faces["faces"]:
        try:
            response = requests.post(
                endpoint + '/facepp/v3/search',
                {
                    'api_key': API_KEY,
                    'api_secret': API_SECRET,
                    'face_token': str(face["face_token"]),
                    'faceset_token': face_set["faceset_token"],
                    'return_result_count': 1,
                }
            )
            # 1秒スリープ
            time.sleep(1)
            # レスポンスのステータスコードが200以外の場合
            if response.status_code != 200:
                return -1
            resources = response.json()
            print("成功")
            print(resources)
            img=draw_img(face,resources,img)
        except Exception as e:
            return -1
    #画像を保存
    cv2.imwrite("./output/result_"+filename, img)
    return resources

# 一番確率の高い顔の情報を描画
def draw_img(face,resources,img):
    try:
        left = face["face_rectangle"]["left"]
        top = face["face_rectangle"]["top"]
        right = left + face["face_rectangle"]["width"]
        bottom = top + face["face_rectangle"]["height"]
        # 矩形を描画
        cv2.rectangle(img, (left, top), (right, bottom), (0, 0, 255), 3)
        font = cv2.FONT_HERSHEY_SIMPLEX
        # 確率の描画
        cv2.putText(img, str(resources["results"][0]["confidence"]) + "%", (left, top), font, 0.5, (255, 255, 255), 3, cv2.LINE_AA)
        cv2.putText(img, str(resources["results"][0]["confidence"]) + "%", (left, top), font, 0.5, (0, 0, 0), 1, cv2.LINE_AA)
        # 名前の描画
        cv2.putText(img, str(resources["results"][0]["user_id"]) , (left, top-20), font, 0.5, (255, 255, 255), 3, cv2.LINE_AA)
        cv2.putText(img, str(resources["results"][0]["user_id"]) , (left, top-20), font, 0.5, (0, 0, 0), 1, cv2.LINE_AA)
    except Exception as e:
        print("none")

    return img

# 比較する顔画像を登録
def create_faceset(face_list,tags):
    id_list = []
    for (img_path,face_id) in zip(face_list,tags):
        img_file = base64.encodebytes(open(img_path, 'rb').read())
        resources = detect_image(img_file)
        set_userid(resources["faces"][0]["face_token"],face_id)
        id_list.append(resources["faces"][0]["face_token"])

    id_list=str(id_list).replace("'", "")
    id_list=str(id_list).replace("[", "")
    id_list=str(id_list).replace("]", "")
    id_list=str(id_list).replace(" ", "")

    print(resources)
    print(id_list)

    endpoint = 'https://api-us.faceplusplus.com'
    try:
        response = requests.post(
            endpoint + '/facepp/v3/faceset/create',
            {
                'api_key': API_KEY,
                'api_secret': API_SECRET,
                'display_name': 'facebank',
                'face_tokens': id_list,
            }
        )
        # 1秒スリープ
        time.sleep(1)
        # レスポンスのステータスコードが200以外の場合
        if response.status_code != 200:
            return -1
        resources = response.json()
        print(resources)
        return resources
    except Exception as e:
        return -1

def set_userid(face_token,user):
    endpoint = 'https://api-us.faceplusplus.com'
    try:
        response = requests.post(
            endpoint + '/facepp/v3/face/setuserid',
            {
                'api_key': API_KEY,
                'api_secret': API_SECRET,
                'display_name': 'facebank',
                'face_token':face_token,
                'user_id':user,
        }
        )
        # 1秒スリープ
        time.sleep(1)
        # レスポンスのステータスコードが200以外の場合
        if response.status_code != 200:
            return -1
        resources = response.json()
        print(resources)
        return resources
    except Exception as e:
        return -1

if __name__ == '__main__':
    # 識別したい画像を取得
    filename="input.jpg"
    img=cv2.imread('./input/'+filename)
    # フォルダ内の画像を取得
    face_list = glob.glob('./facebank/*/*.jpg')
    face_list.sort()
    tags=[]# 各名前(user_id)格納用
    # 登録データから読み取り
    for face_path in face_list:
        tags.append(str(re.search(r'./facebank/(.+)/.+', face_path).group(1)))
    # APIで比較する顔を定義
    face_set = create_faceset(face_list,tags)
    # 識別するAPIにリクエストを送る
    resources = search_image(img,face_set)
各APIの引数などについては公式のリファレンスを参照。
フォルダ階層は以下の通り。
─ facebank/
    ├ A/
    │ └ A.jpg
    ├ B/
    │ └ B.jpg
    ├ C/
    │ └ C.jpg
    ├ D/
    │ └ D.jpg
    └ E/
      └ E.jpg
─ input/
    └ input.jpg
─ output/
    └ result_input.jpg
─ main.py
inputフォルダには識別する画像を入れる。
facebankフォルダの中に各人物名のフォルダを用意し、
そのフォルダ内に顔写真を入れておく。(顔写真の名前は任意)
⑤顔認識
いざ、顔認識。
登録&認識する写真は、人物のフリー素材を公開している「ぱくたそ」から拝借した。
今回認識対象として登録した写真は以下の5枚。
- ezakiさん

- murataさん

- narishigeさん

- okawaさん

- yuseiさん
そして、認識結果がこちら!


なんと顔を登録した人は80%以上の類似度で全員正解!
顔写真の登録枚数は各人物1枚なのに高い精度だ。
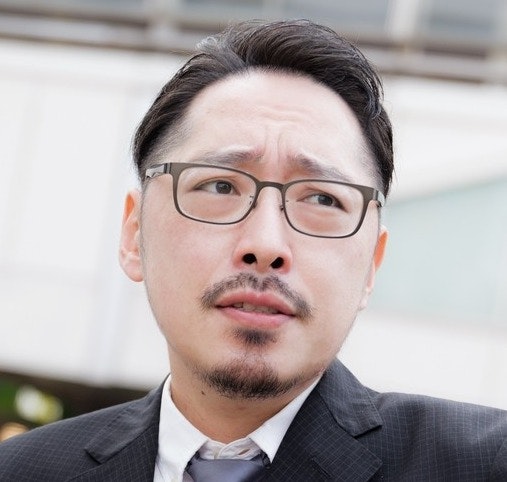
顔を未登録の人も、登録した人の中で最も高い類似度の人として識別されているが、
下図のように低い類似度になっていることが分かる。


Face++にアカウント登録すると、WEBページのデモで自前の画像で顔認識などができるため、
気になる方はお試ししてみてはいかがでしょうか。