前回(2. OnsenuiとAngularjsで簡単に動きのあるページがつくれる)のつづきから。
OnsenuiとAngularjsでできること
splash screen
splash screenに使えるons-loading-placeholderディレクティブがあるが、今回の構成と相性が悪いみたいなのでちょっと強引な実装。
実装例
index.html
<style>
  .splash-screen {
    background: #fff;
    display: -webkit-flex;
    display: -moz-flex;
    display: -ms-flex;
    display: -o-flex;
    display: flex;
    text-align: center;
    position: fixed;
    top: 0;
    bottom: 0;
    right: 0;
    left: 0;
    z-index: 999;
  }
  .splash-screen-content {
    margin: auto;
  }
</style>

<div id="splashScreen" class="splash-screen" my-loading-content>
  <div class="splash-screen-content">アプリケーションの読み込みを行っています...</div>
</div>
constructorの中身をこんな感じに。
myApp.js
constructor() {
// ons.readyに渡した関数は、Onsen UIの初期化が終了している時点で必ず呼ばれます
  ons.ready(() => {
    const elem = document.getElementById('splashScreen');
    if (elem) {
      elem.style.display = 'none';
    }
  });
}
dialogを利用したform作成
onsenuiではこんな感じのformのパーツが簡単に作成できる。
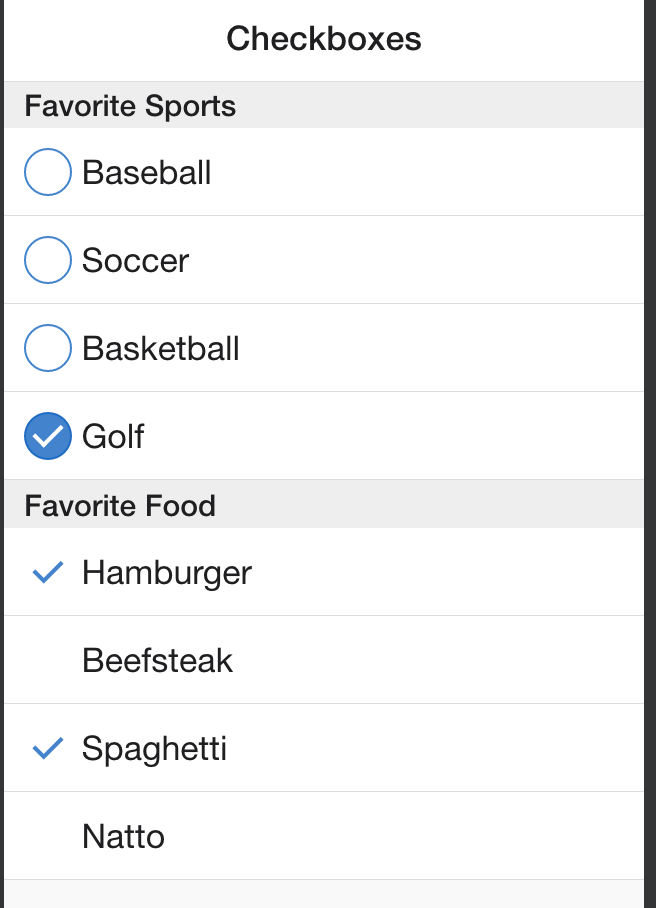
ただ、このままだと項目が何個かあった場合フォーム画面が中々長くなってしまうので、
dialogを利用してチェックボックス入力をつくる。
checklist-modelを使用する。
npm install -S checklist-model
cp ./node_modules/checklist-model/checklist-model.js ./lib/.
こんな感じになる。
注:チェックボックス機能は問題無いが、このままの形式でciniiのapiは機能しない。
実装例
外部ライブラリを読み込むコード追記
index.html
<script src="./lib/checklist-model.js"></script>
checklist-modelやコンポーネントの設定
app.js
import myApp from '../components/myApp/myApp';
import myListPage from '../components/myListPage/myListPage';
import myCheckBoxList from '../components/myCheckBoxList/myCheckBoxList';

import BookService from './services/BookService';

(() => {

  // appモジュールを定義する
  const app = angular.module('app', ['onsen', 'checklist-model']);

  // componentの定義
  app.component('myApp', myApp);
  app.component('myListPage', myListPage);
  app.component('myCheckBoxList', myCheckBoxList);

  // serviceの定義
  app.service('BookService', BookService);

})();
ダイアログ作成
dialog.html
<ons-dialog cancelable var="myDialog">
  <my-check-box-list></my-check-box-list>
</ons-dialog>
ダイアログ内のチェックボックスリストを生成するコンポーネント
myCheckBoxList.html
<ons-toolbar inline fixed-style>
  <div class="center">
    {{$ctrl.title}}
  </div>
  <div class="right">
    <ons-toolbar-button ng-click="$ctrl.hide()">
      <ons-icon icon="ion-ios-close-empty"></ons-icon>
    </ons-toolbar-button>
  </div>
</ons-toolbar>
<ons-list>
  <ons-list-item modifier="tappable" ng-repeat="list in $ctrl.lists">
    <label class="checkbox checkbox--list-item">
      <input type="checkbox" checklist-model="$ctrl.model" checklist-value="list.value">
      <div class="checkbox__checkmark checkbox--list-item__checkmark"></div>
      {{list.label}}
    </label>
  </ons-list-item>
</ons-list>
myCheckBoxList.js
class MyCheckBoxList {
  constructor($scope, $timeout) {
    $scope.$on('showDialog', (event, dialog) => {
      this.title = dialog.title;
      this.lists = dialog.lists;
      this.model = dialog.model;
      $scope.$apply();
    });

    // ダイアログを閉じた後にdom消去する。
    myDialog.once('posthide', () => {
      $timeout(() => {
        myDialog.destroy();
      });
    });
  }

  hide() {
    myDialog.hide();
  }
}
MyCheckBoxList.$inject = ['$scope', '$timeout'];

export default {
  templateUrl: './src/components/myCheckBoxList/myCheckBoxList.html',
  controller: MyCheckBoxList,
};
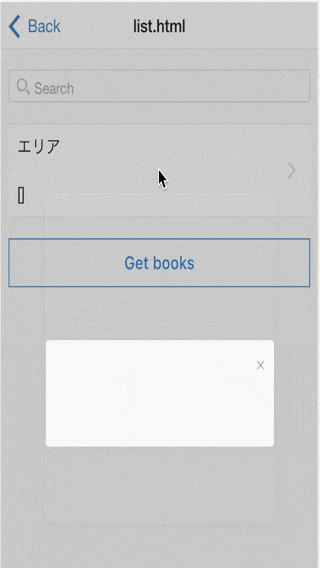
ダイアログ呼び出し元
*formタグにname="$ctrl.form"としておくとvalidationの判定とかで$ctrl.form.validとかが使える
myListPage.html
<ons-scroller>
  <ons-pull-hook var="myListLoader" ng-action="$ctrl.load($done)" height="150px">
    <span ng-switch="$ctrl.getCurrentState()">
      <span class="message-bind" ng-switch-when="initial">ひっぱると更新します</span>
      <span class="message-bind" ng-switch-when="preaction">離すと更新します</span>
      <span class="message-bind" ng-switch-when="action">読み込みを開始します</span>
    </span>
  </ons-pull-hook>
  <ons-toolbar>
    <div class="left">
      <ons-back-button>Back</ons-back-button>
    </div>
    <div class="center">list.html</div>
  </ons-toolbar>
  <div>
    <form name="$ctrl.form" class="formarea" ng-submit="$ctrl.submit()" novalidate>
      <div class="formarea-inputs">
        <input type="search" placeholder="Search" class="search-input" ng-model="$ctrl.params.q" required>
      </div>
      <div class="formarea-inputs list">
        <div class="list__item list__item--chevron" ng-click="$ctrl.showDialog()">
          <div>エリア</div>
          {{$ctrl.params.area}}
        </div>
      </div>
      <div><button class="button--large button--outline" type="submit">Get books</button></div>
    </form>
    <ons-list class="book-list" ng-if="$ctrl.results['opensearch:totalResults']" modifier="inset">
      <ons-list-header>{{$ctrl.results['opensearch:totalResults']}}件みつかりました</ons-list-header>
      <ons-list-item ng-repeat="item in $ctrl.results.items">
        <div>{{item['dc:creator'] || '不明'}}</div>
      </ons-list-item>
    </ons-list>
  </div>
</ons-scroller>
myListPage.js
class myListPage {
  constructor(BookService, $timeout, $rootScope, $scope) {
    this.BookService = BookService;
    this.$timeout = $timeout;
    this.$rootScope = $rootScope;
    this.params = {};
    this.params.area = [];
    this.results = {};
    $scope.$watchCollection(() => this.params, (params) => {
      // this.paramsに変更があった場合に処理を行う場合はここ(1階層分だけを監視)
      console.log(params);
    });
  }

  showDialog() {
    const dialogPath = 'dialog.html';
    const arg = {
      title: 'エリア',
      lists: [
        {value: '1', label: '北海道'},
        {value: '2', label: '東北'},
        {value: '3', label: '関東(東京都を除く)'},
        {value: '4', label: '東京都'},
        {value: '5', label: '甲信越'},
        {value: '6', label: '東海'},
      ],
      model: this.params.area,
    };
    const options = {
      callback: () => {
        this.$rootScope.$broadcast('showDialog', arg);
      },
    };

    ons.createDialog(dialogPath).then((dialog) => {
      dialog.show(options);
    });
  }

  get(params) {
    this.BookService.get(params).then(
      (response) => {
        this.results = response.data['@graph'][0];
      }
    );
  }

  load($done) {
    this.$timeout(() => {
      // 引っ張り終了後の処理
      this.params = {};
      this.results = {};
      $done();
    }, 1000);
  }

  getCurrentState() {
    return myListLoader.getCurrentState();
  }

  submit() {
    this.get(this.params);
  }
}
myListPage.$inject = ['BookService', '$timeout', '$rootScope', '$scope'];

export default {
  templateUrl: './src/components/myListPage/myListPage.html',
  controller: myListPage,
};
データの受け渡し bindings
上の例では、コンポーネント間のデータの受け渡しに$broadcastと$onを使用しているが、
入れ子関係であればbindingsを使ってデータの受け渡しができる。
angular公式
my-appに値を渡したい場合
html
<my-app my-primary-data="[1, 2, 3, 5, 8]" my-secondary-data="'fib'"></my-app>
myApp.js
class MyApp {
  constructor() {
    // こんな感じで参照できる
    console.log(`this is my-primary-data property ${this.myPrimaryData}`); // [1, 2, 3, 5, 8]
    console.log(`this is my-secondary-data property ${this.mySecondaryData}`); // 'fiv'
  }
}
MyApp.$inject = [];

// = はこの中での変更が外にも反映される(双方向バインディング)
// < は変更は外に影響しない(1方向バインディング)
export default {
  bindings: {
    myPrimaryData: '=',
    mySecondaryData: '<'
  },
  templateUrl: './src/components/myApp/myApp.html',
  controller: MyApp,
};