Xcode 標準の XCTest Framework を使ったテストについて整理。
導入
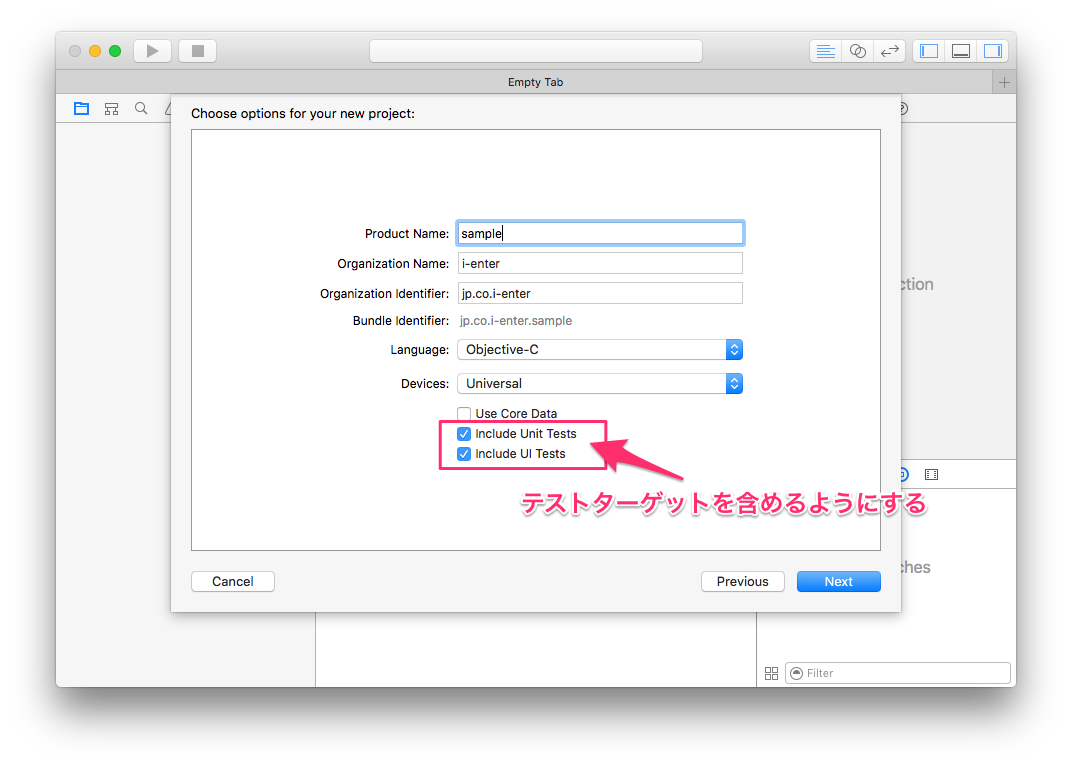
プロジェクト作成時に導入する場合は、このようにテストターゲットを含めるようにします。
既存のプロジェクトに導入する場合は、このようにターゲットを追加します。
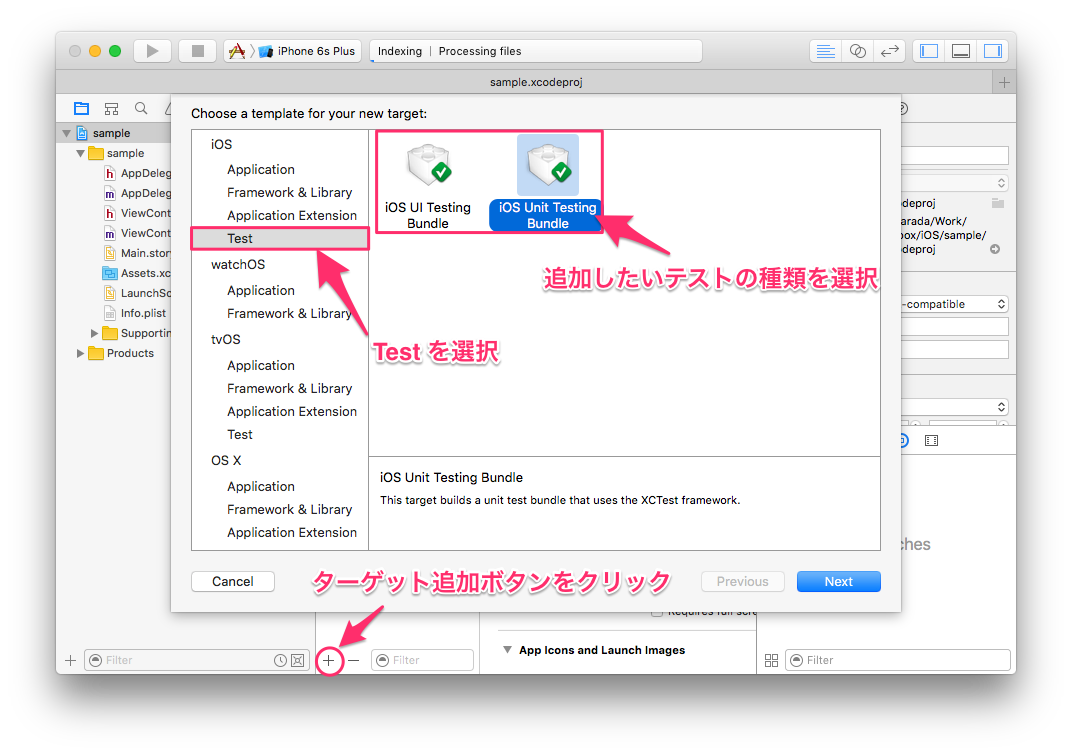
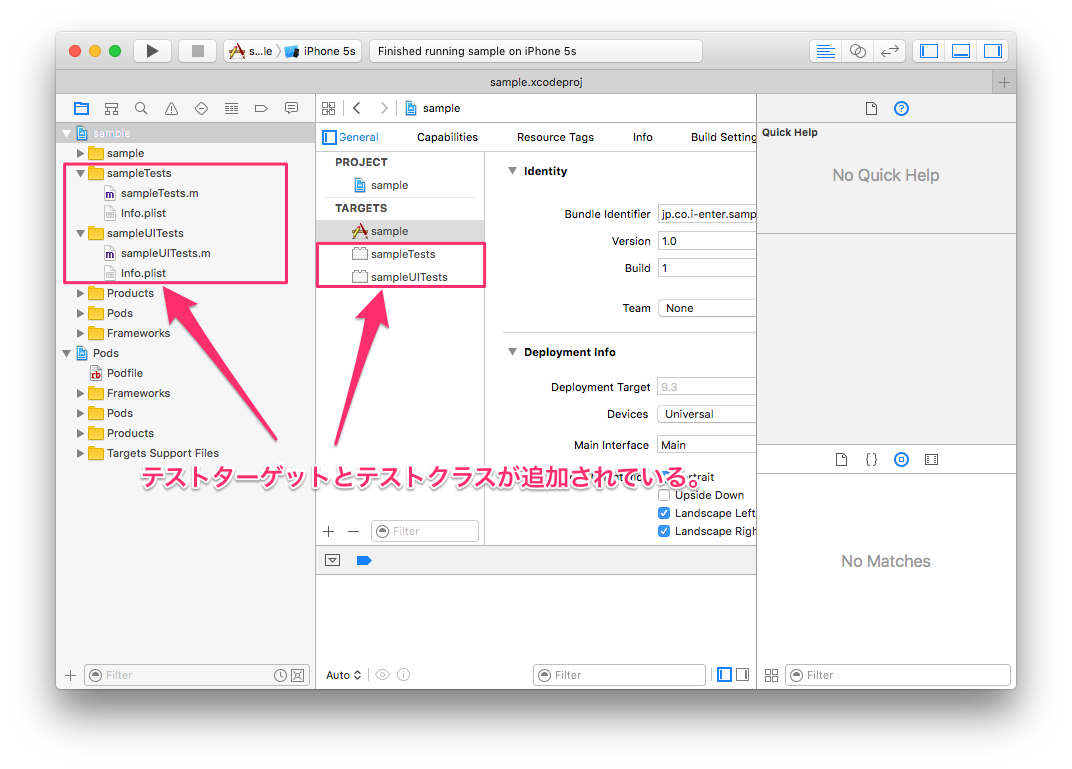
プロジェクトにはこのようにテストターゲットとテストコードが追加されます。
テスト実行
全てのテストを実行する場合は、 Product -> Test もしくは ⌘ + U で実行します。
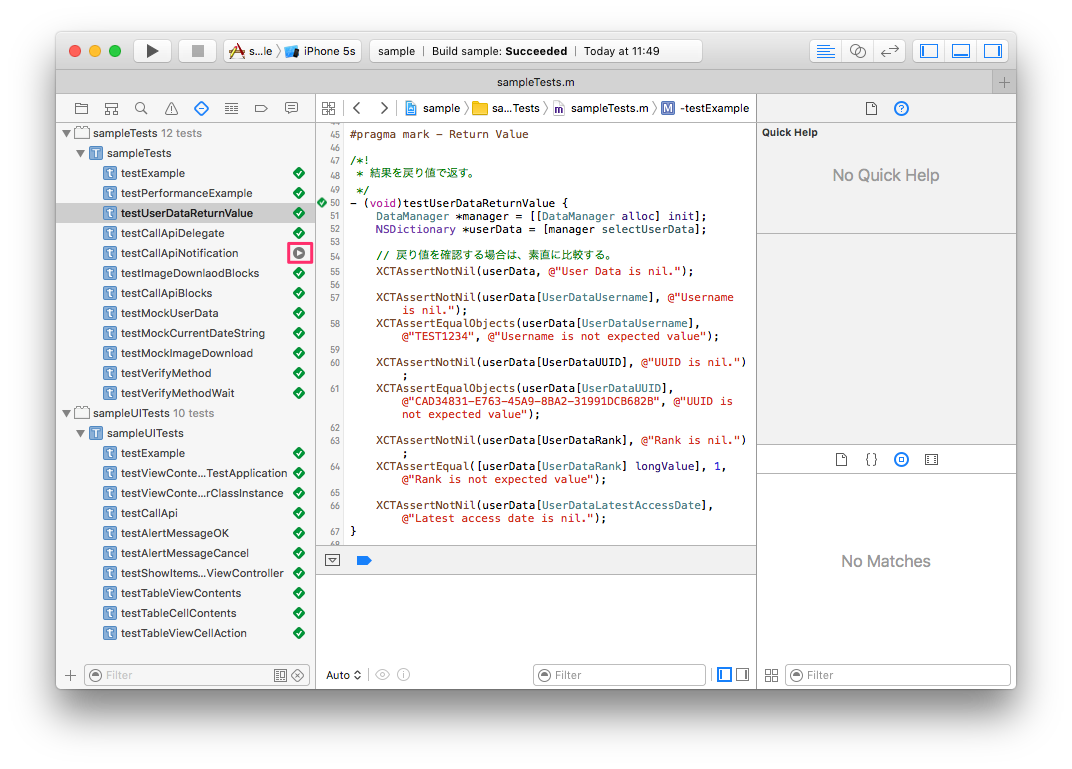
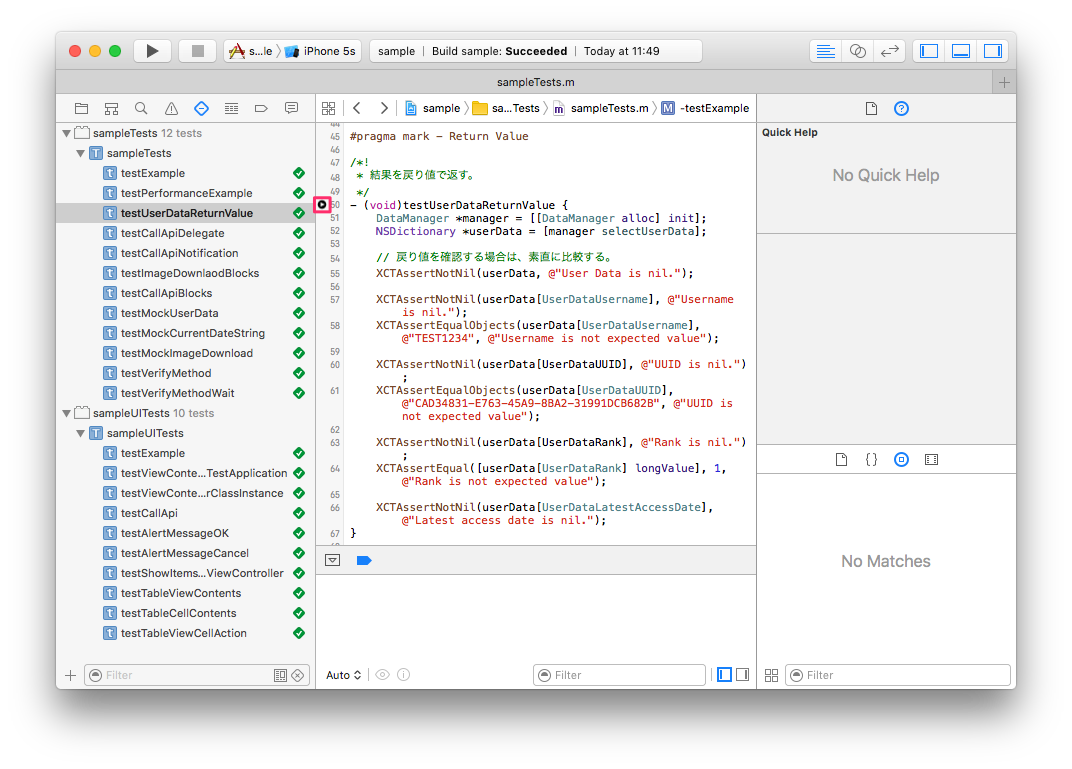
メソッド単位やクラス単位でテストを実行する場合は、このように Test Navigator やエディターでテスト対象にマウスカーソルを合わせるとテスト実行ボタンが表示されますので、これをクリックすることでテストを実行します。
テスト結果
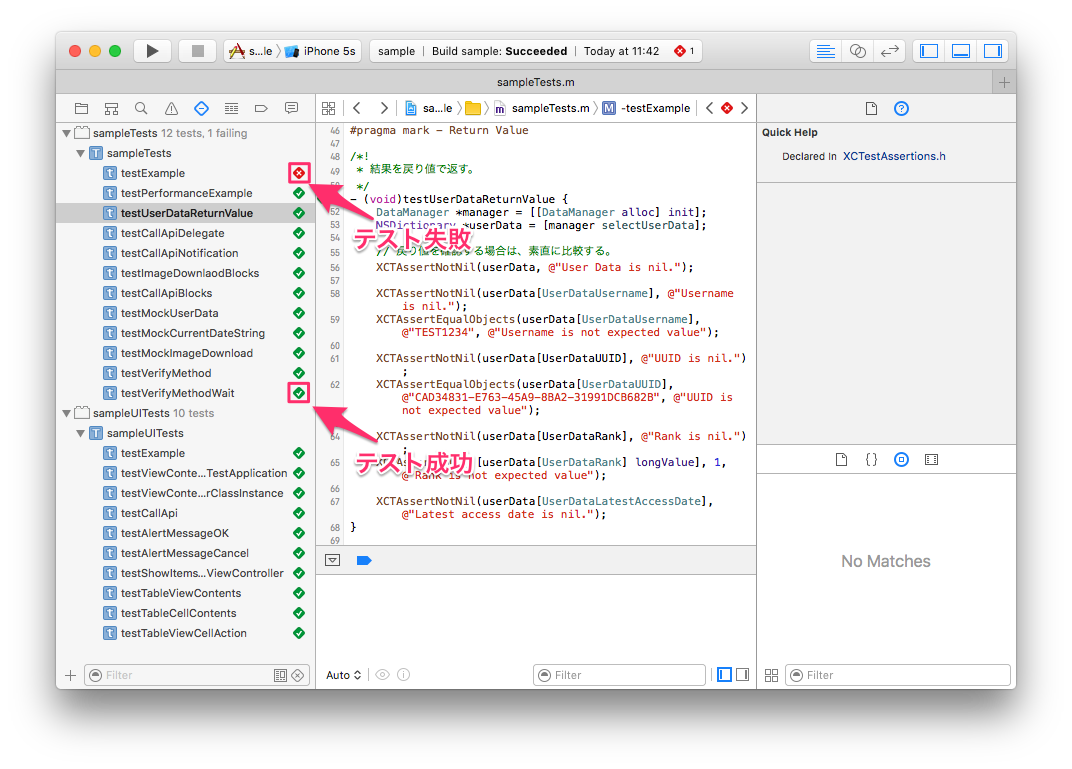
テスト結果は、このように失敗すると赤色のアイコンが表示され、成功すると緑色のアイコンが表示されます。
テストコード
テストメソッドは - (void)testXXX のように頭に test をつけます。これで、このメソッドはテスト用のメソッドだと Xcode が自動的に判断します。
値の確認は XCTAssertNotNil や XCTAssertTrue などのように XCTAssertXXX といったマクロを利用して行います。
戻り値
戻り値の確認をする場合は、素直に比較します。
- (void)testReturnValue {
    DataManager *manager = [[DataManager alloc] init];
    NSDictionary *userData = [manager selectUserData];

    // 戻り値を確認する場合は、素直に比較する。
    XCTAssertNotNil(userData);

    XCTAssertNotNil(userData[UserDataUsername]);
    XCTAssertEqualObjects(userData[UserDataUsername], @"TEST1234");

    XCTAssertNotNil(userData[UserDataUUID]);
    XCTAssertEqualObjects(userData[UserDataUUID], @"CAD34831-E763-45A9-8BA2-31991DCB682B");

    XCTAssertNotNil(userData[UserDataRank]);
    XCTAssertEqual([userData[UserDataRank] longValue], 1);

    XCTAssertNotNil(userData[UserDataLatestAccessDate]);
}
XCTAssertNotNil にて対象のオブジェクトが nil であるか確認します。
XCTAssertEqual や XCTAssertEqualObjects にて期待した値が設定されているかを確認します
非同期処理
通信処理に代表される非同期処理のテストをするには XCTestExpectation を利用して行います。
非同期処理の完了時に -fulfill を呼び出し、非同期処理の監視を終了させます。
監視する時間(秒数)は -waitForExpectationsWithTimeout:handler: で指定します。ここで指定した時間以内に処理が終わらなかった場合はテスト失敗となります。
Blocks
Blocks の場合は、 -expectationWithDescription: で監視用のオブジェクトを作成し、非同期処理完了時に呼ばれる Blocks の中で値の検証を行います。
- (void)testCallApiBlocks {
    // 非同期処理の完了を監視するオブジェクトを作成
    XCTestExpectation *expectation = [self expectationWithDescription:@"CallApiBlocks"];

    NetworkManager *manager = [[NetworkManager alloc] init];
    [manager callApiWithCommand:@"update" parameters:nil completionHandler:^(BOOL result, NSDictionary * _Nullable resultData, NSError * _Nullable error) {
        // 非同期処理の監視を終了
        [expectation fulfill];
        // 結果を確認
        XCTAssertNotNil(resultData, @"result data is nil.");
    }];

    // 指定秒数(60秒)待つ
    [self waitForExpectationsWithTimeout:60 handler:^(NSError * _Nullable error) {
        XCTAssertNil(error, @"has error.");
    }];
}
Delegate
Delegate の場合も、-expectationWithDescription: で監視用のオブジェクトを作成し、 Delegate の設定を行い、非同期処理完了時に呼ばれるメソッドの中で値の検証を行います。
- (void)testCallApiDelegate {
    // 非同期処理の完了を監視するオブジェクトを作成
    callApiExpectation = [self expectationWithDescription:@"CallApiDelegate"];

    NetworkManager *manager = [[NetworkManager alloc] init];
    manager.delegate = self;
    [manager callApiWithCommand:@"update" parameters:nil completionHandler:nil];

    // 指定秒数待つ
    [self waitForExpectationsWithTimeout:60 handler:^(NSError * _Nullable error) {
        XCTAssertNil(error, @"has error.");
    }];
}

- (void)callbackApiResult:(NSDictionary *)result
{
    // 非同期処理の監視を終了
    [callApiExpectation fulfill];
    // 結果を確認
    XCTAssertNotNil(result, @"Api Resut is nil.");
}
Notification
Notification の場合は、 -expectationForNotification:object:handler: を利用します。
指定した名前の通知が来ると handler が実行されますので、この中で値の検証を行います。また、handler が nil の場合、通知が来ると無条件でテスト成功となります。
- (void)testCallApiNotification {
    // 通知を監視する
    [self expectationForNotification:ApiCallbackNotification object:nil handler:^BOOL(NSNotification * _Nonnull notification) {
        // 結果を確認
        XCTAssertNotNil([notification object], @"Notification object is nil.");
        // 通知の監視を終了
        return YES;
    }];

    NetworkManager *manager = [[NetworkManager alloc] init];
    [manager callApiWithCommand:@"update" parameters:nil completionHandler:nil];

    // 指定秒数待つ
    [self waitForExpectationsWithTimeout:60 handler:^(NSError * _Nullable error) {
        XCTAssertNil(error, @"has error.");
    }];
}
UIテスト
UIテストは、テストアプリを動かしながらのテストと、ロジックテストと同様に ViewController クラスのインスタンスを作成してのテストの二種類があります。
準備
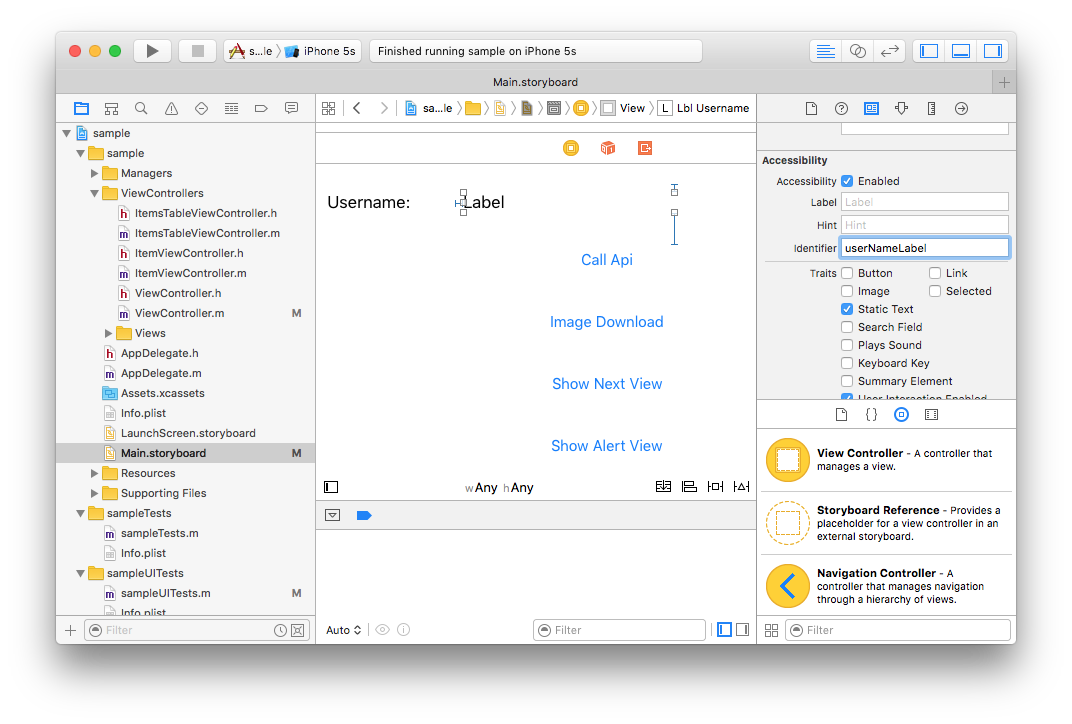
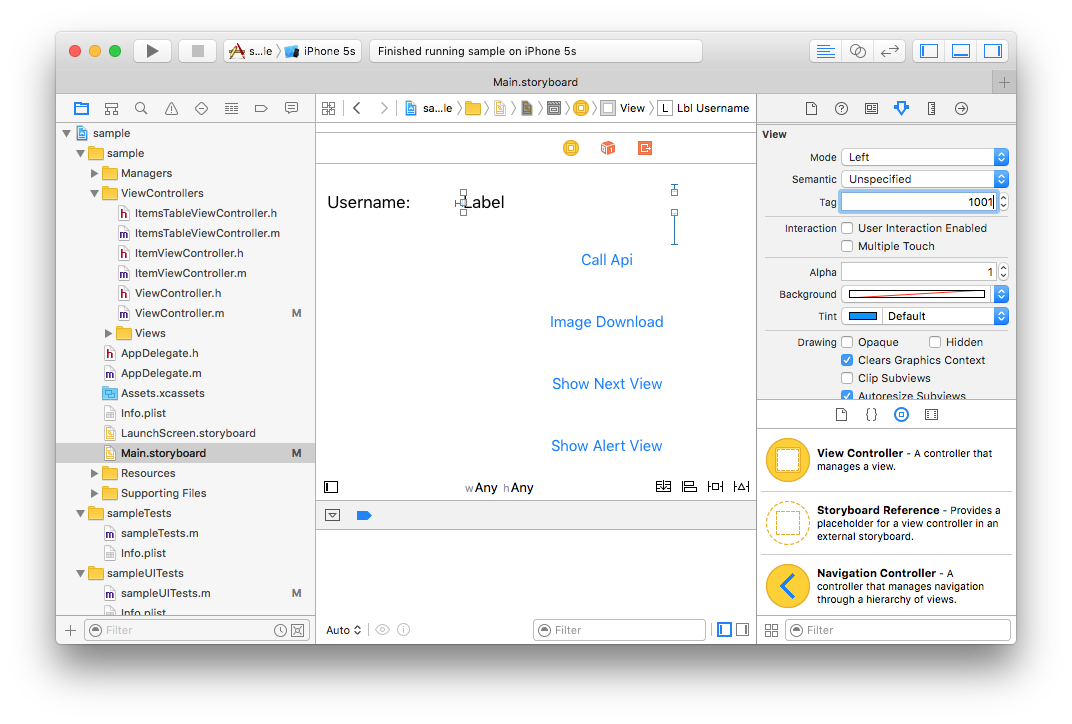
テストクラスから画面のオブジェクトにアクセスできるように、以下のように対象となる View の accessibilityIdentifier と viewTag を設定します。
- (void)viewDidLoad {
    [super viewDidLoad];
    // Do any additional setup after loading the view, typically from a nib.

    // テスト対象とする View の accessibilityIdentifier と viewTag を設定する。
    self.lblUsername.accessibilityIdentifier = ViewIdentifierUsernameLabel;
    self.lblUsername.tag = MainViewTagUsernameLabel;
    self.btnCallApi.accessibilityIdentifier = ViewIdentifierCallApiButton;
    self.btnCallApi.tag = MainViewTagCallApiButton;
    self.btnImageDownload.accessibilityIdentifier = ViewIdentifierImageDownloadButton;
    self.btnImageDownload.tag = MainViewTagImageDownloadButton;
    self.btnShowNextView.accessibilityIdentifier = ViewIdentifierShowNextViewButton;
    self.btnShowNextView.tag = MainViewTagShowNextViewButton;
    self.btnShowAlertView.accessibilityIdentifier = ViewIdentifierShowAlertViewButton;
    self.btnShowAlertView.tag = MainViewTagShowAlertViewButton;

    /* 省略 */
}
テストアプリケーションを対象としたテストで画面のオブジェクトにアクセスするには accessibilityIdentifier で指定した値でアクセスし、ViewController インスタンスを対象としたテストで画面のオブジェクトにアクセスするには viewTag で指定した値でアクセスします。
ViewController にプロパティを用意して Interface Builder と連携させても、テスト時にはこのプロパティからはアクセスできないので注意が必要です。
表示内容の確認
テストアプリケーション
- (void)testViewContentsForTestApplication {
    // テストアプリケーションを取得
    XCUIApplication *app = [[XCUIApplication alloc] init];
    // accessibilityIdentifier に ViewIdentifierUsernameLabel が定義されている UILabel を取得
    XCUIElement *labelElement = app.staticTexts[ViewIdentifierUsernameLabel];
    // UILabel の text を確認
    XCTAssertEqualObjects(labelElement.label, @"TEST1234", @"Usename is not expected value.");
}
クラスインスタンス
ViewController クラスから直接インスタンスを作成する場合は特に注意することはないですが、 Storyboard からインスタンスを作成する場合は、bundle の指定を注意しなければなりません。
アプリ本体側で Storyboard を取得する場合は、bundle は nil で問題ないですが、テストクラス側で Storyboard を取得する場合は、bundle にはテストクラスを含む bundle を設定しなければなりません。
- (void)testViewContentsForClassInstance {
    // Storybord を取得。Bundle の指定に注意する。
    UIStoryboard *storyboard = [UIStoryboard storyboardWithName:@"Main" bundle:[NSBundle bundleForClass:[self class]]];
    // 確認したい View Controller のインスタンスを取得。
    ViewController *mainVC = [storyboard instantiateInitialViewController];
    XCTAssertNotNil(mainVC, @"View controller is nil.");
    XCTAssertTrue([mainVC isKindOfClass:[ViewController class]], @"Target is not 'ViewController'");

    // UILabel を取得
    UILabel *lblUsername = [mainVC.view viewWithTag:MainViewTagUsernameLabel];
    XCTAssertNotNil(lblUsername, @"Username label is nil.");
    XCTAssertTrue([lblUsername isKindOfClass:[UILabel class]], @"Target is not 'UILabel'");

    // UILabel の text を確認
    XCTAssertEqualObjects(lblUsername.text, @"TEST1234", @"Usename is not expected value.");
}
画面操作の確認
画面操作の確認はテストアプリを利用した方が便利です。
ViewController インスタンスを利用することもできますが、イベントを発生させるコードを別途用意しなければなりません。
- (void)testCountUp {
    // テストアプリケーションを取得
    XCUIApplication *app = [[XCUIApplication alloc] init];
    // accessibilityIdentifier に ViewIdentifierNumberLabel が定義されている UILabel を取得
    XCUIElement *labelElement = app.staticTexts[ViewIdentifierNumberLabel];
    // 初期値を確認
    XCTAssertEqualObjects(labelElement.label, @"1");

    // accessibilityIdentifier に ViewIdentifierCountUpButton が定義されている UIButton を取得
    XCUIElement *buttonElement = app.staticTexts[ViewIdentifierCountUpButton];
    // ボタンを3回タップ
    [buttonElement tap]; // 1 -> 2
    [buttonElement tap]; // 2 -> 3
    [buttonElement tap]; // 3 -> 4

    // UILabel の内容を確認
    XCTAssertEqualObjects(labelElement.label, @"4");
}
非同期処理の確認
APIリクエストなど非同期処理を伴うテストを行うには、非同期処理実行時と非同期処理終了時に状態が変わるオブジェクトを用意する必要があります。
以下の例では、非同期処理実行時には読み込み中画面を表示し、非同期処理が終了したらこの画面を非表示にするようにしています。
この場合、 -expectationForPredicate:evaluatedWithObject:handler: を利用して指定した条件となるまで待つようにします。
- (void)testCallApi {
    XCUIApplication *app = [[XCUIApplication alloc] init];

    // accessibilityIdentifier に ViewIdentifierCallApiButton が定義されている UIButton を取得
    XCUIElement *buttonElement = app.buttons[ViewIdentifierCallApiButton];
    // ボタンをタップ
    [buttonElement tap];

    // 非同期処理中は View を表示しているので、
    // accessibilityIdentifier に ViewIdentifierLoadingView が定義されている UIView を取得
    XCUIElement *loadingElement = app.otherElements[ViewIdentifierLoadingView];
    // 非同期処理中に表示されている View が非表示になるまで指定秒数(5秒)待つ。
    NSPredicate *predicate = [NSPredicate predicateWithFormat:@"exists == NO"];
    [self expectationForPredicate:predicate evaluatedWithObject:loadingElement handler:nil];
    [self waitForExpectationsWithTimeout:5 handler:nil];

    // 非同期処理の結果を確認する
    XCUIElement *labelElement = app.staticTexts[ViewIdentifierUsernameLabel];
    XCTAssertEqualObjects(labelElement.label, @"TEST5678", @"Usename is not default value.");
}
アラート表示の確認
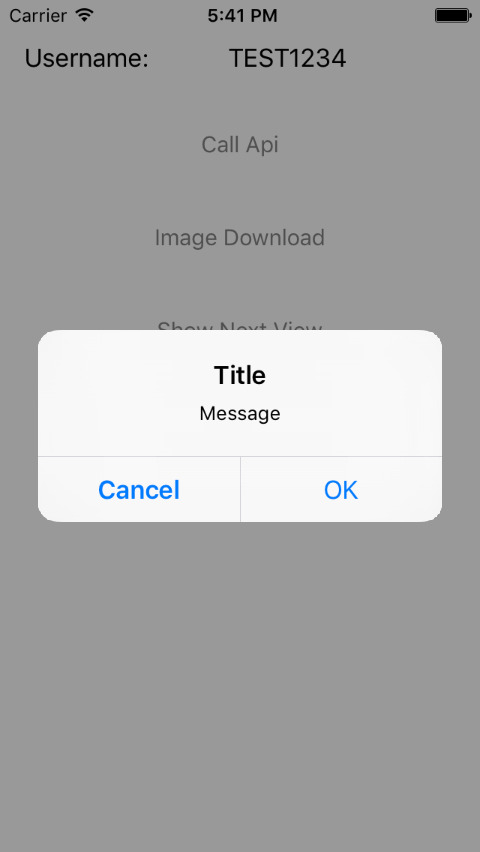
このようなアラートの確認をする場合は、以下のようにタイトルに設定した文字列を指定してアラートオブジェクトを取得します。
ボタンについても同様にボタンのタイトルを指定します。
- (void)testAlertMessageCancel {
    // アラートを表示
    XCUIApplication *app = [[XCUIApplication alloc] init];
    [app.buttons[ViewIdentifierShowAlertViewButton] tap];

    // 表示されたアラートの Cancel ボタンをタップ
    XCUIElementQuery *collectionViewsQuery = app.alerts[@"Title"].collectionViews;
    XCUIElement *cancelButton = collectionViewsQuery.buttons[@"Cancel"];
    [cancelButton tap];

    // 画面の表示内容が変わっていないことを確認
    XCUIElement *labelElement = app.staticTexts[ViewIdentifierUsernameLabel];
    XCTAssertEqualObjects(labelElement.label, @"TEST1234", @"Usename is not default value.");
}
また、表示されるアラートのインデックスを利用することでもアラートオブジェクトを取得できます。
- (void)testAlertMessageOK {
    XCUIApplication *app = [[XCUIApplication alloc] init];

    // accessibilityIdentifier に ViewIdentifierShowAlertViewButton が定義されている UIButton を取得
    XCUIElement *buttonElement = app.buttons[ViewIdentifierShowAlertViewButton];
    // ボタンをタップ
    [buttonElement tap];

    // アラートが表示されるまで指定秒数(5秒)待つ。
    NSPredicate *predicate = [NSPredicate predicateWithFormat:@"0 < count"];
    [self expectationForPredicate:predicate evaluatedWithObject:app.alerts handler:nil];
    [self waitForExpectationsWithTimeout:5 handler:nil];

    // アラートは一つしか表示されていないはず。
    XCTAssertEqual(app.alerts.count, 1);

    // 表示されたアラートの OK ボタンをタップ
    XCUIElement *alertElement = [app.alerts elementBoundByIndex:0];
    XCUIElement *okButtonElement = alertElement.collectionViews.buttons[@"OK"];
    [okButtonElement tap];

    // 画面の表示内容が変わっていることを確認
    XCUIElement *labelElement = app.staticTexts[ViewIdentifierUsernameLabel];
    XCTAssertEqualObjects(labelElement.label, @"TEST9012", @"Usename is not expected value.");
}
画面遷移の確認
ボタンをタップした時に別な画面へ遷移することを確認する場合は、非同期処理と同様なテストケースになります。
- (void)testShowItemsTableViewController {
    XCUIApplication *app = [[XCUIApplication alloc] init];

    // accessibilityIdentifier に ViewIdentifierCallApiButton が定義されている UIButton を取得
    XCUIElement *buttonElement = app.buttons[ViewIdentifierShowNextViewButton];
    // ボタンをタップ
    [buttonElement tap];

    // accessibilityIdentifier に ItemListViewIdentifierTableview が定義されている UITableView を取得
    XCUIElement *tableElement = app.tables[ItemListViewIdentifierTableview];

    // 画面遷移が行われるので、 View が表示されるまで指定秒数(5秒)待つ。
    NSPredicate *predicate = [NSPredicate predicateWithFormat:@"exists == YES"];
    [self expectationForPredicate:predicate evaluatedWithObject:tableElement handler:nil];
    [self waitForExpectationsWithTimeout:5 handler:nil];
}
Table View の確認
Table View の内容を確認する場合は、ViewController のインスタンスを作成する方法とテストアプリを利用する方法があります。
ViewController
- (void)testTableViewContents {
    // Storybord を取得。Bundle の指定に注意する。
    UIStoryboard *storyboard = [UIStoryboard storyboardWithName:@"Main" bundle:[NSBundle bundleForClass:[self class]]];
    // 確認したい View Controller のインスタンスを取得。
    ItemsTableViewController *itemsTableVC = [storyboard instantiateViewControllerWithIdentifier:@"itemsTableViewController"];
    XCTAssertNotNil(itemsTableVC);
    XCTAssertTrue([itemsTableVC isKindOfClass:[ItemsTableViewController class]]);

    // 表示されているデータの数を確認。
    XCTAssertEqual(itemsTableVC.tableView.numberOfSections, 1);
    XCTAssertEqual([itemsTableVC.tableView numberOfRowsInSection:0], 6);

    // Cell の内容を確認。
    ItemTableViewCell *itemCell = [itemsTableVC.tableView cellForRowAtIndexPath:[NSIndexPath indexPathForRow:0 inSection:0]];
    XCTAssertNotNil(itemCell);
    XCTAssertEqualObjects(itemCell.lblIdentifier.text, @"1");
}
テストアプリケーション
- (void)testTableCellContents {
    XCUIApplication *app = [[XCUIApplication alloc] init];

    // TableViewController を表示させる。
    // accessibilityIdentifier に ViewIdentifierCallApiButton が定義されている UIButton を取得
    XCUIElement *buttonElement = app.buttons[ViewIdentifierShowNextViewButton];
    // ボタンをタップ
    [buttonElement tap];

    // accessibilityIdentifier に ItemListViewIdentifierTableview が定義されている UITableView を取得
    XCUIElement *tableElement = app.tables[ItemListViewIdentifierTableView];

    // 画面遷移が行われるので、 View が表示されるまで指定秒数(5秒)待つ。
    NSPredicate *tableViewPredicate = [NSPredicate predicateWithFormat:@"exists == YES"];
    [self expectationForPredicate:tableViewPredicate evaluatedWithObject:tableElement handler:nil];
    [self waitForExpectationsWithTimeout:5 handler:nil];

    // Cell の内容を確認。
    XCUIElement *cellElement = [tableElement.cells elementBoundByIndex:3];
    XCTAssertEqualObjects(cellElement.staticTexts[ItemCellIdentifierIdentifier].label, @"3");
    XCTAssertEqualObjects(cellElement.staticTexts[ItemCellIdentifierName].label, @"ItemC");
}
Cell の操作確認
Cell をタップして別の画面に遷移する場合の
- (void)testTableViewCellAction {
    XCUIApplication *app = [[XCUIApplication alloc] init];

    // TableViewController を表示させる。
    // accessibilityIdentifier に ViewIdentifierCallApiButton が定義されている UIButton を取得
    XCUIElement *buttonElement = app.buttons[ViewIdentifierShowNextViewButton];
    // ボタンをタップ
    [buttonElement tap];

    // accessibilityIdentifier に ItemListViewIdentifierTableview が定義されている UITableView を取得
    XCUIElement *tableElement = app.tables[ItemListViewIdentifierTableView];

    // 画面遷移が行われるので、 View が表示されるまで指定秒数(5秒)待つ。
    NSPredicate *tableViewPredicate = [NSPredicate predicateWithFormat:@"exists == YES"];
    [self expectationForPredicate:tableViewPredicate evaluatedWithObject:tableElement handler:nil];
    [self waitForExpectationsWithTimeout:5 handler:nil];

    // Cell の内容を確認。
    NSString *cellKey = [NSString stringWithFormat:ItemListViewIdentifierTableViewCell, 0, 1];
    XCUIElement *cellElement = tableElement.cells[cellKey];
    XCTAssertEqualObjects(cellElement.staticTexts[ItemCellIdentifierIdentifier].label, @"2");
    XCTAssertEqualObjects(cellElement.staticTexts[ItemCellIdentifierName].label, @"ItemB");

    // accessibilityIdentifier に ItemViewIdentifier が定義されている UIView を取得
    XCUIElement *itemViewElement = app.otherElements[ItemViewIdentifier];

    // Cell をタップ
    [cellElement tap];

    // 画面遷移が行われるので、 View が表示されるまで指定秒数(5秒)待つ。
    NSPredicate *itemViewPredicate = [NSPredicate predicateWithFormat:@"exists == YES"];
    [self expectationForPredicate:itemViewPredicate evaluatedWithObject:itemViewElement handler:nil];
    [self waitForExpectationsWithTimeout:5 handler:nil];

    // 表示内容を確認する。
    XCUIElement *itemNameElement = itemViewElement.staticTexts[ItemViewIdentifierItemName];
    XCTAssertEqualObjects(itemNameElement.label, @"ItemB");
}
操作記録
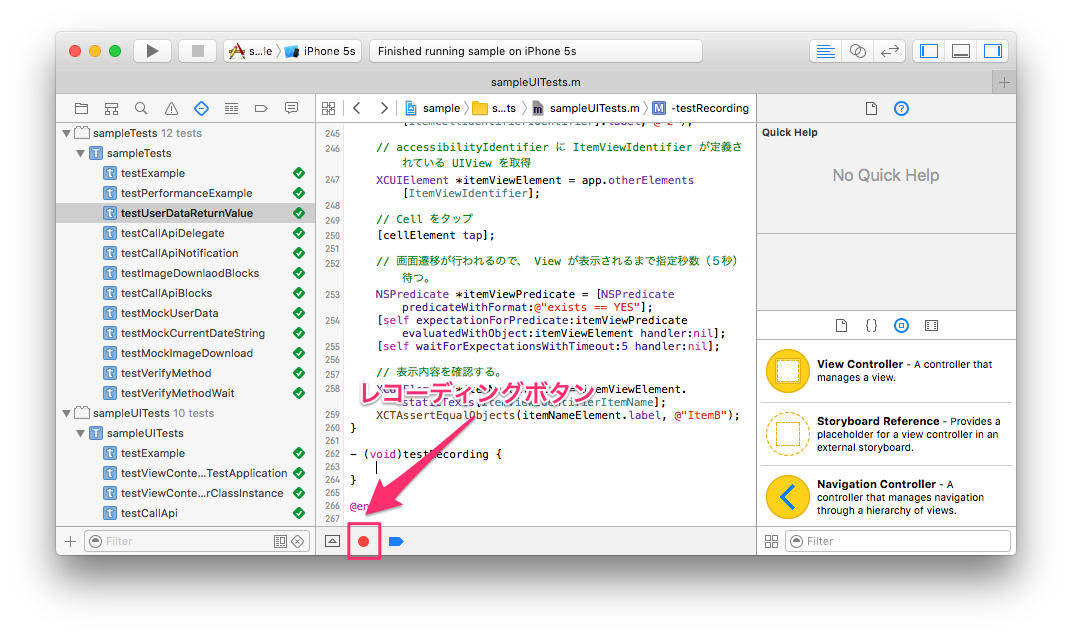
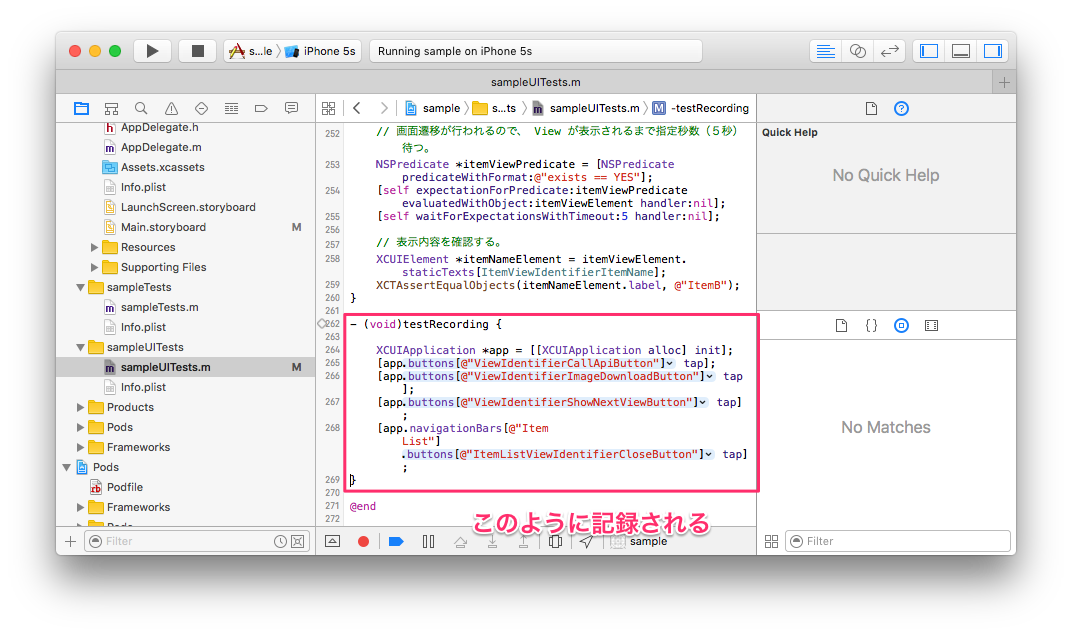
Xcode にはレコーディング機能があるので、このようにアプリを操作した記録を取ることができる。
