Swagger-codegenのコンテナをそのままデプロイして使えたら楽だなと思い、やってみました。
前提として、Google Clould SDKを使うので入れておいてください。
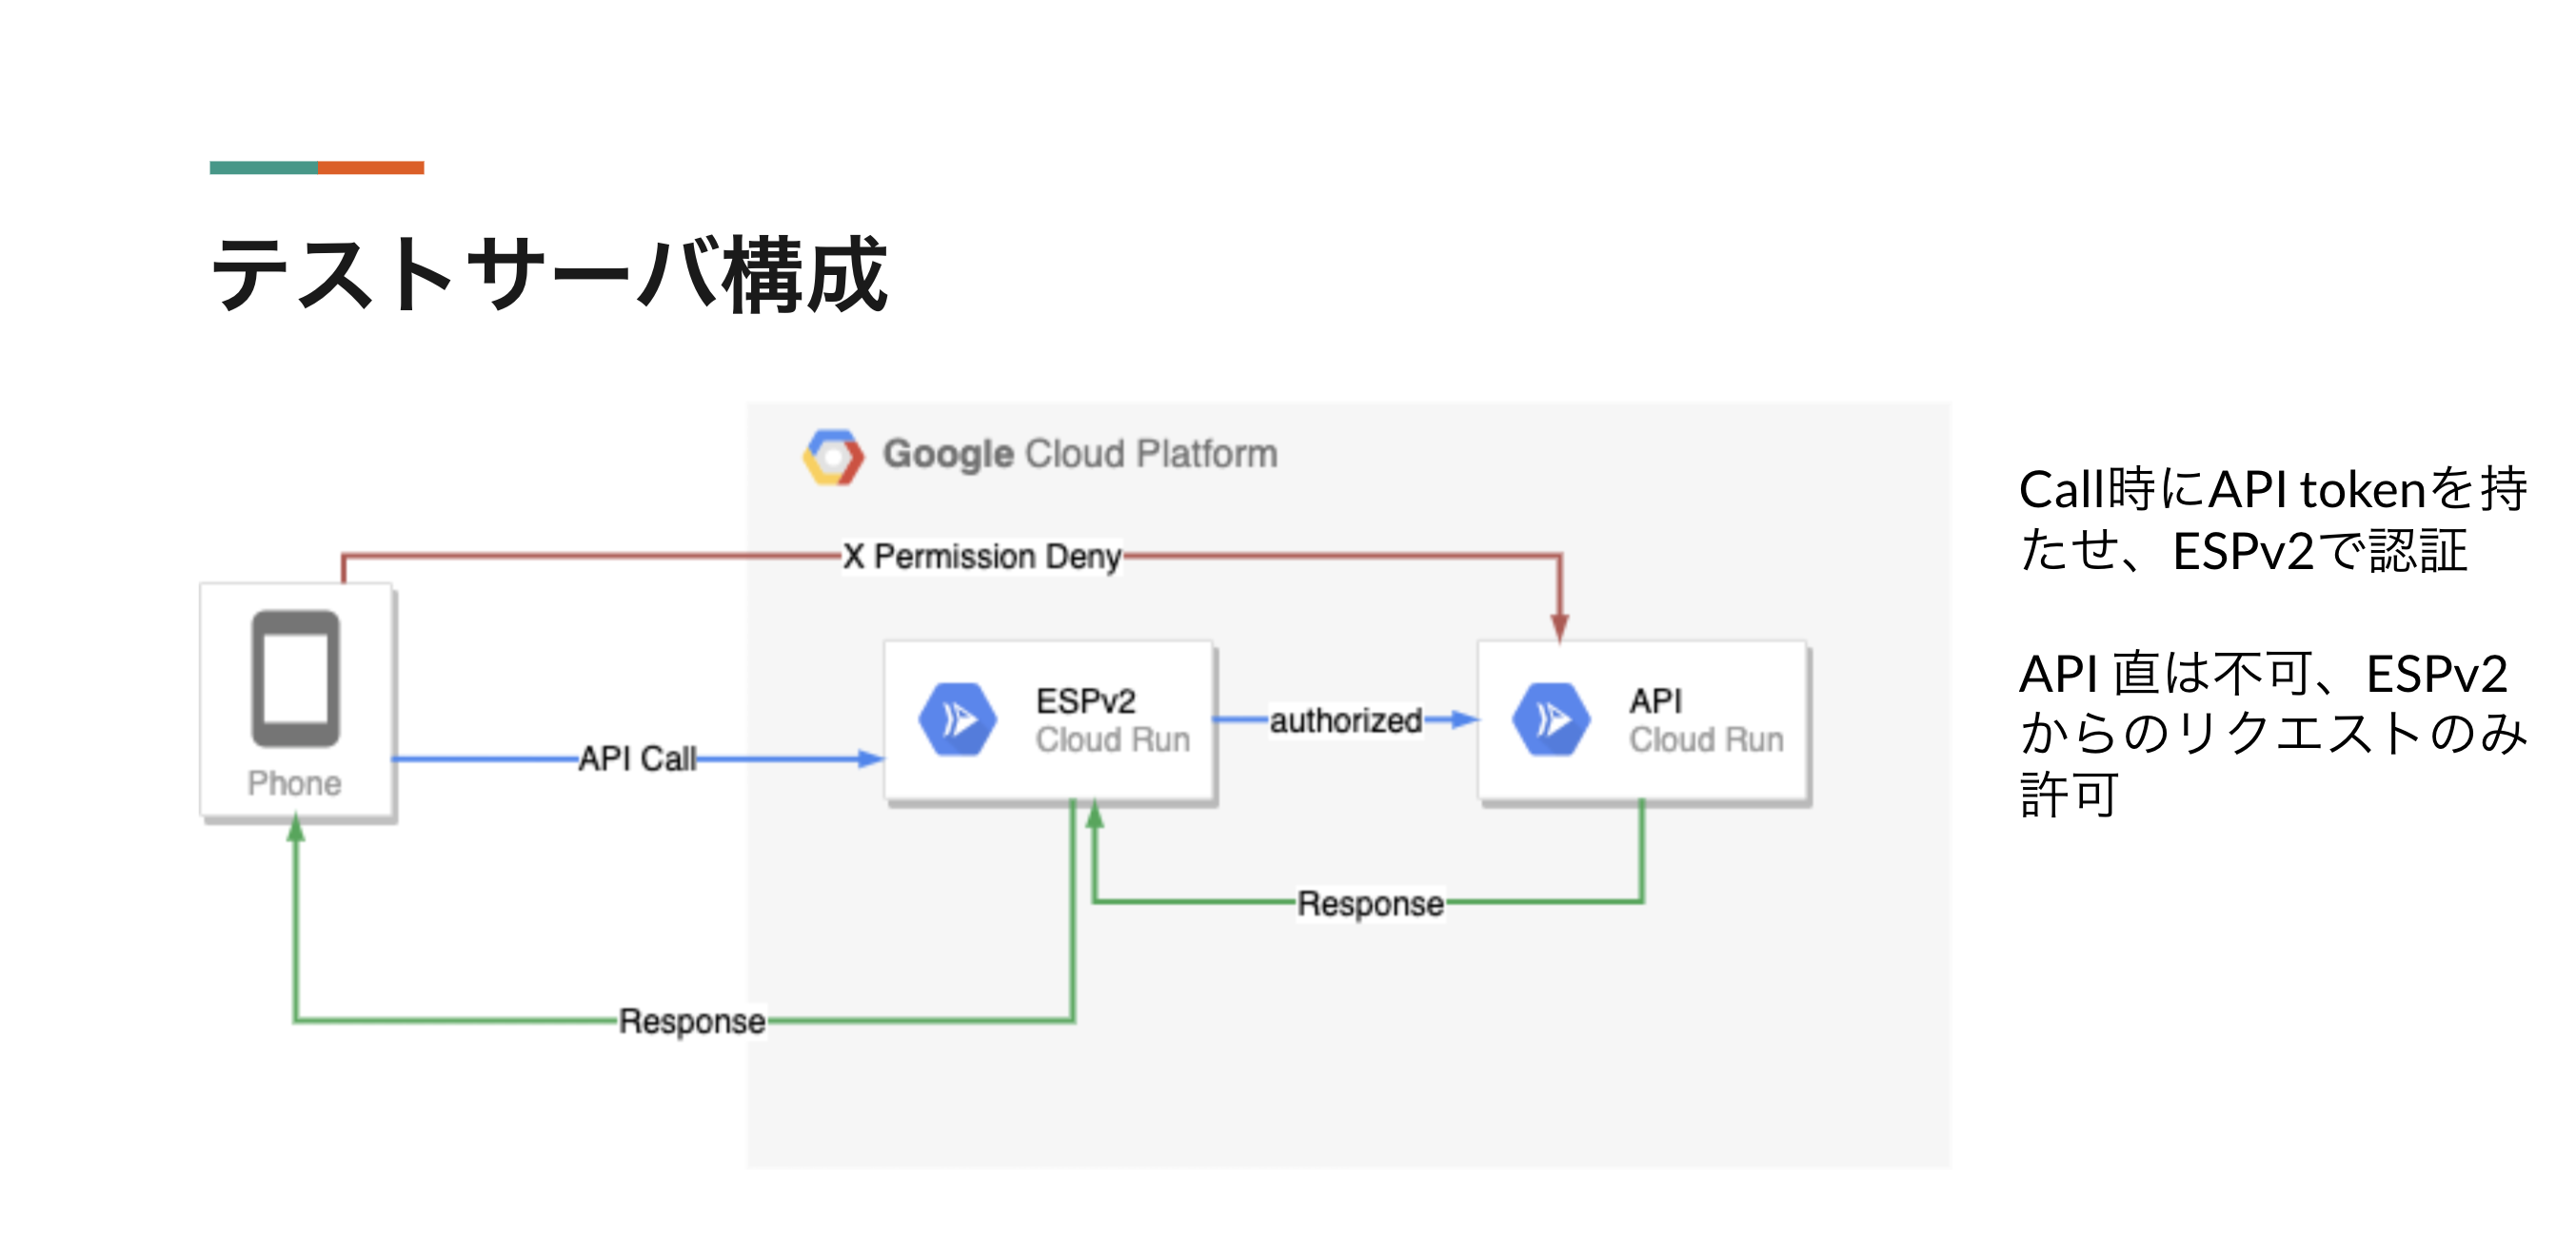
構成
APIがバックエンドサーバで、ESPv2が認証サーバです。
今回はGCP側のIAMでトークンを発行して両者でのみ使える様に設定しています。
バックエンド側のAPIサーバをSwagger-codegenのコンテナで作成
ステップ1: Swaggerのドキュメントを用意(本記事はサンプルそのまま)
swagger: "2.0"
info:
  description: "This is a sample server Petstore server.  You can find out more about     Swagger at [http://swagger.io](http://swagger.io) or on [irc.freenode.net, #swagger](http://swagger.io/irc/).      For this sample, you can use the api key `special-key` to test the authorization     filters."
  version: "1.0.0"
  title: Cloud Endpoints + Cloud Run
  termsOfService: "https://swagger-codegen-example.a.run.app"
  contact:
    email: "apiteam@swagger.io"
  license:
    name: "Apache 2.0"
    url: "http://www.apache.org/licenses/LICENSE-2.0.html"
host: "https://swagger-codegen-example.a.run.app"
basePath: "/v2"
tags:
- name: "pet"
  description: "Everything about your Pets"
  externalDocs:
    description: "Find out more"
    url: "http://swagger.io"
- name: "store"
  description: "Access to Petstore orders"
- name: "user"
  description: "Operations about user"
  externalDocs:
    description: "Find out more about our store"
    url: "http://swagger.io"
schemes:
- "https"
- "http"
paths:
  /pet:
    post:
      tags:
      - "pet"
      summary: "Add a new pet to the store"
      description: ""
      operationId: "addPet"
      consumes:
      - "application/json"
      - "application/xml"
      produces:
      - "application/xml"
      - "application/json"
      parameters:
      - in: "body"
        name: "body"
        description: "Pet object that needs to be added to the store"
        required: true
        schema:
          $ref: "#/definitions/Pet"
      responses:
        "405":
          description: "Invalid input"
      security:
      - petstore_auth:
        - "write:pets"
        - "read:pets"

        ...省略
ステップ2: swaggerサーバとなるDockerfileを用意
Dockerfileはこちらを参考にしました、ありがとうございます。
FROM swaggerapi/swagger-codegen-cli:2.4.14 as builder
WORKDIR /mock-seed
# ホストマシンのswagger.ymlをコピー
COPY ./swagger.yaml ./
WORKDIR /mock-server
# モックサーバーのファイルを作成
RUN java -jar /opt/swagger-codegen-cli/swagger-codegen-cli.jar \
    generate -i /mock-seed/swagger.yaml -l nodejs-server -o ./

FROM node:14.2.0-alpine3.10 as executor
WORKDIR /mock-server
# 上記で作ったモックサーバーのファイル群をコピー
COPY --from=builder /mock-server ./
# パッケージ類のインストール
RUN npm install
# 8080ポートを受ける
EXPOSE 8080
# コンテナ起動でサーバーが起動するようにする
CMD ["npm", "start"]
ステップ3: イメージを構成してレポジトリにsubmit
swagger.yamlとDockerfileの2つがあるフォルダ内で下記実施
gcloud builds submit --tag gcr.io/プロジェクトID/swagger-codegen
ステップ4: リポジトリからCloudRunにPushする
今回はフルマネージドなので--platform managedをつけてます。
gcloud run deploy --image gcr.io/プロジェクトiD/swagger-codegen --platform managed
引用: cloudrunドキュメント
API を有効にするよう求められたら、「y」と返信して有効にします。
PROJECT-ID は実際の GCP プロジェクト ID に置き換えます。プロジェクト ID を表示するには、gcloud config get-value project コマンドを実行します。
デプロイされればURLが発行されるのでこちらをメモリましょう。
Endpointsの設定
これが微妙にわかりにくいです。ざっくりいうと、
- Host名の予約のためにサンプルコンテナをCloud Runに新規デプロイ
- Endpoint構成(openapi-run.yaml)のデプロイ
- Endpoointsとバックエンドを紐付けたイメージを作成&ホスト予約したCloud Runにデプロイ
というステップが必要です。
Endpoint構成だけ新しくすればコンテナも新しくなるのだと思っていたので、ハマった。
ステップ1: ホスト名予約
CLOUD_RUN_SERVICE_NAME は、Endpointsコンテナに使用する名前に置き換えます。
gcloud run deploy CLOUD_RUN_SERVICE_NAME \
    --image="gcr.io/cloudrun/hello" \
    --allow-unauthenticated \
    --platform managed \
    --project=ESP_PROJECT_ID
こんなメッセージが出ますのでメモしておきます。
次のyamlのhostフィールドで CLOUD_RUN_HOSTNAME を指定します。
Service [CLOUD_RUN_SERVICE_NAME] revision [CLOUD_RUN_SERVICE_NAME-REVISION_NUM] has been deployed and is serving traffic at CLOUD_RUN_SERVICE_URL
ステップ2: openapi-run.yamlを用意する
バックエンド側で定義したPathだけは同じ様に書かないといけないのがだるいです。。
返り値とかバックエンド側だけ変更していれば反映されます。
# x-google-allow: allはopen-api.yamlでPathを通さなくても
# サーバ側のPathに通してくれますが、認証を行わず素通りするのでダメです。
# x-google-allow: all

swagger: '2.0'
info:
  title: Cloud Endpoints + Cloud Run
  description: Sample API on Cloud Endpoints with a Cloud Run backend
  version: 1.0.0

# CLOUD_RUN_HOSTNAME を指定します。
host: example.a.run.app
schemes:
  - https
produces:
  - application/json

# 先ほどデプロイしたバックエンド構成のURLを記載
x-google-backend:
  address: "https://swagger-codegen-example.a.run.app"
  protocol: h2

#下記がトークンを使用するための設定です。
# apiキーをヘッダーに入れて使う想定です。
securityDefinitions:
  # This section configures basic authentication with an API key.
  api_key:
    type: "apiKey"
    name: "x-api-key"
    in: "header"
security:
# []には何も入れないでください
  - api_key: []

basePath: "/v2"
tags:
- name: "pet"
  description: "Everything about your Pets"
  externalDocs:
    description: "Find out more"
    url: "http://swagger.io"
- name: "store"
  description: "Access to Petstore orders"
- name: "user"
  description: "Operations about user"
  externalDocs:
    description: "Find out more about our store"
    url: "http://swagger.io"
schemes:
- "https"
- "http"

# バックエンド側に定義したPathは全て書いてください
paths:
  /pet:
    post:
      tags:
      - "pet"
      summary: "Add a new pet to the store"
      description: ""
      operationId: "addPet"
      consumes:
      - "application/json"
      - "application/xml"
      produces:
      - "application/xml"
      - "application/json"
      parameters:
      - in: "body"
        name: "body"
        description: "Pet object that needs to be added to the store"
        required: true
        schema:
          $ref: "#/definitions/Pet"
      responses:
        "405":
          description: "Invalid input"
      security:
      - petstore_auth:
        - "write:pets"
        - "read:pets"

        ...省略
ステップ3: Endpoints の構成をデプロイする
gcloud endpoints services deploy openapi-run.yaml
    --project ESP_PROJECT_ID
これにより、以下のような出力が得られます。
Service Configuration [CONFIG_ID] uploaded for service [CLOUD_RUN_HOSTNAME]
と表示されます。
ステップ4: スクリプトをローカルマシンにダウンロードします
chmod +x gcloud_build_image
./gcloud_build_image -s CLOUD_RUN_HOSTNAME \
    -c CONFIG_ID -p ESP_PROJECT_ID
ステップ5:Cloud Runサービスの再デプロイ
こちらはユーザから叩く想定なので未認証を許可にしています。
gcloud run deploy CLOUD_RUN_SERVICE_NAME \
  --image="gcr.io/ESP_PROJECT_ID/endpoints-runtime-serverless:CLOUD_RUN_HOSTNAME-CONFIG_ID" \
  --allow-unauthenticated \
  --platform managed \
  --project=ESP_PROJECT_ID
Endpointsのコンテナはこれでできました!
openapi-run.yamlを編集した際はステップ2からやって更新します。
しかし、、この手順非常に面倒なので、CI/CDを設定することをお勧めします。
、、が、どこにも情報がなかったので、別記事(※執筆中)で書きます。
アクセス周りの設定
ここでバックエンドと認証サーバの設定や、APIキー発行を行います。
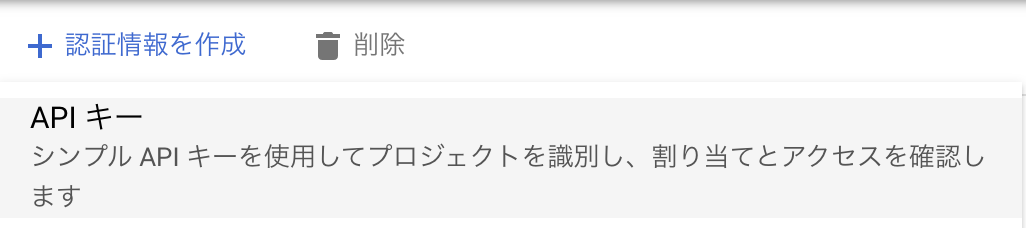
ステップ1: APIキー発行
APIとサービスのコンソールから、認証情報を作成を押下し、APIキーを作成してください。
文字列が生成されるのでメモってください。
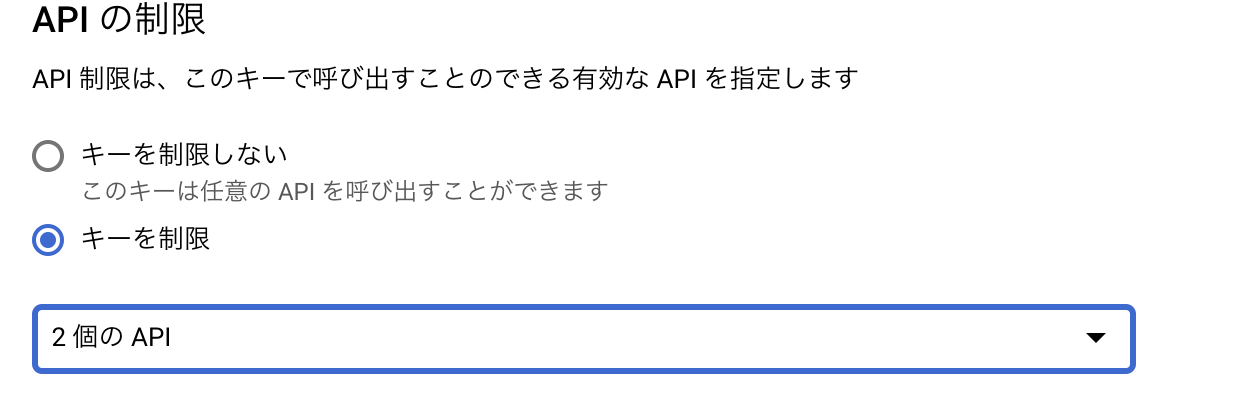
APIキーの有効範囲設定
また、このキーで認証して使用できるサービスを制限しておきましょう。
今回はデプロイしたEndpointコンテナ(認証サーバ)のみに設定します。
ステップ2: バックエンドサーバのアクセス制限
バックエンド側のcloud runコンソールに入り、権限を設定します。
allUsersは使わず、Cloud Run起動元ロールをメンバーとしてバックエンドのコンテナ側に設定します。
こうすると、同プロジェクトのサービス以外からは何をリクエストしても403 unauthrizedが返る様になります。
設定後はこんなメッセージが出ていると思います。

テスト
ここまで終わったら、認証サーバの方のURLを、ポストマンなどでAPIキー付きで叩いてみてください。

200が返されれば勝ちです!