背景
Python製のpython使い向けのUnixライクなシェルがあるって噂を聞き調べて見るとxonsh(コンシュ)なるものを見つけました。
使ってみたいと思い導入して使って見たので感想と導入方法を記載します。
xonshとは
Python製のシェル
CLI上でPythonコードの記述とシェルコマンドを利用できます。
つまり下記みたいな事が出来る。
$ ls -l
total 0
-rw-r--r--  1 Ryuichi  staff  0 11 25 16:03 testfile.py

$ a = 20 ; b = 40
$ print(a + b)
60
コマンド/Pythonコードが切り替え無しで実行できる!すごい!
参考にしているサイトは下記です
◼ GitHub
◼ 公式サイト
また@vaaaaanquishさんが色々と為になる記事を___日本語___で書いているのでとても参考になるのでぜひともチェックしてみてください。(日本語の記事が大変少ないのでとても助かります)
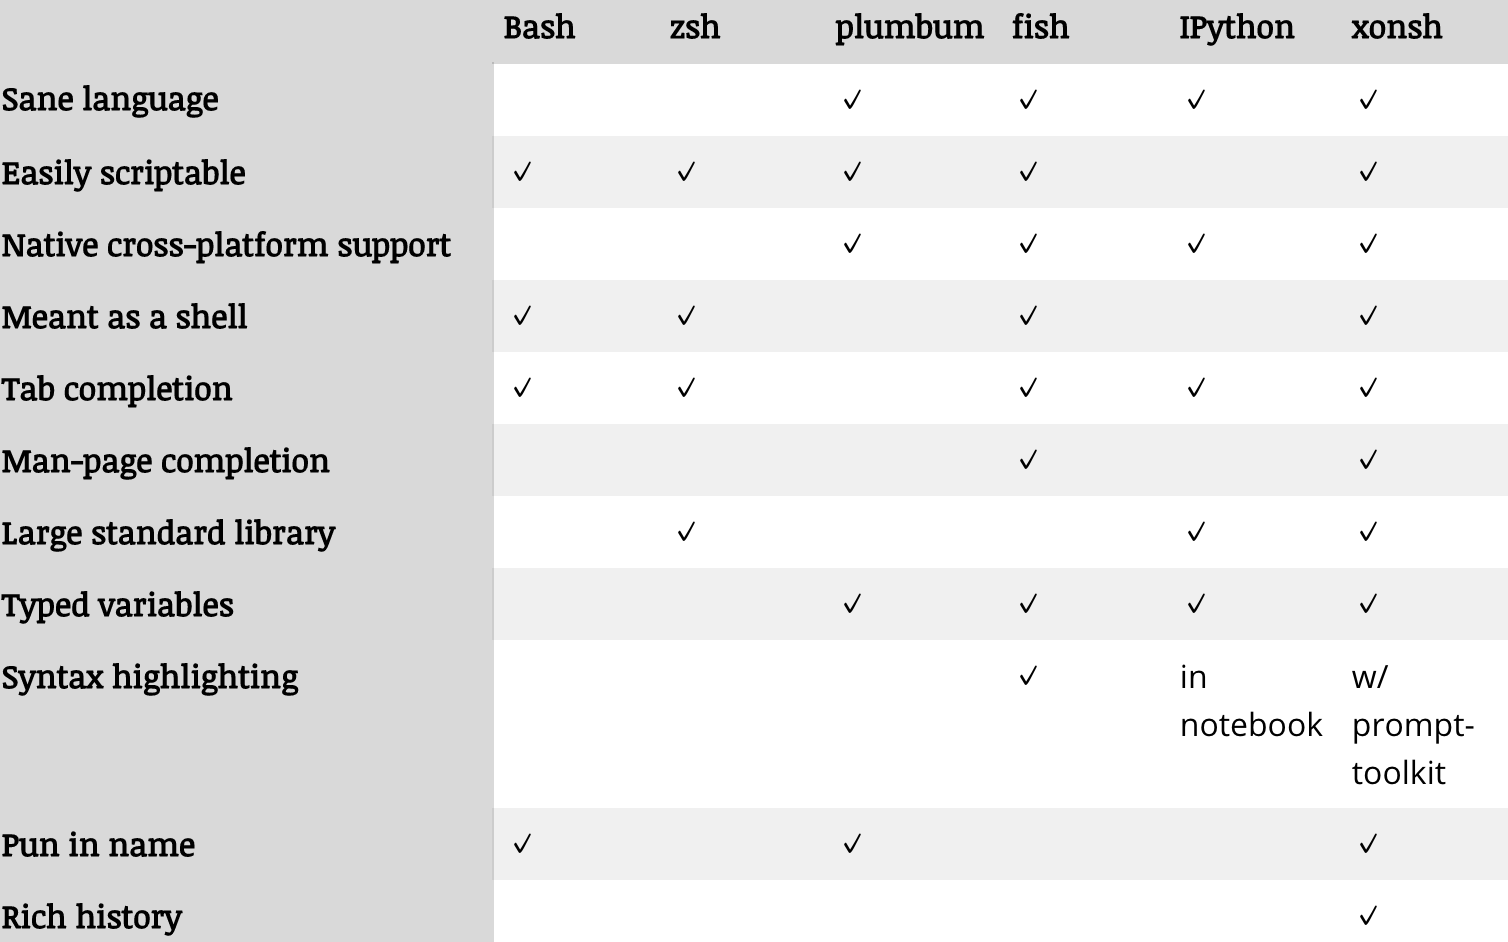
bashやzshとの比較に関しては公式にこんな感じでまとまっています。

bashやzshと比較してもIPythonと比較しても機能面で優秀ですね。
shellコマンドが使えるのはとても便利です。
導入
とっても簡単です。
公式ガイドにはMac以外の導入方法もあるのでそちらをご参照ください。
$ brew install xonsh
$ which xonsh
/usr/local/bin/xonsh

# 最新バージョンは0.8.3
$ $ xonsh --version
xonsh/0.8.3

# インストールしたら「xonsh」で起動します
$ xonsh

                            Welcome to the xonsh shell (0.8.3)

                                ~ The xonsh is a symbol ~

------------------------------------------------------------------------------------------
xonfig tutorial    ->    Launch the tutorial in the browser
xonfig wizard      ->    Run the configuration wizard and claim your shell
(Note: Run the Wizard or create a ~/.xonshrc file to suppress the welcome screen)
Tab補完に「bash-completion2」が必要です。
1を導入済みの方は削除後にインストールしてください。
$ brew unlink bash-completion
$ brew install bash-completion2
簡単に遊んでみる
基本動作
まずは基本的な操作を色々試してみました。
Ryuichi@iMac8270 ~/work/tmp/xonsh $ cat test.sh
# !/bin/bash

date
pwd
ls -l
echo 'hello xonsh' > test.tmp
cat test.tmp
rm -f test.tmp
ls -l test.tmp

Ryuichi@iMac8270 ~/work/tmp/xonsh $ ./test.sh
2018年 11月25日 日曜日 16時32分56秒 JST
/Users/Ryuichi/work/tmp/xonsh
total 8
-rwxr-xr-x  1 Ryuichi  staff  101 11 25 16:32 test.sh
-rw-r--r--  1 Ryuichi  staff    0 11 25 16:03 testfile.py
hello xonsh
ls: test.tmp: No such file or directory
上記は実行できて当然で面白みもないので次はPythonの構文も混ぜて作ってみます。
pythonとunameコマンドでOS名とホスト名を表示しています。
$ cat testfile
import platform
import socket

uname -s
hostname
print(platform.system())
print(socket.gethostname())

$ ./testfile
Darwin
iMac8270
Darwin
iMac8270
まとめ
とりあえず導入まで。
コマンド作成とかTab補完作成もしてみたが記事にまとめるのはまたいつかまとめます。

