はじめに
今回は、ReactアプリケーションにAzure ADを活用した認証を追加して見たいと思います。
Azure ADの設定
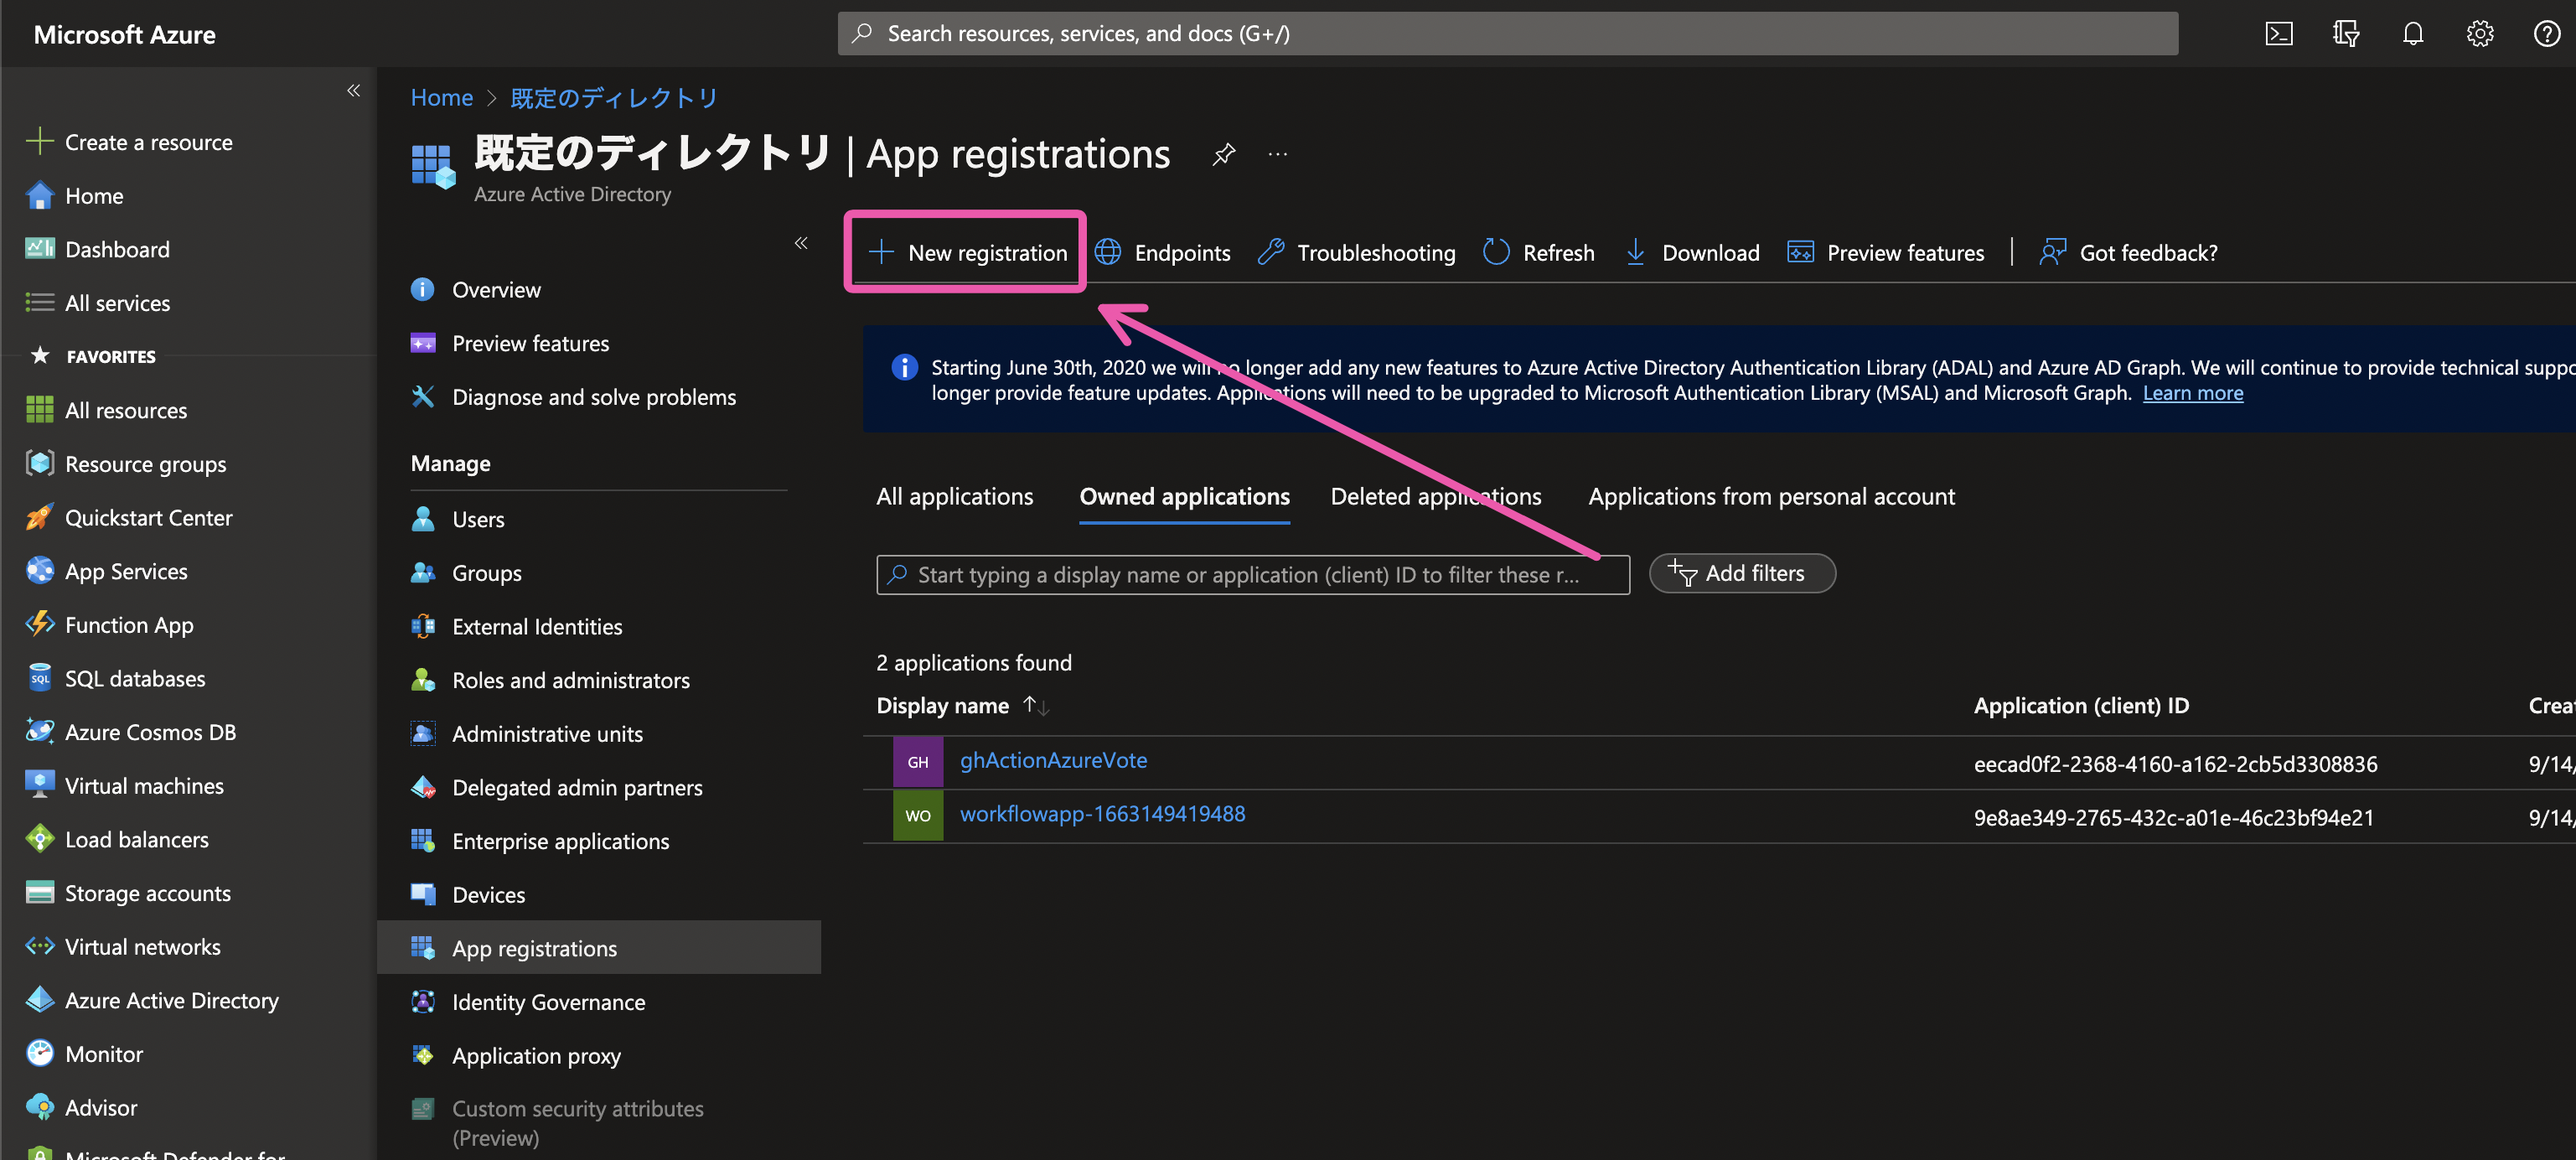
アプリケーションの作成
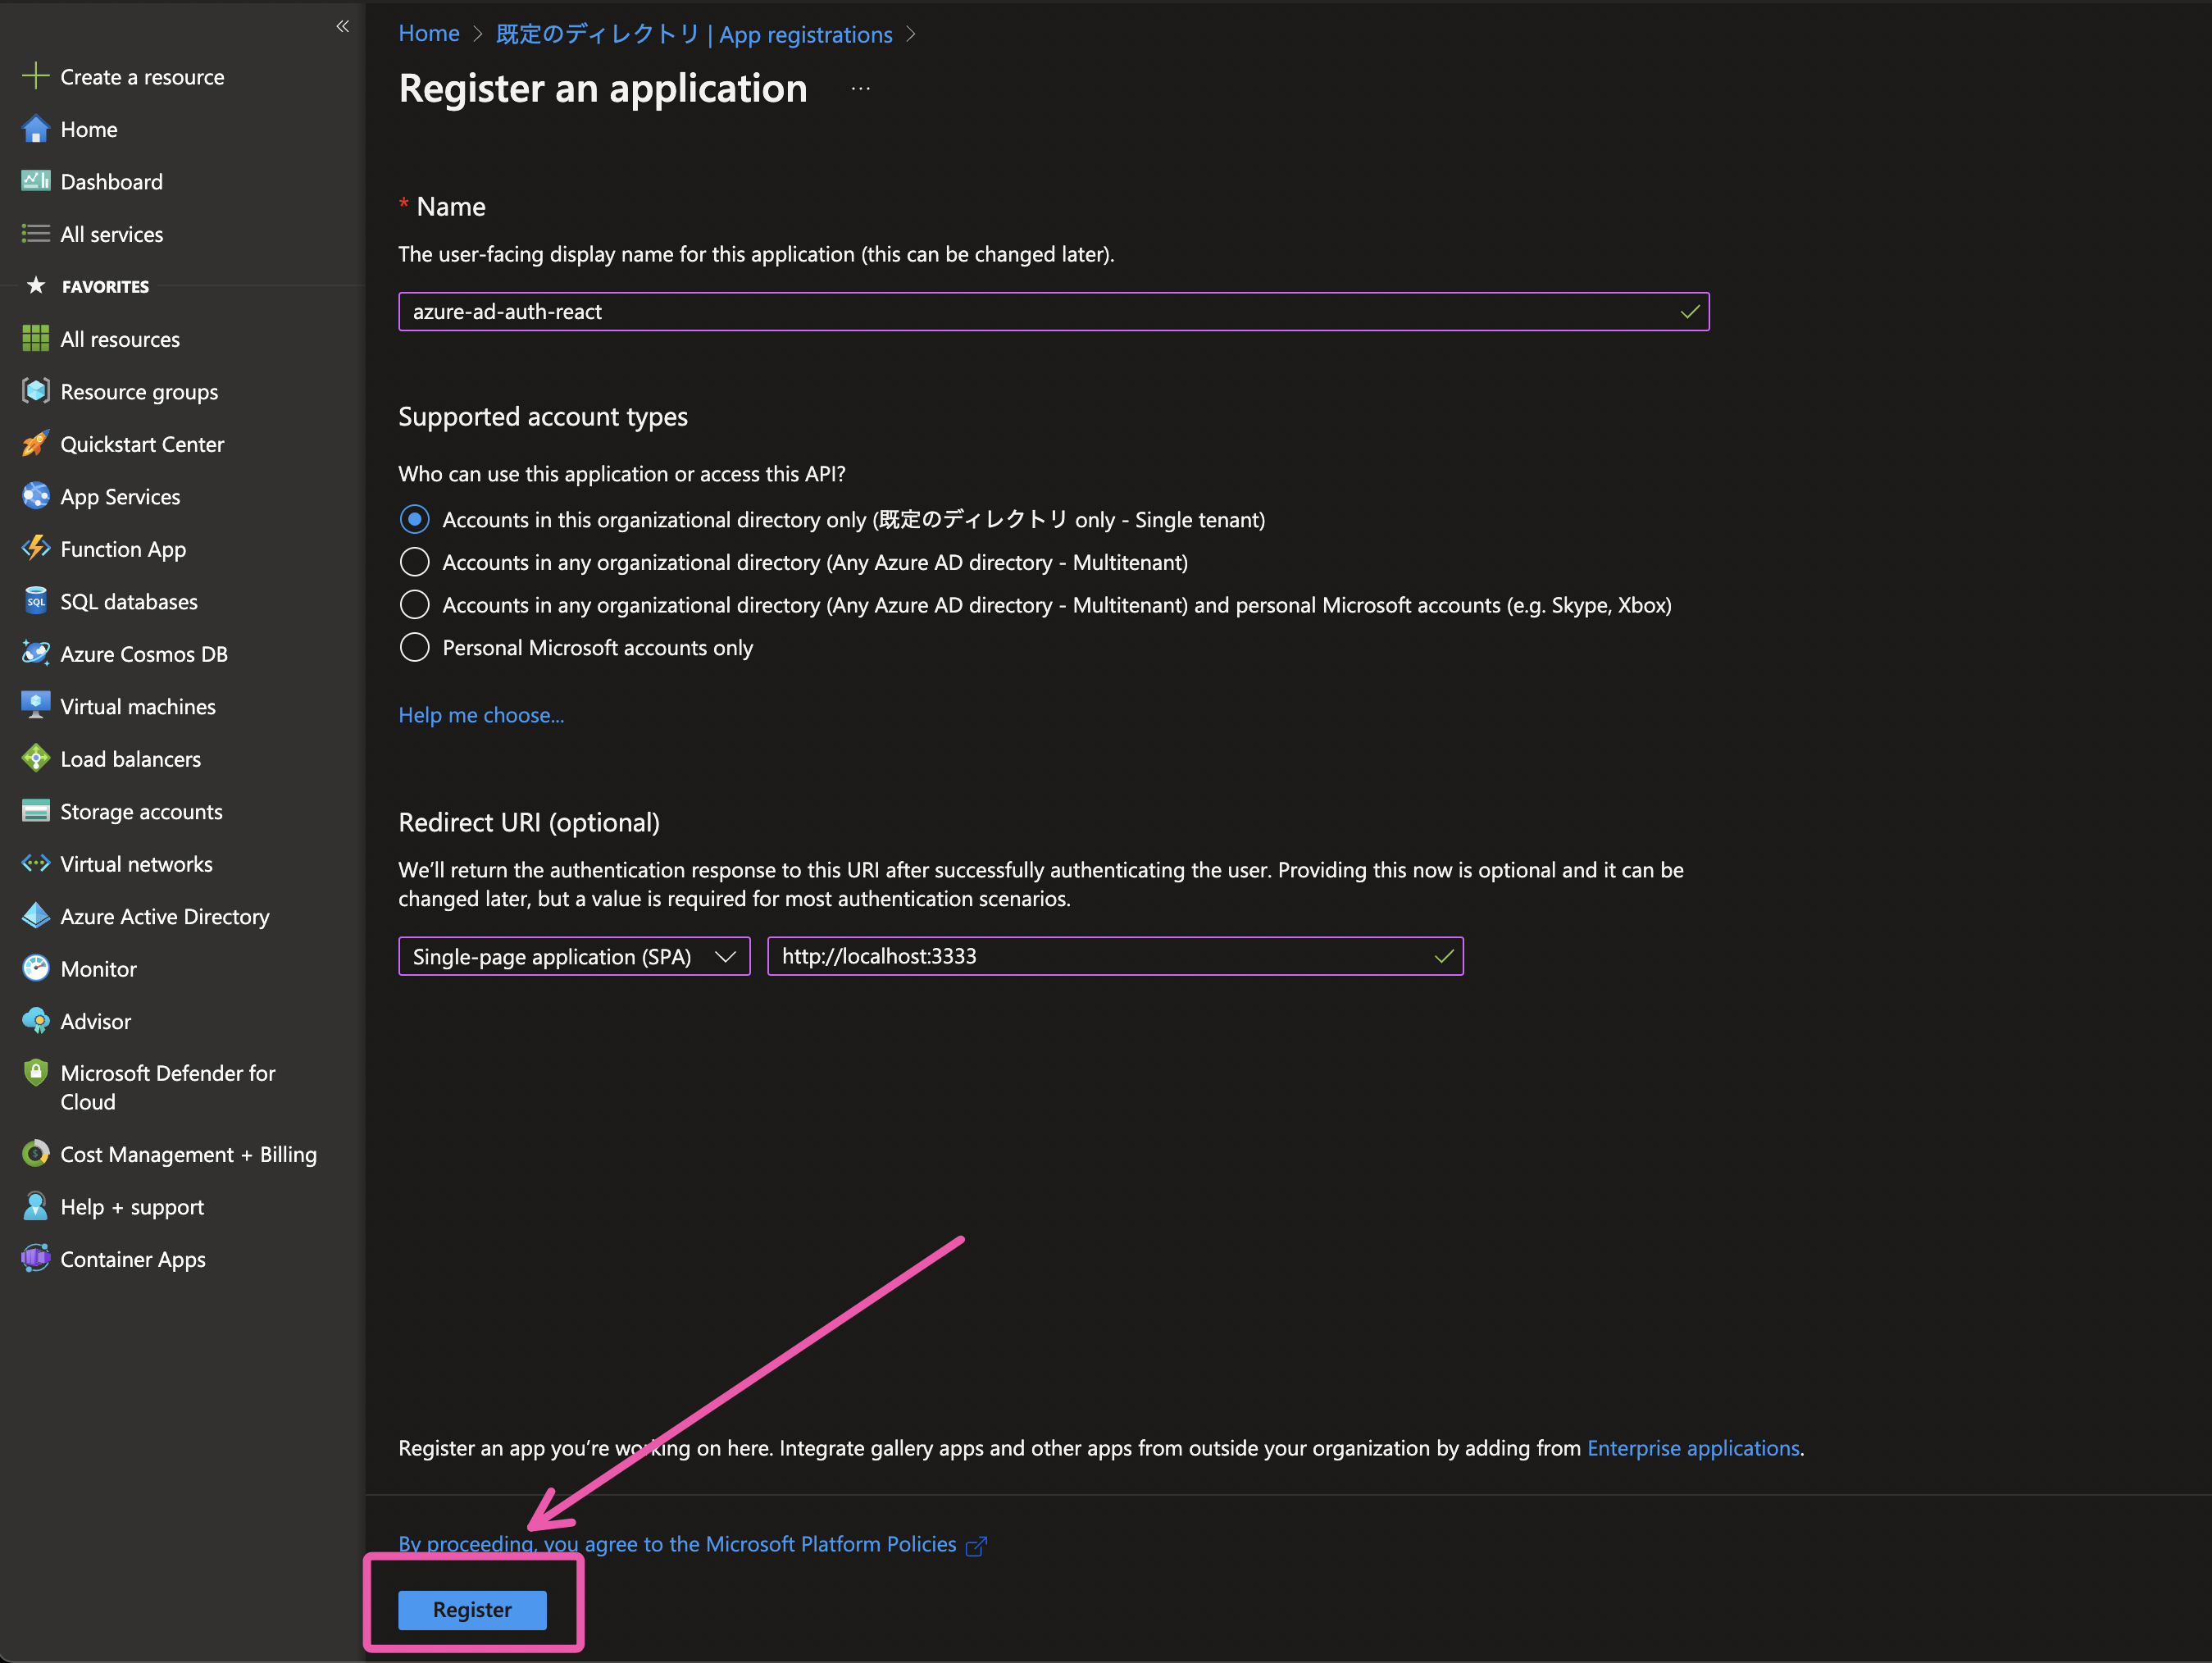
Azure AD に今回のアプリケーションを追加し、設定していきます。
Redirect URL は React のアプリケーションが動いているホストを指定する。今回はローカル開発環境下で動いているので、localhostを指定する。React にRedirect専用のページを用意するならそのpath 含めて指定する。
Azure AD にアプリケーションの追加ができたら、Application (client) IDが発行される。このIDはReactからAzure ADに通信をするために必要なので、メモしておこう。
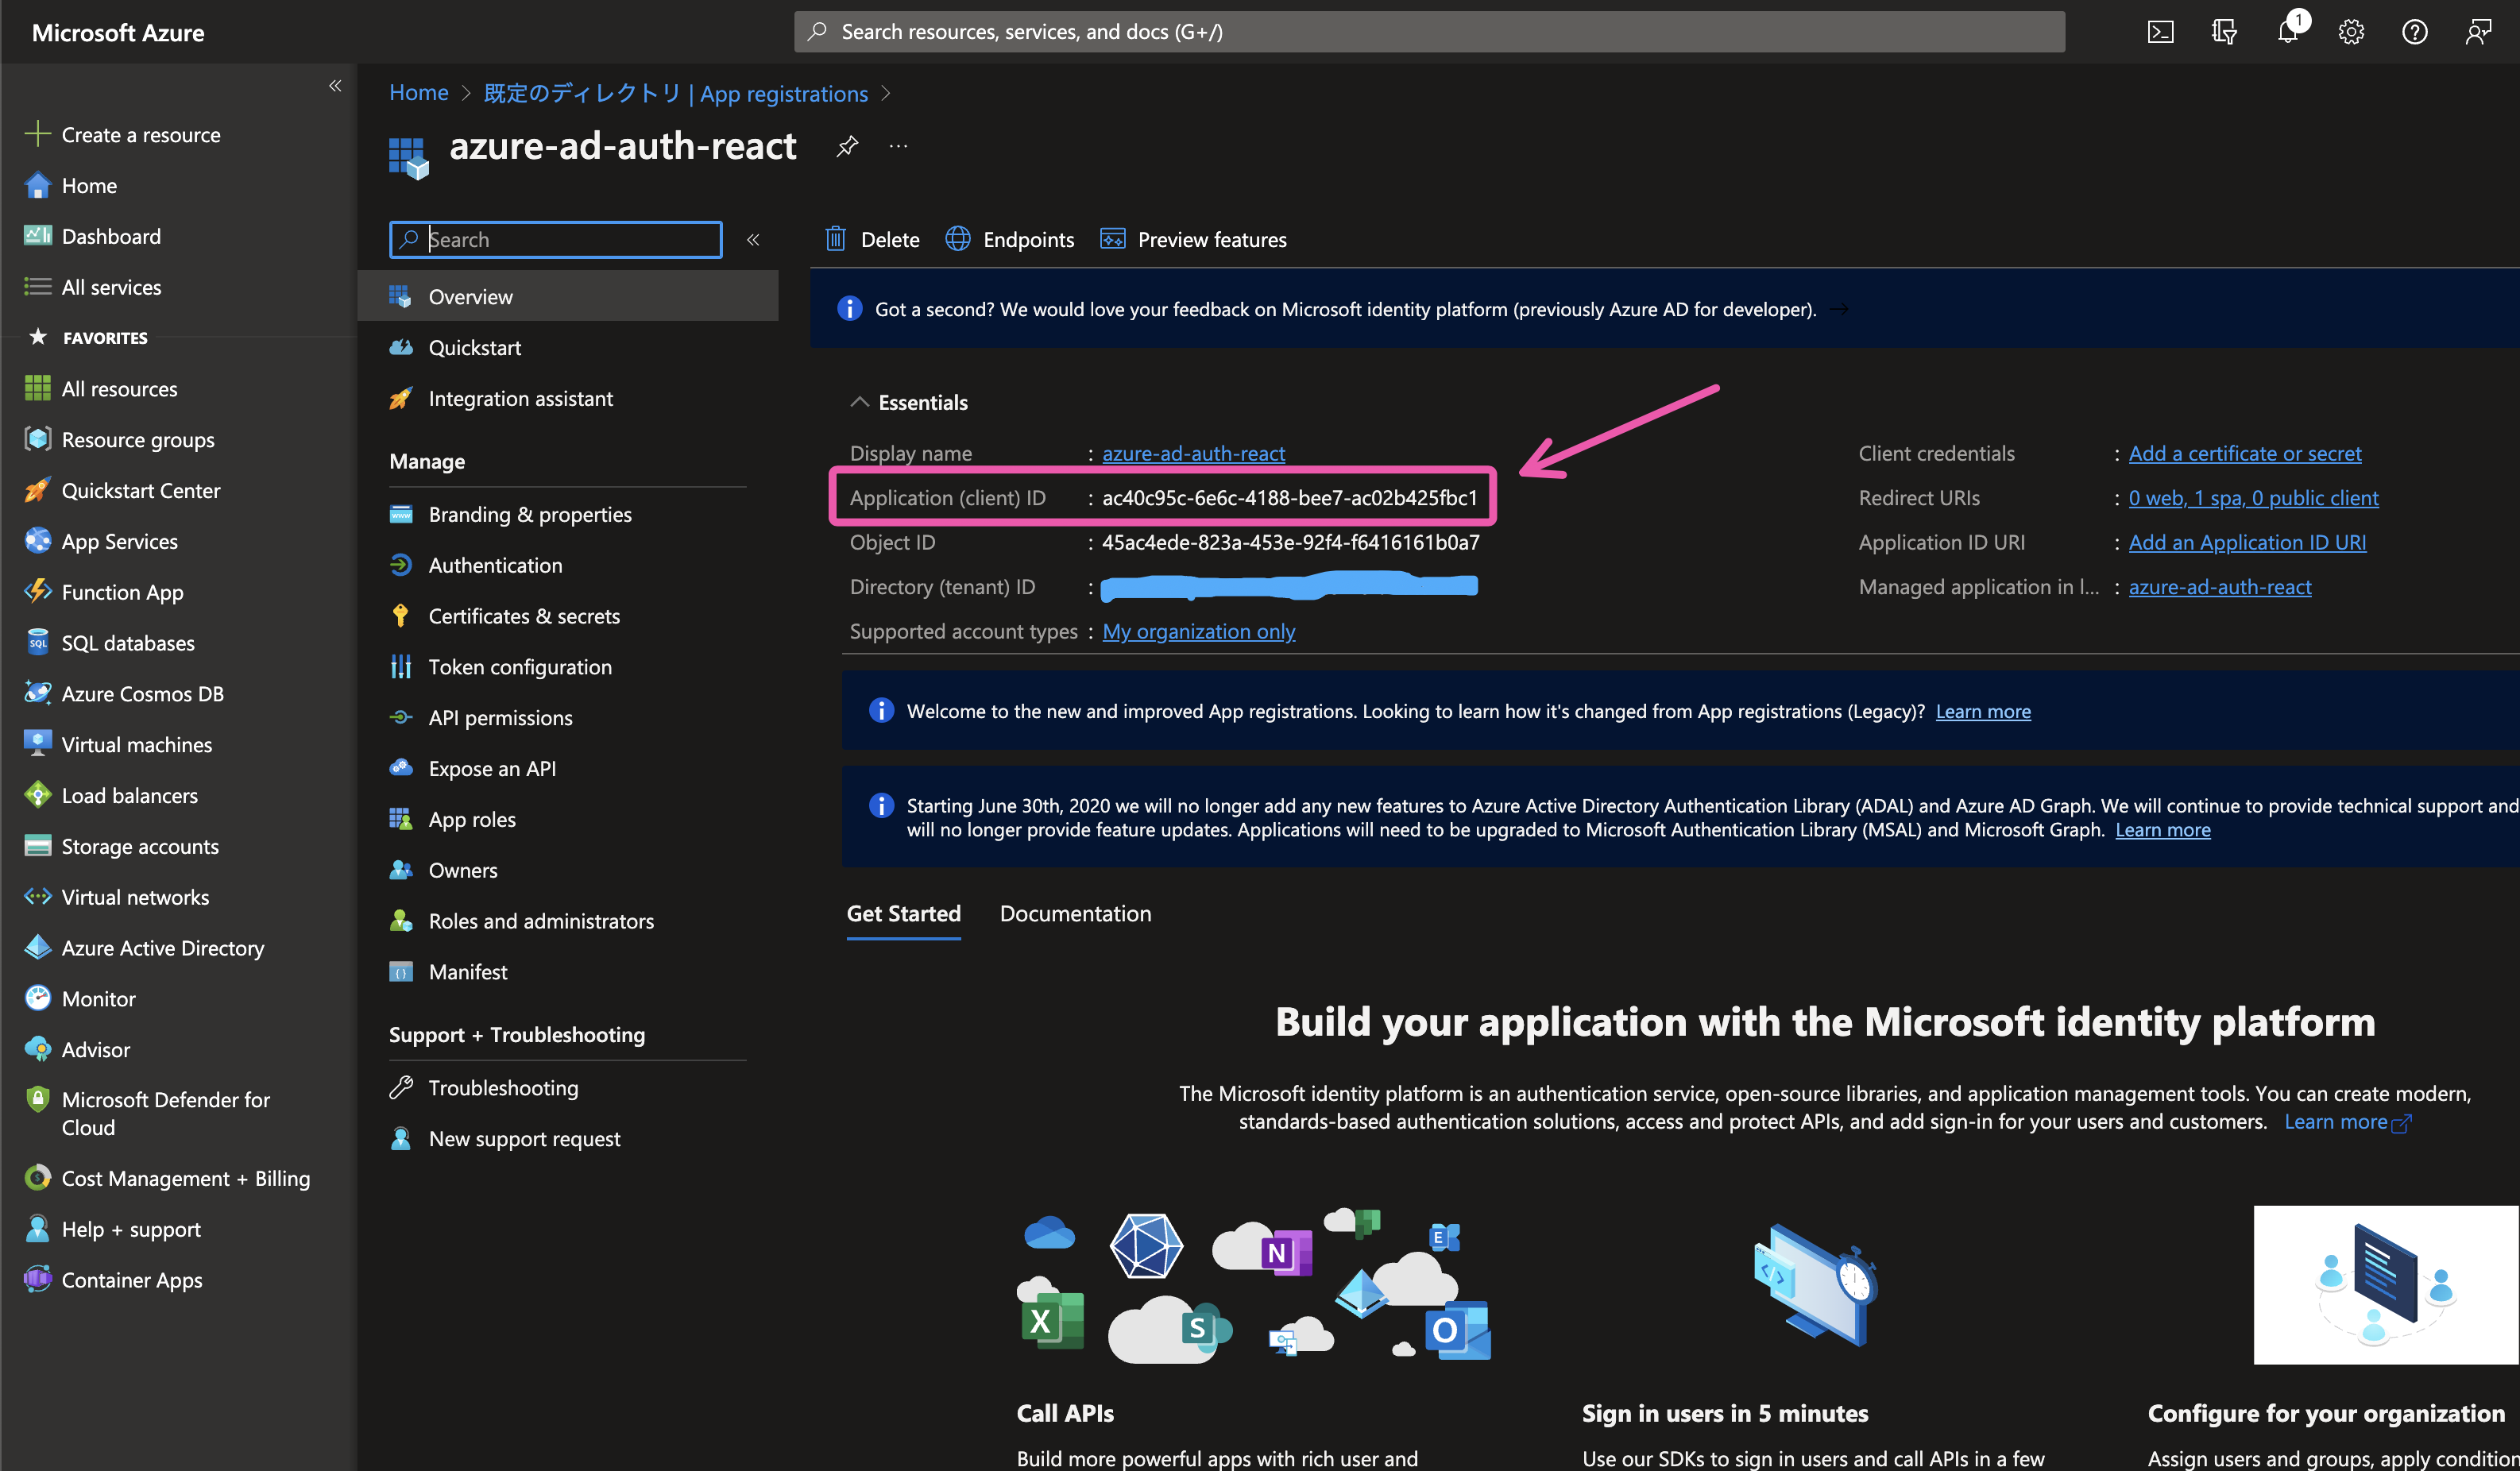
アプリケーションの設定

認証が成功した際の発行するトークンの種類(アクセストークンとIDトークン)の設定をします。React(SPA) アプリケーション場合は、両方有効化する必要があります。(と書いています)僕はこれに気づかず、かなりつまりました。
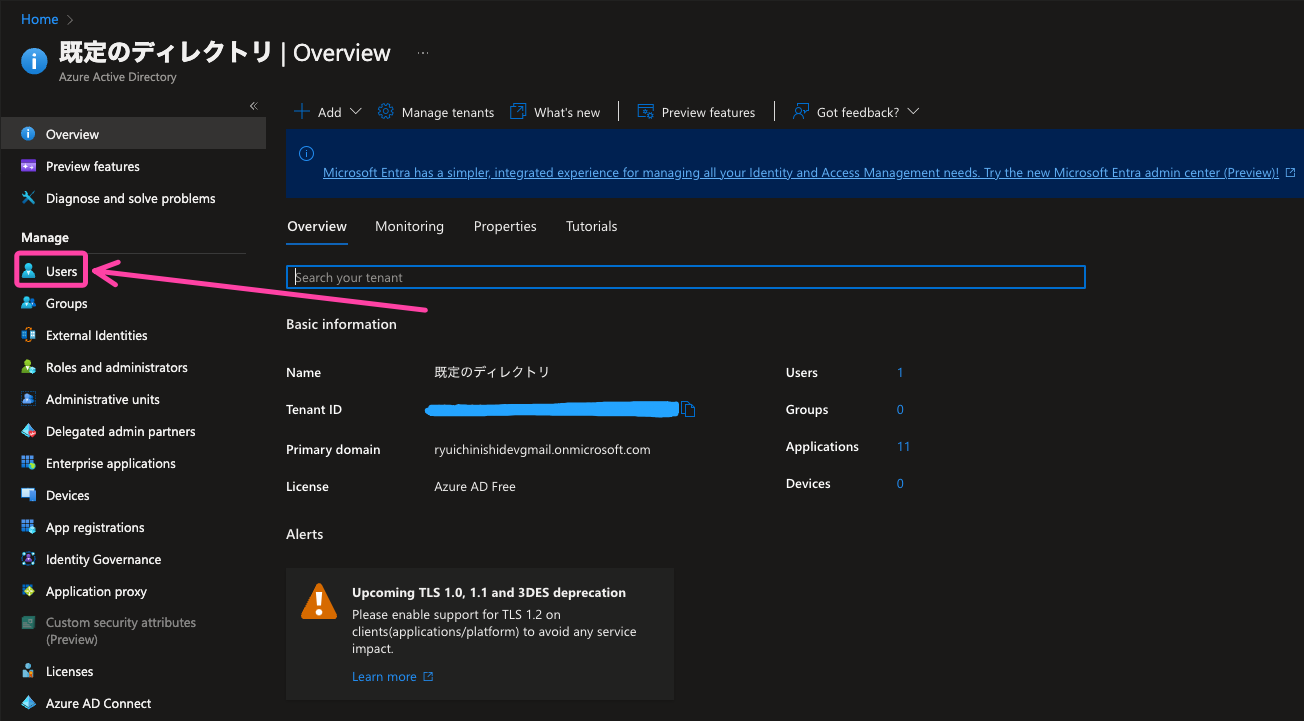
ユーザの作成
テスト用の新しいユーザをAzure ADに追加します。
ログインするときに必要なユーザーネームは、ここで設定した任意の名前とPrimary domainの組み合わせです。この情報も必要なのでメモしておこう。
パスワードは、一時的なパスワードなので、初回ログイン時にまた新たにパスワードの設定を求められます。だからこの時点では適当なパスワードかAuto-generate passwordを選択して自動生成しよう。
ユーザの作成ができた瞬間は画面に反映されないので、Refreshボタンをクリックしてみてください。おそらく先程作ったユーザが出てくるので。
こんな感じに。
React プロジェクトの作成
viteを使ってReactプロジェクトを作る
開発ツールとして、Vite を使います。Webpack と比べて、かなり軽くて高速です。
typescript のテンプレートが用意されているので、以下のコマンドでテンプレートから React プロジェクトを生成します。
npm create vite@latest azure-ad-auth-react -- --template react-ts
Create React App と違ってライブラリーのインストールまではしてくれないので、npm installをします。
cd azure-ad-auth-react && npm install
package.jsonに開発用の実行devスクリプトが定義されているので、実行します。もちろんホットリロードが効きます。
npm run dev
❯ npm run dev

> azure-ad-auth-react@0.0.0 dev
> vite


  VITE v3.2.3  ready in 337 ms

  ➜  Local:   http://127.0.0.1:5173/
  ➜  Network: use --host to expose
無事Reactが動きました。ものすごく簡単、そして高速です。
開発サーバのポート番号を変更します。Azure AD で登録したRedirect URLにあわせます。今回は3333。
import { defineConfig } from 'vite'
import react from '@vitejs/plugin-react'

export default defineConfig({
  plugins: [react()],
  server: {
    port: 3333
  }
})
Microsoft Authentication Libraries (MSAL)を使ってAzure AD に認証する
Azure ADとの認証を円滑にするために、オープンソースプロジェクトとして、Microsoft Authentication Libraries (MSAL)というものがあります。遠慮なく使わさせてもらいます。今回はReactを使ってブラウザーから直接認証を行うので、MSALの一部である@azure/msal-browserというものをインストールして、使っていきます。
npm install -E @azure/msal-browser
viteのテンプレートとして生成されたApp.tsxをそのまま編集していきます。
import { useState } from "react";
+ import { AccountInfo, PublicClientApplication } from "@azure/msal-browser";
import reactLogo from "./assets/react.svg";
import "./App.css";

+ type Account = Partial<AccountInfo>;

function App() {
  const [count, setCount] = useState(0);
+ const [isAuthenticated, setIsAuthenticated] = useState(false);
+ const [error, setError] = useState<any>(null);
+ const [user, setUser] = useState<Account | null>(null);

+ const publicClientApp = new PublicClientApplication({
+    auth: {
+     clientId: "ac40c95c-6e6c-4188-bee7-ac02b425fbc1",
+      redirectUri: "http://localhost:3333",
+      authority:
+        "https://login.microsoftonline.com/ryuichinishidevgmail.onmicrosoft.com/",
+    },
+    cache: {
+      cacheLocation: "sessionStorage",
+      storeAuthStateInCookie: true,
+    },
+  });

+  const login = async () => {
+    try {
+      const res = await publicClientApp.loginPopup({
+        scopes: ["user.read"],
+        prompt: "select_account",
+      });
+      setIsAuthenticated(true);
+      setUser({ ...res.account });
+    } catch (error) {
+      setIsAuthenticated(false);
+      setUser(null);
+      setError(error);
+    }
+  };

+  const logout = async () => {
+    await publicClientApp.logoutPopup();
+    setIsAuthenticated(false);
+    setUser(null);
+  };

  return (
    <div className="App">
      <div>
        <a href="https://vitejs.dev" target="_blank">
          <img src="/vite.svg" className="logo" alt="Vite logo" />
        </a>
        <a href="https://reactjs.org" target="_blank">
          <img src={reactLogo} className="logo react" alt="React logo" />
        </a>
      </div>
      <h1>Vite + React</h1>
      <div className="card">
        <button onClick={() => setCount((count) => count + 1)}>
          count is {count}
        </button>
        <p>
          Edit <code>src/App.tsx</code> and save to test HMR
        </p>
      </div>
      <p className="read-the-docs">
        Click on the Vite and React logos to learn more
      </p>
+      {isAuthenticated ? (
+        <div>
+          <button onClick={logout}>logout</button>
+        </div>
+      ) : (
+        <div>
+          <button onClick={login}>login</button>
+        </div>
+      )}
+      {error ? <div>{error.message}</div> : null}
+      <br/>
+      {user ? <div>Hello, {user.username}</div> : null}
    </div>
  );
}

export default App;
基本的に@azure/msal-browserのPublicClientApplicationのインスタンスを通して、Azure AD とやり取りします。このインスタンスさえ作成してしまえば簡単に認証処理ができます。クラスのコンストラクタに指定する値は:
- auth.clientId => 先程メモした
Application (client) ID - auth.redirectUri => 先程自ら設定したRedirect URL
- auth.authority => 'https://login.microsoftonline.com/{Primary Domain}'
Primary Domainは Azure AD のoverviewに記載されています。
キャッシュの設定は、sessionStorageに保存して、authのstateはCookieとして保存する。
const publicClientApp = new PublicClientApplication({
    auth: {
     clientId: "ac40c95c-6e6c-4188-bee7-ac02b425fbc1",
      redirectUri: "http://localhost:3333",
      authority:
        "https://login.microsoftonline.com/ryuichinishidevgmail.onmicrosoft.com/",
    },
    cache: {
      cacheLocation: "sessionStorage",
      storeAuthStateInCookie: true,
    },
  });
public.loginPopup functionを実行するとlogin ページのポップアップがでてきて、そのまま簡単に認証ができます。scopesに権限を指定できます。今回はとりあえず read アクセスだけ。認証が成功すると、発行されたトークンを含め、デコードされたアカウントのオブジェクトが返ってくるので、その値をステートに登録しています。
 const login = async () => {
    try {
      const res = await publicClientApp.loginPopup({
        scopes: ["user.read"],
        prompt: "select_account",
      });
      setIsAuthenticated(true);
      setUser({ ...res.account });
    } catch (error) {
      setIsAuthenticated(false);
      setUser(null);
      setError(error);
    }
  };
ログアウト処理も、ものすごく簡単で、publicClientApp.logoutPopupを呼び出すだけで、ログアウトするためのポップアップページがでてきて、そこでログアウトができます。
  const logout = async () => {
    await publicClientApp.logoutPopup();
    setIsAuthenticated(false);
    setUser(null);
  };
あとは、ステートの値に応じてUIの表示を変えています。ログインが成功すれば。logoutのボタンを表示させ、現在ログインしているアカウントの名前を表示、そうでなければloginボタンを表示。何かしらエラーが発生すれば、それを画面に表示する。
      {isAuthenticated ? (
        <div>
          <button onClick={logout}>logout</button>
        </div>
      ) : (
        <div>
          <button onClick={login}>login</button>
        </div>
      )}
      {error ? <div>{error.message}</div> : null}
      <br/>
      {user ? <div>Hello, {user.username}</div> : null}
実際に実行してみます。
npm run dev
ログインボタンが表示されているので、クリックする。

ログインボタンをクリックすると、ログイン専用のポップアップページが出てくる。

先程、新しく作成したユーザのユーザネームとパスワードを入力して、sign in ボタンをクリック。

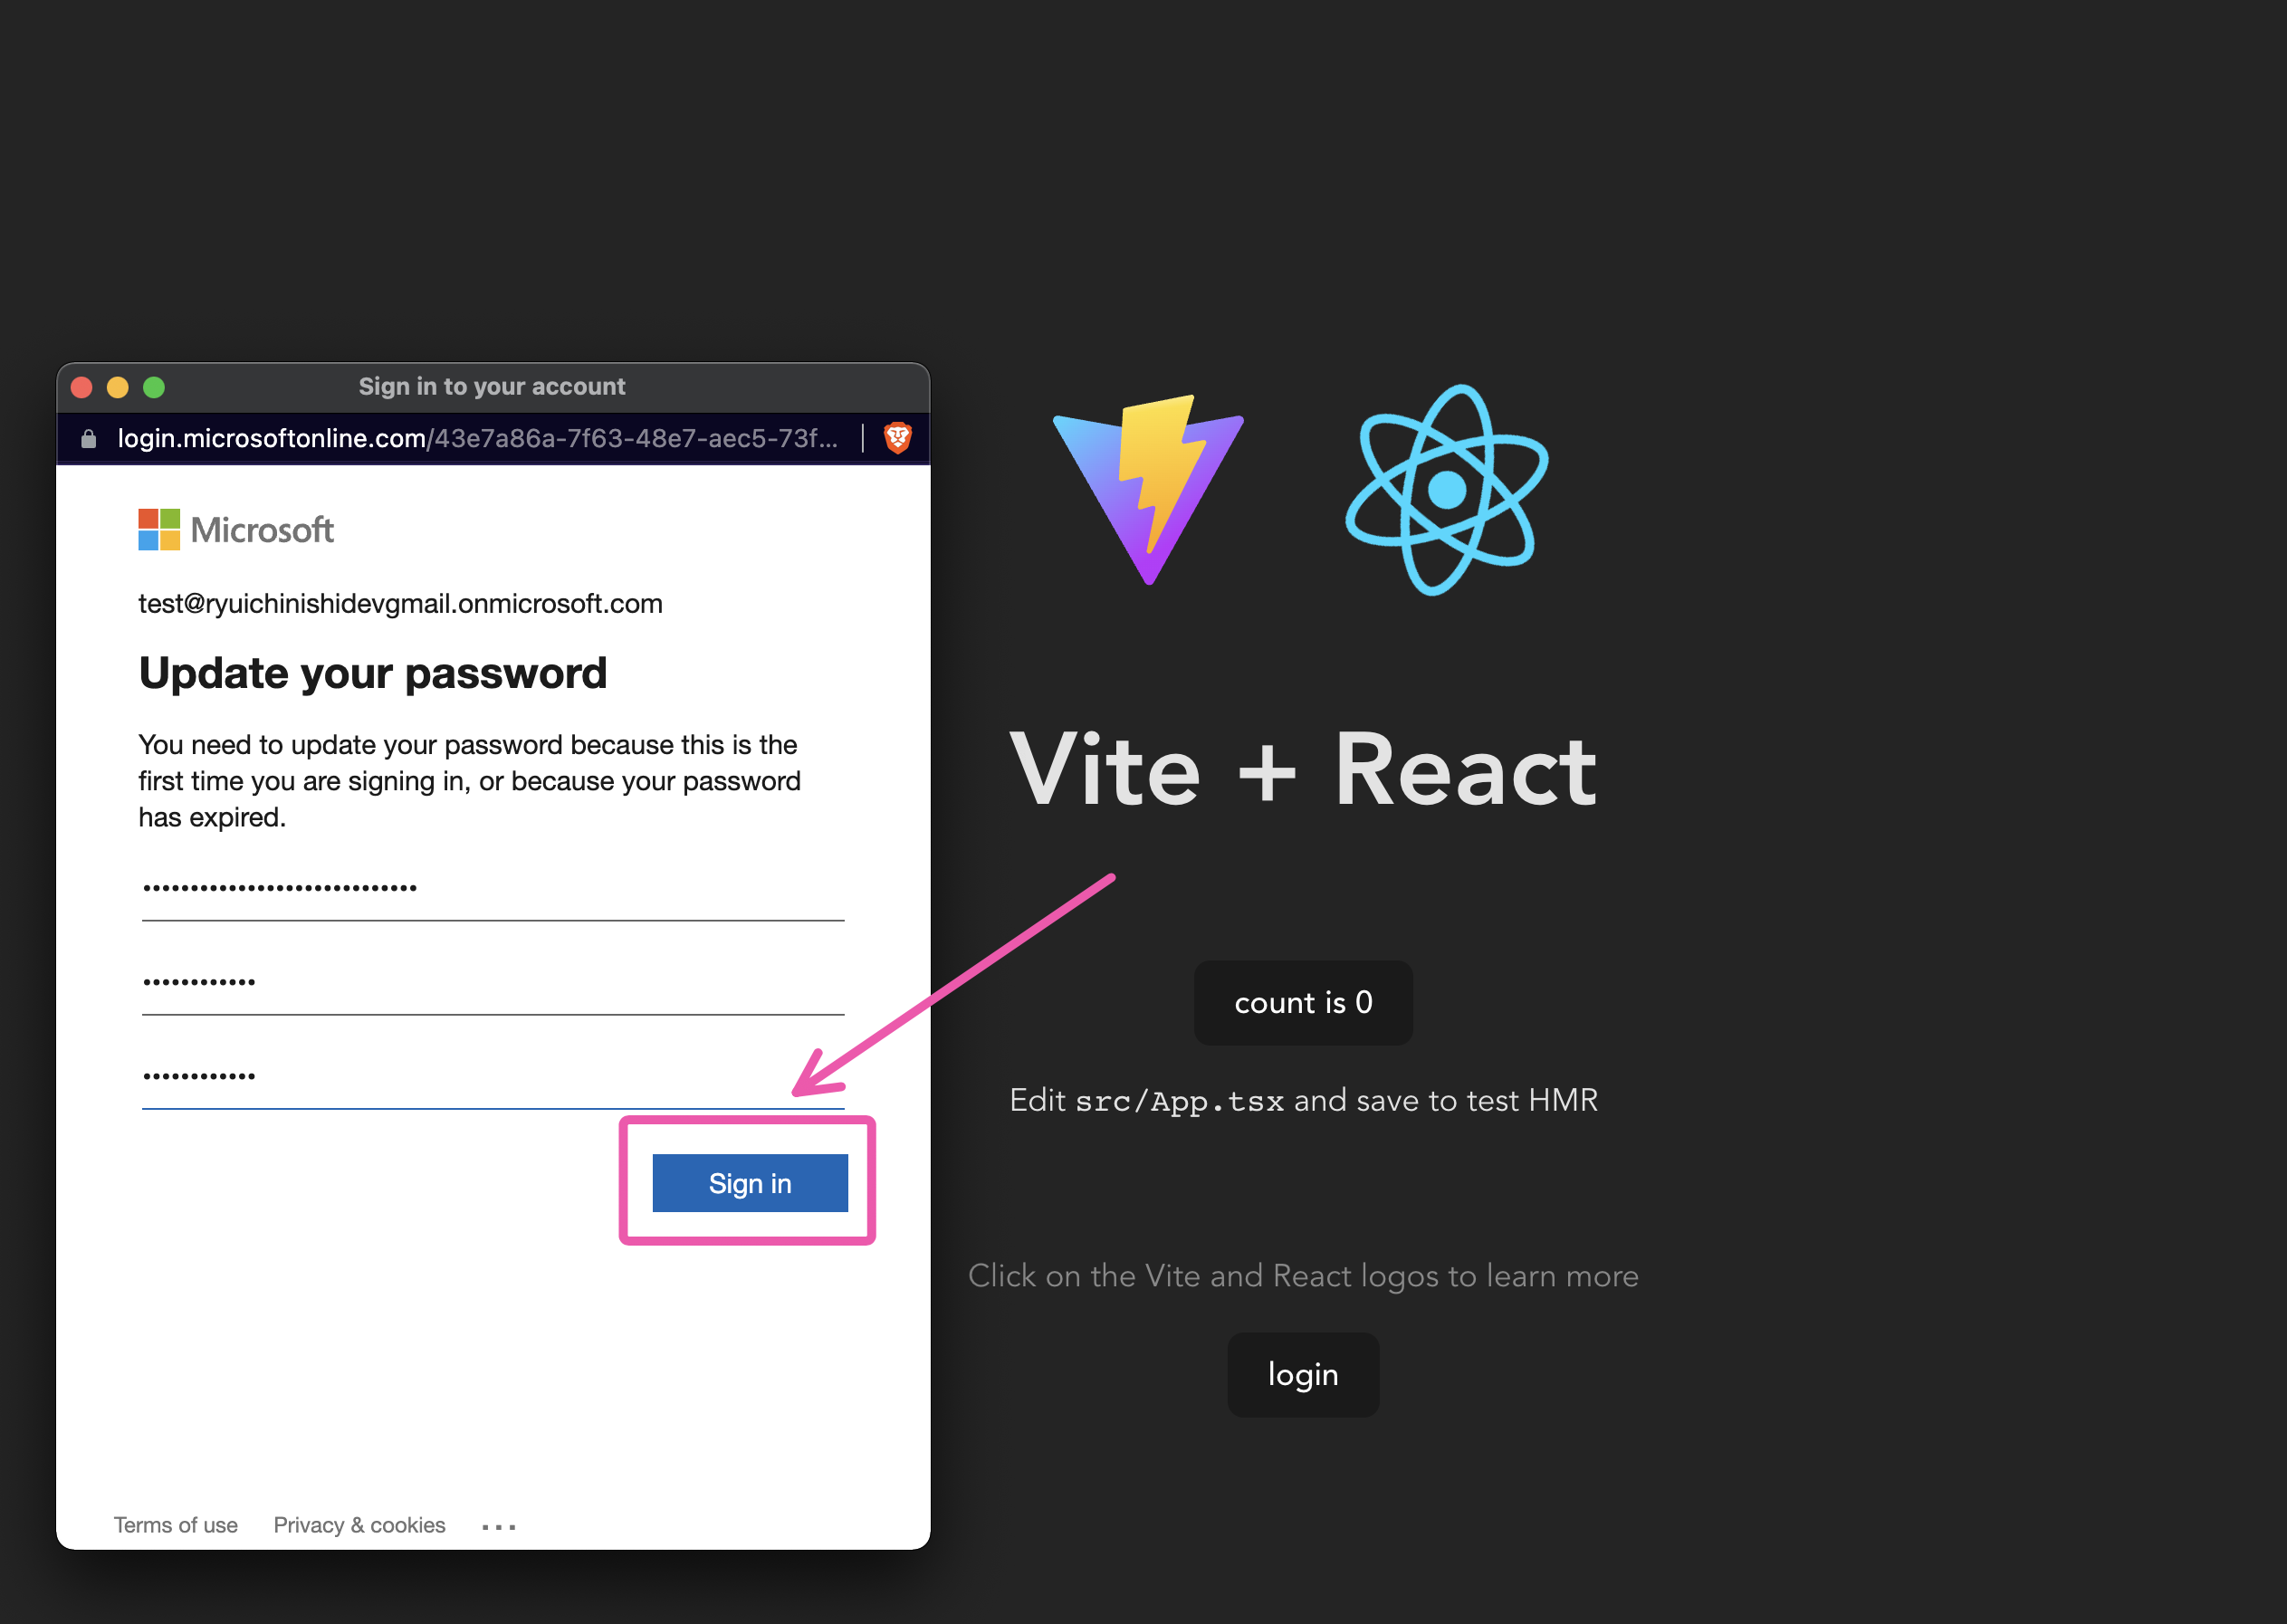
初回ログインなので、パスワードの変更を求められます。任意の新しいパスワードを入力する。
ログインが成功すると、下にユーザネームが表示される。

おわりに
Microsoft Authentication Librariesを利用することにより、思った以上に簡単にReactアプリケーションに認証機能を追加することができました。発行されたアクセストークンを使ってazureのリソースに簡単にアクセスすることができます。このようにAzureを活用すると安全なアプリケーションが爆速で開発できるようになります。


