初めに
MagentoのSand boxが必要となったので、Google Clould上に構築しました。結論から言えばものすごく大変です。Magentoそのものの開発を行うのでない限り、誰かに作ってもらったほうが時間と費用の節約になります。
何回か試行錯誤を繰り返した結果なので、大丈夫だとは思いますが、実際のECショップを立ち上げるには甘いところが多々あると思います。この記事を参照するときはあくまでも自己責任でお願いします。
基本的には こちらの記事をベースにしていますが、試行錯誤の結果で内容を追加・削除したところが多々あります。
VM
手元にUbuntuマシンがなかったので、Google Cloud上に構築しました。インストール時は結構CPUパワーを食うので、当初の設定はこんな感じです。

これにメモリ8GBとSSD 10Gを積んでいます。
Apache, Mysql, PHPのインストール
まずはお約束の
sudo apt update
sudo apt upgrade
Apatch
sudo apt install apache2
IPアドレス指定でサーバにつないでみて、以下の画面が表示されるのを確認します(Google Cloudを使用しているのでhttp://localhostではダメ)。

/etc/apache2/sites-available/000-default.confの更新
赤枠の部分を追加します。この設定を行っておかないとMagento2が動きません。
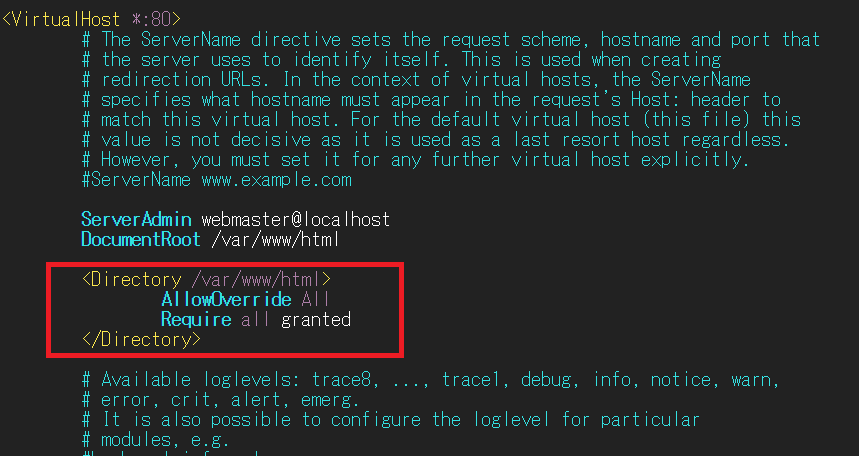
        <Directory /var/www/html>
                AllowOverride All
                Require all granted
        </Directory>
Rewrite の有効化
Magento2を動作させるために設定します。mod_rewriteを有効にします。
~$ sudo a2enmod
Your choices are: access_compat actions alias allowmethods asis auth_basic auth_digest auth_form authn_anon authn_core authn_dbd authn_dbm authn_file authn_socache authnz_fcgi authnz_ldap authz_core authz_dbd authz_dbm authz_groupfile authz_host authz_owner authz_user autoindex buffer cache cache_disk cache_socache cern_meta cgi cgid charset_lite data dav dav_fs dav_lock dbd deflate dialup dir dump_io echo env expires ext_filter file_cache filter headers heartbeat heartmonitor http2 ident imagemap include info lbmethod_bybusyness lbmethod_byrequests lbmethod_bytraffic lbmethod_heartbeat ldap log_debug log_forensic lua macro mime mime_magic mpm_event mpm_prefork mpm_worker negotiation php8.1 proxy proxy_ajp proxy_balancer proxy_connect proxy_express proxy_fcgi proxy_fdpass proxy_ftp proxy_hcheck proxy_html proxy_http proxy_http2 proxy_scgi proxy_wstunnel ratelimit reflector remoteip reqtimeout request rewrite sed session session_cookie session_crypto session_dbd setenvif slotmem_plain slotmem_shm socache_dbm socache_memcache socache_shmcb speling ssl status substitute suexec unique_id userdir usertrack vhost_alias xml2enc
Which module(s) do you want to enable (wildcards ok)?
rewrite
Enabling module rewrite.
To activate the new configuration, you need to run:
  systemctl restart apache2
Apacheを再起動します。
sudo systemctl restart apache2
Mysqlの準備
Adobeのページを見るとSystem RequirementとしてMagento2.4.5ではMySQL 8.0が必要とされています。よって手動でMySQL8.0のrepositoriesを追加します。
こちらの記事の方法ではうまくいかなかったので「ubuntu-20-04に最新版のmysql-8-0をインストール」を参照しました。
現時点での最新版は8.24-1でした。よって
wget -c https://dev.mysql.com/get/mysql-apt-config_0.8.24-1_all.deb
そのあとに
sudo dpkg -i mysql-apt-config_0.8.24-1_all.deb
とすると、以下の画面が現れます(mysql-8.0が選択されている)。


最後に、OKを選択してEnterキーを押します。

すると、こんな感じの出力が出てきます。
$ sudo dpkg -i mysql-apt-config_0.8.24-1_all.deb
(Reading database ... 67857 files and directories currently installed.)
Preparing to unpack mysql-apt-config_0.8.24-1_all.deb ...
Unpacking mysql-apt-config (0.8.24-1) over (0.8.11-1) ...
Setting up mysql-apt-config (0.8.24-1) ...
Warning: apt-key should not be used in scripts (called from postinst maintainerscript of the package mysql-apt-config)
OK
$
sudo apt-get updateします。
$ sudo apt-get update
Hit:1 http://asia-northeast1.gce.archive.ubuntu.com/ubuntu bionic InRelease
Hit:2 http://asia-northeast1.gce.archive.ubuntu.com/ubuntu bionic-updates InRelease
Hit:3 http://asia-northeast1.gce.archive.ubuntu.com/ubuntu bionic-backports InRelease
Get:4 http://repo.mysql.com/apt/ubuntu bionic InRelease [20.0 kB]
Hit:5 http://security.ubuntu.com/ubuntu bionic-security InRelease
Get:6 http://repo.mysql.com/apt/ubuntu bionic/mysql-8.0 Sources [973 B]
Get:7 http://repo.mysql.com/apt/ubuntu bionic/mysql-apt-config amd64 Packages [567 B]
Get:8 http://repo.mysql.com/apt/ubuntu bionic/mysql-8.0 amd64 Packages [8528 B]
Get:9 http://repo.mysql.com/apt/ubuntu bionic/mysql-tools amd64 Packages [8196 B]
Fetched 38.3 kB in 2s (16.7 kB/s)
Reading package lists... Done
mysql-8.0の何かを持ってきたようなので、準備完了です。
MySql 8.0のインストール
aptコマンドでインストールします。
sudo apt install mysql-server
インストール終了直後に以下の画面が表示されます。

パスワード入力後Enterキーを押します。もう一度パスワード入力を求められます。

RECOMMENDEDの方法で先に進みます。

MySQLを動かしてみます。
$ mysql -u root -p
Enter password:
Welcome to the MySQL monitor.  Commands end with ; or \g.
Your MySQL connection id is 8
Server version: 8.0.31 MySQL Community Server - GPL

Copyright (c) 2000, 2022, Oracle and/or its affiliates.

Oracle is a registered trademark of Oracle Corporation and/or its
affiliates. Other names may be trademarks of their respective
owners.

Type 'help;' or '\h' for help. Type '\c' to clear the current input statement.

mysql>
ちゃんとVersion8につながっています。
MySQL上のDatabase設定、他
前の章から引き継ぎ、MySQLのなかでmagent2というデータベースを作成します。
CREATE DATABASE magento2;
magentipというユーザを作成します。ここでmagentipのパスワードも設定します。
CREATE USER 'magentip'@'localhost' IDENTIFIED BY '<your_pssword>';
ALTER USER 'magentip'@'localhost' IDENTIFIED WITH mysql_native_password BY '<your_pssword>';
magentipに権限付与します。
GRANT ALL PRIVILEGES ON *.* TO 'magentip'@'localhost' WITH GRANT OPTION;
権限を変更したのでFLUSH PRIVILEGESしてからコンソールを抜けます。
mysql> FLUSH PRIVILEGES;
Query OK, 0 rows affected (0.00 sec)
mysql> exit
Bye
PHP
Adobeのページ(必要システム構成)には、PHPは8.1が必要と記載されています。よってrepositoryを手動で追加します。
sudo apt-get install software-properties-common
sudo add-apt-repository ppa:ondrej/php
sudo apt-get update
PHP8.1をインストールします。
sudo apt install php8.1 libapache2-mod-php php-mysql
PHPのバージョンを確認してみます。
$ php -v
PHP 8.1.12 (cli) (built: Oct 28 2022 17:39:18) (NTS)
Copyright (c) The PHP Group
Zend Engine v4.1.12, Copyright (c) Zend Technologies
    with Zend OPcache v8.1.12, Copyright (c), by Zend Technologies
他に必要なPHPモジュールをインストールします。
sudo apt install php8.1-bcmath php8.1-intl php8.1-soap php8.1-zip php8.1-gd php8.1-curl php8.1-cli php8.1-xml php8.1-xmlrpc php8.1-gmp php8.1-common php8.1-mbstring
Elasticsearch
まずjava(openjdkのほう)をインストールします。
以下のコマンドでインストールできるopenjdkのバージョンを確認します。
$ sudo apt search "^openjdk.*jdk$"
Sorting... Done
Full Text Search... Done
openjdk-11-jdk/bionic-updates,bionic-security 11.0.17+8-1ubuntu2~18.04 amd64
  OpenJDK Development Kit (JDK)

openjdk-17-jdk/bionic-updates,bionic-security 17.0.5+8-2ubuntu1~18.04 amd64
  OpenJDK Development Kit (JDK)

openjdk-8-jdk/bionic-updates,bionic-security 8u352-ga-1~18.04 amd64
  OpenJDK Development Kit (JDK)
openjdk-17-jdkがインストール可能です。
sudo apt update
sudo apt-get install openjdk-17-jdk
Javaのバージョンを確認します。
$ java -version
openjdk version "17.0.5" 2022-10-18
OpenJDK Runtime Environment (build 17.0.5+8-Ubuntu-2ubuntu118.04)
OpenJDK 64-Bit Server VM (build 17.0.5+8-Ubuntu-2ubuntu118.04, mixed mode, sharing)
Elasticsearchのインストールを開始します。
curl -fsSL https://artifacts.elastic.co/GPG-KEY-elasticsearch | sudo apt-key add -
Elastic-7.x.listをsource.list.dに加えます(そういう意味らしい)。
echo "deb https://artifacts.elastic.co/packages/7.x/apt stable main" | sudo tee -a /etc/apt/sources.list.d/elastic-7.x.list
Elasticsearchの本体をインストールします。Magento2.35で必要なのはElasticsearch7.6ですが、今ダウンロードできるのは7.17です。
$ sudo apt update
$ sudo apt search "^elasticsearch"
Sorting... Done
Full Text Search... Done
elasticsearch/stable 7.17.7 amd64
  Distributed RESTful search engine built for the cloud

elasticsearch-curator/bionic 5.2.0-1 all
  command-line tool for managing Elasticsearch time-series indices

golang-gopkg-olivere-elastic.v2-dev/bionic 2.0.12-1 all
  Elasticsearch client for Golang

golang-gopkg-olivere-elastic.v3-dev/bionic 3.0.41-1 all
  Elasticsearch client for Golang

rsyslog-elasticsearch/bionic-updates,bionic-security 8.32.0-1ubuntu4.2 amd64
  Elasticsearch output plugin for rsyslog
$ sudo apt install elasticsearch
Elasticsearchをサービスとして登録します。
$ sudo systemctl daemon-reload
$ sudo systemctl enable elasticsearch.service
Synchronizing state of elasticsearch.service with SysV service script with /lib/systemd/systemd-sysv-install.
Executing: /lib/systemd/systemd-sysv-install enable elasticsearch
Created symlink /etc/systemd/system/multi-user.target.wants/elasticsearch.service → /usr/lib/systemd/system/elasticsearch.service.
elasticsearchの設定
以下ファイルの設定を行います(この辺りはこちらのサイトより引用)。
- elasticsearch.yml
- elasticsearch.service
elasticsearch.yml
sudo vi /etc/elasticsearch/elasticsearch.yml
cluster.nameとnode.nameの文頭の#を外し、node.nameを'My First Node'に変更しました。

次にnetwork.hostとhttp.portの行を有効にします(Un-commentする)。network.hostはどこからでもアクセスできるように0.0.0.0に変更します(Google cloudなのでこうしておかないとローカルPCからアクセスできない)

elasticsearch.service
sudo vi /usr/lib/systemd/system/elasticsearch.service
TimeoutStartSecを900に変更。

ここまでの設定が終わったらelasticserchサービスを開始します。
$ sudo systemctl daemon-reload
$ sudo systemctl start elasticsearch.service
Job for elasticsearch.service failed because the control process exited with error code.
See "systemctl status elasticsearch.service" and "journalctl -xe" for details.
journalctl -xeで確認しろと記載があるので見てみます。
Nov 14 05:41:51 magento2-ubuntu18-03 systemd-entrypoint[3427]: ERROR: [1] bootstrap checks failed. You must address the points described in the following [1] lines before starting Elasticsearch.
Nov 14 05:41:51 magento2-ubuntu18-03 systemd-entrypoint[3427]: bootstrap check failure [1] of [1]: the default discovery settings are unsuitable for production use; at least one of [discovery.seed_hosts, discovery.seed_providers, cluster.initial_master_nodes] must be configured
Nov 14 05:41:51 magento2-ubuntu18-03 systemd-entrypoint[3427]: ERROR: Elasticsearch did not exit normally - check the logs at /var/log/elasticsearch/my-application.log
Nov 14 05:41:51 magento2-ubuntu18-03 systemd-entrypoint[3427]: uncaught exception in thread [process reaper (pid 3646)]
at least one of [discovery.seed_hosts, discovery.seed_providers, cluster.initial_master_nodes] must be configured.というメッセージが出ています。デフォルト値でdiscovery.seed_hostsを設定してみます(elasticsearch.ymlに対して下図赤線部分)。

サービスを開始します(sudo systemctl start elasticsearch.serviceは応答が返ってくるまで1~2分程度かかります、おそらく環境に依存します)。
$ sudo systemctl daemon-reload
$ sudo systemctl start elasticsearch.service
curlで http://localhost:9200 にアクセスして動作確認します。
$ curl -X GET 'http://localhost:9200'
{
  "name" : "My First Node",
  "cluster_name" : "my-application",
  "cluster_uuid" : "_na_",
  "version" : {
    "number" : "7.17.7",
    "build_flavor" : "default",
    "build_type" : "deb",
    "build_hash" : "78dcaaa8cee33438b91eca7f5c7f56a70fec9e80",
    "build_date" : "2022-10-17T15:29:54.167373105Z",
    "build_snapshot" : false,
    "lucene_version" : "8.11.1",
    "minimum_wire_compatibility_version" : "6.8.0",
    "minimum_index_compatibility_version" : "6.0.0-beta1"
  },
  "tagline" : "You Know, for Search"
}
elasticsearchが動いていることを確認できました。
Magento
composerを使用してMagentoをダウンロードします。
composerのインストール
まずはcomposerから。
curl -sS https://getcomposer.org/installer -o composer-setup.php
カレントディレクトリはこういう状態になります。
~/tmp$ curl -sS https://getcomposer.org/installer -o composer-setup.php
:~/tmp$ ls
composer-setup.php
Magento2.4はComposer2が必要なので、以下のようにインストールします。
$ sudo php composer-setup.php --install-dir=/usr/local/bin --filename=composer
All settings correct for using Composer
Downloading...

Composer (version 2.4.4) successfully installed to: /usr/local/bin/composer
Use it: php /usr/local/bin/composer
あっさりと終了しました。
バージョンを確認してみます。
$ composer
   ______
  / ____/___  ____ ___  ____  ____  ________  _____
 / /   / __ \/ __ `__ \/ __ \/ __ \/ ___/ _ \/ ___/
/ /___/ /_/ / / / / / / /_/ / /_/ (__  )  __/ /
\____/\____/_/ /_/ /_/ .___/\____/____/\___/_/
                    /_/
Composer version 2.4.4 2022-10-27 14:39:29
Magento2.4
Magentoのアクセスキー
この後MagentoのAccess Keyが必要なのであらかじめ取得しておきます(ご本尊のAdobeのページに取得方法が記載されています)。取得したアクセスキーは
-Username: public Key
-Password: private Key
として使用します。
Magentoユーザ作成
このあたりから、参照する記事によって記載している内容が異なってきます。ここからはこちらの記事を参考にしています。
MagentoのCLI操作やCRON用のユーザを用意します(パスワードを聞かれるので用意しておいてください)。
$ sudo adduser magento_user
Adding user `magento_user' ...
Adding new group `magento_user' (1003) ...
Adding new user `magento_user' (1002) with group `magento_user' ...
Creating home directory `/home/magento_user' ...
Copying files from `/etc/skel' ...
Enter new UNIX password:
Retype new UNIX password:
passwd: password updated successfully
Changing the user information for magento_user
Enter the new value, or press ENTER for the default
        Full Name []: Magento2 User
        Room Number []:
        Work Phone []:
        Home Phone []:
        Other []:
Is the information correct? [Y/n] Y
デフォルトグループをwww-dataグループにします。
sudo usermod -g www-data magento_user
一応、sudoグループにも含めておきます。
sudo adduser magento_user sudo
Magento2.4.4のダウンロード
以降は先ほど作成したmagento_userで操作するのでsuコマンドで切り替えます。
su - magento_user
DocumentRootフォルダの所有者をmagento_userにします。DocumentRootは特に変更していないので/var/www/htmlです。
$ sudo chown magento_user:www-data /var/www/html -R
$ ls -all
total 20
drwxr-xr-x 2 magento_user www-data  4096 Nov 14 06:40 .
drwxr-xr-x 3 root         root      4096 Nov 14 06:40 ..
-rw-r--r-- 1 magento_user www-data 10918 Nov 14 06:40 index.html
Magento2はhtmlコンテンツとしてインストールするので、インストールディレクトリにカレントを変更します(以下では/var/www/html直下に入れる)。なお、中身が空でないとインストール中エラーになるので、もともと入っていたindex.htmlは消します。
$ cd /var/www/html
$ rm index.thml
$ $ ls -all
total 8
drwxr-xr-x 2 magento_user www-data 4096 Nov 14 08:13 .
drwxr-xr-x 3 root         root     4096 Nov 14 06:40 ..
ダウンロードを開始します。
$ composer create-project --repository-url=https://repo.magento.com/ magento/project-community-edition=2.4.5 .
Creating a "magento/project-community-edition=2.4.5" project at "./"
Warning from repo.magento.com: You haven't provided your Magento authentication keys. For instructions, visit https://devdocs.magento.com/guides/v2.3/install-gde/prereq/connect-auth.html
    Authentication required (repo.magento.com):
      Username: <your public Key>
      Password: <your private Key>
Do you want to store credentials for repo.magento.com in /home/magento_user/.config/composer/auth.json ? [Yn] Y
Installing magento/project-community-edition (2.4.5)
As there is no 'unzip' nor '7z' command installed zip files are being unpacked using the PHP zip extension.
This may cause invalid reports of corrupted archives. Besides, any UNIX permissions (e.g. executable) defined in the archives will be lost.
Installing 'unzip' or '7z' (21.01+) may remediate them.
  - Downloading magento/project-community-edition (2.4.5)
  - Installing magento/project-community-edition (2.4.5): Extracting archive
Created project in /var/www/html/.
Loading composer repositories with package information
Info from https://repo.packagist.org: #StandWithUkraine
# 途中省略
Generating autoload files
123 packages you are using are looking for funding.
Use the `composer fund` command to find out more!
PHP CodeSniffer Config installed_paths set to ../../magento/magento-coding-standard,../../phpcompatibility/php-compatibility
No security vulnerability advisories found
magento_user@magento2-ubuntu18-05:/var/www/html$
Magento2のインストール
コマンドラインからインストールします。下ではさらっと記述していますが、2行目の--base-urlがgoogle cloudを使用する際厄介で、仮にhttp://localhostとするとローカルPC(自分がいま捜査している端末)にRedirectしてしまいます。Google Domainなどでドメインを取得し、Google cloud computingで使用しているホストのIPアドレスをDNSに登録する必要があります。
bin/magento setup:install \
--base-url="<your domain>" \
--db-host=localhost \
--db-name=magento2 \
--db-user=magentip \
--db-password="<Mysql magentip password>" \
--admin-firstname=Admin \
--admin-lastname=Admin \
--admin-email=admin@admin.com \
--admin-user=admin \
--admin-password=admin123 \
--language=en_US \
--currency=USD \
--timezone=America/Chicago \
--use-rewrites=1
最後に表示されている
[SUCCESS]: Magento installation complete.
[SUCCESS]: Magento Admin URI: /admin_1wgure
Nothing to import.
magento_user@magento2-ubuntu18-05:/var/www/html$
/admin_1wgureがsetup用のURLとなります(ランダムに設定されるようです)。
FileのPermission変更
DocumentRoot配下に作成されたフォルダ・ファイルのオーナーとパーミッションを変更します。
$ cd /var/www/html
$ sudo chown -R magento_user:www-data .
$ find . -type d -exec chmod 770 {} \;
$ find . -type f -exec chmod 660 {} \;
chmod: changing permissions of './var/cache/mage--f/mage---40d_FRONTEND__CSP_WHITELIST_CONFIG': Operation not permitted
chmod: changing permissions of './var/cache/mage--3/mage---40d_GLOBAL__CSP_WHITELIST_CONFIG': Operation not permitted
chmod: changing permissions of './generated/code/Magento/Framework/Controller/Result/Redirect/Interceptor.php': Operation not permitted
chmod: changing permissions of './generated/code/Magento/Framework/Message/Session/Interceptor.php': Operation not permitted
chmod: changing permissions of './generated/code/Magento/Framework/App/Router/DefaultRouter/Interceptor.php': Operation not permitted
chmod: changing permissions of './generated/code/Magento/Framework/App/Action/Forward/Interceptor.php': Operation not permitted
chmod: changing permissions of './generated/code/Magento/Csp/Model/Collector/CspWhitelistXml/Reader/Proxy.php': Operation not permitted
chmod: changing permissions of './generated/code/Magento/Cms/Controller/Router/Interceptor.php': Operation not permitted
2番目のほうだけ怒られているのでsudo してみます。
$sudo find . -type f -exec chmod 660 {} \;
Disable Two-Factor Authorization
2要素認証を無効にします。
$ php bin/magento module:disable Magento_TwoFactorAuth
The following modules have been disabled:
- Magento_TwoFactorAuth

Cache cleared successfully.
Generated classes cleared successfully. Please run the 'setup:di:compile' command to generate classes.
Info: Some modules might require static view files to be cleared. To do this, run 'module:disable' with the --clear-static-content option to clear them.
deploy
最後に、Magento の動作モードをProductionモードに変更してコンテンツをdeployします。
$ php bin/magento deploy:mode:set production
Enabling maintenance mode
Starting compilation
Compilation was started.
%message% 0/9 [>---------------------------]   0% < 1 sec 115.0 MiBProxies code generation... 0/9 [>---------------------------]   0% < 1 sec 115.0 MiB
Proxies code generation... 1/9 [===>------------------------]  11% 1 sec 119.0 MiB
Repositories code generation... 1/9 [===>------------------------]  11% 1 sec 119.0 MiB
Repositories code generation... 2/9 [======>---------------------]  22% 11 secs 238.0 MiB
Service data attributes generation... 2/9 [======>---------------------]  22% 11 secs 238.0 MiB
Application code generator... 3/9 [=========>------------------]  33% 11 secs 238.0 MiB
Application code generator... 4/9 [============>---------------]  44% 18 secs 262.0 MiB
Interceptors generation... 4/9 [============>---------------]  44% 18 secs 262.0 MiB
Interceptors generation... 5/9 [===============>------------]  55% 38 secs 296.0 MiB
Area configuration aggregation... 5/9 [===============>------------]  55% 38 secs 296.0 MiB
Area configuration aggregation... 6/9 [==================>---------]  66% 43 secs 394.0 MiB
Interception cache generation... 6/9 [==================>---------]  66% 43 secs 394.0 MiB
Interception cache generation... 7/9 [=====================>------]  77% 48 secs 394.0 MiB
App action list generation... 7/9 [=====================>------]  77% 48 secs 394.0 MiB
Plugin list generation... 8/9 [========================>---]  88% 48 secs 394.0 MiB
Plugin list generation... 9/9 [============================] 100% 51 secs 394.0 MiB
Generated code and dependency injection configuration successfully.
Compilation complete
Starting deployment of static content

Deploy using quick strategy
frontend/Magento/blank/en_US            2181/2181           ============================ 100%   7 secs
adminhtml/Magento/backend/en_US         2879/2879           ============================ 100%   10 secs
frontend/Magento/luma/en_US             2197/2197           ============================ 100%   8 secs

Execution time: 28.001624107361
Deployment of static content complete
Disabling maintenance mode
Enabled production mode.
cronの設定
こちらの記事を参考にしました。
magento_userのcromとして登録するので、カレントユーザをmagento_userにしてから実行する必要があります。
$ cd /var/www/html/
$ php ./bin/magento cron:install --force
Crontab has been generated and saved
内容を確認してみます。
$ crontab -l

#~ MAGENTO START 69dd2b02e1f3a65918182048ea4e29979a849d8942e8f53ed20a4bf10e529b36
* * * * * /usr/bin/php8.1 /var/www/html/bin/magento cron:run 2>&1 | grep -v "Ran jobs by schedule" >> /var/www/html/var/log/magento.cron.log
#~ MAGENTO END 69dd2b02e1f3a65918182048ea4e29979a849d8942e8f53ed20a4bf10e529b36
bin/magento setup:static-content:deploy -f
こちらの方法を参照してみる(現時点 2022/11/16では何をやっているのか意味を把握していない)。
$php bin/magento setup:upgrade
Cache types config flushed successfully
Cache cleared successfully
File system cleanup:
/var/www/html/generated/code/AdobeStock
/var/www/html/generated/code/Composer
(途中省略)
Nothing to import.
Please re-run Magento compile command. Use the command "setup:di:compile"
Media files stored outside of 'Media Gallery Allowed' folders will not be available to the media gallery.
Please refer to Developer Guide for more details.

$ php  bin/magento setup:di:compile
$ php bin/magento setup:static-content:deploy -f

Deploy using quick strategy
frontend/Magento/blank/en_US            2181/2181           ============================ 100%   7 secs
frontend/Magento/blank/en_US            2181/2181           ============================ 100%   7 secs
frontend/Magento/blank/en_US            2181/2181           ============================ 100%   7 secs
frontend/Magento/blank/en_US            2181/2181           ============================ 100%   7 secs
frontend/Magento/blank/en_US            2181/2181           ============================ 100%   7 secs
frontend/Magento/blank/en_US            2181/2181           ============================ 100%   7 secs
frontend/Magento/blank/en_US            2181/2181           ============================ 100%   7 secs
frontend/Magento/blank/en_US            2181/2181           ============================ 100%   7 secs
frontend/Magento/blank/en_US            2181/2181           ============================ 100%   7 secs
frontend/Magento/blank/en_US            2181/2181           ============================ 100%   7 secs
adminhtml/Magento/backend/en_US         2879/2879           ============================ 100%   9 secs
frontend/Magento/luma/en_US             2197/2197           ============================ 100%   8 secs

Execution time: 26.501586914062
$ bin/magento setup:di:compile
Compilation was started.
Plugin list generation... 9/9 [============================] 100% 49 secs 400.0 MiB
Generated code and dependency injection configuration successfully.
動作確認
以下の画面が出力されます。ちなみに2022/11/28時点では、この後にサンプルデータを入れようとしてもうまくいきませんでした。

