はじめに
AIの学習で時間がかかるものはGPUを使いたいが、自分のPCにはそんなハイスペックなものは持っていない><
そこで、Google Colaboratoryを使うと、GPUを使うことができます!
機械学習の中でも最近のはやりのGANを使ってみたいと思います。
また、その中でもきれいな画像を生成できる、StyleGanを使ってみます。
1. Google ColaboratoryのGPU設定
Google Colaboratoryを開いて、GPUを使えるように設定します。
**[編集]→[ノートブックの設定]**で設定できます。
ハードウェアアクセラレータを**[GPU]**に設定してください。
これで、GPUを使用することができます。
2. StyleGANのインストール
Google Colaboratoryのコードセルに下記を入力して実行すると、StyleGANをインストールできます。
git clone https://github.com/NVlabs/stylegan.git
3. Generatorのダウンロード
学習済のGeneratorをダウンロードします。
URLを変更して、画像の種類を変えることができます。下記では、猫画像を使っています。必要に応じてURLを変更してください。
import os
import pickle
import numpy as np
import PIL.Image
import dnnlib
import dnnlib.tflib as tflib
import config

# Initialize TensorFlow.
tflib.init_tf()

# Load pre-trained network.
# url = 'https://drive.google.com/uc?id=1MEGjdvVpUsu1jB4zrXZN7Y4kBBOzizDQ' # karras2019stylegan-ffhq-1024x1024.pkl 人物
# url = 'https://drive.google.com/uc?id=1MOSKeGF0FJcivpBI7s63V9YHloUTORiF' # stylegan-bedrooms-256x256.pkl bedroom
# url = 'https://drive.google.com/uc?id=1MJ6iCfNtMIRicihwRorsM3b7mmtmK9c3' # karras2019stylegan-cars-512x384.pkl 車
url = 'https://drive.google.com/uc?id=1MQywl0FNt6lHu8E_EUqnRbviagS7fbiJ' # karras2019stylegan-cats-256x256.pkl 猫
with dnnlib.util.open_url(url, cache_dir=config.cache_dir) as f:
    _G, _D, Gs = pickle.load(f)
    # _G = Instantaneous snapshot of the generator. Mainly useful for resuming a previous training run.
    # _D = Instantaneous snapshot of the discriminator. Mainly useful for resuming a previous training run.
    # Gs = Long-term average of the generator. Yields higher-quality results than the instantaneous snapshot.
4. 画像の作成
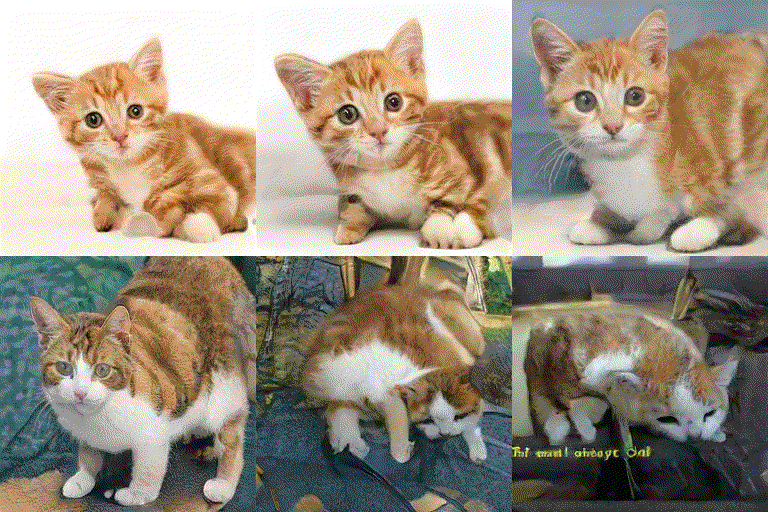
2つのベクトルと、その間を線形補完したベクトルを使用して、画像を作成します。
下記では、latents0とlatents1ベクトルを使用して、画像を20枚作成しています。
# Pick latent vector.
rnd = np.random.RandomState(40)
latents0 = rnd.randn(1, Gs.input_shape[1])
latents1 = rnd.randn(1, Gs.input_shape[1])

num_split = 19  # 2つのベクトルを19分割
for i in range(20):
    latents = latents1 + (latents0-latents1) * i / num_split

    # Generate image.
    fmt = dict(func=tflib.convert_images_to_uint8, nchw_to_nhwc=True)
    images = Gs.run(latents, None, truncation_psi=0.7, randomize_noise=True, output_transform=fmt)

    # Save image.
    os.makedirs(config.result_dir, exist_ok=True)
    png_filename = os.path.join(config.result_dir, 'photo'+'{0:04d}'.format(i)+'.png')
    PIL.Image.fromarray(images[0], 'RGB').save(png_filename)
5. Gifの作成
resultsフォルダにある画像を使って、gif動画を作成します。
import glob

files = sorted(glob.glob('results/*.png'))
images = list(map(lambda file: Image.open(file), files))
images[0].save('stylegan.gif', save_all=True,
               append_images=images[1:],
               duration=150, loop=0)
6. ダウンロード
作成したgifをダウンロードします。
from google.colab import files
files.download("stylegan.gif")
子猫の成長していく過程のように見えて面白いですね♪
最後のほうは、少し変になってしまってますが、画像を選べば自然に使えそうです!
おわりに
学習済のデータを使って、猫画像を生成してみました。
自然に見える画像もあれば、少し違和感のある画像もありましたが、これだけ綺麗に作成できるのは画期的ですね!
NVIDIAあたりが研究してるのでしょうが、VR技術などと合わせて使うと、おもしろそうだなと思いました。
