こんにちは。プログラミングスクールHappiness Chainでメンターをしているryoです。
今回はVercel利用でのNext.jsのAPIを使用する際に、タイムアウト上限60秒を超えてエラーとなる問題を解消する方法を紹介します。こちらの記事はNext.js13対応の記事になります。
参考記事は以下になります。
https://www.defer.run/blog/nextjs-timeout-error
実装イメージ
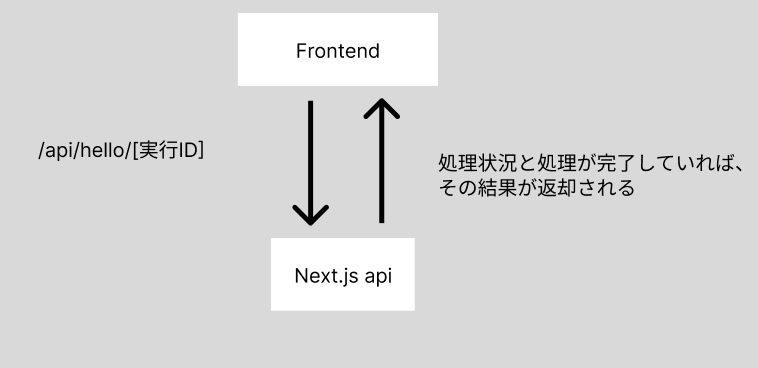
実装イメージは以下になります。
まず、1つ目のエンドポイントで重い処理を実行開始します。
重い処理は非同期で処理され、実行IDが返却されます。

その後、返却されたIDを含めて2つ目のエンドポイントを叩き、
その処理の処理状況と、もし処理が完了していれば、処理結果が返却されます。
実装環境
node 19.8.1
next 13.5.3
deferのsetup
deferというパッケージを使います。
npm i @defer/client
プロジェクト直下にdeferというディレクトを作成し、
longProcessという重い処理の関数を作成します。
今回は6秒後に文字列を返すようにしています。
define a background function
import { defer } from "@defer/client";

async const longProcess = () => {
  return new Promise((resolve) => {
    setTimeout(() => {
      const now = new Date();
      resolve(
        `Hello World ${now.getHours()}:${now.getMinutes()}:${now.getMinutes()}`
      );
    }, 6000);
  });
}

// the function must be wrapped with `defer()` and exported as default
export default defer(longProcess);
また、next.config.jsを編集する必要があります。
/** @type {import('next').NextConfig} */
const nextConfig = {
  experimental: {
    serverMinification: false,
  },
};

module.exports = nextConfig;
Next.js APIを作成
next.js13のappディレクトリ構成にて作成します。
エンドポイントとしては、
/api/hello
/api/hello/[executionId]
とします。
そのため、
/app/api/hello/route.ts
/app/api/hello/[executionId]/route.ts
を作成します。
/api/helloを叩くと重い処理が実行され、レスポンスとして実行ID(executionId)が返却されます。
そして、/app/api/hello/[executionId]/route.tsを叩くと、処理が実行中の場合は、stateにstartが入ったobjectが返却され、処理が完了している場合は、stateにsucceedが入り、resultに処理結果が格納されます。
import type { NextApiRequest, NextApiResponse } from "next";

import longProcess from "../../../defer/longProcess";

export const GET = async (
  _req: NextApiRequest,
  _res: NextApiResponse
) => {
  const data = await longProcess();

  return new Response(JSON.stringify(data));
};
import { getExecution } from "@defer/client";
import type { NextApiRequest } from "next";

type ParamsType = {
  params: { executionId: string };
};

export const GET = async (_req: NextApiRequest, { params }: ParamsType) => {
  const { executionId } = params
  const ret = await getExecution(executionId as string);
  return new Response(JSON.stringify(ret));
};
呼び出し部分を作成
"use client";

import { useState } from "react";

export default function Home() {
  const [executionId, setExecutionId] = useState("");
  const [status, setStatus] = useState("");
  const [result, setResult] = useState("");

  const handleSubmitStart = async () => {
    setResult("");
    setStatus("");
    const res = await fetch("/api/hello", { method: "GET" });
    const data = await res.json();
    setExecutionId(data.id);
  };

  const handleSubmitInquiry = async () => {
    const res = await fetch(`/api/hello/${executionId}`, {
      method: "GET",
    });
    const data = await res.json();
    if (data == null) return;
    setStatus(data.state);
    if (data.state === "succeed") {
      setResult(data.result);
    }
  };

  return (
    <div>
      <h1>ExecutionId: {executionId}</h1>
      <h1>Status: {status}</h1>
      <h1>Result: {result}</h1>
      <button type="button" onClick={handleSubmitStart}>
        Start
      </button>
      <button type="button" onClick={handleSubmitInquiry}>
        Inquiry
      </button>
    </div>
  );
}
上記実装にて、Startボタンを押した際に、処理が開始され、

Inquiryボタンを押すと、対象の処理の状態を取得でき、

処理が終わっている場合は、結果を取得することができます。

今回は処理結果の取得をボタンを押して取得していますが、
useEffect、setIntervalを使用して、定期的に取得するようにするのが良いかと思います。