学習内容を備忘録としてまとめます。
コメント機能を実装しましたので、作成方法を記載します。

投稿に対してコメントを行えるようになっています。
※動作画面に出てきているモーダル画面については下記をご参照ください。
【JavaScript】モーダル画面実装
実装方法
実装方法について記載していきます。
テーブル構成
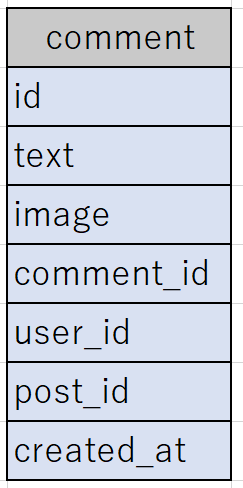
まずはコメントテーブルを作成していきます。
それぞれのカラムの役割としては下記のようになっています。
| カラム名 | 役割 |
|---|---|
| id | コメントID |
| text | コメント内容 |
| image | コメントに添付される画像 |
| comment_id | コメントに対するコメントのID |
| user_id | コメントをしたユーザーID |
| post_id | コメントをした投稿ID |
| created_id | コメントをした時刻 |
コメントボタン作成
コメントをするためのボタンを作成します。
<div class="comment_confirmation">
 <p class="modal_title" >この投稿にコメントしますか?</p>
 <p class="post_content"><?= nl2br($post['text']) ?></p>
 <form method="post" action="../comment/comment_add_done.php" enctype="multipart/form-data">
 <textarea class="textarea form-control" placeholder="コメントを入力ください" name="text"></textarea>
 <div class="comment_img">
  <input type="file" name="image_name" class="comment_image" accept="image/*" multiple>
 </div>
   <input type="hidden" name="id" value="<?= $post['id'] ?>">
   <div class="post_btn">
   <button class="btn btn-outline-danger" type="submit" name="comment" value="comment">コメント</button>
   <button class="btn btn-outline-primary modal_close" type="button">キャンセル</button>
   </div>
 </form>
</div>
コメント内容の記載と画像を添付できるようになっており、
comment_add.phpに遷移しコメントテーブルにINSERTをかけるような処理になっています。
※上記のコードは説明上不要な部分を省略しているので、トップの動作画面とは違いがあります。
<input type="hidden" name="id" value="<?= $post['id'] ?>">
こちらで投稿IDを取得してどの投稿に対してのコメントなのかを判断しています。
先ほど説明したcomment_add.phpについてみていきます。
コメント処理
<?php
try
{
$date = new DateTime();
$date->setTimeZone(new DateTimeZone('Asia/Tokyo'));
$comment_text=$_POST['text'];
$comment_image_name=$_FILES['image_name'];
if(!empty($_POST['comment_id']))
{
$comment_id=$_POST['comment_id'];
}
$user_id=$_SESSION['user_id'];
$post_id=$_POST['id'];

if($comment_text=='')
{
    set_flash('danger','コメントが空です');
    reload();
}

if($comment_image_name['size']>0)
{
    if($comment_image_name['size']>1000000)
    {
        set_flash('danger','画像が大きすぎます');
        reload();
    }
    else
    {
        move_uploaded_file($comment_image_name['tmp_name'],'./image/'.$comment_image_name['name']);

    }
}

$comment_text=htmlspecialchars($comment_text,ENT_QUOTES,'UTF-8');
$user_id=htmlspecialchars($user_id,ENT_QUOTES,'UTF-8');
$dsn = 'mysql:dbname=db;host=localhost;charset=utf8';
$user = 'root';
$password = '';
$dbh = new PDO($dsn,$user,$password);
$dbh -> setAttribute(PDO::ATTR_ERRMODE, PDO::ERRMODE_EXCEPTION);
$sql = 'INSERT INTO comment(text,image,user_id,created_at,post_id,comment_id) VALUES (?,?,?,?,?,?)';
$stmt = $dbh -> prepare($sql);
$data[] = $comment_text;
$data[] = $comment_image_name['name'];
$data[] = $user_id;
$data[] = $date->format('Y-m-d H:i:s');
$data[] = $post_id;
if(!empty($comment_id))
{
$data[] = $comment_id;
}
else
{
$data[] = '';
}
$stmt -> execute($data);
$dbh = null;

set_flash('sucsess','コメントを追加しました');
header('Location:../post/post_disp.php?post_id='.$post_id.'');

}
catch (Exception $e)
{
print'ただいま障害により大変ご迷惑をお掛けしております。';
exit();
}

?>
コメント内容と添付されている画像を確認して、コメントテーブルにINSERTしています。
if(!empty($_POST['comment_id']))
{
$comment_id=$_POST['comment_id'];
}
こちらの行はcomment_idがPOSTされたときに、$comment_idに値を渡しています。
後ほど説明しますが、コメントにコメントされた場合に$comment_idに値を渡すようになっております。
$comments = get_comments($post['id']);
foreach($comments as $comment):
if(empty($comment['comment_id'])):
$comment_user = get_user($comment['user_id']);
<div class="comment">
  <div class="user_info">
    <img src="/user/image/<?= $comment_user['image'] ?>">
    <?php print''.$comment_user['name'].''; ?>
  </div>
<span class="comment_text"><?= $comment['text'] ?></span>
<?php
if(!empty($comment['image'])){
print'<p class="comment_image"><img src="../comment/image/'.$comment['image'].'"></p>';
}
print'<span class="comment_created_at">'.convert_to_fuzzy_time($comment['created_at']).'</span>';
endif;
?>
あとはお好みの箇所へコメント情報をブラウザに表示します。
if(empty($comment['comment_id'])):
comment_idが空であるかどうかでコメントのコメントなのかを判断して、
trueの場合は表示するようになっています。
$comments = get_comments($post['id']);
$comment_user = get_user($comment['user_id']);
get_comments関数で引数の投稿IDを元にデータからコメント情報を取得し、
get_userでコメントIDからコメントしたユーザー情報を取得しています。
それぞれの関数については下記になります。
function get_comments($post_id){
  try {
    $dsn='mysql:dbname=db;host=localhost;charset=utf8';
    $user='root';
    $password='';
    $dbh=new PDO($dsn,$user,$password);
    $sql = "SELECT *
            FROM comment
            WHERE post_id = :id";
    $stmt = $dbh->prepare($sql);
    $stmt->execute(array(':id' => $post_id));
    return $stmt->fetchAll();
  } catch (\Exception $e) {
    error_log('エラー発生:' . $e->getMessage());
    set_flash('error',ERR_MSG1);
  }
}

function get_user($user_id){
  try {
    $dsn='mysql:dbname=db;host=localhost;charset=utf8';
    $user='root';
    $password='';
    $dbh=new PDO($dsn,$user,$password);
    $sql = "SELECT id,name,password,profile,image
            FROM user
            WHERE id = :id AND delete_flg = 0 ";
    $stmt = $dbh->prepare($sql);
    $stmt->execute(array(':id' => $user_id));
    return $stmt->fetch();
  } catch (\Exception $e) {
    error_log('エラー発生:' . $e->getMessage());
    set_flash('error',ERR_MSG1);
  }
}
コメントに返信する機能
<div class="reply_comment_confirmation">このコメントに返信しますか?</p>
  <p class="post_content"><?= nl2br($comment['text']) ?></p>
  <form method="post" action="../comment/comment_add_done.php" enctype="multipart/form-data">
    <p>コメント内容を入力ください。</p>
    <input type="text" name="text">
    <p>画像を選んでください。</p>
    <input type="file" name="image_name">
    <input type="hidden" name="id" value="<?= $post['id'] ?>">
    <input type="hidden" name="comment_id" value="<?= $comment['id'] ?>">
    <button class="btn btn-outline-danger" type="submit" name="comment" value="comment">コメント</button>
    <button class="btn btn-outline-primary modal_close" type="button">キャンセル</button>
  </form>
</div>
コメントに返信する機能を実装します。
上記はその機能のボタンになっているのですが、ほぼ通常にコメントするボタンと変わりません。
<input type="hidden" name="comment_id" value="<?= $comment['id'] ?>">
こちらで返信対象のコメントのIDを取得しています。
これでcomment_idを用いてコメントに返信したコメントか、またコメントのコメントなのかを判断することができます。
<?php
$reply_comments = get_reply_comments($post['id'],$comment['id']);
foreach($reply_comments as $reply_comment):
?>
<div class="reply">
<?php
  if($reply_comment['comment_id']==$comment['id']):
    $reply_comment_user = get_user($reply_comment['user_id']);
?>
    <div class="user_info">
      <img src="/user/image/<?= $reply_comment_user['image'] ?>">
      <?php print''.$reply_comment_user['name'].''; ?>
    </div>
  <span class="comment_text">'.$reply_comment['text'].'</span>';
  if(!empty($reply_comment['image'])){
  <p class="comment_image"><img src="../comment/image/'.$reply_comment['image'].'"></p>';
}
取得したコメントのコメント情報を元にブラウザに表示します。
こちらは対象になったコメントの中に記載しています。
$reply_comments = get_reply_comments($post['id'],$comment['id']);
get_reply_comments関数で投稿IDとコメントIDを元に、コメントに返信したコメント情報を取得しています。
下記のような処理が行われています。
function get_reply_comments($post_id,$comment_id){

  try {
    $dsn='mysql:dbname=db;host=localhost;charset=utf8';
    $user='root';
    $password='';
    $dbh=new PDO($dsn,$user,$password);
    $sql = "SELECT *
            FROM comment
            WHERE post_id = :id AND comment_id = :comment_id";
    $stmt = $dbh->prepare($sql);
    $stmt->execute(array(':id' => $post_id , ':comment_id' => $comment_id));
    return $stmt->fetchAll();

  } catch (\Exception $e) {
    error_log('エラー発生:' . $e->getMessage());
    set_flash('error',ERR_MSG1);
  }
}
投稿IDと対象のコメントIDを元にコメント情報を取得しています。
先ほどのブラウザに表示する画面に戻りまして、
$reply_comment_user = get_user($reply_comment['user_id']);
先ほどの$reply_commentで、コメントに返信したユーザー情報をget_user関数で取得しています。

上記のようにコメントに返信することができるようになります。
※説明で余分な部分は省いているため、上の動作画面とは違う画面になる可能性があります。