はじめに
Leafletとは、Web地図サービスで広く使われるオープンソースのJavaScriptライブラリです。
仕事でLeafletを使うことなったので、勉強してみました。
基礎部分は以下にまとめましたので、こちらも参考にしてください。
https://qiita.com/ryou83480820/items/06238ef347062f65435e
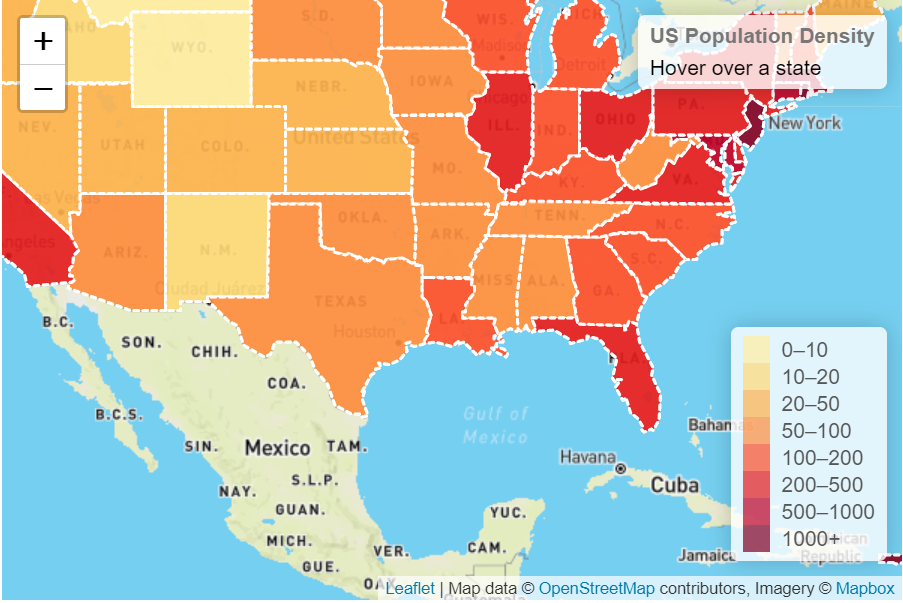
今回はヒートマップを作製します。基本的には公式のチュートリアルをやってみたという内容になります。
https://leafletjs.com/examples/geojson/
https://leafletjs.com/examples/choropleth/
外部ファイルを読み込む
外部ファイルはGeoJson形式で読み込みます。
詳しくはこちら
https://leafletjs.com/examples/geojson/
GeoJsonは以下のようなものです。
	 {
	     "type": "Feature",
	         "properties": {
		         "name": "Alabama",
			         "density": 94.65
				     },
		  "geometry": :{"type":"Polygon",
                  "coordinates":[[-87.359296,35.00118],[-85.606675,34.984749],[-85.431413,34.124869],[-85.184951,32.859696]...]}},
	  }
"coordinates"でポリゴンの隅のlat,lonを指定します。
"properties"の値はヒートマップの色分けをする際に使います。
Leafletでヒートマップを作る
Leafletの基本的な部分については既知であるとして話を進めます。
よくわからない人は以下を参照してください。
https://qiita.com/ryou83480820/items/06238ef347062f65435e
ヒートマップを作るコードは以下になります。
<!DOCTYPE html>
<html>
<head>
<title>Quick Start - Leaflet</title>
<meta charset="utf-8" />
<meta name="viewport" content="width=device-width, initial-scale=1.0">
<link rel="stylesheet" href="https://unpkg.com/leaflet@1.7.1/dist/leaflet.css" integrity="sha512-xodZBNTC5n17Xt2atTPuE1HxjVMSvLVW9ocqUKLsCC5CXdbqCmblAshOMAS6/keqq/sMZMZ19scR4PsZChSR7A==" crossorigin=""/>
<script src="https://unpkg.com/leaflet@1.7.1/dist/leaflet.js" integrity="sha512-XQoYMqMTK8LvdxXYG3nZ448hOEQiglfqkJs1NOQV44cWnUrBc8PkAOcXy20w0vlaXaVUearIOBhiXZ5V3ynxwA==" crossorigin=""></script>
<style>
/*右側の情報欄にかかわるCSS*/
.info {
padding: 6px 8px;
font: 14px/16px Arial, Helvetica, sans-serif;
background: white;
background: rgba(255,255,255,0.8);
box-shadow: 0 0 15px rgba(0,0,0,0.2);
border-radius: 5px;
}
.info h4 {
margin: 0 0 5px;
color: #777;
}
/*カラーバーに関わるCSS*/
.legend {
line-height: 18px;
color: #555;
}
.legend i {
width: 18px;
height: 18px;
float: left;
margin-right: 8px;
opacity: 0.7;
}
</style>
</head>
<body>
<div id="mapid" style="width: 600px; height: 400px;"></div>
<script src="us-states.js"></script>
<script>
//地図の中心と、zoomレベルを設定
var mymap = L.map('mapid').setView([37.8, -102], 4);
//タイルレイヤーの追加(この例ではMapbox Streetsタイルレイヤーを用いる)
L.tileLayer('https://api.mapbox.com/styles/v1/{id}/tiles/{z}/{x}/{y}?access_token=pk.eyJ1IjoibWFwYm94IiwiYSI6ImNpejY4NXVycTA2emYycXBndHRqcmZ3N3gifQ.rJcFIG214AriISLbB6B5aw', {
maxZoom: 18,
attribution: 'Map data © <a href="https://www.openstreetmap.org/copyright">OpenStreetMap</a> contributors, ' +
'Imagery © <a href="https://www.mapbox.com/">Mapbox</a>',
id: 'mapbox/streets-v11',
tileSize: 512,
zoomOffset: -1//APIはデフォルトで512x512のタイルを返すので(256x256ではなく)、ズームを-1でオフセット。
}).addTo(mymap);
//色を返す関数
function getColor(d) {
return d > 1000 ? '#800026' :
d > 500 ? '#BD0026' :
d > 200 ? '#E31A1C' :
d > 100 ? '#FC4E2A' :
d > 50 ? '#FD8D3C' :
d > 20 ? '#FEB24C' :
d > 10 ? '#FED976' :
'#FFEDA0';
}
//styleを指定する関数
function style(feature) {
return {
fillColor: getColor(feature.properties.density),
weight: 2,
opacity: 1,
//境界線の色
color: 'white',
//境界線の間隔
dashArray: '3',
fillOpacity: 0.7
};
}
L.geoJson(statesData, {style: style}).addTo(mymap);
//右上にマウスオーバーされているdensityと州名を表示
var info = L.control();
info.onAdd = function (mymap) {
this._div = L.DomUtil.create('div', 'info'); // create a div with a class "info"
this.update();
return this._div;
};
// method that we will use to update the control based on feature properties passed
info.update = function (props) {
this._div.innerHTML = '<h4>US Population Density</h4>' + (props ?
'<b>' + props.name + '</b><br />' + props.density + ' people / mi<sup>2</sup>'
: 'Hover over a state');
};
info.addTo(mymap);
function highlightFeature(e) {
var layer = e.target;
info.update(layer.feature.properties);
}
function resetHighlight(e) {
var layer = e.target;
info.update();
}
function onEachFeature(feature, layer) {
layer.on({
mouseover: highlightFeature,
mouseout: resetHighlight,
});
}
geojson = L.geoJson(statesData, {
style: style,
onEachFeature: onEachFeature
}).addTo(mymap);
//カラーバーを作成
var legend = L.control({position: 'bottomright'});
legend.onAdd = function (mymap) {
var div = L.DomUtil.create('div', 'info legend'),
grades = [0, 10, 20, 50, 100, 200, 500, 1000],
labels = [];
// loop through our density intervals and generate a label with a colored square for each interval
//描写時に使用したgetColor関数の色を参照
//gradesに次の値があるか
for (var i = 0; i < grades.length; i++) {
div.innerHTML +=
'<i style="background:' + getColor(grades[i] + 1) + '"></i> ' +
grades[i] + (grades[i + 1] ? '–' + grades[i + 1] + '<br>' : '+');
}
return div;
};
legend.addTo(mymap);
</script>
</body>
</html>
完成形はこのような感じです。