新しいプロジェクトでSpringBootを使います。
業務システムで、SPAのようなものは要求されないので、素直にThymeleafを使うことにします。
が、サイドバーとか、ヘッダーとか、各ページに記載するのも嫌なので、何か方法がないかを調べてみました。
環境
Spring Boot 3.3.0
Thymeleaf 3.1.2
Thymeleaf layout dialect 3.2.0
やりたいこと
こんな感じです。
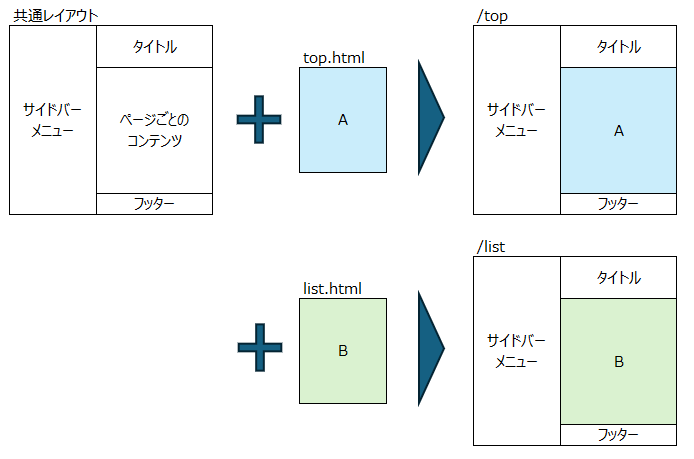
共通のレイアウトを定義しておいて、コンテンツ部分のみ記述することで最終的に共通レイアウトと、個別のコンテンツを組み合わせて、ページを表示する。
調べた限り「Thymeleaf layout dialect」を使えばできそうでした。
実際にやってみた
大前提として、SpringBoot + Spring Web + Thymeleaf のプロジェクトが作成されていることとします。
設定
まずは、Gradleの設定。以下を追加します。
implementation 'nz.net.ultraq.thymeleaf:thymeleaf-layout-dialect:3.2.0'
Controllerを書く
page1、page2と二つの画面を表示できるようにコントローラーを作ります。
@Controller
public class ContentController {

    @GetMapping("/page1")
    public String page1() {
        return "page1";
    }

    @GetMapping("/page2")
    public String page2() {
        return "page2";
    }

}
画面を作る
ということで、ここからは、Thymeleafで画面を作っていきます。
構成としては以下のようなイメージ
templates
│  page1.html
│  page2.html
│
└─common
    layout.html
    footer.html
    header.html
    sidebar.html
共通部分
th:insert、th:fragmentは、Thymeleafの標準的な書き方なので、ここでは説明を割愛します。
- header.html
<!DOCTYPE html>
<html xmlns:th="http://www.thymeleaf.org">
<head>
    <meta charset="UTF-8">
    <title>Header</title>
</head>
<body>
    <div th:fragment="header">
        <h1>ヘッダー</h1>
    </div>
</body>
</html>
- sidebar.html
<!DOCTYPE html>
<html xmlns:th="http://www.thymeleaf.org">
<head>
    <meta charset="UTF-8">
    <title>Sidebar</title>
</head>
<body>
    <div th:fragment="sidebar">
        <nav>
            <ul>
                <li><a href="#">リンク1</a></li>
                <li><a href="#">リンク2</a></li>
                <li><a href="#">リンク3</a></li>
            </ul>
        </nav>
    </div>
</body>
</html>
- footer.html
<!DOCTYPE html>
<html xmlns:th="http://www.thymeleaf.org">
<head>
    <meta charset="UTF-8">
    <title>Footer</title>
</head>
<body>
    <div th:fragment="footer">
        <p>フッター</p>
    </div>
</body>
</html>
- layout.html
<!DOCTYPE html>
<html xmlns:th="http://www.thymeleaf.org">
<head>
    <meta charset="UTF-8">
    <title>Layout</title>
    <link rel="stylesheet" type="text/css" href="/css/styles.css"/>
</head>
<body>
    <header th:insert="~{common/header :: header}"></header>
    <div class="container">
        <aside th:insert="~{common/sidebar :: sidebar}"></aside>
		<main layout:fragment="content"></main>
    </div>
    <footer th:insert="~{common/footer :: footer}"></footer>
</body>
</html>
コンテンツ側のページ
Page1と、Page2を作ります。
- page1
<!DOCTYPE html>
<html xmlns:th="http://www.thymeleaf.org" xmlns:layout="http://www.ultraq.net.nz/thymeleaf/layout"
	layout:decorate="~{common/layout}">

<head>
	<meta charset="UTF-8">
	<title>Content</title>
</head>

<body>
	<div layout:fragment="content">
		<h2>コンテンツエリア</h2>
		<p>ここにコンテンツ1が表示されます。</p>
	</div>
</body>

</html>
- page2
<!DOCTYPE html>
<html xmlns:th="http://www.thymeleaf.org" xmlns:layout="http://www.ultraq.net.nz/thymeleaf/layout"
	layout:decorate="~{common/layout}">

<head>
	<meta charset="UTF-8">
	<title>Content</title>
</head>

<body>
	<div layout:fragment="content">
		<h2>コンテンツエリア</h2>
		<p>ここにコンテンツ2が表示されます。</p>
	</div>
</body>

</html>
CSSを用意する
CSSを作って、static/css配下に、styles.cssという名前で作成しておきます。
@charset "UTF-8";

body {
	font-family: Arial, sans-serif;
}

header,
footer {
	background-color: #f8f8f8;
	padding: 10px;
	text-align: center;
}

.container {
	display: flex;
}

aside {
	width: 200px;
	background-color: #f0f0f0;
	padding: 10px;
}

main {
	flex-grow: 1;
	padding: 10px;
}
確認
さてここまでできたら動作を確認します。
Spring Bootアプリを起動して、以下URLにアクセスします。
http://localhost:8080/page1
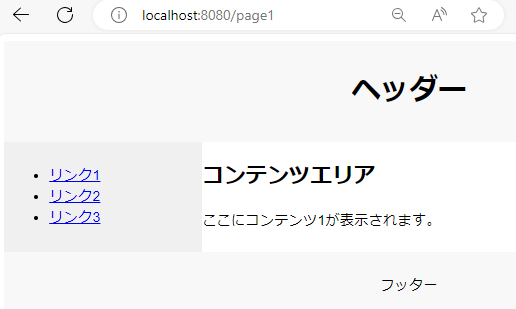
無事できました。
続いて、以下URLにアクセス
http://localhost:8080/page2
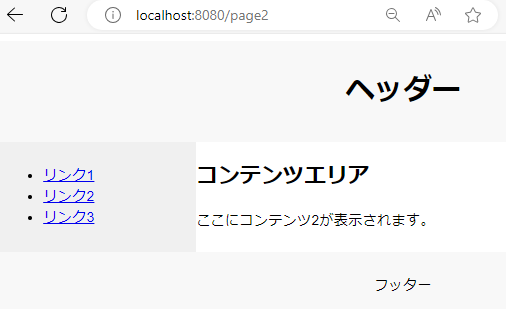
はい。やりたいことはうまくいきましたね。
最後に
意外と簡単にできました。
これで共通部分を気にせず、担当者が実装すべきところに専念することができそうです。