Zynq で u-boot をデバッグしてみました。なんかの参考になれば。
Zynq の特殊事情
Zynq で u-boot のような Eclipse で管理していないプログラムをデバッグするときは素の gdb と xmd を使います。
通常のデバッグには SystemDebug (TCF) を使おう
Eclipse で使うなら System Debugger と XSDB(XMD の代わり) を使いましょう。XSDB は tcl が使えるので便利です。TCF を使うと Chipscope (とはもう言わないみたいだが) も統合的に使えます。ぱっとみたところ gdb へのプロキシーがない。Eclipse からしか使えないのが難点。
Zynq の立ち上げ
普通に FSBL -> u-boot -> Linux まで立ち上がる SD で立ち上げてみます。FSBL で DDR の初期化などが行われるので便利です。u-boot のプロンプトでリターンをして Linux が立ち上がる前に止めます。
U-Boot 2014.01-dirty (Jul 04 2014 - 19:54:37)

I2C:   ready
Memory: ECC disabled
DRAM:  1 GiB
MMC:   zynq_sdhci: 0
SF: Detected N25Q128 with page size 256 Bytes, erase size 64 KiB, total 16 MiB
*** Warning - bad CRC, using default environment

In:    serial
Out:   serial
Err:   serial
Net:   Gem.e000b000
Hit any key to stop autoboot:  0
Linux まで立ち上がると MMU が使われ始めてしまうのでデバッグがうまくいきません。Linux まで立ち上がってしまった場合はおとなしく Poweroff して最初からやり直してください。
xmd で Zynq を捕まえる
xmd のプロンプトで connect hw arm として Zynq に接続します。これで gdb server として xmd が動作します。
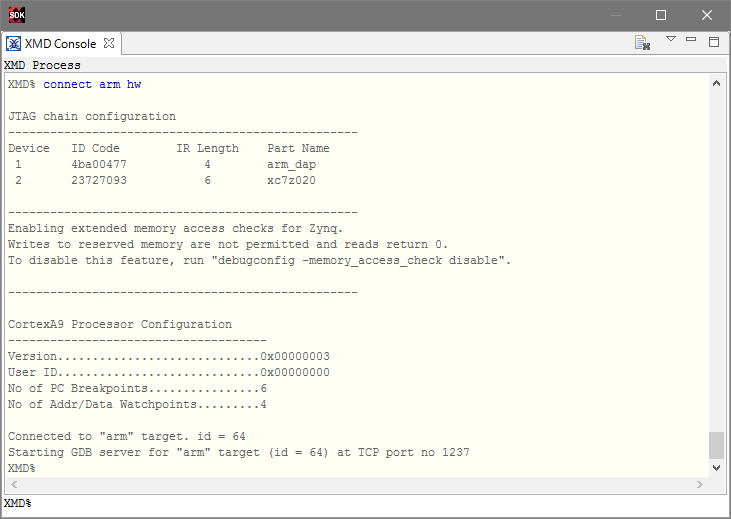
この例では TCP ポート 1237 として起動しました(普通は 1234です。何回か繰り返していると番号が一つずつ増えていきます。ちゃんと disconnect すれば増えない。)。xmd で捕まえているので Zynq の u-boot のプロンプトは効きません。逆にいうと u-boot が動いているなら xmd で捕まえていません。
蛇足ですが、この方法で cpu1 もデバッグできます。その場合は connect arm hw -debugdevice cpunr 2 とします。
DDR が初期化されていない
DDR が初期化されていないと gdb でうまく動作しません。gdb で load 後に stepi ですぐに死んでしまう場合はその可能性があります。ps7_init.tcl を xmd から実行すれば DDR の初期化ができます。またこのように暴走した時は xmd から stop コマンドを実行すると CPU が強制的に止まります。
実際のデバッグ
u-boot をコンパイル
デバッグに先立ち u-boot をコンパイルします。
make CROSS_COMPILE=arm-none-linux-gnueabi- zynq_ted_emc_config
make
Xilinx のコンパイラを使っている人は CROSS_COMPILE=arm-xilinx-linux-gnueabi-。
gdb でダウンロード
gdb に u-boot の引数で起動し、target と接続後、load します。
> arm-none-linux-gnueabi-gdb u-boot
GNU gdb (Sourcery CodeBench Lite 2012.09-64) 7.4.50.20120716-cvs
Copyright (C) 2012 Free Software Foundation, Inc.
License GPLv3+: GNU GPL version 3 or later <http://gnu.org/licenses/gpl.html>
This is free software: you are free to change and redistribute it.
There is NO WARRANTY, to the extent permitted by law.  Type "show copying"
and "show warranty" for details.
This GDB was configured as "--host=i686-pc-linux-gnu --target=arm-none-linux-gnueabi".
For bug reporting instructions, please see:
<https://support.codesourcery.com/GNUToolchain/>...
Reading symbols from /home/ryos/vdma_sd_boot/gemini_xosl_build_20140709/u-boot-xlnx/u-boot...done.
(gdb) target remote <IPアドレス>:1237
Remote debugging using <IPアドレス>:1237
0x3ff7221c in ?? ()
(gdb) load
Loading section .text, size 0x39d6c lma 0x4000000
Loading section .rodata, size 0xdf2f lma 0x4039d6c
Loading section .hash, size 0x2c lma 0x4047c9c
Loading section .data, size 0x212c lma 0x4047cc8
Loading section .got.plt, size 0xc lma 0x4049df4
Loading section .u_boot_list, size 0x87c lma 0x4049e00
Loading section .rel.dyn, size 0x8160 lma 0x404a67c
Start address 0x4000000, load size 337883
Transfer rate: 4 KB/sec, 95 bytes/write.
(gdb)
の部分は xmd が立ち上がっている PC の IP アドレスです。ローカルなら localhost ですがそもそも u-boot をローカル(windows で)でコンパイルできなかったので Linux サーバから gdb をつかっています。
gdb で cont とすれば u-boot が実行されます。事前に breakpoint を掛けたりして置けばデバッグできます。止めたいときは xmd から stop。あとハードウェアのブレイクポイントを掛けたいときは xmd から bps などを使えばいいはずです。ハードウェアのブレイクポイントはソフトが暴走するときには有効です。また(個人的に実績はないですが、、、)watch point も xmd から使えるはずです。gdb などでは調査が難しい特定のメモリ領域が破壊されたりするときに効力を発揮します。
u-boot のアプリ(外部コマンド)
本題はこちらだったのですが、前置きが長くなった。u-boot は make するとついでに examples/standalone に u-boot から起動可能な簡単な standalone なアプリもコンパイルしてくれます。それを gdb でロードして実行してみましょう。
hello_world も gdb で load
u-boot をダウンロードした後に hello_world もダウンロードすることで gdb からメモリへ load することができます。load すると gdb は pc を書き換えてしまうことに注意が必要です。load 後に PC を戻してあげましょう。
Program received signal SIGINT, Interrupt.
0x3ff7152c in ?? ()
(gdb) p $pc
$1 = (void (*)()) 0x3ff7152c
(gdb) load examples/standalone/hello_world
Loading section .text, size 0x1c8 lma 0xc100000
Loading section .rodata, size 0x8a lma 0xc1001c8
Start address 0xc100000, load size 594
Transfer rate: 3 KB/sec, 84 bytes/write.
(gdb) p $pc
$2 = (void (*)()) 0xc100000
(gdb) set $pc= 0x3ff7152c
(gdb) p $pc
$3 = (void (*)()) 0x3ff7152c
(gdb) cont
Continuing.
ことあと、u-boot に戻って 0xc100000 から実行します。
zynq-uboot> go 0xc100000
## Starting application at 0x0C100000 ...
Example expects ABI version 6
Actual U-Boot ABI version 6
Hello World
argc = 1
argv[0] = "0xc100000"
argv[1] = "<NULL>"
Hit any key to exit ...

## Application terminated, rc = 0x0
** ダウンロードされるアドレスは 0xc100000
ダウンロードされるアドレスは 0xc100000 です。これは arch/arm/config.mk に記述されていますが、各ボードで本来は設定されるべきアドレスです。気持ちとしては DDR は 0 番地から始まって 256M 位ふつうあるよね。ということでしょうが、128M しかないボードがあったとしたらうまく動かないので注意したいところです。
u-boot のアプリを再コンパイル
ダウンロードされるアドレスの設定を変えたいのであれば CONFIG_STANDALONE_LOAD_ADDR を変えればよく、make 時にも指定可能です。試しに変えてみます。
> rm examples/standalone/hello_world
> make CROSS_COMPILE=arm-none-linux-gnueabi CONFIG_STANDALONE_LOAD_ADDR=0x040a0000
> arm-none-linux-gnueabi-objdump -h examples/standalone/hello_world

examples/standalone/hello_world:     file format elf32-littlearm

Sections:
Idx Name          Size      VMA       LMA       File off  Algn
  0 .text         000001c8  040a0000  040a0000  00008000  2**2
                  CONTENTS, ALLOC, LOAD, READONLY, CODE
  1 .rodata       0000008a  040a01c8  040a01c8  000081c8  2**0
                  CONTENTS, ALLOC, LOAD, READONLY, DATA
<攻略>
でもって hello_world を load します
> fg
arm-none-linux-gnueabi-gdb u-boot-orig
^C
Program received signal SIGINT, Interrupt.
0x3ff71530 in ?? ()
(gdb) load examples/standalone/hello_world
Loading section .text, size 0x1c8 lma 0x40a0000
Loading section .rodata, size 0x8a lma 0x40a01c8
Start address 0x40a0000, load size 594
Transfer rate: 3 KB/sec, 84 bytes/write.
(gdb) set $pc=0x3ff71530
(gdb) cont
Continuing.
u-boot で実行
zynq-uboot> go 0x40a0000
## Starting application at 0x040A0000 ...
Example expects ABI version 6
Actual U-Boot ABI version 6
Hello World
argc = 1
argv[0] = "0x40a0000"
argv[1] = "<NULL>"
Hit any key to exit ...

## Application terminated, rc = 0x0
見事動きました。
上記 0x040a0000 は u-boot で使っているかわからないので、上記は偶然動いているかもしれません。ですので u-boot で使っていない場所を CONFIG_STANDALONE_LOAD_ADDR に指定すべきです
CONFIG_STANDALONE_LOAD_ADDR
この CONFIG は examples/standalone/Makefile で使われます。
examples/standalone/Makefile に次の記述があります。いまのところここにしか使われていないようです。つまり load すべきアドレスを決定するだけです。u-boot 本体にはいまのところ影響なさそうですが(実証済み)、本来は u-boot で使用されない領域として u-boot 本体でも調整されるべきです。また、将来的に調整される可能性があります。ですので各ボードで適切な値を設定しなくてはならないでしょう。
$(obj)%:    $(obj)%.o $(LIB)
        $(LD) $(LDFLAGS) -g -Ttext $(CONFIG_STANDALONE_LOAD_ADDR) \
            -o $@ -e $(SYM_PREFIX)$(notdir $(<:.o=)) $< $(LIB) \
            -L$(gcclibdir) -lgcc
fatload して bootelf
作成した hello_world は fatload で u-boot からロードして実行することが出来ます(本来の使い方)。elf を使います。バイナリでは何かダイナミックな設定があるようで、単純には動きませんでした。まずは Zynq 側の Linux を立ち上げて SD カードに hello_world.elf を書き込みます(Linux を立ち上げなくても、SD カードにかけさえすればよい) そして、再度、u-boot を gdb から立ち上げます。fatls で hello_world.elf を確認した後、fatload で適当な場所にロードします。load された elf を更に bootelf で実行します。
fatls で確認
zynq-uboot> fatls mmc 0:1
    40687   hello_world
fatload で使ってなさそうなアドレスへロード
zynq-uboot> fatload mmc 0:1 0x3000000 hello_world
reading hello_world
40687 bytes read in 21 ms (1.8 MiB/s)
bootelf で実行
zynq-uboot> bootelf 0x3000000
## Starting application at 0x0c100000 ...
Example expects ABI version 6
Actual U-Boot ABI version 6
Hello World
argc = 1
argv[0] = "0x3000000"
argv[1] = "<NULL>"
Hit any key to exit ...

## Application terminated, rc = 0x0