概要
社内勉強会の資料。
ReactのContextの考え方と、使い方について。
ちなみにここでは、有用性を伝えるというよりは実際の使い方を感じとってもらうというのがメインの目的です。
通常の使い方に加えて、Hooksでの使い方も合わせて記載します。
React.createContextとReact.useContextって何が違うの?って思ったら、対象読者です。
React Contextって?
Reactでは、基本的にコンポーネントがコンポーネント外から動的に値を受け取る方法はpropsのみです。
Reduxを使用する場合でも、react-reduxなどによってStoreの値をprops経由でコンポーネントに渡しますね。
Contextは、propsとは別の方法でコンポーネントに動的に値を渡す、React純正のAPIです。
Contextの存在意義
Contextは、propsのバケツリレー地獄を回避するために存在します。
とあるコンポーネントで作成/取得されたデータを深くネストされた子コンポーネントに渡そうとしたとき、react-reduxの場合はconnect関数によって(ReduxのStoreを経由することで)コンポーネントの階層に関係なく値を渡すことが出来ますが、propsだけを使用している場合はそうも行きません。
// https://ja.reactjs.org/docs/context.htmlより引用

<Page user={user} avatarSize={avatarSize} />
// ... Page コンポーネントは以下をレンダー ...
<PageLayout user={user} avatarSize={avatarSize} />
// ... PageLayout コンポーネントは以下をレンダー ...
<NavigationBar user={user} avatarSize={avatarSize} />
// ... NavigationBar コンポーネントは以下をレンダー ...
<Link href={user.permalink}>
  <Avatar user={user} size={avatarSize} />
</Link>
userとavatarSizeをバケツリレーしているが、実際に使うのは一番下のLinkコンポーネントだけ。
こういう構造の場合、経由するコンポーネント全部にuserとavatarSizeというpropsを定義しないといけないし、Linkのpropsを増やそうとしたら経由するコンポーネント全てのpropsにもそれを追加する必要が出てきてしまいます。
Contextを使用すれば、上記の形が雰囲気的には以下のようになります(雰囲気です)。
const LinkContext = React.createContext(context);
<Page />
// ... Page コンポーネントは以下をレンダー ...
<PageLayout />
// ... PageLayout コンポーネントは以下をレンダー ...
<NavigationBar />
// ... NavigationBar コンポーネントは以下をレンダー ...
<Link href={user.permalink}>
  <LinkContext.Consumer>
  { (context) => {
    <Avatar user={context.user} size={context.avatarSize} />
  }}
  </LinkContext.Consumer>
</Link>
一番上で作成された値を、バケツリレーしているpropsが消えました。
コンポーネントの階層に関係なくLinkコンポーネントに必要な値を渡せています。
実際の使い方
最低限必要なのは以下の3種類。
- React.createContext関数
- Provider
- Consumer
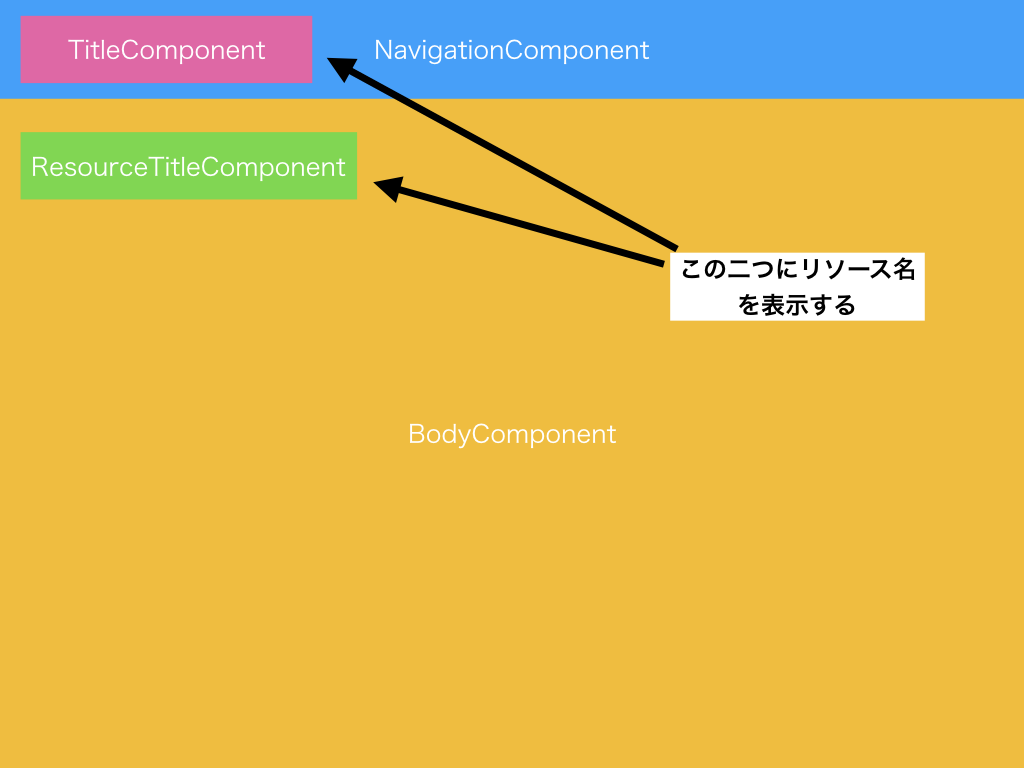
例えば、何かのWebアプリケーションでそのサービスのリソース"Hoge"を表示している場合に、ページ上部のナビゲーションコンポーネントと、その下の本体コンポーネントの二箇所にその名前を表示する必要があるとしましょう。
コンポーネントごとにサーバから取得しているとリクエストが増えるので、リソース情報の取得を、それらのコンポーネントを持つ一番上のルートのコンポーネントで行います。
普通に書くと
何もしないと、こういう感じでしょうか。雰囲気を感じ取ってください。
export const RootComponent = () => {
  const resource = getResource(); // 何らかの手段で頑張ってサーバから取ってくる。

  return (
    <>
      <NavigationComponent resourceName={resource.name} />
      <BodyComponent resourceName={resource.name} />
    </>
  );
};

// RootComponent に含まれる一個目のコンポーネント
export const NavigationComponent = (props) => (
  <header>
    <TitleComponent title={props.resourceName} />
    <NannkaBetsunoComponent ... />
  </header>
);

export const TitleComponent = (props) => (
  <div>{props.title}</div>
);

// RootComponent に含まれる二個目のコンポーネント
export const BodyComponent = (props) => (
  <main>
    <ResourceTitleComponent name={props.resourceName} />
    ...
  </main>
);

export const ResourceTitleComponent = (props) => (
  <article>{props.name}</article>
);
まあとにかくprops経由でバケツリレーしてます。
この場合、Contextを使うとpropsの記載個数を減らすことができます。
Context使うと
// まずはここでコンテキストを作成。
const ResourceContext = React.createContext(""); // 渡している空文字列はデフォルトの値。

export const RootComponent = () => {
  const resource = getResource(); // 何らかの手段で頑張ってサーバから取ってくる。

  return (
    // Providerコンポーネントで包むことによって、Provider配下のコンテキストを決定する
    <ResourceContext.Provider value={resource.name}>
      <NavigationComponent />
      <BodyComponent />
    </ResourceContext.Provider>
  );
};

// RootComponent に含まれる一個目のコンポーネント
export const NavigationComponent = (props) => (
  <header>
    // Provider配下のコンテキストでは、その値をConsumerコンポーネントから受け取ることができる。
    // Render Propsと同じように受け取る。function as a childとも呼ばれる。
    <ResourceContext.Consumer>
      { (resourceName) => (
        <TitleComponent title={resourceName} />
      )}
    </ResourceContext.Consumer>

    <NannkaBetsunoComponent ... />
  </header>
);

export const TitleComponent = (props) => (
  <div>{props.title}</div>
);

// RootComponent に含まれる二個目のコンポーネント
export const BodyComponent = (props) => (
  <main>
    // ここでも同じように
    <ResourceContext.Consumer>
      { (resourceName) => (
        <ResourceTitleComponent name={resourceName} />
      )}
    </ResourceContext.Consumer>

    ...
  </main>
);

export const ResourceTitleComponent = (props) => (
  <article>{props.name}</article>
);
以下それぞれの解説。
React.createContext
const ResourceContext = React.createContext("");
この関数によってコンテキストオブジェクトを作成します。
作成されるコンテキストオブジェクトは、TypeScript的な表現をするならこんな感じのもの。
{
  Provider: React.Component;
  Consumer: React.Component;
}
みたいな感じで、ProviderとConsumerというコンポーネントを所持しています。
Providerコンポーネント
  return (
    // Providerコンポーネントで包むことによって、Provider配下のコンテキストを決定する
    <ResourceContext.Provider value={resource.name}>
      <NavigationComponent />
      <BodyComponent />
    </ResourceContext.Provider>
  );
先ほど作成したコンテキストオブジェクトのプロパティに入ってます。
react-reduxを使ったことがある場合は、Providerという名前には馴染みがあると思います。
Provider - React Redux
Providerコンポーネントは、propsとしてvalueを受け取ります。
このvalueに入れるのが、実際に配下のコンポーネントに渡したい値。通常、バケツリレーしていた値。
Providerコンポーネントではvalueが変更されると配下のコンポーネントを再レンダーします。
その際の比較方法は参照の同一性のため、プリミティブ値以外を渡す場合は参照の変更の有無に気を使う必要があります。
公式Docの例ではstateを使用しています。
Consumerコンポーネント
    // Provider配下のコンテキストでは、その値をConsumerコンポーネントから受け取ることができる。
    // Render Propsと同じように受け取る。function as a childとも呼ばれる。
    <ResourceContext.Consumer>
      {(resourceName) => (
        <TitleComponent title={resourceName} />
      )}
    </ResourceContext.Consumer>
これも同様にコンテキストオブジェクトから引っ張ってきます。
Providerにvalueとして渡した値を受け取るためのコンポーネントです。
Render Propsになっているので、Consumerコンポーネントのprops.childに対して関数を渡すと、その引数に値が入ります。
ContextType
基本的な使い方はこれだけなんですが、まあまあ記述量増えるのがお分かりでしょうか。
これをもう少し使いやすくしてくれたのが、Component.contextTypeです。
これはコンポーネントのプロパティとしてcontextTypeを生やし、そこにコンテキストオブジェクトを突っ込むというものです。
そうすると、そのコンポーネント内ではコンテキストの値を this.context で取得することができます。
class BodyComponent {
  static contextType = ResourceContext;

  render() {
    return (
      <main>
        <ResourceTitleComponent name={this.context} />
        ...
      </main>
    );
  }
}

// あるいは、staticでなくこうでもOK
BodyComponent.contextType = ResourceContext;
あーいいじゃないですか。
もう純粋に、Consumerコンポーネントを書かなくて良くなっているので、完全に上位互換じゃないですか。
アディオス、Consumer。
Hooksでは
いやちょっと待って、FunctionComponentではどうするの?
はい、Hooksあります、React.useContextです。
// これはそのまま
const ResourceContext = React.createContext("");

export const RootComponent = () => {
  const resource = getResource(); // 何らかの手段で頑張ってサーバから取ってくる。

  return (
    // これもそのまま
    <ResourceContext.Provider value={resource.name}>
      <NavigationComponent />
      <BodyComponent />
    </ResourceContext.Provider>
  );
};

// RootComponent に含まれる一個目のコンポーネント
export const NavigationComponent = (props) => {
  // ココ!
  const resourceName = React.useContext(ResourceContext);

  return (
    <header>
      <TitleComponent title={resourceName} />
      <NannkaBetsunoComponent ... />
    </header>
  );
};

export const TitleComponent = (props) => (
  <div>{props.title}</div>
);

// RootComponent に含まれる二個目のコンポーネント
export const BodyComponent = (props) => {
  // ココ!
  const resourceName = React.useContext(ResourceContext);

  return (
    <main>
      <ResourceTitleComponent name={resourceName} />
      ...
    </main>
  );
};

export const ResourceTitleComponent = (props) => (
  <article>{props.name}</article>
);
あ〜いいですね、非常にHooksっぽい。
やっぱりアディオス、Consumer。
おしまい
ということで、基本的にはこれくらい覚えとけば問題ないんじゃないでしょうか。
あとは実戦で試してみよう。
迷ったら公式読もうね。
