2020/05/04 追記
portal は teleport にリネームされたようです。
記事内容も修正しました。
--
2020年Q1リリース予定のVue.js 3.0の新機能 Teleport を試してみたのでまとめます。
(参考)
以下でVue 3.0(vue-next)の環境構築、他の新機能についてもまとめています。
Teleportとは?
定義したコンポーネントが属するDOMツリーとは別の場所に、まるでテレポートしたかのようにコンポーネントを移動できる機能です。
直接指定の位置に表示できるので、
- Modal、Tooltipなど要素の上部レイヤーに表示したいコンテンツでもz-indexでのCSSハックが不要になる
- Modalなどの独立したコンポーネントに対して親要素のstyle干渉を防げる
などの利点があります。
Vue.js 2系でもサードパーティのプラグイン LinusBorg/portal-vue を使えば実現できます。
Vue.js 3.0ではそれを仮想DOMレベルでサポートするようです。(実装詳細まではあまり理解してない)
(PortalVueのロゴ。概念を表していてとても良い。)
Teleportの書き方
<Teleport>コンポーネントにtargetを指定した上で、内部に別箇所で描画したい要素を記載するだけです。それだけで、targetで指定したセレクタの要素内部に、<teleport>内部の要素が移動して描画されます。
セレクタで指定する要素は、VueのDOMツリー外部のものでも可能です。
<teleport target="セレクタ">
  <!-- 以下がtargetで指定した要素に移動して描画される -->
  <MyModal />
</teleport>
Teleportのサンプルアプリの実装
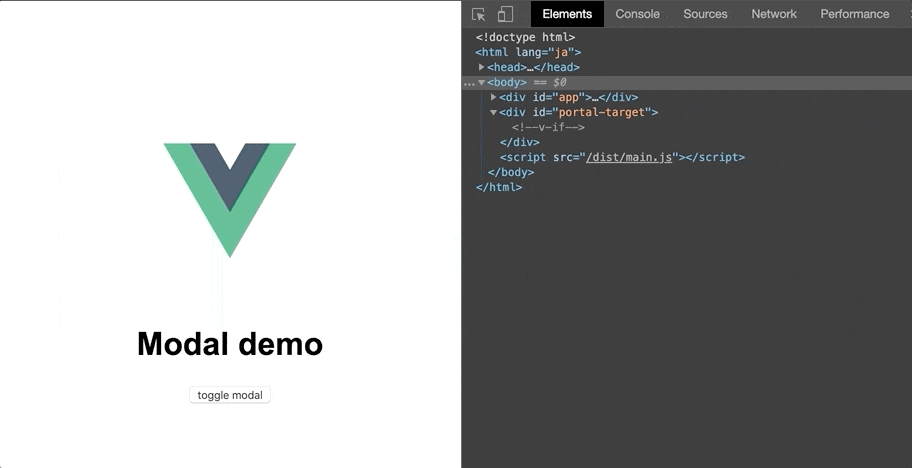
下記画像のようなサンプルアプリを作っていきます。
画像右側のデバックコンソールをみると、モーダル要素はApp.vueがマウントされている<div id="app">ではなく、<div id="myModal">内部に表示されるのがわかると思います。
一応動作コードはこちらのリポジトリにあります。
https://github.com/kawamataryo/vue-next-ts-webpack-preview/tree/portal-demo
App.vue
まずTeleportを定義するApp.vueの実装です。
<teleport>コンポーネントの要素としてto="#teleport-target"を指定しています。
そして内部にv-ifで表示制御するモーダル要素を配置しています。
<template>
<div class="container">
<img src="./logo.png" />
<h1>Modal demo</h1>
<button @click="toggleModal">toggle modal</button>
<teleport to="#teleport-target">
<!-- 以下要素がid="teleport-target"内に描画される -->
<div v-if="isVisible" id="myModal" class="modal">
<div class="modal-content">
<span class="close" @click="toggleModal">×</span>
<p>modall content</p>
</div>
</div>
</teleport>
</div>
</template>
<script lang="ts">
import { defineComponent, ref } from "vue";
export default defineComponent({
setup() {
const isVisible = ref(false);
const toggleModal = () => {
isVisible.value = !isVisible.value;
};
return {
isVisible,
toggleModal
};
}
});
</script>
main.ts
次にApp.vueをマウントするmain.tsです。
サンプルアプリでは、id="app"をApp.vueのマウント対象としています。
import { createApp } from 'vue'
import App from './App.vue'

createApp(App).mount('#app')
index.html
最後にTeleportの移動先となるindex.htmlです。
App.vueのマウント対象の<div id="app">、Teleportのtargetとしてた<div id="teleport-target">を配置します。
<div id="teleport-target">自体は通常のDOM要素ですが、ここにApp.vueの<teleport>内部に指定した要素が移動して描画されます。
<doctype html>
<html lang="ja">
<head>
  <link rel="stylesheet" href="/dist/main.css">
  <meta charset="UTF-8">
  <meta name="viewport"
        content="width=device-width, user-scalable=no, initial-scale=1.0, maximum-scale=1.0, minimum-scale=1.0">
  <meta http-equiv="X-UA-Compatible" content="ie=edge">
  <title>Vue3.0 demo</title>
</head>
<body>
  <div id="app"></div>
  <div id="teleport-target"></div>
  <script src="/dist/main.js"></script>
</body>
</html>
終わりに
以上、Vue.js 3.0 の新機能を試す。 〜Teleport 編〜 でした
z-indexや親スタイルの干渉防ぐをCSSをハックしなくて良いのは便利ですね。コードを綺麗に保てそうです。
portal-vueを使えばVue 2系の現行プロジェクトでも使えるので積極的に使っていきたいです。