ググると構築手順がいくつか出てきますが、バージョンが古かったり手順が抜けていたりするものが多かったので改めて書きます。
ソフトウェアのバージョンについてはマイナーバージョン違い程度なら動くと思いますが、一応私の環境で動作確認したものとして細かいところまで記載します。
環境
- CPU: Core i7 4790K
- RAM: 16GB
- GPU: GeForce GTX1070
- OS: Windows10 Professional 64bit
用意するもの
-
Anaconda3-4.2.0
- 素のPython3系は追加ライブラリーの用意とか色々面倒なのでAnacondaでサクッと入れてしまいましょう。
- Visual Studio 2015 Community
- CUDA Toolkit 8.0.44
-
NVIDIA Device Driver
- CUDA Toolkitを入れるとデバイスドライバーがPascal系GPUでCUDAが動かない古いもので上書きされてしまうので、再上書き用のものを調達しておきます
構築手順
Anacondaインストール
流れに身を任せてインストールする(私はAll Usersにしました)
C:\Users\xxx\Desktop>python -V
Python 3.5.2 :: Anaconda 4.2.0 (64-bit)
Visual Studioインストール
以下のコンポーネントにチェックを付ける必要があります
- Visual C++
- Python tools for Visual Studio
- ユニバーサルWindowsアプリ開発ツール(Windows 10 Mobile用エミュレーターは不要)
CUDA Toolkitインストール
流れに身を任せてインストールする(Visual Studioが無いと怒られても無視してOK)
GPUデバイスドライバー再インストール
流れに身を任せてインストールする
パスを通す
Visual Studio C++コンパイラーを使用するため、以下のパスを通します
C:\Program Files (x86)\Microsoft Visual Studio 14.0\VC\bin
C:\Users\xxx\Desktop>cl
Microsoft(R) C/C++ Optimizing Compiler Version 19.00.24215.1 for x86
Copyright (C) Microsoft Corporation.  All rights reserved.

使い方: cl [ オプション... ] ファイル名... [ /link リンク オプション... ]
環境変数を設定
コンパイラーからWindows KitsのC言語ヘッダーファイルを見えるようにするため以下の環境変数を設定します。
もし以降の手順でエラーが発生する場合は反映されていない可能性があるのでマシンをリブートしてみて下さい。
setx /M INCLUDE C:\Program Files (x86)\Windows Kits\10\Include\10.0.10240.0\ucrt
pipでpycudaをインストール
numpyを先に入れないとエラーになります
pip install numpy
pip install pycuda
動作確認
以下のコードを実行すると各配列の値が2倍になっていることがわかります(端数の丸めで微妙に誤差がありますが)。
これらはCPUではなくGPU上で並列処理されています。
# coding: utf-8
import pycuda.autoinit
import pycuda.driver as cuda
import pycuda.gpuarray as gpuarray
import numpy


d_array = numpy.random.randn(5, 5) # 0~1の乱数が入った5x5の倍制度配列を生成
s_array = d_array.astype(numpy.float32) # 配列を単精度に変換(GPUは単精度演算の方が早い)

gpu = gpuarray.to_gpu(s_array) # GPUのメモリー領域を確保しデータを渡す
result = (2 * gpu).get() # 格納されているデータを2倍して結果を取得


# 演算前の値を表示
for x in s_array:
	for xx in x:
		print("{: f}".format(xx), end="\t")
	print("")

print("")

# 演算後の値を表示(乱数が2倍されている)
for y in result:
	for yy in y:
		print("{: f}".format(yy), end="\t")
	print("")
(pycuda) C:\Users\xxx\Desktop\pycuda>python test.py
-0.669086        0.185353        0.582968       -0.633109       -0.919642
-1.009083       -1.280092       -0.099129        1.277974        2.213542
-1.724065        0.687357       -1.065952        1.218844        0.317282
-1.725983       -0.927514        1.681942       -0.061144        1.901111
-1.018675        0.701194       -1.015236       -1.547711        0.794663

-1.338171        0.370705        1.165937       -1.266219       -1.839285
-2.018165       -2.560184       -0.198259        2.555947        4.427085
-3.448129        1.374713       -2.131905        2.437687        0.634564
-3.451965       -1.855027        3.363883       -0.122289        3.802222
-2.037349        1.402387       -2.030472       -3.095421        1.589327

(pycuda) C:\Users\xxx\Desktop\pycuda>
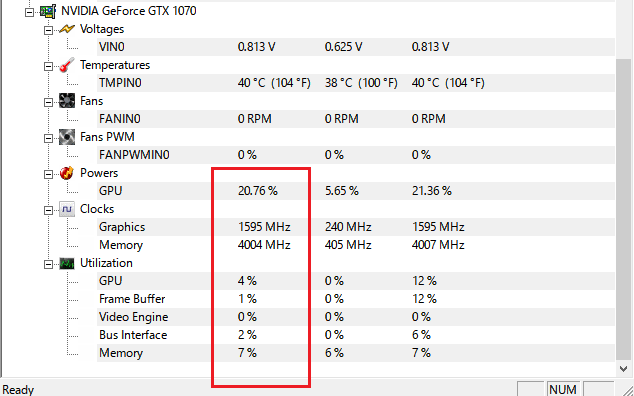
それホンマにGPU上で演算されてんの?
ホンマです。
フルに性能を使い切るには程遠いですが確かにGPUに負荷がかかっています。
下の画像は配列を5,000*5,000に設定して簡単に負荷を計測したものです。


