実務でREST APIのソースを読む機会があり、自分でも簡単なものを作成してみたので備忘録として残しておく。
作成するアプリの概要
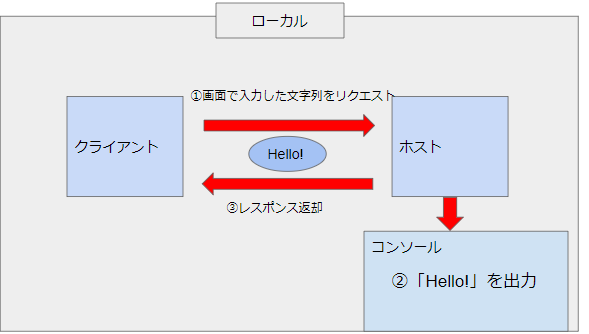
リクエストを投げるクライアント側とレスポンスを返すホスト側の2つを用意する。
クライアント側がブラウザで入力した文字列をホスト側にリクエストを投げる。
受け取った文字列をホスト側でコンソールに出力するというシンプルすぎるもの。
コンソールへの出力が成功した場合は「0」を、失敗した場合は「1」の処理結果コードをクライアントに返却する。
クライアントもホストのどちらもSpring Bootで実装し、どちらもローカルに存在しているものとする。
使用ライブラリはJackson、lombook。テンプレートエンジンはthymeleafを使用している。
クライアントの実装
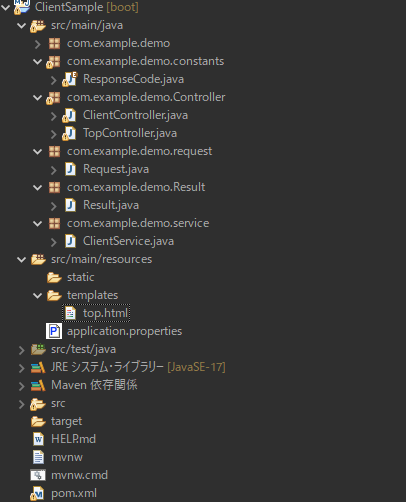
プロジェクトの構成は以下の通り。
画面側の実装
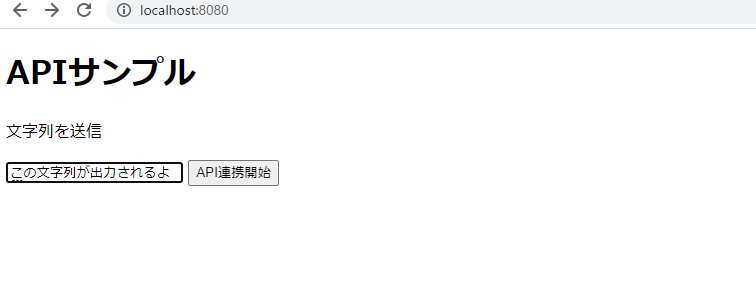
まずは文字列を入力するページとそのページを表示するコントローラーの実装を行う。
ここら辺は基本的な部分なので説明は割愛する。
・文字列入力画面
<!DOCTYPE html>
<html xmlns:th="http://www.thymeleaf.org">
<head>
<meta charset="UTF-8">
<title>API Sample</title>
</head>
<body>
	<h1>APIサンプル</h1>
	<p>文字列を送信</p>
	<form th:action="@{/client/execute}" th:method="post">
        <input type="text" name="str"/>
    	<input type="submit" value="API連携開始" />
    </form>
</body>
</html>
・文字列入力画面を表示するコントローラー
package com.example.demo.Controller;

import org.springframework.stereotype.Controller;
import org.springframework.ui.Model;
import org.springframework.web.bind.annotation.GetMapping;
import org.springframework.web.bind.annotation.RequestMapping;

import com.example.demo.request.Request;

@Controller
@RequestMapping("/")
public class TopController {

	@GetMapping
	public String top() {
		return "top";
	}
}
リクエスト用とレスポンス用のクラスの作成
入力された文字列を保持するフィールドを持つリクエスト用のクラス。
@JsonPropertyはJavaインスタンスのシリアライズ時のプロパティ名を指定することができるアノテーションである。
フィールドstrに文字列をセットし、ホストにリクエストする。
package com.example.demo.request;

import com.fasterxml.jackson.annotation.JsonProperty;

import lombok.Data;

@Data
public class Request {

	//パラメータ
	@JsonProperty("str")
	private String str;
}
レスポンス(処理結果コード)を受け取るためのResultクラス
ホストから返される処理結果コードをフィールドresultCodeに保持する。
package com.example.demo.Result;

import lombok.Data;

@Data
public class Result {

	// 処理結果コード
	String resultCode;
}
処理結果コードの内容を定義しているenum。
受け取った処理結果コードから定数を取得できるgetEnumByResultCodeを持つ。
package com.example.demo.constants;

import java.util.Arrays;

import lombok.AllArgsConstructor;
import lombok.Data;

@AllArgsConstructor
public enum ResponseCode {
	NORMAL("0"), ERROR("1"),;

	String resultCode;

	public String getResultCode() {
		return this.resultCode;
	}

	// 処理結果コードからenumを取得
	public static ResponseCode getEnumByResultCode(String resultCode) {
		return Arrays.stream(ResponseCode.values()).filter(v -> v.getResultCode().equals(resultCode)).findFirst()
				.orElse(null);
	}
}
リクエストを投げる処理の実装
・入力された文字列を受け取るコントローラー
package com.example.demo.Controller;

import org.springframework.beans.factory.annotation.Autowired;
import org.springframework.ui.Model;
import org.springframework.web.bind.annotation.PostMapping;
import org.springframework.web.bind.annotation.RequestMapping;
import org.springframework.web.bind.annotation.RequestParam;
import org.springframework.web.bind.annotation.ResponseBody;
import org.springframework.web.bind.annotation.RestController;

import com.example.demo.constants.ResponseCode;
import com.example.demo.request.Request;
import com.example.demo.service.ClientService;

@RestController
@RequestMapping("/client")
public class ClientController {

	@Autowired
	ClientService service;

	@ResponseBody
	@PostMapping("/execute")
	public void execute(@RequestParam("str") String str){
		Request request = new Request();
		request.setStr(str);
		// API実行処理
		try {
			ResponseCode response = service.doApi(request);
			if(response.getResultCode().equals("0")) {
				System.out.println("API連携成功");
				System.out.println("処理結果コード:" + response.getResultCode());
			} else {
				System.out.println("API連携失敗");
				System.out.println("処理結果コード:" + response.getResultCode());
			}
		} catch(Exception e ) {
			System.out.println("API連携でエラーが発生しました。");
		}
	}
}
処理の流れは以下の通り、
①Requestクラスのインスタンスを生成し、文字列をフィールド「str」にセット。
これでホストに投げるリクエストは完成。
②ClientService.javaのdoApiメソッド(リクエストを投げる処理)を呼び出し、ホストからレスポンスを受け取る。
doApiメソッドの詳細は後述。
③受け取ったレスポンスを判定し、後続の処理を実行
ここでは処理結果コードを単純に出力しているだけ。
①と③は見ての通りなので問題ない。
②の詳細は以下の通り
package com.example.demo.service;

import java.net.URI;

import org.springframework.beans.factory.annotation.Autowired;
import org.springframework.boot.web.client.RestTemplateBuilder;
import org.springframework.http.MediaType;
import org.springframework.http.RequestEntity;
import org.springframework.http.ResponseEntity;
import org.springframework.stereotype.Service;

import com.example.demo.Result.Result;
import com.example.demo.constants.ResponseCode;
import com.example.demo.request.Request;

@Service
public class ClientService {

	//REST通信用のテンプレート
	@Autowired
	RestTemplateBuilder builder;


	public ResponseCode doApi(Request request) throws Exception{
		// 送信先URL
		String url = "http://localhost:8081/host/response";

		try {
			Result result = post(url, request, Result.class);
			System.out.println(result);
			return ResponseCode.getEnumByResultCode(result.getResultCode());
		} catch(Exception e) {
			System.out.println("例外発生");
			throw e;
		}

	}

	// POST送信実行
	public <T, U> U post(String url, T param, Class<U> resClazz)throws Exception {
		RequestEntity<T> entity = RequestEntity.post(new URI(url)).accept(MediaType.APPLICATION_JSON).body(param);
		ResponseEntity<U> response = builder.build().exchange(entity, resClazz);
		return response != null ? response.getBody() : null;
	}
}
まず、呼びだされたdoApiメソッドで送り先のURLを指定する。
その後、実際にホストにリクエストを投げるpostメソッドを呼び出す。
postメソッドではホストにリクエストを投げるために、RequestEntityとResponseEntityというクラスを使用している。
今回初めて知ったクラスだったので調べてみたが、それぞれのJavadocを参照すると以下のように書いてある。
RequestEntity
HTTP メソッドとターゲット URL も公開する HttpEntity の拡張。RestTemplate で使用してリクエストを準備し、@Controller メソッドでリクエスト入力を表します。
ResponseEntity
HttpStatusCode ステータスコードを追加する HttpEntity の拡張。RestTemplate および @Controller メソッドで使用されます。
相変わらず何言っているのかよくわからず、ざっくりした理解だが、RequestEntityはRESTAPIでのリクエストを表すクラス、RequestEntityはレスポンスを表すクラスのようだ。
HTTP応答全体(ステータスコード、ヘッダー、および本文)を表しているとのこと。
RequestEntity.postで送信先のURLをセットし、.acceptでリクエストのMediaTypeを指定する。
ここではJSON形式で送信するようにしている。
最後に.bodyでリクエストのボディにパラメータをセットする。
次にRestTemplateBuilderというRESTのテンプレートを作成できるクラスのbuildメソッドでRESTテンプレートをビルドする。
.exchangeで先ほど作成したRequestEntityをリクエストとして、API通信を実行し、実行結果をResponseEntityの変数に代入する。
後はレスポンスのボディをdoApiに返してあげて、doApiは受け取った値からクライアント側で定義している処理結果コードの定数を取得し、ClientControllerに返す。
後は処理結果コードごとの後続処理を行って処理が終了する。
ホストの実装
続いてホスト側の実装を行う。
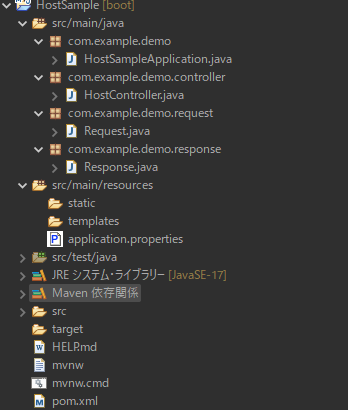
ホスト側のプロジェクト構成は下記の通り
リクエスト用とレスポンス用のクラスの作成
クライアントからのリクエスト用のクラスとレスポンス用のクラスをそれぞれ実装する。
リクエスト用のクラス
package com.example.demo.request;

import lombok.Data;

@Data
public class Request {

	private String str;
}
レスポンス用のクラス
package com.example.demo.response;

import lombok.Data;

@Data
public class Response {

	// 処理結果コード
	private String resultCode;
}
リクエスト受領と具体的な処理の実装
リクエストを受け取り、文字列を出力するコントローラーの実装を行う。
package com.example.demo.controller;

import org.springframework.web.bind.annotation.PostMapping;
import org.springframework.web.bind.annotation.RequestBody;
import org.springframework.web.bind.annotation.RequestMapping;
import org.springframework.web.bind.annotation.ResponseBody;
import org.springframework.web.bind.annotation.RestController;

import com.example.demo.request.Request;
import com.example.demo.response.Response;

@RestController
@RequestMapping("/host")
public class HostController {

	@PostMapping("/response")
	@ResponseBody
	public Response createResponse(@RequestBody Request request) {
		Response response = new Response();
		try {
			System.out.println("受領したリクエストの文字列=" + request.getStr());
			response.setResultCode("0");
			System.out.println("レスポンスで返す処理結果コードは→" + response.getResultCode());
			return response;
		} catch(Exception e) {
			response.setResultCode("1");
			System.out.println("エラーが発生しました。処理結果コード1を返却");
			return response;

		}

	}
}
クラスに@RestControllerを付与することでJSONを返すコントローラーだと指定する。
そして、@ResponseBodyをメソッドに付与することで戻り値がそのままレスポンスの中身になるようにしている。
処理の流れとしてはClientService.postで投げられてきたリクエストを引数で受け取り、そのままSystem.out.printlnで出力する。
無事に出力できたら、ResponseクラスのフィールドresultCodeに処理結果コード0をセットしてクライアントに返却する。
これでクライアントとホスト両方の実装が完了した。
動作確認
文字列入力画面で任意の文字を入力して送信ボタンを押下。
文字列は出力されているかの確認
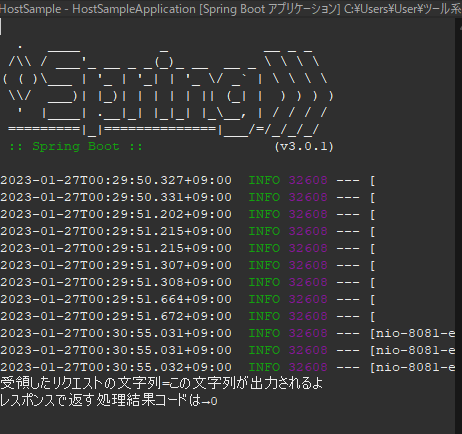
ホスト側のコンソール↓
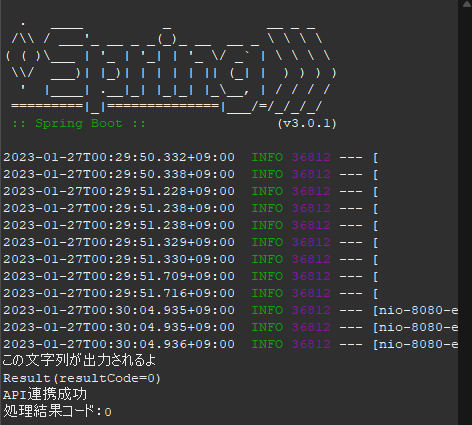
クライアント側のコンソール↓
無事にクライアントからリクエスト送信→ホストがリクエスト受領→リクエストを使ってなんらかの処理→クライアントへレスポンス返却→クライアント側でレスポンス受領の流れを実装することができた。
今回はとりあえず動くものを作ったんので簡単に実装できたが、実際はタイムアウト時間を設定したりとか様々なことができるのでいろいろ調べてみると面白そう。
