JX通信社Advent Calendar 2019 9日目の記事です。
はじめに
先月、AWS AppSyncのリアルタイムデータ機能のアップデート が実施され、これまでクライアントとの接続にはMQTT over WebSocketsが利用されていましたが、今回のアップデートから純粋なWebSocketを利用できるようになりました。このアップデートにより、ペイロードの最大サイズが128kbから240kbに引き上げられ、CloudWatchメトリクスへの対応等の改善が行われています。
JX通信社が開発するサービスでは、toB/toC共にリアルタイム性が重視されるため、サービス本体や管理画面にWebSocketを利用しています。今回はVueで構築された既存サービスにNuxtとAWS AppSyncを導入するにあたり検証を行いました。
Amplify CLIを使ってAppSyncのセットアップを進めていきますが、 AWS re:invent 2019 で iOS/Android向けの新しいAmplify Frameworkが発表された ので、今回はセットアップとNuxtアプリケーション上でのAPI接続、次回 12/16に作成済みのAppSyncへの接続・設定方法とiOSアプリケーションの実装を紹介します。
Amplify CLIのインストール
amplifyコマンドを使ってセットアップを進めていくため、次のコマンドでインストールします。
% npm install -g @aws-amplify/cli
% amplify configure
nodenvを利用している場合はamplify configureの前に次のコマンドを実行してください。
% nodenv rehash
% amplify plugin scan
amplify configureを実行すると、AWSアカウントと紐付けを行うためにブラウザが起動してログイン画面が表示されます。
% amplify configure
Follow these steps to set up access to your AWS account:

Sign in to your AWS administrator account:
https://console.aws.amazon.com/
Press Enter to continue

Specify the AWS Region
? region:  <リージョン指定>
Specify the username of the new IAM user:
? user name:  <IAMユーザー名>
Complete the user creation using the AWS console
https://console.aws.amazon.com/iam/home?<クエリ>
Press Enter to continue

Enter the access key of the newly created user:
? accessKeyId:  <生成されたアクセスキー>
? secretAccessKey:  <生成されたシークレット>
This would update/create the AWS Profile in your local machine
? Profile Name:  <プロファイル名>

Successfully set up the new user.
Nuxtプロジェクトの作成
create-nuxt-appコマンドを使ってプロジェクトを作成します。
今回この記事ではサーバーフレームワークとテストは扱わないためNoneを選択しています。
UI frameworkに iView を利用しています。詳しくは8日目の管理画面向けのVue.jsのUIフレームワーク、iViewについてをご覧ください。
npx create-nuxt-app advcal19

create-nuxt-app v2.12.0
✨  Generating Nuxt.js project in advcal19
? Project name advcal19
? Project description My dazzling Nuxt.js project
? Author name rychhr
? Choose the package manager Npm
? Choose UI framework iView
? Choose custom server framework None (Recommended)
? Choose Nuxt.js modules (Press <space> to select, <a> to toggle all, <i> to invert selection)
? Choose linting tools ESLint, Prettier
? Choose test framework None
? Choose rendering mode Single Page App
? Choose development tools jsconfig.json (Recommended for VS Code)
パッケージの追加
必要なパッケージを追加します。
% cd advcal19
% npm i aws-amplify aws-amplify-vue
Amplifyのセットアップ
amplify initでセットアップを行います。
Build CommandとStart CommandはNuxtが生成したコマンドを設定します。
% amplify init
Note: It is recommended to run this command from the root of your app directory
? Enter a name for the project advcal19
? Enter a name for the environment dev
? Choose your default editor: Visual Studio Code
? Choose the type of app that you're building javascript
Please tell us about your project
? What javascript framework are you using vue
? Source Directory Path:  .
? Distribution Directory Path: dist
? Build Command:  npm run build
? Start Command: npm run start
Using default provider  awscloudformation

For more information on AWS Profiles, see:
https://docs.aws.amazon.com/cli/latest/userguide/cli-multiple-profiles.html

? Do you want to use an AWS profile? Yes
? Please choose the profile you want to use <amplify configure時に追加したプロファイル>
GitHub上で公開する場合、amplify initで作成されたamplify/以下のteam-provider-info.jsonを.gitignoreに追加するように注意してください。
If you want to share a project publicly and open source your serverless infrastructure, you should remove or put the amplify/team-provider-info.json file in gitignore file.
APIとデータベースのセットアップ
amplify add apiで質問形式に答えると、AppSync APIとDynamoDBの自動セットアップが実行されます。
% amplify add api
? Please select from one of the below mentioned services: GraphQL
? Provide API name: advcal2019
? Choose the default authorization type for the API API key
? Enter a description for the API key:
? After how many days from now the API key should expire (1-365): 7
? Do you want to configure advanced settings for the GraphQL API No, I am done.
? Do you have an annotated GraphQL schema? No
? Do you want a guided schema creation? Yes
? What best describes your project: Single object with fields (e.g., “Todo” with ID, name, description)
? Do you want to edit the schema now? Yes
Do you want to edit the schema now?でYesを入力するとエディタが立ち上がるので次のように置き換えます。
type Message @model {
  id: ID!
  message: String
  createdAt: String
}
バックエンドリソースの作成
amplify pushでこれまで行ってきた設定を元に、バックエンドリソースを作成します。
Do you want to generate code for your newly created GraphQL APIではNoを選択していますが、Yesの場合コードが自動で生成されます。
% amplify push
✔ Successfully pulled backend environment dev from the cloud.

Current Environment: dev

| Category | Resource name | Operation | Provider plugin   |
| -------- | ------------- | --------- | ----------------- |
| Api      | advcal2019    | Create    | awscloudformation |
? Are you sure you want to continue? Yes

...

? Do you want to generate code for your newly created GraphQL API No
⠏ Updating resources in the cloud. This may take a few minutes...

...

GraphQL endpoint: https://<XXX>.appsync-api.<リージョン>.amazonaws.com/graphql
GraphQL API KEY: <APIキー>
AppSyncコンソールで動作確認
amplify console apiを実行するとブラウザが立ち上がり、定義したMessageモデルから生成されたQuery/Mutation/Subscriptionを試すことができます。

Nuxtプラグインの作成
AppSync APIのセットアップは完了したのでNuxt側の設定を行っていきます。
amplify initで指定したSource Directory Pathに設定値が記述されたaws-exports.jsが生成されているのでその設定値を読み込むプラグインを追加します。
// plugins/amplify.js
import Vue from 'vue'
import Amplify, * as AmplifyModules from 'aws-amplify'
import { AmplifyPlugin } from 'aws-amplify-vue'
import awsconfig from '~/aws-exports'
Amplify.configure(awsconfig)

Vue.use(AmplifyPlugin, AmplifyModules)
nuxt.config.jsを編集して追加したプラグインを設定します。
export default {
  plugins: [
    '@/plugins/iview',
    '@/plugins/amplify'
  ],
  // ...
}
MutationとSubscriptionの実装
pages/index.vueを編集してメッセージの送信とSubscriptionによる変更検知を実装していきます。
iViewのUIコンポーネントを利用してフォームを作成します。
<template>
  <div class="container">
    <div>
      <Form>
        <FormItem>
          <Input v-model="value" type="text" />
        </FormItem>
        <FormItem>
          <Button @click="handleSubmit" type="primary">submit</Button>
        </FormItem>
        <FormItem>
          <span>{{ message }}</span>
        </FormItem>
      </Form>
    </div>
  </div>
</template>
aws-amplify/apiパッケージのAPIを介してAppSync APIと接続します。
<script>
import API, { graphqlOperation } from '@aws-amplify/api'

const createMessage = `mutation createMessage($message: String!) {
  createMessage(input: { message: $message }) {
    __typename
    id
    message
    createdAt
  }
}
`

const onCreateMessage = `subscription onCreateMessage {
  onCreateMessage {
    __typename
    message
  }
}`

export default {
  data() {
    return {
      message: '',
      value: ''
    }
  },
  created() {
    this.subscribe()
  },
  methods: {
    async handleSubmit(event) {
      event.preventDefault()
      event.stopPropagation()
      const message = {
        id: '',
        message: this.value,
        createdAt: ''
      }
      await API.graphql(graphqlOperation(createMessage, message))
    },
    subscribe() {
      this.subscription = API.graphql(
        graphqlOperation(onCreateMessage)
      ).subscribe({
        next: (event) => {
          if (event) {
            this.message = event.value.data.onCreateMessage.message
          }
        }
      })
    }
  }
}
</script>
アプリケーションの実行
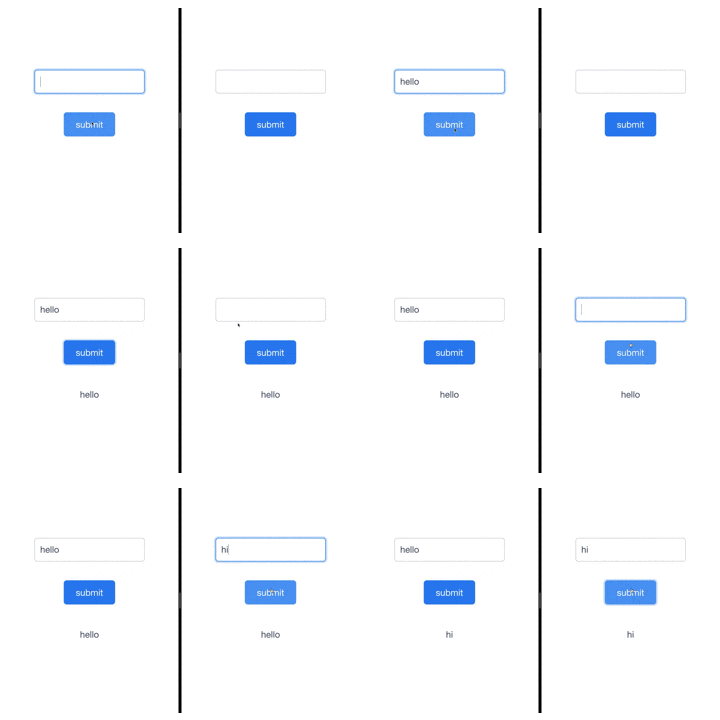
npm run devで開発サーバーを立ち上げたあと、localhost:3000を複数のタブで開いた状態でフォームの内容送信することで動作を確認することができます。また、ブラウザの開発ツールでwss://で通信していることがわかると思います。
おわりに
今回は、NuxtアプリケーションへのAmplifyの導入とAppSync APIとの接続方法を紹介しました。今後はMQTTではなくPure WebSocketsの利用を推奨されるとのことですが、クライアント側で特別な設定をする必要はありません。
rychhr/advcal19-appsync-nuxt にサンプルコードを載せておきます。
10日目は @shinyorke さんの "PySparkで分散処理デビューする前にやったこと" です。
