はじめに
以下の教材でJavaScriptのDOMについて勉強したので、勉強したことをチートシートとして残すことにしました
DOMの取得
ID名から取得
-
document.getElementById("ID名");
指定したID名と一致する要素を取得
<div id="container"></div>
const container = document.getElementById("container");
クラス名から取得
-
document.getElementsByClassName("クラス名");
指定したクラス名と一致する最初の要素を取得
<a class="link" href="https://www.google.co.jp/">リンク</a>
const link = document.getElementsByClassName("c-link");
タグ名から取得
-
document.getElementsByTagName("HTMLタグ名");
指定したタグ名と一致する最初の要素を取得
<p class="para">ここにテキストが入ります</p>
const para = document.getElementsByTagName("p");
CSSセレクター名から取得
1つの要素を取得
-
document.querySelector("CSSセレクター名");
指定したCSSセレクター名と一致する最初の要素を取得
<input type="submit" id="submit-btn" class="c-submit-btn">
ID名から取得する場合は、ID名の前に#を付ける
// ID名から取得
const submitBtn = document.querySelector("#submit-btn");
クラス名から取得する場合は、クラス名の前に.を付ける
// クラス名から取得
const submitBtn = document.querySelector(".c-submit-btn");
CSSの属性セレクターから取得する場合は、属性名と値を[]で囲む
const submitBtn = document.querySelector('input[type="submit"]');
全ての要素を取得
-
document.querySelectorAll("CSSセレクター名");
指定したCSSセレクター名と一致する全ての要素を取得
<ul class="p-list">
    <li class="p-list__item c-item">リスト1</li>
    <li class="p-list__item c-item">リスト2</li>
    <li class="p-list__item c-item">リスト3</li>
</ul>
const items = document.querySelectorAll(".c-item");

for (item of items) {
    console.log(item);
}

// 出力結果
// <li class="p-list__item">リスト1</li>
// <li class="p-list__item">リスト2</li>
// <li class="p-list__item">リスト3</li>
DOMの操作
テキストの取得・操作
テキストの取得
-
Element.innerText;
innerTextを使うと、ブラウザ上に表示されているテキストが取得される -
Element.textContent;
textContentを使うと、HTMLタグ内のテキストが取得される -
Element.innerHTML;
innerHTMLを使うと、HTMLタグ内のテキストがタグ込みで取得される
<p class="para">ここに<span style="display: none;">テキスト</span>が入ります。</p>
const para = document.querySelector(".para");

console.log(`innerText: ${para.innerText}`);
console.log(`textContent: ${para.textContent}`);
console.log(`innerHTML: ${para.innerHTML}`);

// 出力結果
// ここにが入ります。
// ここにテキストが入ります。
// ここに<span style="display: none;">テキスト</span>が入ります。
テキストの操作
-
Element.innerText = "代入するテキスト";
改行は反映されるが、HTMLタグはブラウザ上にそのままテキストとして出力されてしまう -
Element.textContent = "代入するテキスト";
改行は反映されず、HTMLタグもブラウザ上にそのままテキストとして出力されてしまう -
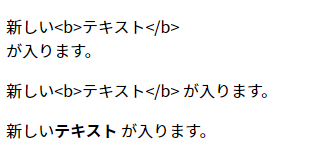
Element.innerHTML = "代入するテキスト";
改行は反映されないが、HTMLタグの方はブラウザ上に反映される
<p class="para1"></p>
<p class="para2"></p>
<p class="para3"></p>
const para1 = document.querySelector(".para1");
const para2 = document.querySelector(".para2");
const para3 = document.querySelector(".para3");

const newText = "新しい<b>テキスト</b>\nが入ります。"

para1.innerText = newText;
para2.textContent = newText;
para3.innerHTML = newText;
属性値の取得・操作
属性値の取得
<a href="https://www.google.co.jp/" class="link">リンク</a>
Element.属性名;
const link = document.querySelector(".link");

const href = link.href;

console.log(href); // https://www.google.co.jp/
Element.getAttribute("属性名");
const link = document.querySelector(".link");

const href = link.getAttribute("href");

console.log(href); // https://www.google.co.jp/
属性値の操作
<a href="https://www.google.co.jp/" class="link">リンク</a>
Element.属性名 = "代入する属性値";
const link = document.querySelector(".link");

link.href = "https://qiita.com/";
Element.setAttribute("属性名", "代入する属性値");
const link = document.querySelector(".link");

link.setAttribute("href", "https://qiita.com/");
スタイルの取得・操作
スタイルの取得
Element.style.CSSプロパティ名;
<p class="para">ここに<span style="color: red;">テキスト</span>が入ります。</p>
const coloredText = document.querySelector(".para span");

const colorValue = coloredText.style.color;

console.log(colorValue); // red
※1. 上記の書き方でCSSプロパティの値を取得できるのは、インラインスタイル(HTMLタグに直接スタイルを当てること)を使っている、もしくはJavaScriptからスタイルを設定している場合のみ
※2. font-sizeやbackground-colorのようにプロパティ名が2語以上の場合は、fontSizeやbackgroundColorのようにキャメルケースで書く
getComputedStyle(Element).CSSプロパティ名
<div class="box"></div>
.box {
    background-color: red;
    border: 2px solid black;
    height: 200px;
    width: 400px;
}
const box = document.querySelector(".box");

const boxStyle = getComputedStyle(box);

console.log(boxStyle.backgroundColor); // rgb(255, 0, 0)
console.log(boxStyle.border); // 2px solid rgb(0, 0, 0)
console.log(boxStyle.height); // 200px
console.log(boxStyle.width); // 400px
スタイルの操作
Element.style.CSSプロパティ名 = "代入する値";
<p class="para">ここに<span style="color: red;">テキスト</span>が入ります。</p>
const coloredText = document.querySelector(".para span");

coloredText.style.color = "purple";
※ font-sizeやwidthのように値に数字を用いるプロパティの場合でも、"16px"のように代入する値をクオーテーションで囲む
※ (2024/09/04修正) 代入する値が 数字+単位 の場合は、値をクオーテーションで囲む必要があるが、数字のみ(単位を必要としない)場合はクオーテーションで囲む必要はない
const para = document.querySelector(".para");

// 代入する値が 数字+単位
para.style.fontSize = "14px";
// 代入する値が 数字のみ
para.style.opacity = 0.7;
クラスの操作
クラスの追加
Element.classList.add("追加するクラス名");
<p class="para">ここにテキストが入ります</p>
const para = document.querySelector(".para");

para.classList.add("border");

console.log(para.getAttribute("class")); // para border
クラスの削除
Element.classList.remove("削除するクラス名");
<p class="para border">ここにテキストが入ります</p>
const para = document.querySelector(".para");

para.classList.remove("border");

console.log(para.getAttribute("class")); // para
クラスの付け外し
Element.classList.toggle("付け外しするクラス名");
<p class="para">ここにテキストが入ります</p>
const para = document.querySelector(".para");

para.classList.toggle("border");

console.log(para.getAttribute("class")); // para border

para.classList.toggle("border");

console.log(para.getAttribute("class")); // para
クラスが含まれているか判定
Element.classList.contains("判定するクラス名");
<p class="para">ここにテキストが入ります</p>
const para = document.querySelector(".para");

console.log(para.classList.contains("para")); // true
親・子・兄弟要素の取得
親要素の取得
Element.parentElement;
子要素の取得
Element.children;
兄弟要素の取得
Element.previousSibling;Element.previousElementSibling;
※ previousElementSiblingは自分と同階層にある直前の要素を返してくれるが、previousSiblingの場合は、直前に改行や空白があればそれらを返す
Element.nextSibling;Element.nextElementSibling;
※ nextElementSiblingは自分と同階層にある直前の要素を返してくれるが、nextSiblingの場合は、直前に改行や空白があればそれらを返す
<ul>
    <li><a>リスト1</a></li>
    <li class="myself"><a>リスト2</a></li>
    <li><a>リスト3</a></li>
</ul>
const myself = document.querySelector(".myself");

const parent = myself.parentElement;
const child = myself.children;
const prevSib = myself.previousSibling;
const prevElmSib = myself.previousElementSibling;
const nextSib = myself.nextSibling;
const nextElmSib = myself.nextElementSibling;

console.log(parent); // <ul>...</ul>
console.log(child[0]); // <a>リスト2</a>
console.log(prevSib); // #text
console.log(prevElmSib); // <li><a>リスト1</a></li>
console.log(nextSib); // #text
console.log(nextElmSib); // <li><a>リスト3</a></li>
(2024/09/04追記) 親要素の取得
-
Element.closest("CSSセレクター");
指定したCSSセレクターと一致する祖先要素(自分自身を含む)を探索する
<nav class="p-nav">
    <ul class="p-nav__items">
        <li class="p-nav__item p-nav__item--one">リスト1</li>
        <li class="p-nav__item p-nav__item--two">
            <span class="myself">※</span>
            リスト2
        </li>
        <li class="p-nav__item p-nav__item--three">リスト3</li>
    </ul>
</nav>
const myself = document.querySelector(".myself");

console.log(myself.closest("li > span")); // <span class="myself">※</span>
console.log(myself.closest("li:has(span)")); // <li class="p-nav__item p-nav__item--two">...</li>
console.log(myself.closest(".p-nav")); // <nav class="p-nav">...</nav>
要素の追加・削除
子要素を追加
-
ParentElement.appendChild(追加する子要素);
親要素の末尾(親要素の閉じタグの直前)に子要素を追加できる
<ul>
    <li>リスト1</li>
    <li>リスト2</li>
    <li>リスト3</li>
</ul>
const list = document.querySelector("ul");

const item = document.createElement("li");

item.textContent = "リスト4";

list.appendChild(item);
-
ParentElement.append(追加する子要素);
親要素の末尾に子要素を追加できるが、appendChildとは違って一度に複数の要素を追加できたり、文字列を追加できたりする
<div class="container"></div>
const container = document.querySelector(".container");

const h1 = document.createElement("h1");
const img = document.createElement("img");

h1.textContent = "タイトルです。";
img.setAttribute("src", "画像URL");

container.append(h1, img, "ここにテキストが入ります。");
兄弟要素を追加
-
Element.insertAdjacentElement("追加する場所", 追加する兄弟要素);追加する場所
-
beforebegin... 基準となる要素の前 -
afterend... 基準となる要素の後
※ この他にも、基準となる要素の開始タグ直後に要素を追加できる
afterbeginや、基準となる要素の閉じタグ直前に要素を追加できるbeforeendというパラメータもある -
<ul>
    <li class="myself">私はリストです。</li>
</ul>
const myself = document.querySelector(".myself");

const prevItem = document.createElement("li");
const nextItem = document.createElement("li");

prevItem.textContent = "直前のリストです。";
nextItem.textContent = "直後のリストです。";

myself.insertAdjacentElement("beforebegin", prevItem);
myself.insertAdjacentElement("afterend", nextItem);
-
Element.after(追加する兄弟要素);
基準となる要素の直後に兄弟要素を追加できる
<ul>
    <li class="myself">私はリストです。</li>
</ul>
const myself = document.querySelector(".myself");

const nextItem = document.createElement("li");

nextItem.textContent = "直後のリストです。";

myself.after(nextItem);
子要素を削除
ParentElement.removeChild(削除する子要素);
<ul>
    <li>リスト</li>
    <li class="myself">私は削除されます。</li>
    <li>リスト</li>
</ul>
const myself = document.querySelector(".myself");

const parent = myself.parentElement;

parent.removeChild(myself);
ChildElement.remove();
<ul>
    <li>リスト</li>
    <li class="myself">私は削除されます。</li>
    <li>リスト</li>
</ul>
const myself = document.querySelector(".myself");

myself.remove();


