きっかけ
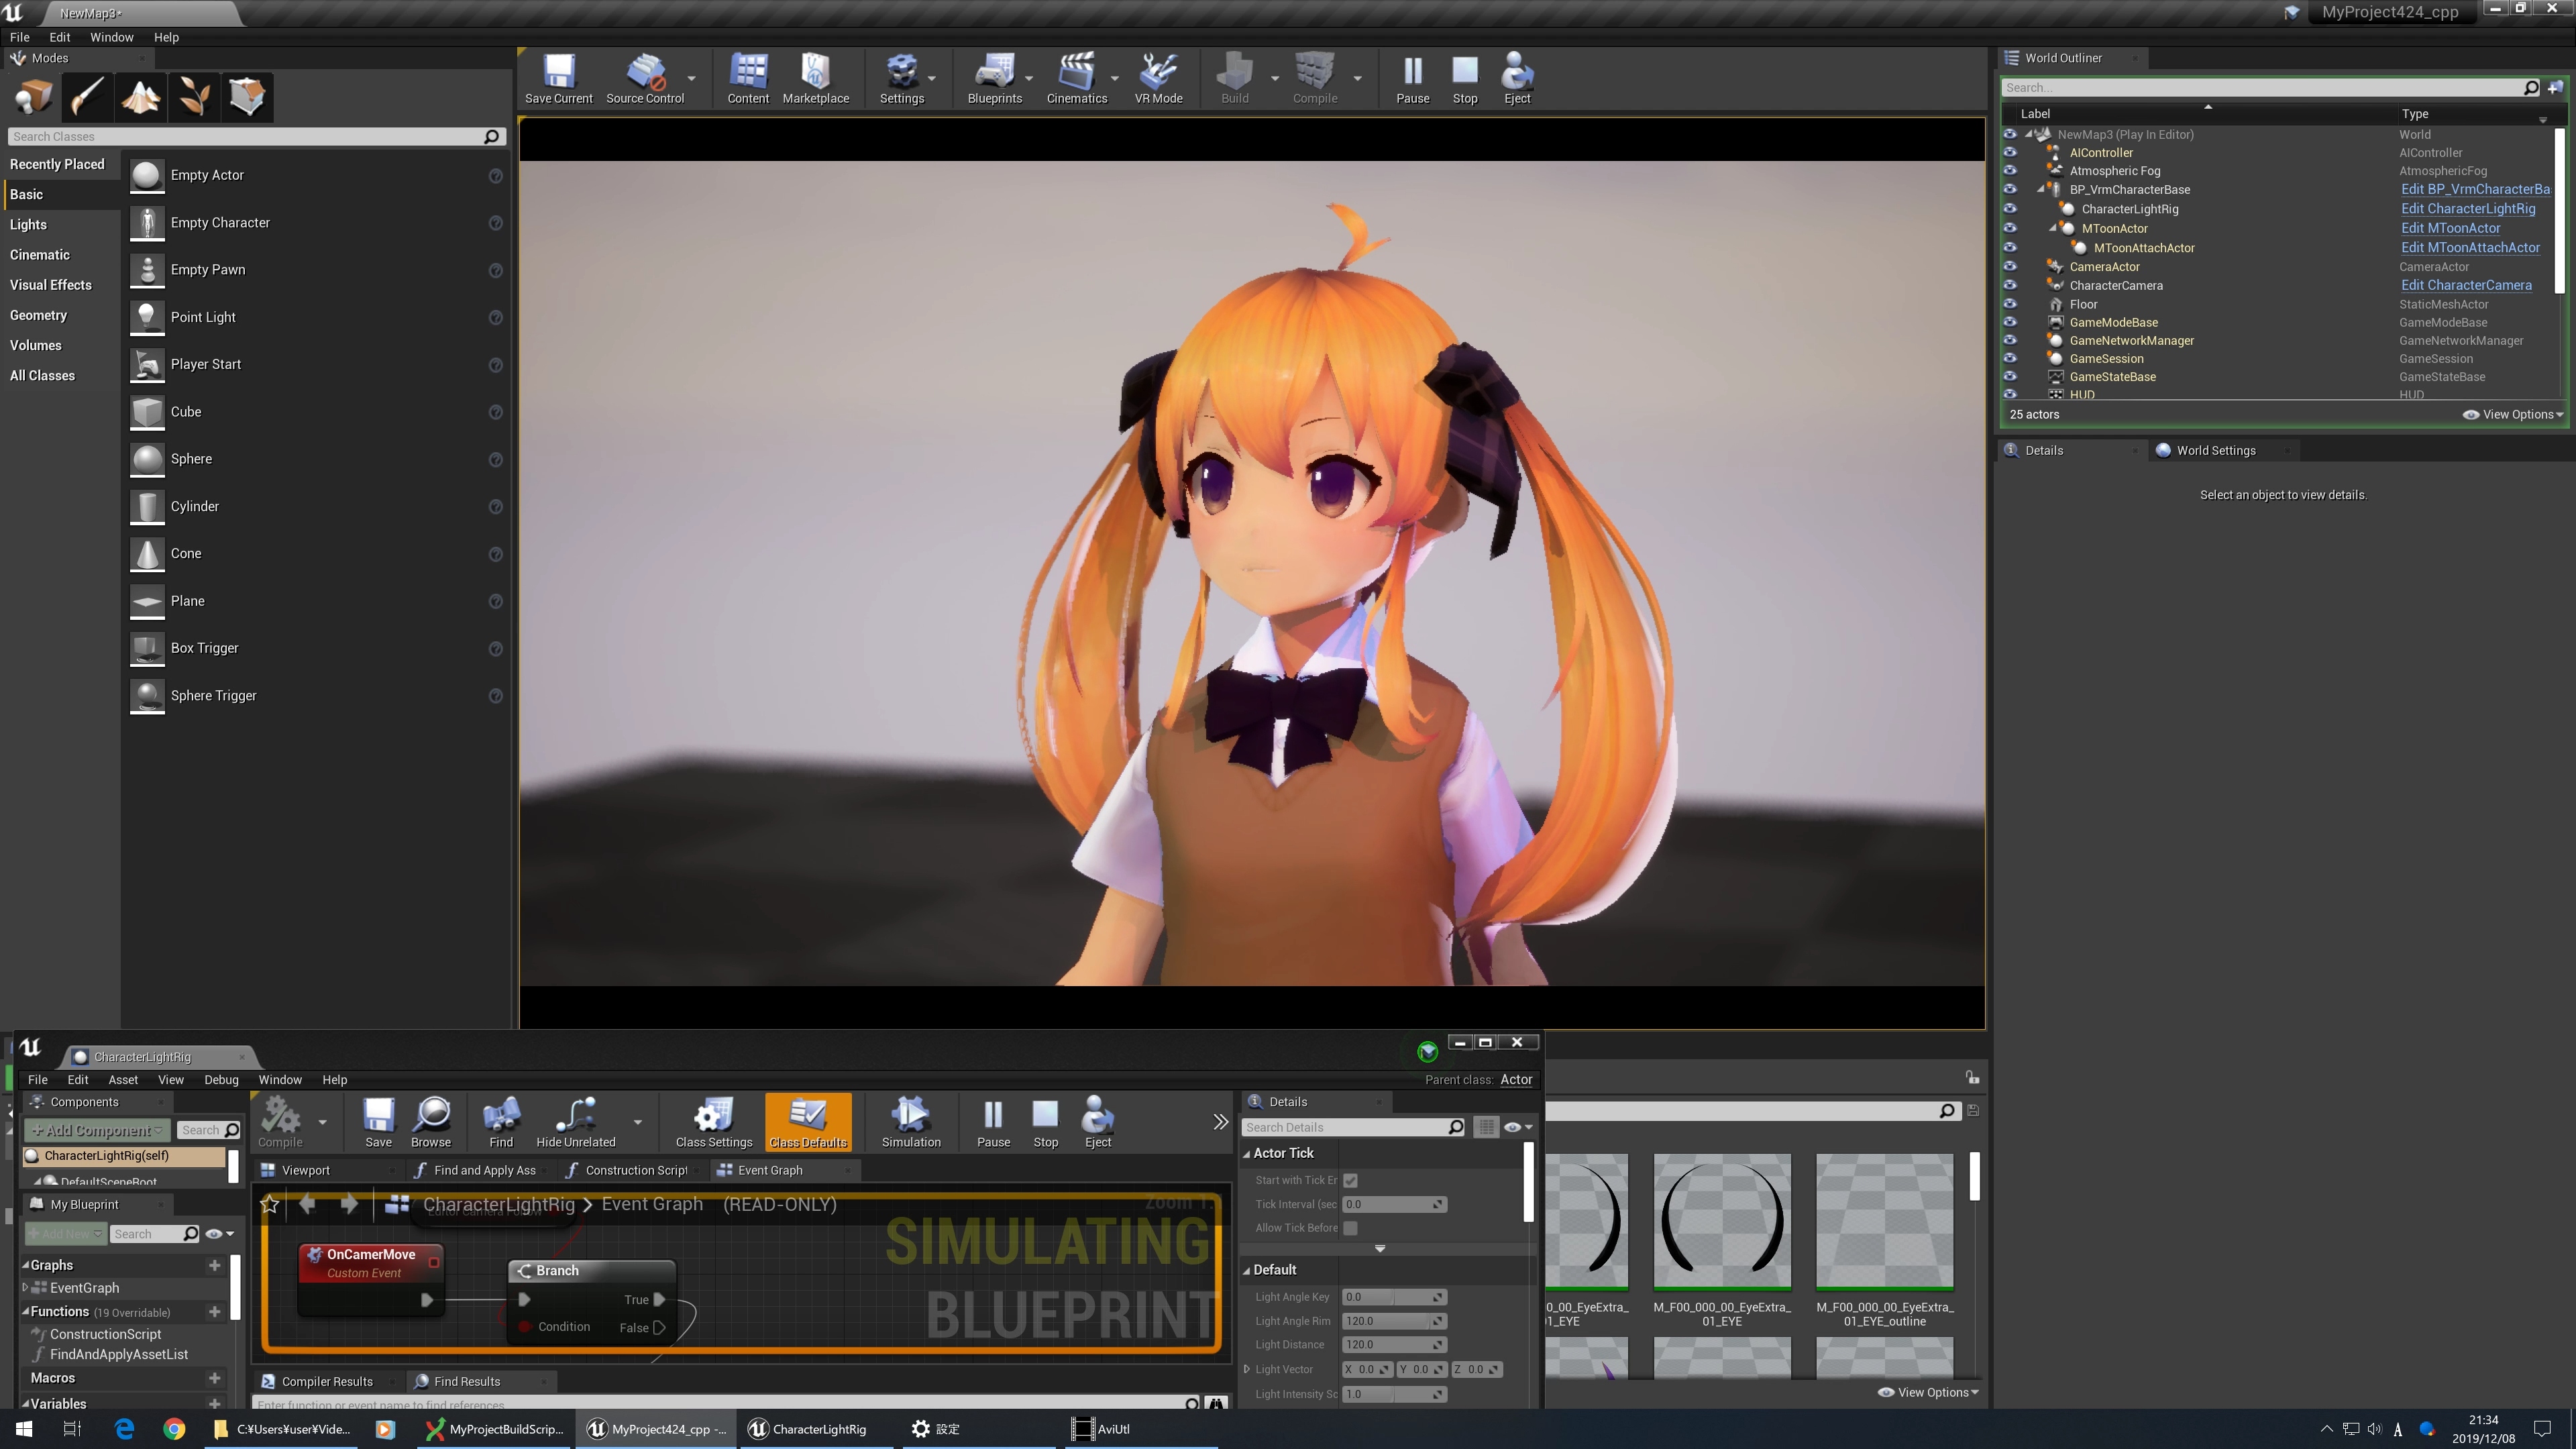
キャラを可愛くライティングするシステムができた!
だけど確認の度にゲームカメラに切り替えるのが面倒だなぁ。
ならばEditor画面で確認できるようにしよう!
先に実行結果
VRM4Uのキャラ用ライト。
— はるべえ (@ruyo_h) December 8, 2019
Play / Simulate/ Editor モードでリムライトが追従する。https://t.co/FwVt9Qo5x6#VRM4U
動画のリンクはこちら https://www.youtube.com/watch?v=4WLaAPOUFDM
かわいい! …ですが今回の見どころは以下です。
・Editor/Simulateモードのカメラ座標を利用している。
・EditorモードでBlueprint実行(ライトの移動)をしている。
|Playの動作|Editorの動作|
|:---|---|---|
|
バックライト(右奥のライト)が効いている。|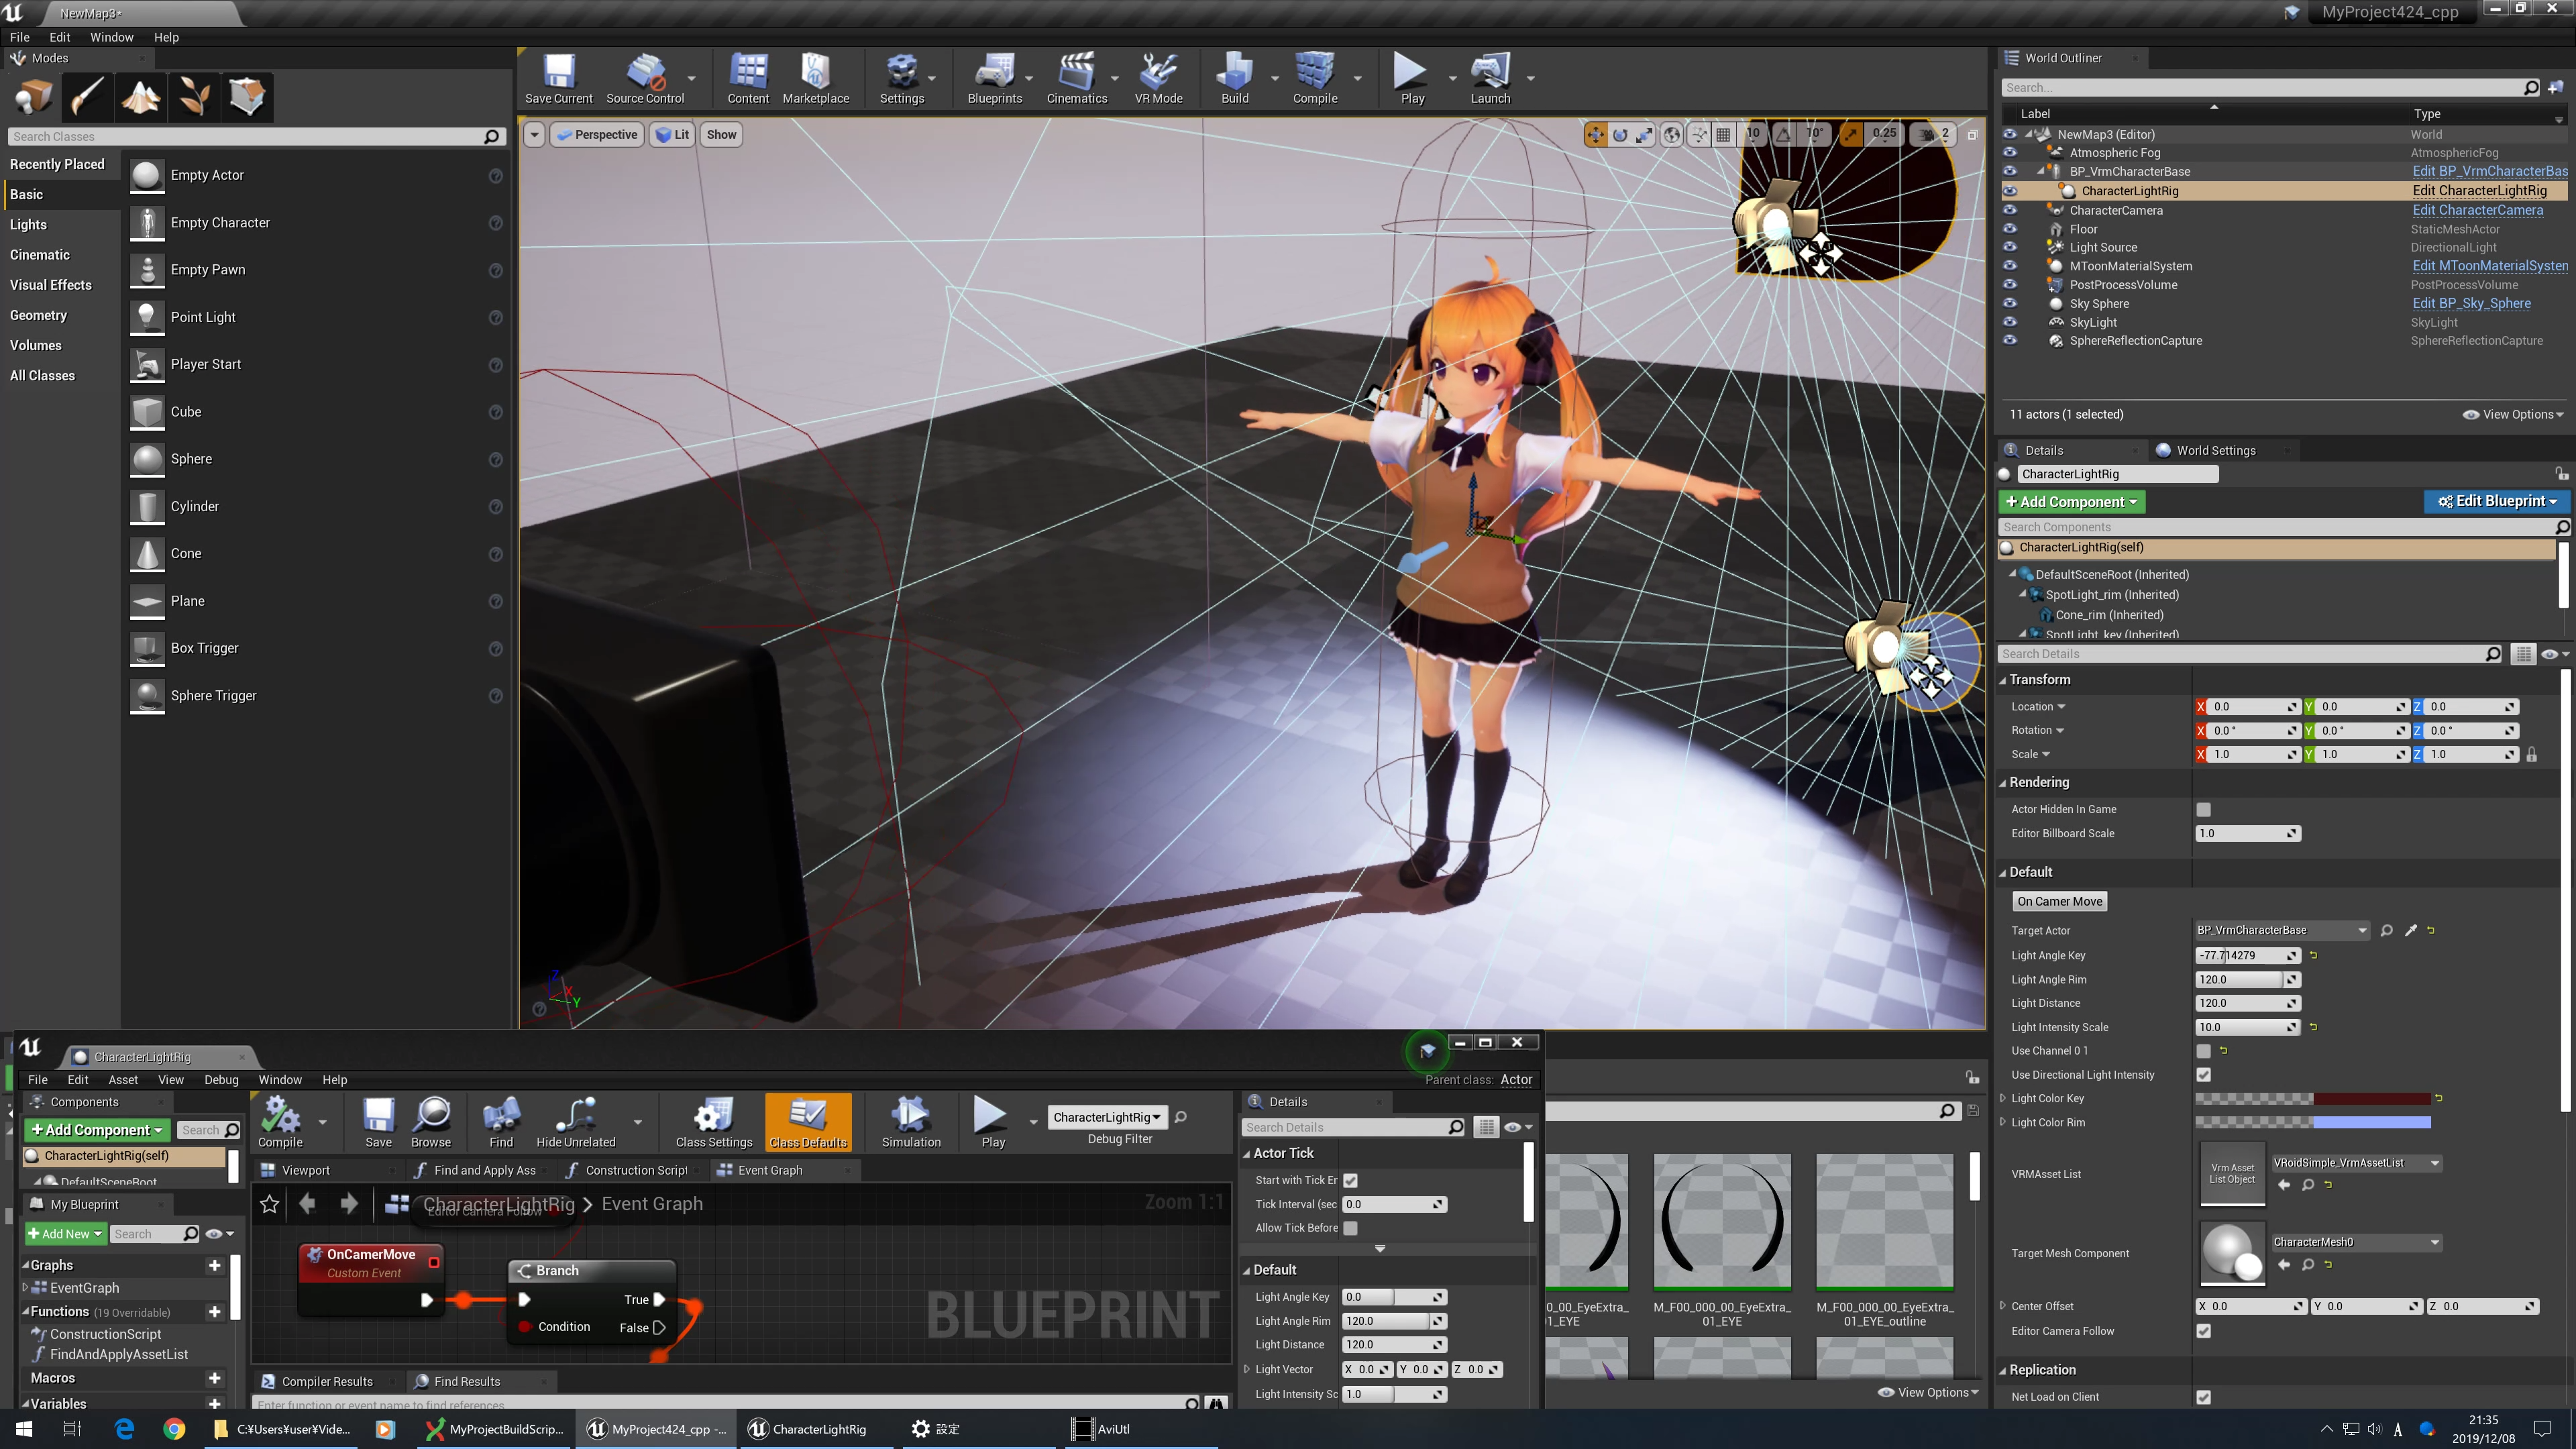
Playと同じライトが効いている。Editorでもカメラと連動する。|
環境:UE4.24 preview4 (UE4.20~で動作確認)
モデル:ついんてちゃん
https://hub.vroid.com/characters/6515310034341535951/models/6479090333116559171
C++での実装です。
解説
内容は2つ「Editor/Simulateのカメラ座標取得」「EditorでBlueprint実行」です。
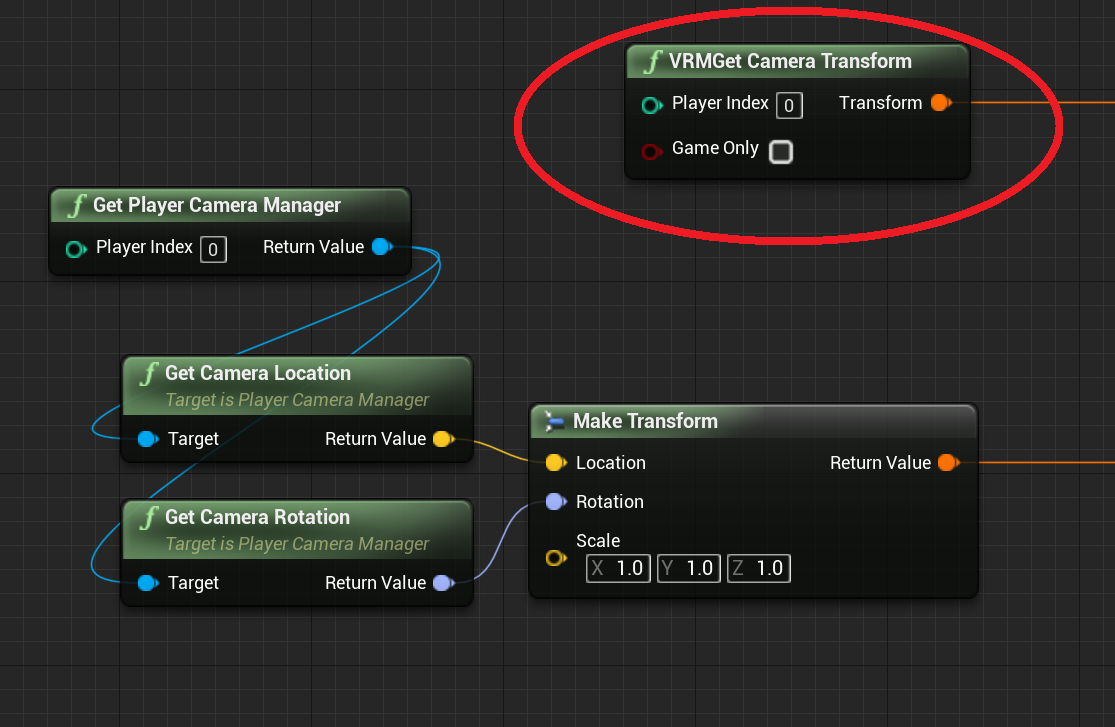
Editor/Simulateのカメラ座標を取得する
作ったノード
Editor時のカメラのTransformを取得します。Play中は既存のCameraManagerから取得した場合と同じ挙動にしてあります。
 |
ソース
要点は、以下のようにカメラ座標を取得することです。
・Editor/Simulateの時:FEditorViewportClientから取得
・Playの時:CameraManagerから取得
**カメラ取得のソース。クリックで展開します**
UFUNCTION(BlueprintPure, Category = "VRM4U", meta = (WorldContext = "WorldContextObject", DynamicOutputParam = "transform"))
static void VRMGetCameraTransform(const UObject* WorldContextObject, int32 PlayerIndex, bool bGameOnly, FTransform &transform);
void UVrmBPFunctionLibrary::VRMGetCameraTransform(const UObject* WorldContextObject, int32 PlayerIndex, bool bGameOnly, FTransform &transform) {

	transform.SetIdentity();

	bool bSet = false;
	auto *c = UGameplayStatics::GetPlayerCameraManager(WorldContextObject, PlayerIndex);

# if WITH_EDITOR
	if (bGameOnly == false) {
		if (GEditor) {
			if (GEditor->bIsSimulatingInEditor || c==nullptr) {
				if (GEditor->GetActiveViewport()) {
					FEditorViewportClient* ViewportClient = StaticCast<FEditorViewportClient*>(GEditor->GetActiveViewport()->GetClient());
					if (ViewportClient) {
						if (ViewportClient->AspectRatio > 0.f) {
							const auto &a = ViewportClient->ViewTransformPerspective;
							transform.SetLocation(a.GetLocation());
							transform.SetRotation(a.GetRotation().Quaternion());
							bSet = true;
						}
					}
				}
			}
		}
	}
# endif
	if (bSet == false) {
		if (c) {
			transform.SetLocation(c->GetCameraLocation());
			transform.SetRotation(c->GetCameraRotation().Quaternion());
		}
	}
}
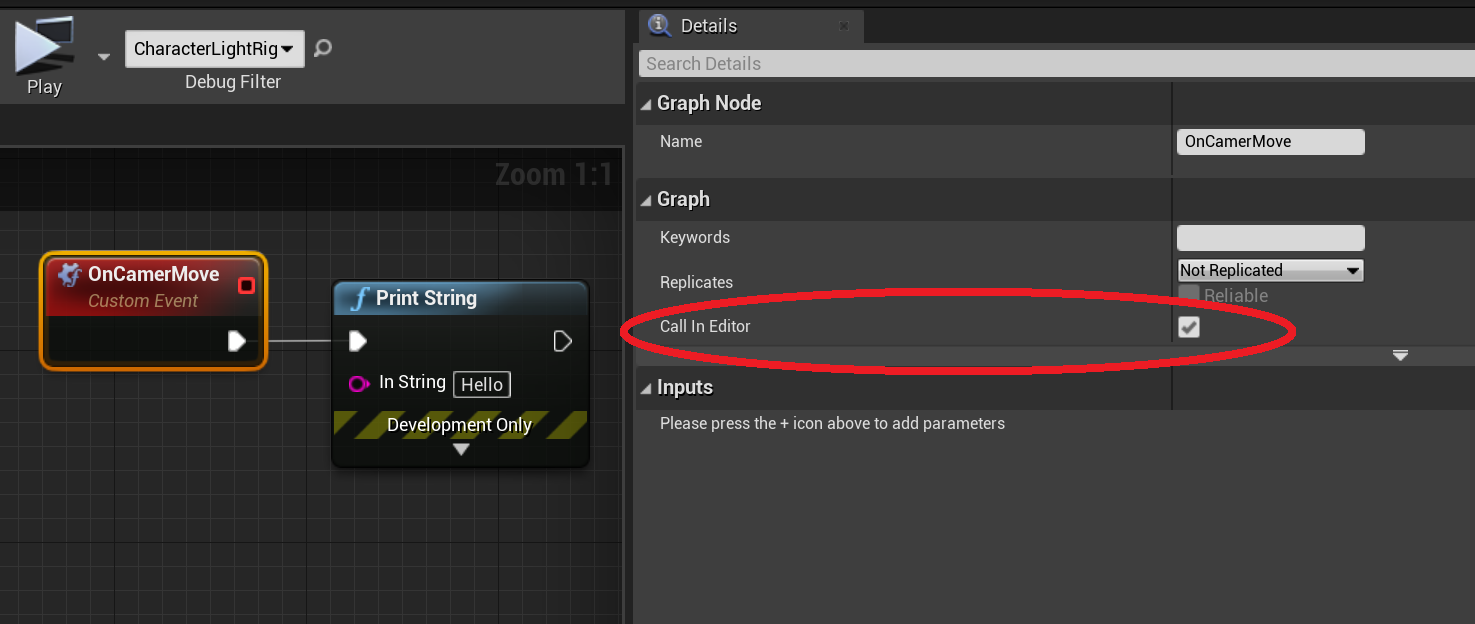
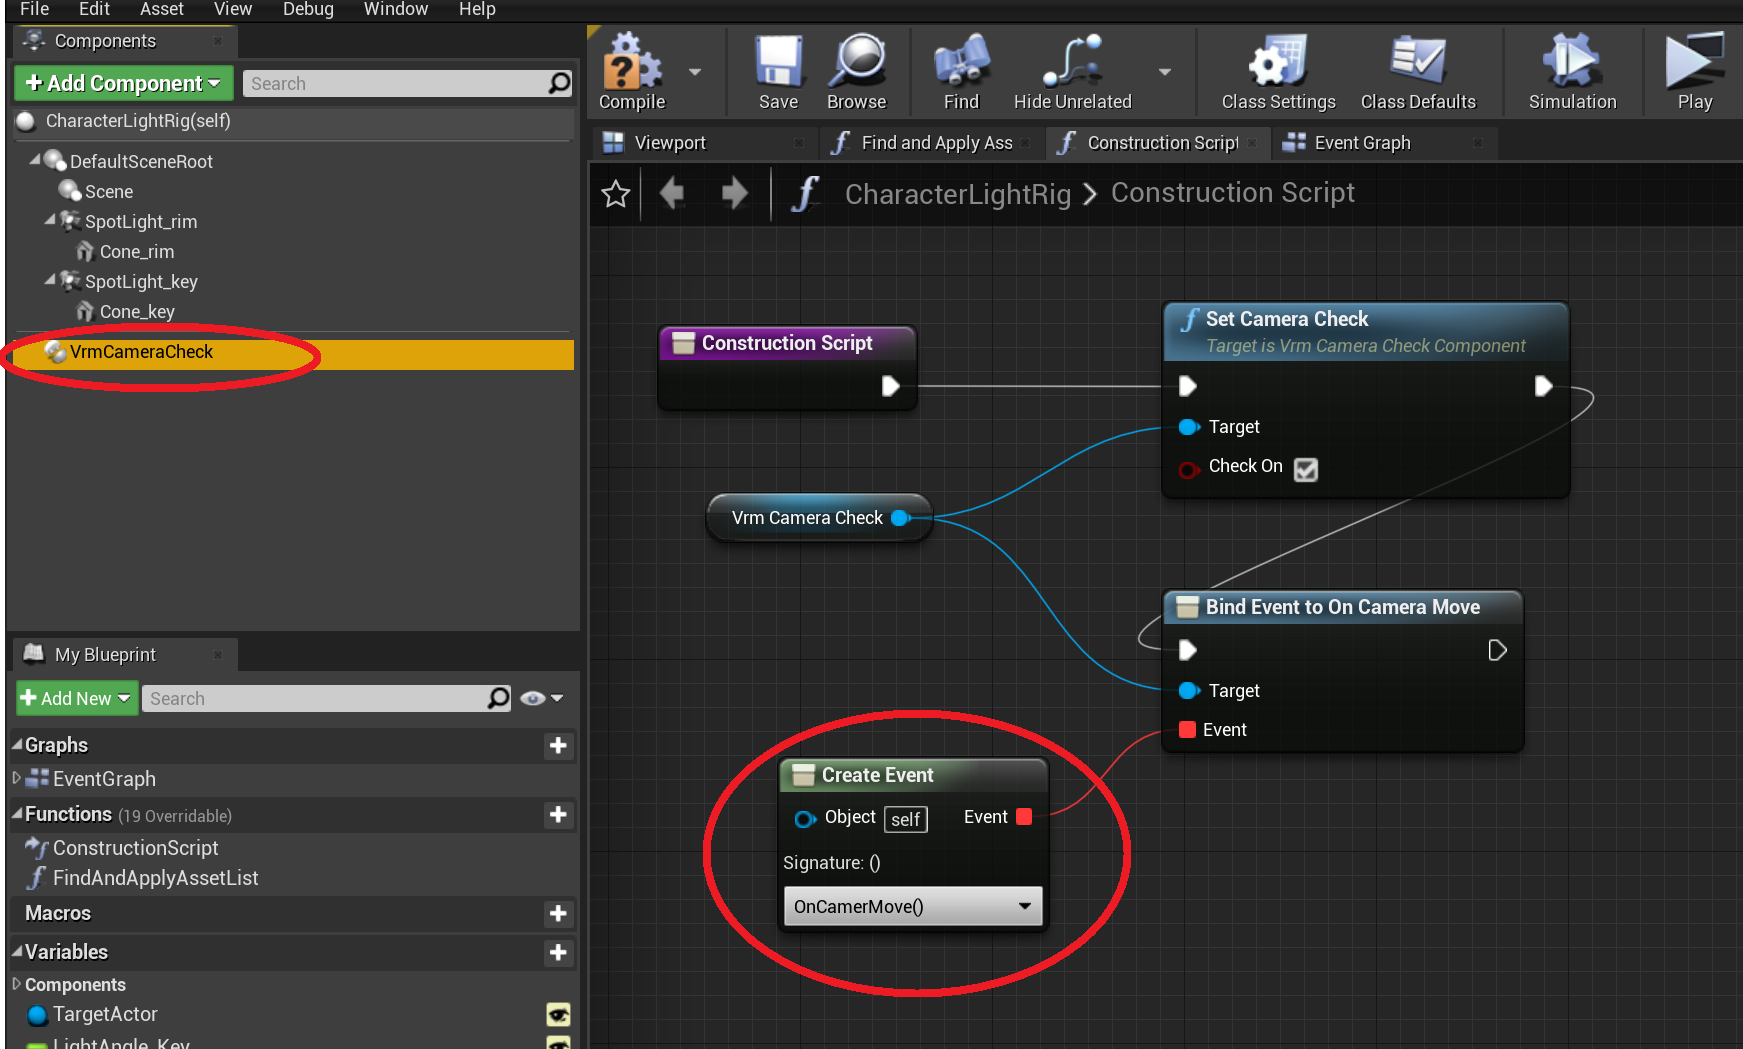
EditorでBlueprintを実行する
作ったノード
今回はActorComponentとして実装しました。
呼びたいカスタムイベントを作成し、Call In EditorのチェックボックスをOnにします。
ConstructionScriptにてイベントをアサインします。
これでEditorモードでカメラが移動した時にイベントが呼ばれます。
 |
 |
ソース
要点は、FEditorDelegates::OnEditorCameraMovedに関数を登録し、それをBlueprintに伝えてあげることです。
なおFEditorDelegatesは他にも面白いイベントを拾えます。興味のある方はEditor.hを眺めてみましょう。
**Editorでイベントを登録するソース。クリックで展開します**
# pragma once

# include "CoreMinimal.h"
# include "Misc/CoreDelegates.h"

# if WITH_EDITOR
# include "Editor/UnrealEdTypes.h"
# endif

# include "VrmCameraCheckComponent.generated.h"

/**
 *
 */
UCLASS(meta=(BlueprintSpawnableComponent))
class VRM4U_API UVrmCameraCheckComponent : public UActorComponent
{
	GENERATED_UCLASS_BODY()
public:
	DECLARE_DYNAMIC_MULTICAST_DELEGATE(FVrmCameraCheckDelegate);

	UPROPERTY(BlueprintAssignable)
	FVrmCameraCheckDelegate OnCameraMove;

	UFUNCTION(BlueprintCallable, Category = "VRM4U", meta = (DynamicOutputParam = "OutVrmAsset"))
	void SetCameraCheck(bool bCheckOn);

private:
	void OnCameraTransformChanged(const FVector&, const FRotator&, enum ELevelViewportType, int32);

	FDelegateHandle handle;
};
# include "VrmCameraCheckComponent.h"

# if WITH_EDITOR
# include "Editor.h"
# include "EditorViewportClient.h"
# include "LevelEditorViewport.h"
# endif

UVrmCameraCheckComponent::UVrmCameraCheckComponent(const FObjectInitializer& ObjectInitializer)
	:Super(ObjectInitializer)
{
}

void UVrmCameraCheckComponent::OnCameraTransformChanged(const FVector&, const FRotator&, ELevelViewportType, int32) {
	OnCameraMove.Broadcast();
}

void UVrmCameraCheckComponent::SetCameraCheck(bool bCheckOn) {
# if WITH_EDITOR
	if (bCheckOn) {
		handle = FEditorDelegates::OnEditorCameraMoved.AddUObject(this, &UVrmCameraCheckComponent::OnCameraTransformChanged);
	} else {
		if (handle.IsValid()) {
			FEditorDelegates::OnEditorCameraMoved.Remove(handle);
		}
	}
# endif
}
まとめ
Editor/Simulateでカメラ座標の取得、Blueprintの実行ができるようになりました。
それをキャラのライトシステムに利用しました。
手軽な確認環境があると、パラメータ調整が捗ります。
キャラの見た目はEditorでも確認できるようにしましょう!
(やりすぎると処理が重くて怒られちゃうので、On/Off機能も忘れずに)
おまけ(宣伝)
VRMモデルのインポート/描画にはVRM4Uを利用しています。上記ライトシステムはこのプラグインの機能です。
興味あれば是非ご利用どうぞ!
https://github.com/ruyo/VRM4U
おわりに
明日は @copo さんのobject space raymarching のお話です。