はじめに
株式会社UnReactのレガシーバックエンドこと わだ です。
Swiper.jsを使用する際に
Swiper.jsとは
jQueryは不要でJavaScriptとCSSでスライドショーを実装することができるとても便利なライブラリです。
npmを利用して実装することができますが、Shopifyではnpmを使用できないのでコードを貼り付ける方法を使用します。
問題点
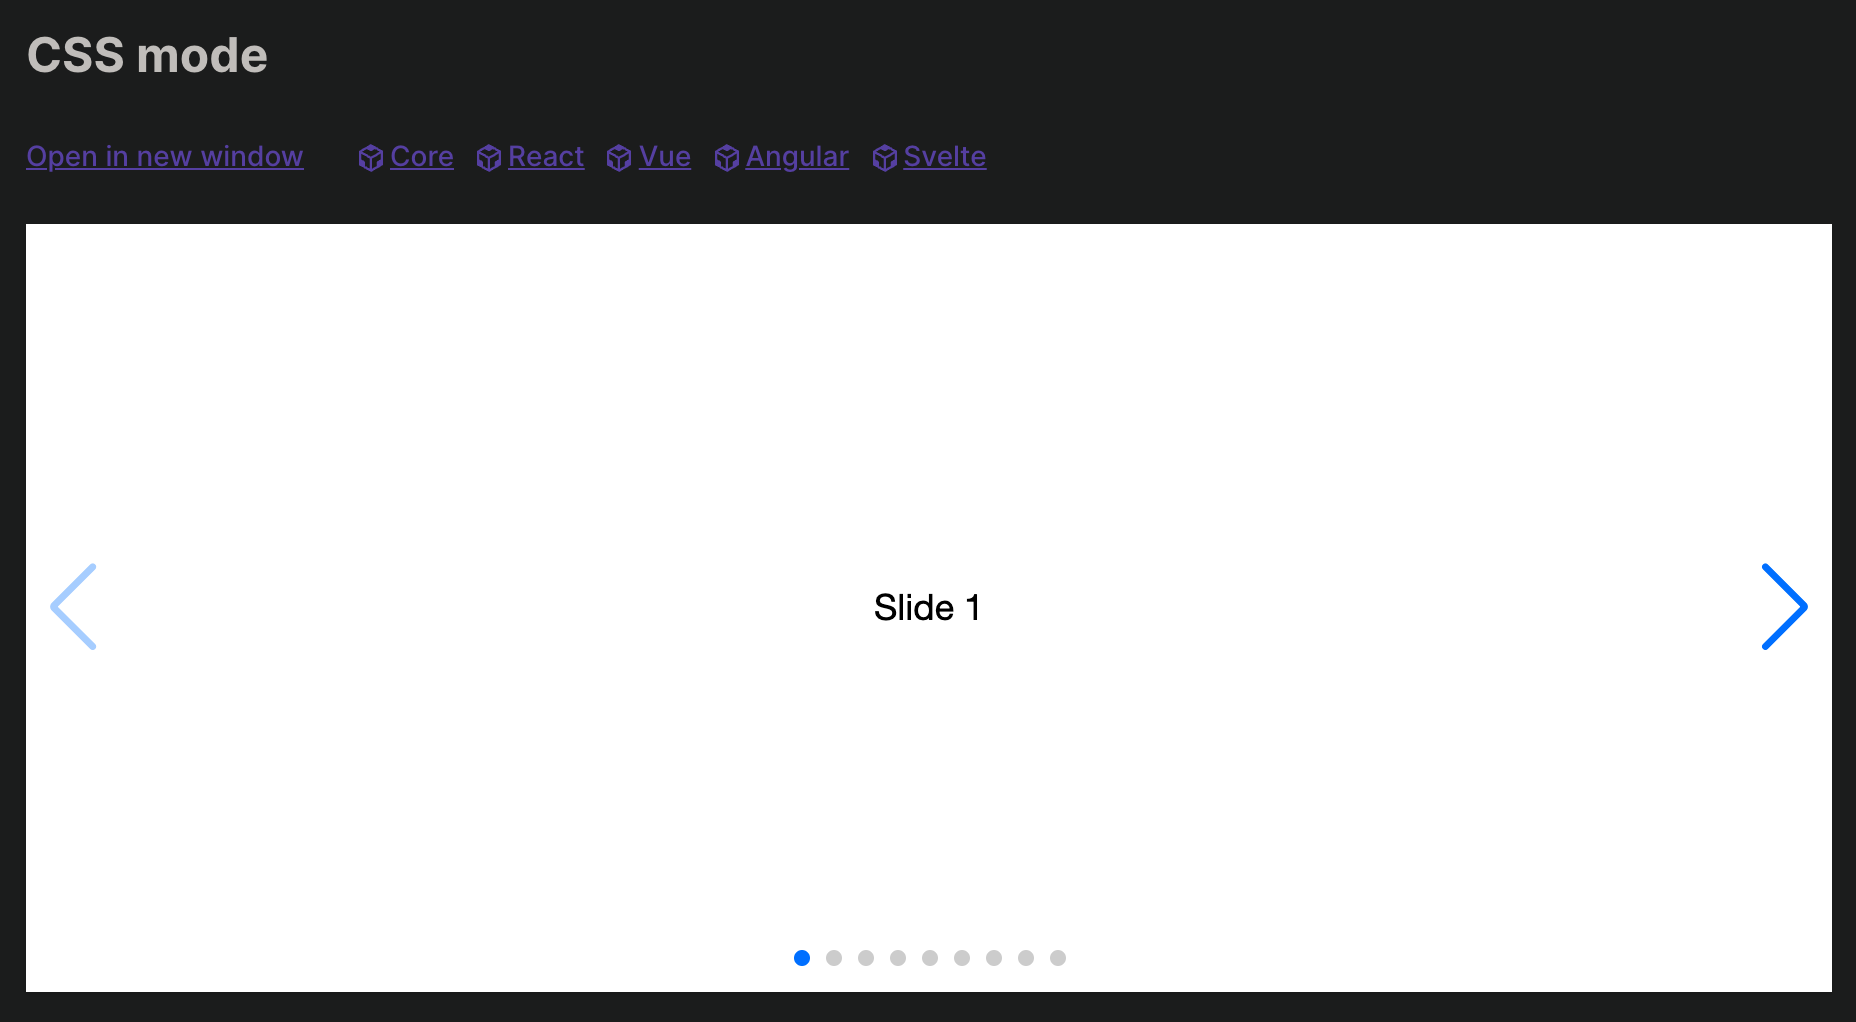
デモ画像↓
実際の画像↓

私の遭遇した問題点は、デモ通りの矢印が現れないという現象です。
正確には、要素は存在するが透明で見えないという状態です。
要素の高さが文字の高さと同じなのは
今回は、私が解決した方法を解説します。
完成物
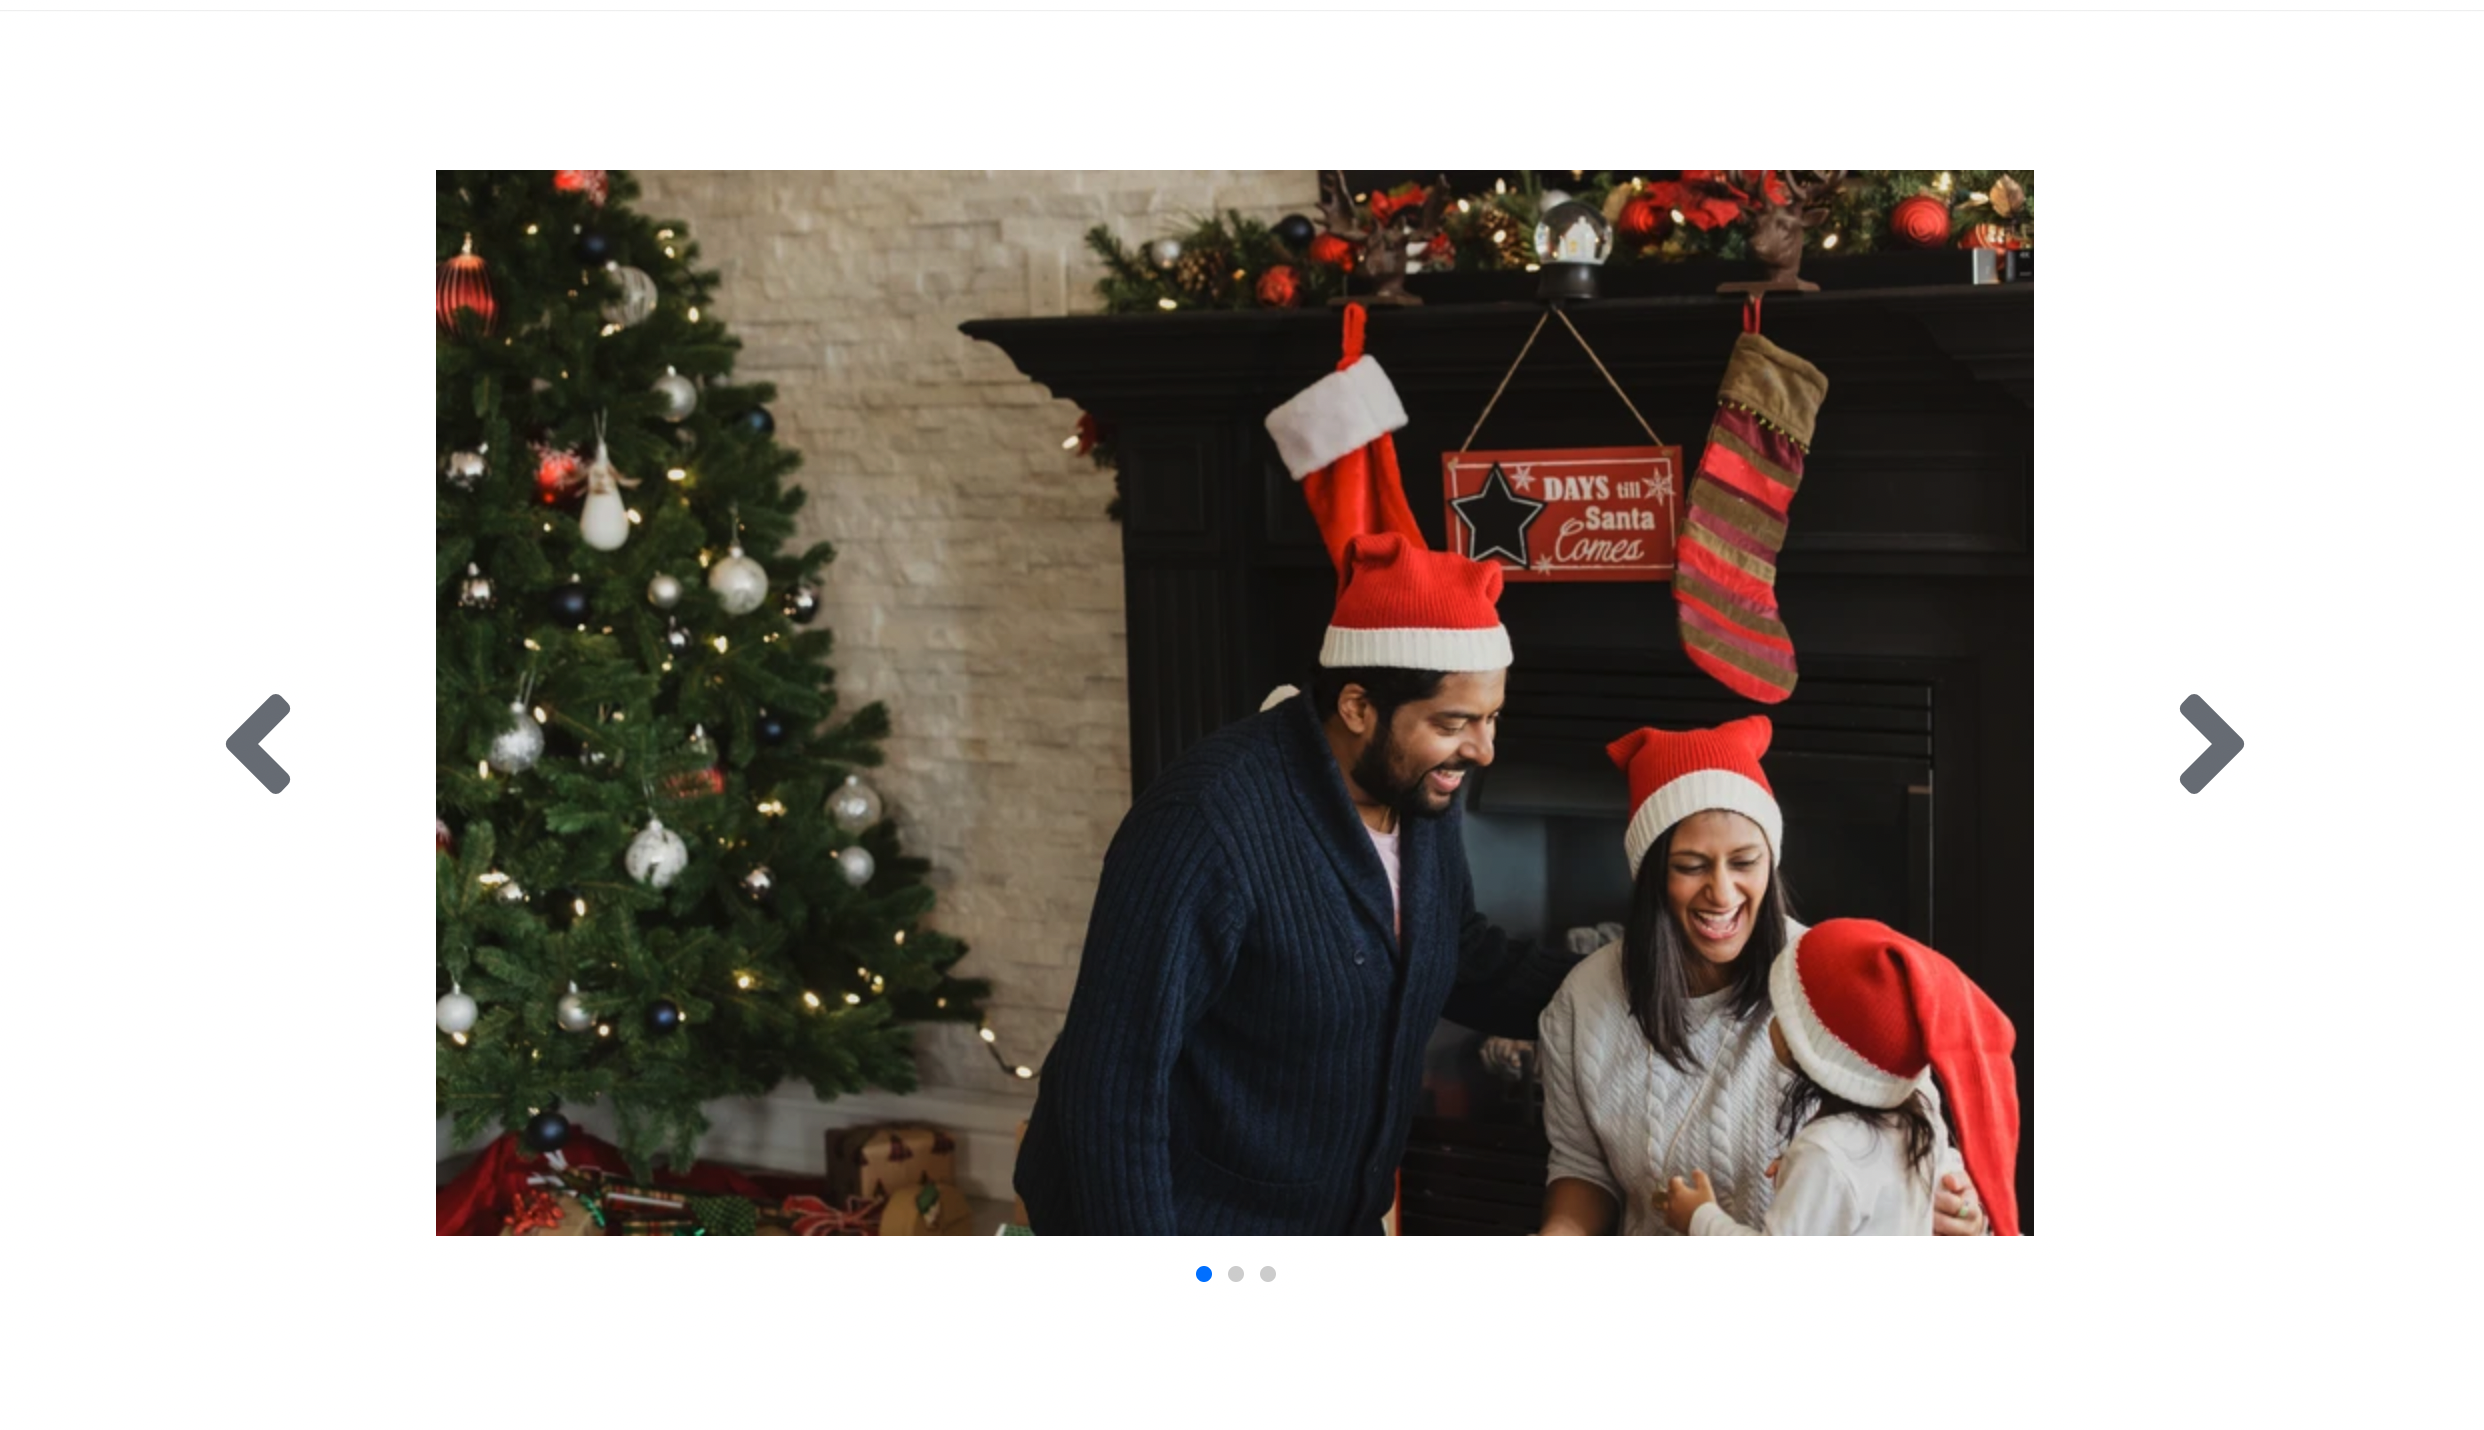
- 矢印をFontAwsomeで実装
- 矢印を外に出す。
- 永遠ループする。
実装のポイント
CodeSandBoxを開く
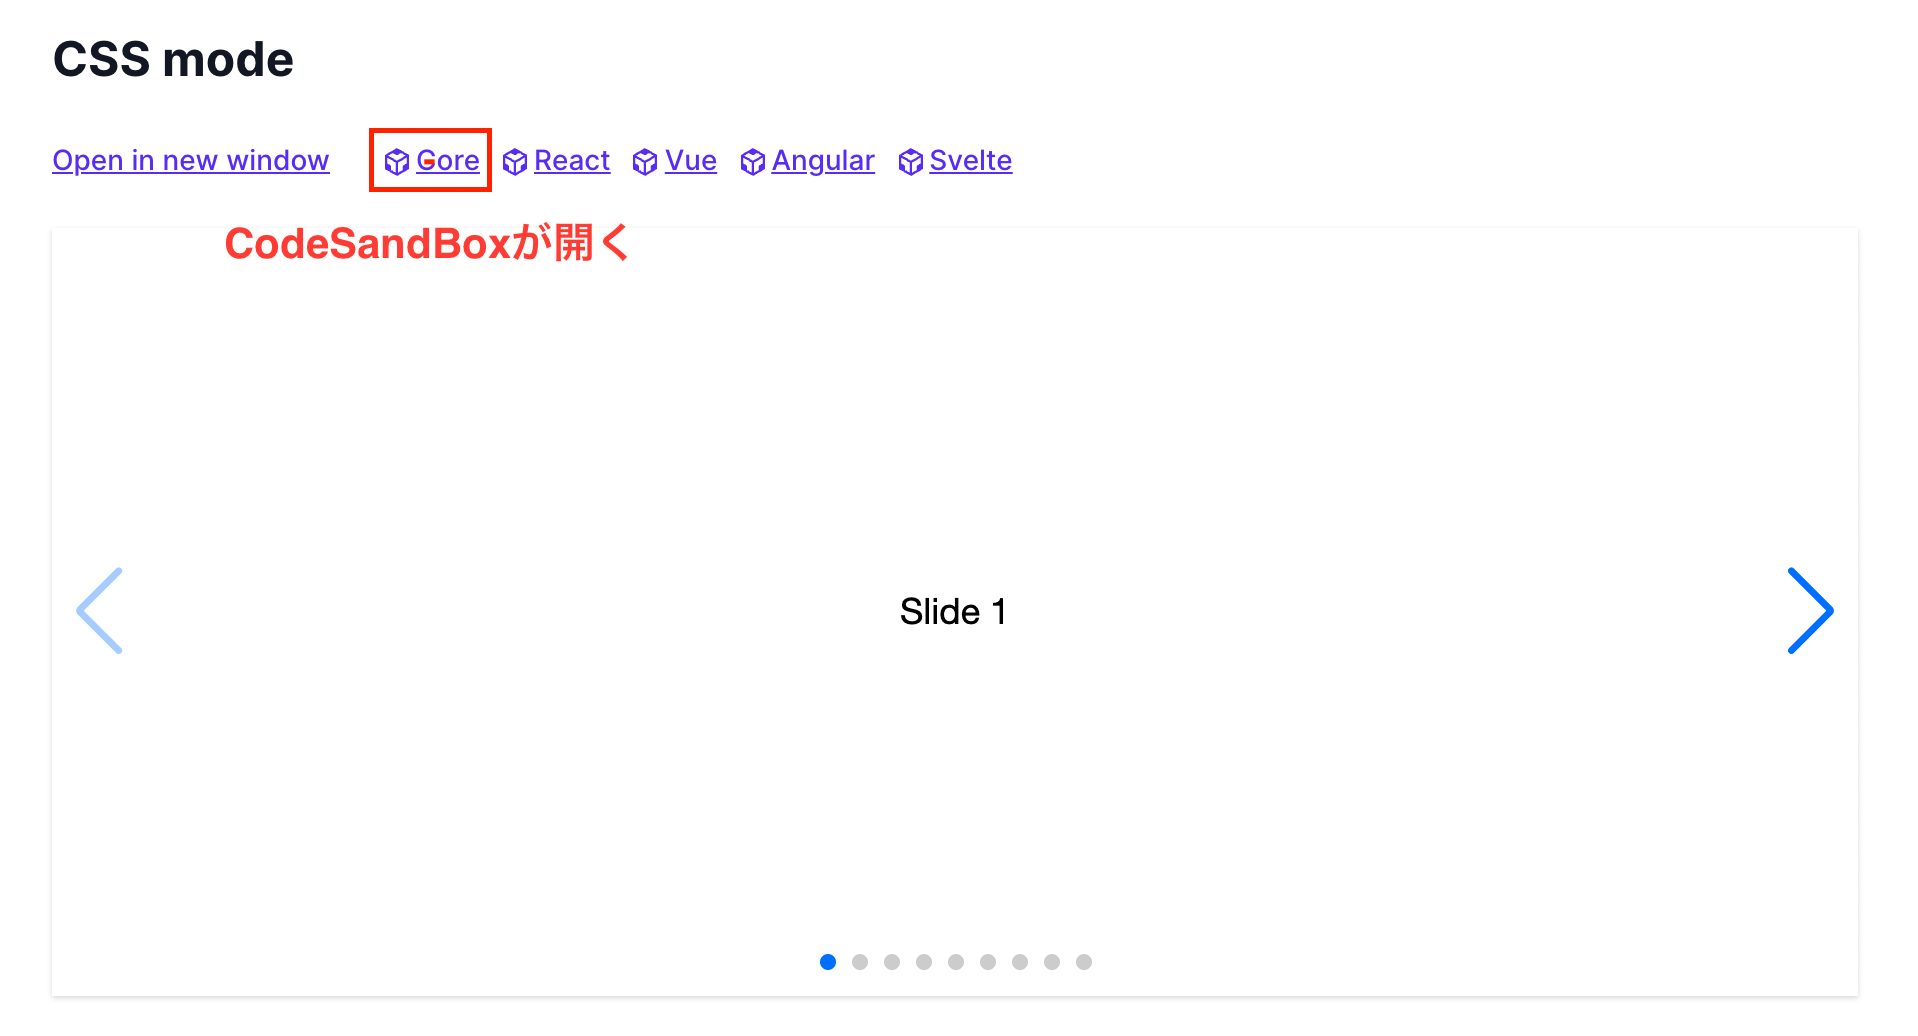
Coreというボタンをクリックすると、CodeSandBoxを開くことができます。
ここで、使用するコードが見られます。
必要なコードの読み込み
headタグの末尾に、必要なCSSを読み込みます。
Shopifyではtheme.liquidにheadタグは存在します。
    <!-- Link Swiper's CSS -->
    <link
      rel="stylesheet"
      href="https://unpkg.com/swiper/swiper-bundle.min.css"
    />
bodyタグの末尾に必要なJavaScriptを読み込みます。
Shopifyではtheme.liquidにbodyタグは存在します。
動きのパラメーターを設定しています。
      <!-- Swiper JS -->
      <script src="//unpkg.com/swiper/swiper-bundle.min.js"></script>

    <script>
      var swiper = new Swiper(".mySwiper", {
        cssMode: true,
        navigation: {
          nextEl: ".swiper-button-next",
          prevEl: ".swiper-button-prev",
        },
        pagination: {
          el: ".swiper-pagination",
        },
        mousewheel: true,
        keyboard: true,
      });
    </script>
セクション作成
セクションファイルにhtmlと詳細のCSSを貼り付けます。
    <!-- Demo styles -->
    <style>
      html,
      body {
        position: relative;
        height: 100%;
      }

      body {
        background: #eee;
        font-family: Helvetica Neue, Helvetica, Arial, sans-serif;
        font-size: 14px;
        color: #000;
        margin: 0;
        padding: 0;
      }

      .swiper {
        width: 100%;
        height: 100%;
      }

      .swiper-slide {
        text-align: center;
        font-size: 18px;
        background: #fff;

        /* Center slide text vertically */
        display: -webkit-box;
        display: -ms-flexbox;
        display: -webkit-flex;
        display: flex;
        -webkit-box-pack: center;
        -ms-flex-pack: center;
        -webkit-justify-content: center;
        justify-content: center;
        -webkit-box-align: center;
        -ms-flex-align: center;
        -webkit-align-items: center;
        align-items: center;
      }

      .swiper-slide img {
        display: block;
        width: 100%;
        height: 100%;
        object-fit: cover;
      }
    </style>

    <!-- Swiper -->
    <div class="swiper mySwiper">
      <div class="swiper-wrapper">
        <div class="swiper-slide">Slide 1</div>
        <div class="swiper-slide">Slide 2</div>
        <div class="swiper-slide">Slide 3</div>
        <div class="swiper-slide">Slide 4</div>
        <div class="swiper-slide">Slide 5</div>
        <div class="swiper-slide">Slide 6</div>
        <div class="swiper-slide">Slide 7</div>
        <div class="swiper-slide">Slide 8</div>
        <div class="swiper-slide">Slide 9</div>
      </div>
      <div class="swiper-button-next"></div>
      <div class="swiper-button-prev"></div>
      <div class="swiper-pagination"></div>
    </div>
FontAwsomeの使用
矢印が透明で見えないので、FontAwsomeで矢印を実装します。
headタグにfontawsomeを読み込みもす。
<head>

~略~

<link
  href="https://use.fontawesome.com/releases/v5.6.1/css/all.css"
  rel="stylesheet" />
</head>
表示したい矢印のfontawsomeのページを探します。
iタグで表示する方法もありますが、swiper.jsのhtml構造を崩したくないので、contentを使用する方法を使います。
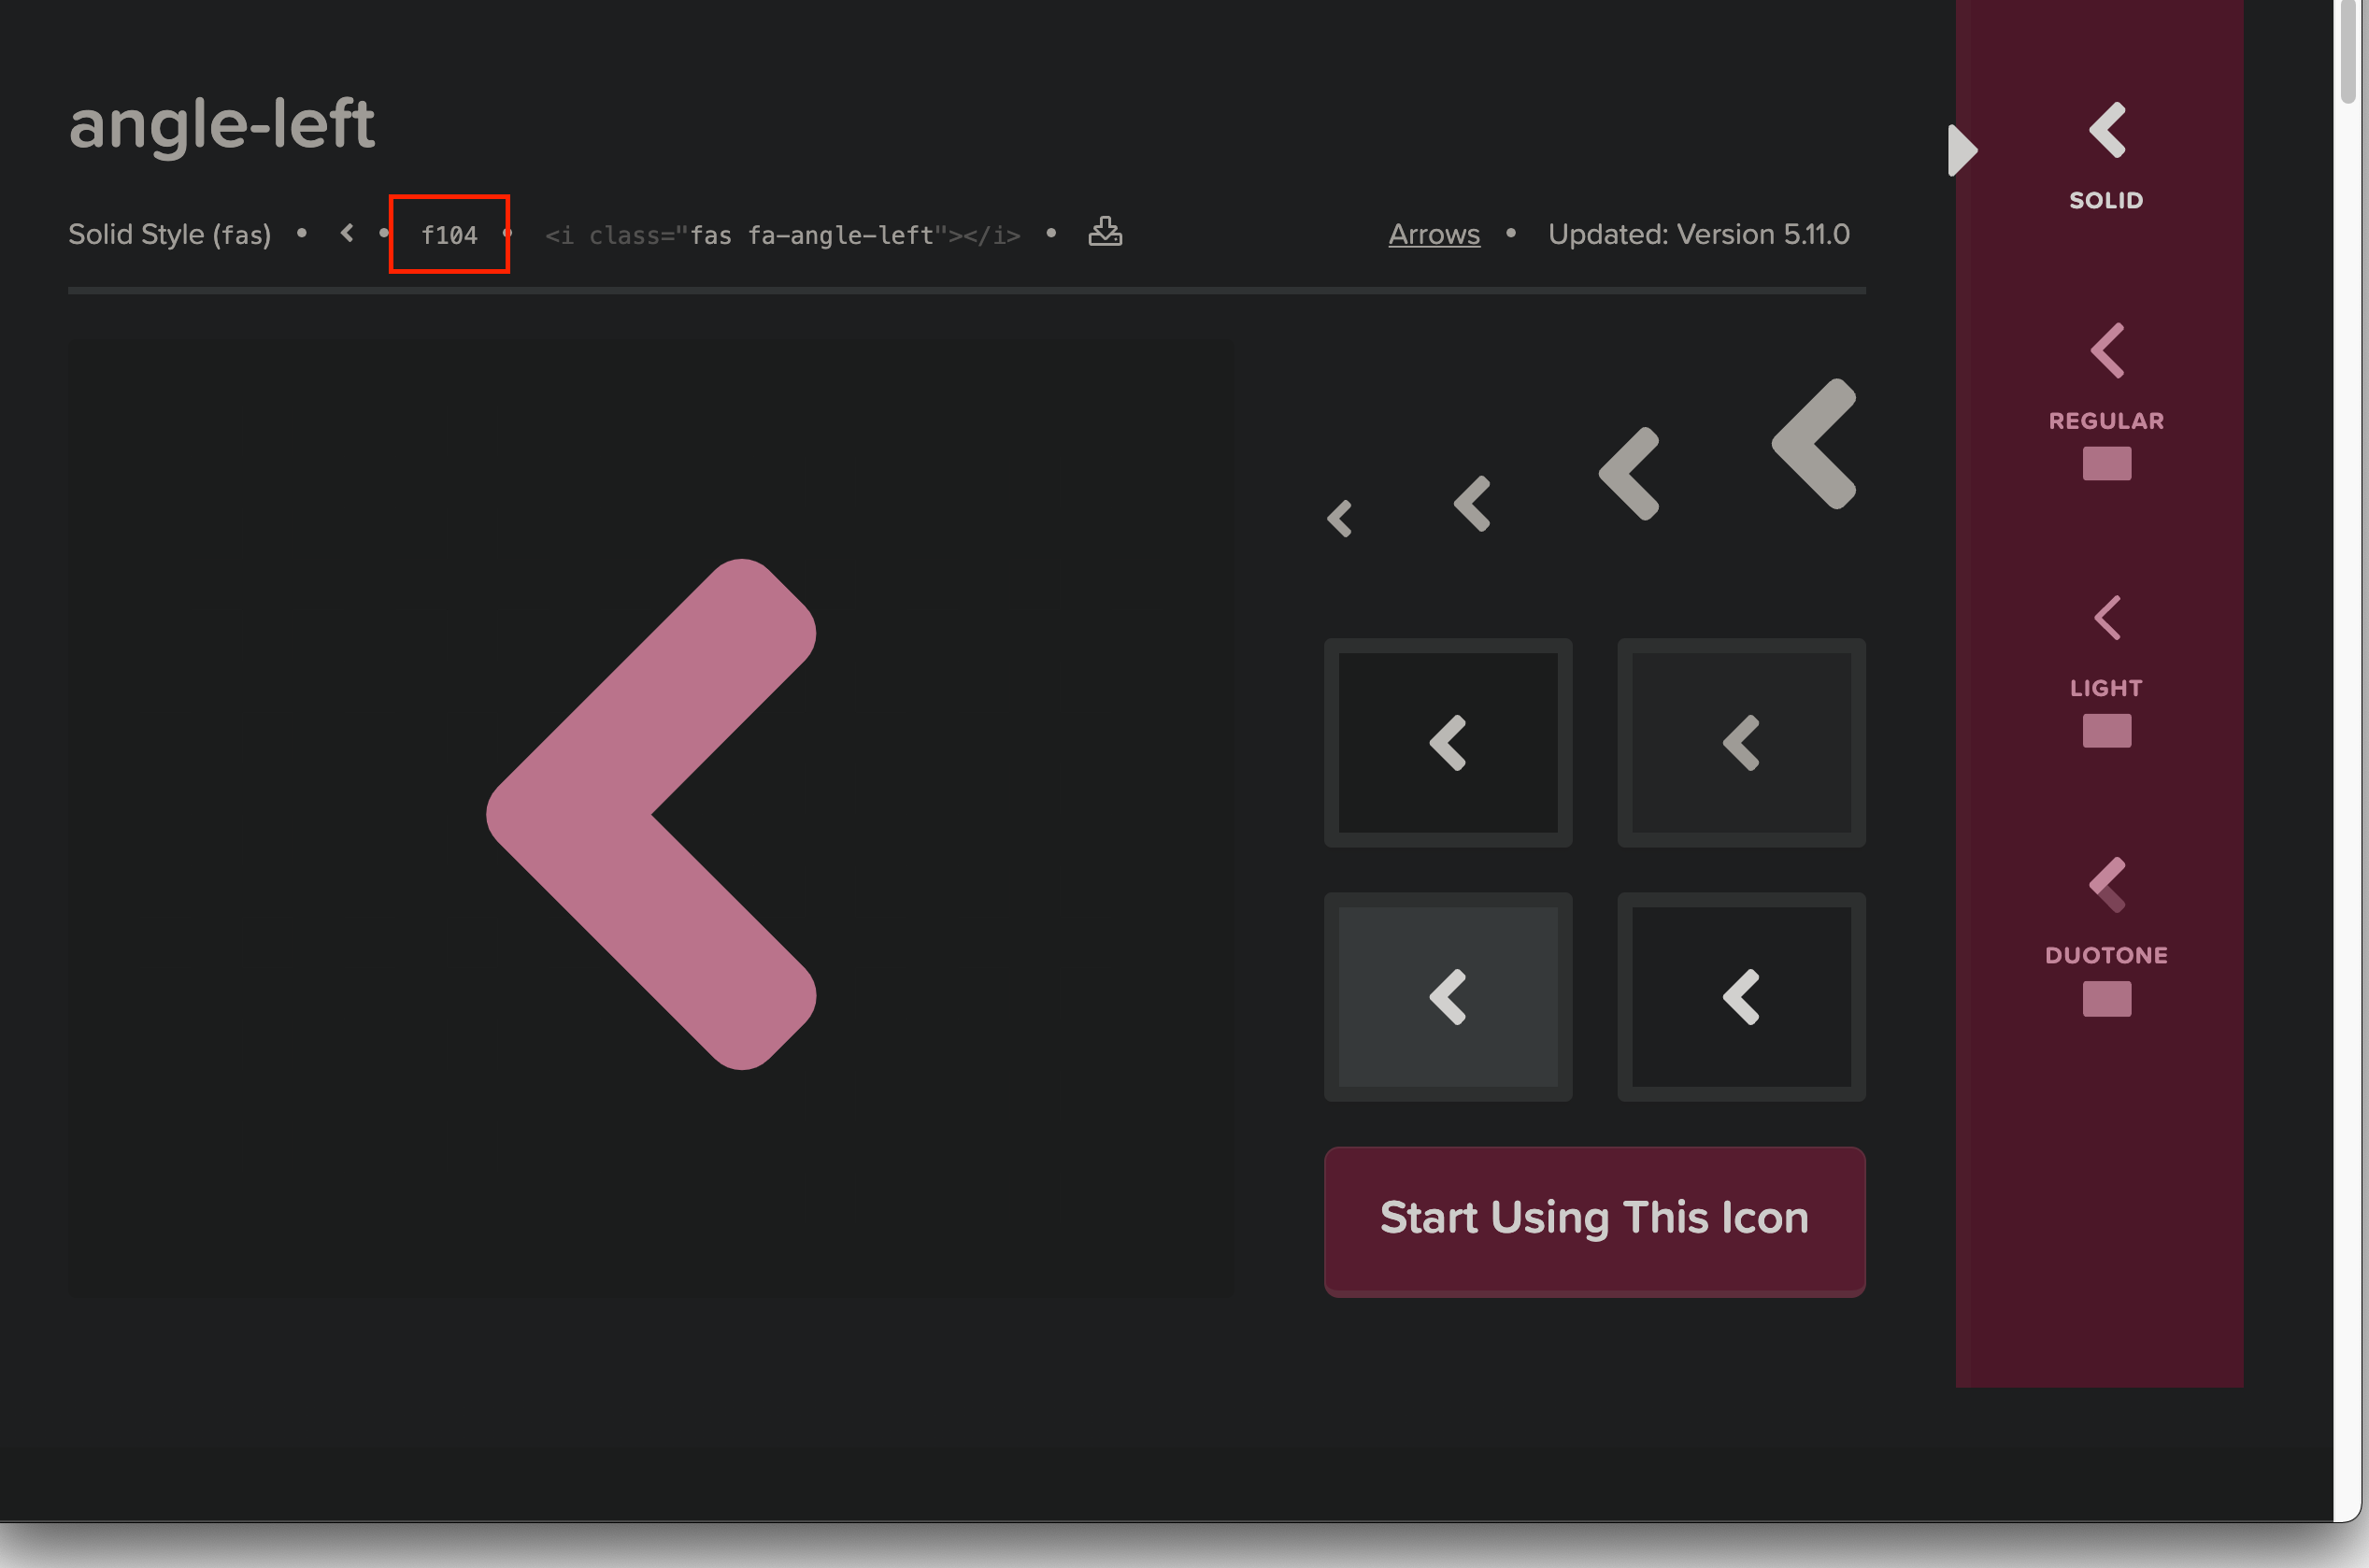
  .swiper-button-prev::after {
    font-family: "Font Awesome 5 Free";
    font-weight: bold;
    content: "\f104";
  }
設定するCSSは3つです。
- font-family
- font-weight
- content
contentの中にバックスラッシュの後に、fontawsomeのサイトに記載されているコードを入れます。
管理画面から画像を入れるようにする。
blockから画像を呼び出す方法を示します。
  <div class="swiper mySwiper my-10 md:my-20 max-w-5xl">
    <div class="swiper-wrapper mb-10">
      {%- for block in section.blocks -%}
      <div class="swiper-slide">
        <img src="{{ block.settings.image | img_url: '800x' }}">
      </div>
      {%- endfor -%}
    </div>
    <div class="swiper-button-next"></div>
    <div class="swiper-button-prev"></div>
    <div class="swiper-pagination"></div>
  </div>

{% schema %}
  {
    "name": "オリジナルスワイパー",
    "settings": [
      {
        "type": "text",
        "id": "heading",
        "label": "Heading"
      }
    ],
    "blocks": [
      {
        "type": "image",
        "name": "block image",
        "settings": [
        {
          "type": "image_picker",
          "id": "image",
          "label": "Image"
        }
        ]
      }
    ],
    "presets": [
      {
        "name": "オリジナルスワイパー"
      }
    ]
  }
{% endschema %}
矢印を外に出す。
以下のCSSが画像をいっぱいに広げているので、画像幅の指定を削除します。
.swiper-slide img {
  width: 100%;
  height: 100%;
}
下記の '800x' で画像サイズを調節できます。
<img src="{{ block.settings.image | img_url: '800x' }}">
あとは、矢印のサイズを大きく、画像の要素の最大幅を指定、マージンを調節してください。
JavaScriptの設定で、loopで最初のスライドに戻ったり、speed でスライドの移動スピードを調節できます。
実装したコード
実装したコードを全て以下に示します。
※TailwindCSSを使用しています。
<!-- Demo styles -->
<style>
  html,
  body {
    position: relative;
    height: 100%;
  }

  .swiper {
    margin-left: auto;
    margin-right: auto;
  }

  .swiper-slide {
    text-align: center;
    font-size: 18px;
    background: #fff;

    /* Center slide text vertically */
    display: -webkit-box;
    display: -ms-flexbox;
    display: -webkit-flex;
    display: flex;
    -webkit-box-pack: center;
    -ms-flex-pack: center;
    -webkit-justify-content: center;
    justify-content: center;
    -webkit-box-align: center;
    -ms-flex-align: center;
    -webkit-align-items: center;
    align-items: center;
  }

  .swiper-slide img {
    display: block;
    object-fit: cover;
  }
  .sqiper-wrapper {
    position: relative;
  }

  .swiper-button-next::after {
    font-family: "Font Awesome 5 Free";
    font-weight: bold;
    font-size: 5rem;
    content: "\f105";
    color: #71767e;
  }

  .swiper-button-prev::after {
    font-family: "Font Awesome 5 Free";
    font-weight: bold;
    font-size: 5rem;
    content: "\f104";
    color: #71767e;
  }

  .swiper-pagination {
    color: #71767e;
  }

</style>

<!-- Swiper -->
  <div class="swiper mySwiper my-10 md:my-20 max-w-5xl">
    <div class="swiper-wrapper mb-10">
      {%- for block in section.blocks -%}
      <div class="swiper-slide">
        <img src="{{ block.settings.image | img_url: '800x' }}">
      </div>
      {%- endfor -%}
    </div>
    <div class="swiper-button-next"></div>
    <div class="swiper-button-prev"></div>
    <div class="swiper-pagination"></div>
  </div>
<!-- Swiper -->

{% schema %}
  {
    "name": "オリジナルスワイパー",
    "settings": [
      {
        "type": "text",
        "id": "heading",
        "label": "Heading"
      }
    ],
    "blocks": [
      {
        "type": "image",
        "name": "block image",
        "settings": [
        {
          "type": "image_picker",
          "id": "image",
          "label": "Image"
        }
        ]
      }
    ],
    "presets": [
      {
        "name": "オリジナルスワイパー"
      }
    ]
  }
{% endschema %}
<!doctype html>

~略~

<head>

~略~

    <!-- Link Swiper's CSS -->
    <link
      rel="stylesheet"
      href="https://unpkg.com/swiper/swiper-bundle.min.css"
    />
    <link href="https://use.fontawesome.com/releases/v5.6.1/css/all.css" rel="stylesheet" />
</head>

<body>

~略~


      <!-- Swiper JS -->
      <script src="//unpkg.com/swiper/swiper-bundle.min.js"></script>

      <!-- Initialize Swiper -->
      <script>
        var swiper = new Swiper(".mySwiper", {
          slidesPerView: 1,
          spaceBetween: 30,
          loop: true,
          speed: 1200,
          pagination: {
            el: ".swiper-pagination",
            clickable: true,
          },
          autoplay: {
            delay: 3000,
            disableOnInteraction: false,
          },
          navigation: {
            nextEl: ".swiper-button-next",
            prevEl: ".swiper-button-prev",
          },
        });
      </script>
</body>
</html>
追記(2021/12/21)
「Web 制作リファレンス」 という最強のサイトでSwiperについて解説がありました。
全記事非常に丁寧かつ詳細な記事を書いてありますので、どうぞご参考に。