目次
- はじめに
- アプリ概要
- 開発環境
- 画像収集
- 顔領域の検出
- 画像の分割
- 画像の水増し
- モデルの作成・学習
- おわりに
はじめに
この記事は、Aidemy premium plan AIアプリ開発講座の成果物作成の過程を記録したものです。
私は将棋に興味があるので、将棋棋士の顔を判別できるアプリを作成しました。
アプリ概要
Web上にアップロードされた画像から藤井聡太・渡辺明・永瀬拓矢・豊島将之・羽生善治の内の誰かを判別するアプリ。
開発環境
Google Colaboratory
画像収集
Seleniumを使ってYahooからそれぞれの棋士の画像を取得し、GoogleDriveに保存しました。requestsとBeautiful Soupでは画像を取得できなかったので、Seleniumを使用しました。
1人あたり100枚の画像を取得することができました。取得した画像の中で、関係ない画像やマスクをしている画像などの使用できない画像は削除しました。その結果、今回使用する画像は1人あたり80枚になりました。
!apt-get update
!apt install chromium-chromedriver
!cp /usr/lib/chromium-browser/chromedriver /usr/bin
!pip install selenium

from selenium import webdriver
from time import sleep
import os
import pandas as pd
import requests

options = webdriver.ChromeOptions()
options.add_argument('--headless')
options.add_argument('--no-sandbox')
options.add_argument('--disable-gpu')
options.add_argument('--disable-dev-shm-usage')
options.add_argument('--incognito')

name = ["藤井聡太","渡辺明","永瀬拓矢","豊島将之","羽生善治"]

for search_name in name:
  driver = webdriver.Chrome("chromedriver",options=options)
  driver.implicitly_wait(10)

  driver.get("https://search.yahoo.co.jp/image")

  sleep(3)

  search_box = driver.find_element_by_class_name("SearchBox__searchInput")
  search_box.send_keys(search_name)
  search_box.submit()

  sleep(3)

  #下までスクロール
  height = 1000
  while height < 50000:
    driver.execute_script("window.scrollTo(0,{});".format(height))
    height += 1000
    sleep(2)

  elements = driver.find_elements_by_class_name("sw-Thumbnail")

  #取得する画像の枚数を出力
  print(search_name + ":" + str(len(elements)))

  image_list = []

  #画像のURLを取得
  for i,e in enumerate(elements,start=1):
    n = f"{search_name}_{i}"
    image_url = e.find_element_by_tag_name("img").get_attribute("src")

    d = {"filename": n,"image_url": image_url}

    image_list.append(d)

    sleep(3)

  #取得したURLをCSVファイルに保存
  df = pd.DataFrame(image_list)

  df.to_csv('{}_image_url.csv'.format(search_name))

  driver.quit()

# CSVファイルに保存したURLから画像を取得
for n in name:
  df = pd.read_csv('{}_image_url.csv'.format(n))

  os.makedirs('/content/drive/MyDrive/'+ n +'/',exist_ok=True) #GoogleDrive内にフォルダを作成

  for save_n, img_url in zip(df.filename[:],df.image_url[:]):
    image = requests.get(img_url)
    with open("/content/drive/MyDrive/" + n + "/" + save_n + ".jpg", "wb") as f:
      f.write(image.content) #画像をGoogle Driveに保存

      sleep(3)
顔領域の検出
OpenCVのカスケード分類器haarcascade_frontalface_default.xml使用して顔部分を切り抜きました。半分くらいの画像は、顔部分を検出できなかったり顔部分以外を検出したりして切り抜きに失敗していたので、自力で顔部分を切り抜きました。face_recognitionライブラリやFace APIを使えばより正確に顔検出できるようなので今度試してみようと思います。
import cv2
import matplotlib.pyplot as plt
import glob
import os

name = ["藤井聡太","渡辺明","永瀬拓矢","豊島将之","羽生善治"]

for n in name:
  output_path = "/content/drive/MyDrive/{}/".format(n)
  file_1 = "/content/drive/MyDrive/{}_face_true/".format(n)
  file_2 = "/content/drive/MyDrive/{}_face_false/".format(n)

  file_list = glob.glob(output_path+"{}*.jpg".format(n))
  os.makedirs(file_1)
  os.makedirs(file_2)

  for i,filename in enumerate(file_list,start=1):
    img = cv2.imread(filename)

    if img is None:
      print(filename)
      print()

    img_gray = cv2.cvtColor(img,cv2.COLOR_BGR2GRAY)
    cascade = cv2.CascadeClassifier(cv2.data.haarcascades + "haarcascade_frontalface_default.xml")

    face = cascade.detectMultiScale(img_gray)

    if len(face) > 0:
      #切り抜きに成功した画像を保存
      for x,y,w,h in face:
        image = img[y:y+h,x:x+w]
        cv2.imwrite(file_1 + "{}_{}.jpg".format(n,str(i)),image)
    else:
      #切り抜きに失敗した画像を保存
      cv2.imwrite(file_2 + "{}_{}.jpg".format(n,str(i)),img)
画像の分割
画像を学習データとテストデータに分けます。今回は1人あたり80枚の画像の内8割を学習データ、2割の画像をテストデータとして使用します。
import random
import glob
import os
import shutil

name = ["藤井聡太","渡辺明","永瀬拓矢","豊島将之","羽生善治"]

path = "/content/drive/MyDrive/"

for n in name:
  os.makedirs("{}{}_test".format(path,n),exist_ok=True)

  files = glob.glob(os.path.join("{}{}_face_true/*.jpg".format(path,n)))
  random.shuffle(files)

  for i in range(len(files)//5):
    shutil.move(str(files[i]),"{}{}_test".format(path,n))
画像の水増し
学習データが少なかったので、画像の水増しをしました。openCVを使い、閾値処理・ぼかし処理・モザイク処理・回転処理の4つの処理をして水増ししました。1人あたり900枚くらいまで学習データを増やすことができました。
import os
import numpy as np
import matplotlib.pyplot as plt
import cv2
import glob

name = ["藤井聡太","渡辺明","永瀬拓矢","豊島将之","羽生善治"]
path = "/content/drive/MyDrive/"

def scratch_image(img,thr=True,filt=True,resize=True,rotate=True):
  # 水増しの手法を配列にまとめる
  methods = [thr, filt, resize, rotate]

  img_size = img.shape
  filter1 = np.ones((3, 3))
  size = tuple([int(img_size[0]/2), int(img_size[1]/2)])
  mat = cv2.getRotationMatrix2D(size, 15, 1.0)

  # オリジナルの画像データを配列に格納
  images = [img]

  # 手法に用いる関数
  scratch = np.array([
                      lambda x: cv2.threshold(x, 100, 255, cv2.THRESH_TOZERO)[1],
                      lambda x: cv2.GaussianBlur(x, (3, 3), 0),
                      lambda x: cv2.resize(cv2.resize(x, (img_size[1] // 2, img_size[0] // 2)),(img_size[1], img_size[0])),
                      lambda x: cv2.warpAffine(x,mat,img_size[::-1][1:3])
                    ])

  doubling_images = lambda f, imag: (imag + [f(i) for i in imag])
  # methodsがTrueの関数で水増し
  for func in scratch[methods]:
      images = doubling_images(func, images)

  return images


for n in name:
  os.makedirs("{}{}_train".format(path,n),exist_ok=True)

  files = glob.glob(os.path.join("{}{}_face_true/*".format(path,n)))
  for i,filename in enumerate(files,start=1):
    img = cv2.imread(filename)

    images_list = scratch_image(img)

    output_path = "{}{}_train".format(path,n)

    for v, img in enumerate(images_list,start=1):
      cv2.imwrite("{}/{}_{}_{}.jpg".format(output_path,n,str(i),str(v)),img)
モデルの作成・学習
機械学習モデルを構築して学習させていきます。今回はVGG16モデルを使って転移学習を行いました。
転移学習とは、既に学習されているモデルを再利用して新しいモデルの学習を行うことです。転移学習を行うことによって、データや学習にかかる時間を大幅に減らすことができ、データが少なくても高い精度を出すことができます。今回使用するVGG16はImageNetと呼ばれる大規模な画像データを学習させたCNNモデルです。畳み込み層が13層、全結合層が3層、計16層の畳み込みニューラルネットワークになっています。
import os
import cv2
import glob
import random
import numpy as np
import matplotlib.pyplot as plt
from tensorflow.keras.utils import to_categorical
from tensorflow.keras.layers import Dense, Dropout, Flatten, Input
from tensorflow.keras.applications.vgg16 import VGG16
from tensorflow.keras.models import Model, Sequential
from tensorflow.keras.preprocessing.image import ImageDataGenerator, img_to_array, load_img
from tensorflow.keras import optimizers
from tensorflow.keras.optimizers import SGD
from google.colab import files

name = ["藤井聡太","渡辺明","永瀬拓矢","豊島将之","羽生善治"]
path = "/content/drive/MyDrive/"

X_train = []
X_test = []
y_train = []
y_test = []

# 学習データ・テストデータをリストに代入
for i, n in enumerate(name):
  files = glob.glob(os.path.join(path + n + "_train/*.jpg"))
  for file in files:
    image = load_img(file)
    image = img_to_array(image)
    image = cv2.resize(image,(32,32))
    X_train.append(image)
    y_train.append(i)

for i, n in enumerate(name):
  files = glob.glob(os.path.join(path + n + "_test/*.jpg"))
  for file in files:
    image = load_img(file)
    image = img_to_array(image)
    image = cv2.resize(image,(32,32))
    X_test.append(image)
    y_test.append(i)

# 学習データ・テストデータをシャッフル
tr =list(zip(X_train,y_train))
random.shuffle(tr)
X_train,y_train = zip(*tr)

te = list(zip(X_test,y_test))
random.shuffle(te)
X_test,y_test = zip(*te)

# Numpy配列に変換
X_train = np.array(X_train)
X_test = np.array(X_test)
y_train = np.array(y_train)
y_test = np.array(y_test)

# 正解ラベルをOne-hot形式に変換
y_train = to_categorical(y_train)
y_test = to_categorical(y_test)

# モデルの定義
input_tensor = Input(shape=(32,32,3))
vgg16 = VGG16(include_top=False,weights="imagenet",input_tensor=input_tensor)

top_model = Sequential()
top_model.add(Flatten(input_shape=vgg16.output_shape[1:]))
top_model.add(Dense(256,activation="sigmoid"))
top_model.add(Dense(128,activation="sigmoid"))
top_model.add(Dense(5,activation="softmax"))

model = Model(inputs = vgg16.input, outputs = top_model(vgg16.output))

for layer in model.layers[:19]:
  layer.trainable = False


model.compile(loss="categorical_crossentropy",optimizer=optimizers.SGD(lr=1e-4,momentum=0.9),metrics=["accuracy"])

model.summary()

history = model.fit(X_train,y_train,batch_size=32,epochs=125,verbose=1,validation_data=(X_test,y_test))

# 精度の評価
scores = model.evaluate(X_test, y_test, verbose=1)

# グラフを作成
fig = plt.figure(figsize=(15,5))
plt.subplots_adjust(wspace=0.4, hspace=0.6)

ax = fig.add_subplot(1,2,1)

loss=history.history['loss']
val_loss=history.history['val_loss']
epochs=len(loss)

ax.plot(range(epochs), loss, marker = '.', label = 'loss')
ax.plot(range(epochs), val_loss, marker = '.', label = 'val_loss')
ax.legend(loc = 'best')
ax.grid()
ax.set_xlabel('epoch')
ax.set_ylabel('loss')

accuracy=history.history['accuracy']
val_accuracy=history.history['val_accuracy']
epochs=len(accuracy)

ax2 = fig.add_subplot(1,2,2)

ax2.plot(range(epochs), accuracy, marker = '.', label = 'accuracy')
ax2.plot(range(epochs), val_accuracy, marker = '.', label = 'val_accuracy')
ax2.legend(loc = 'best')
ax2.grid()
ax2.set_xlabel('epoch')
ax2.set_ylabel('accuracy')
plt.show()
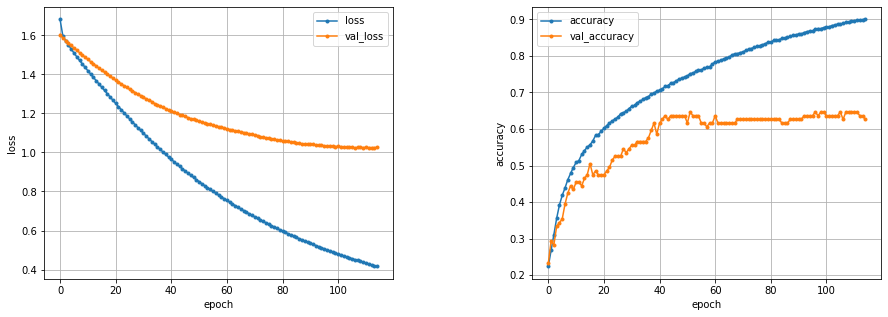
精度は約65%と低めの結果になりました。集めた画像の枚数が少なかったこともあり、これ以上精度を上げることはできませんでした。

おわりに
画像収集からモデルの作成までを一通り実装してみて、さらに理解を深めることができました。今回は、画像が少なかったこともあり、精度が思ったより上がらなかったので、今度は精度が8割~9割になるように再度挑戦してみようと思います。
herokuにアプリをデプロイしたので良ければ見てみてください。
https://shogiplayerclassifier.herokuapp.com/