前回はscenkitを使って、ipadに合わせて直方体をグルグルさせましたが、
今回はmotionセンサで取得したデータをグラフ表示させてみます。
Pythonistaのuiを使って、pitch,roll,yawの遷移グラフとscenkitを使ったiPadの動きと連動した直方体を表示させます。
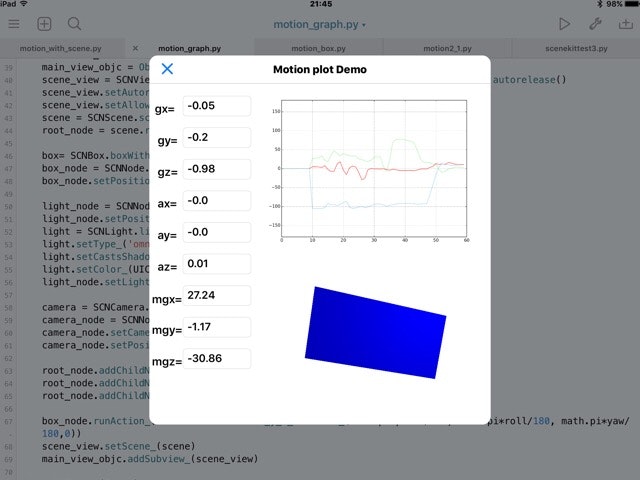
pyuiのイメージは次のような画面です。
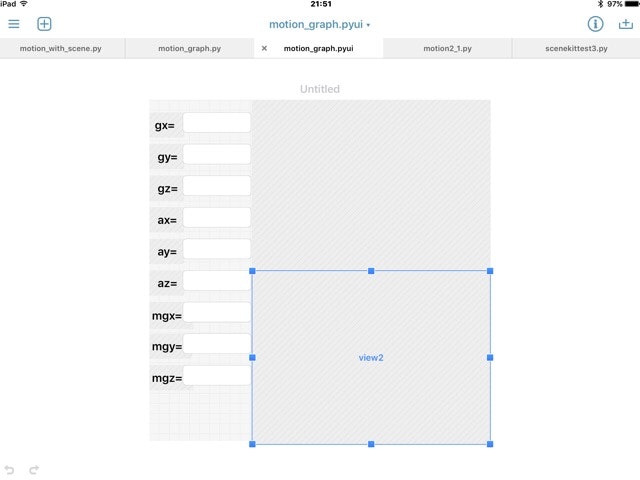
サブviewとしてimage viewのimageview1とcustom viewのview2を用意します。
加速度、ジャイロ、磁気センサ表示用のtextBoxも準備しておきます。
今回、textboxの名前は、加速度は、ax,ay,az、ジャイロはgx,gy,gz、磁気センサはmx,my,mzにしています。
描画用のソースは以下のとおり。
motion_graph.py
# coding: utf-8
# For use in pythonista on iOS
from objc_util import *
import ui
import motion
from scene import *
import math
import numpy as np
import time
import ioView
import matplotlib.pyplot as plt
import Image
import sys
import os
from matplotlib.ticker import *
# boxの大きさ
scale = 40
W=3
L=1.5
H=0.5/2

pitch,roll,yaw=0.0,0.0,0.0
ax,ay,az=0.0,0.0,0.0
gx,gy,gz=0.0,0.0,0.0
mgx,mgy,mgz=0.0,0.0,0.0
load_framework('SceneKit')
SCNView, SCNScene, SCNBox, SCNText, SCNNode, SCNLight, SCNCamera, SCNAction, SCNTransaction,UIFont= map(ObjCClass, ['SCNView', 'SCNScene', 'SCNBox', 'SCNText', 'SCNNode', 'SCNLight',  'SCNCamera', 'SCNAction','SCNTransaction','UIFont'])
class SCNVector3 (Structure):
    _fields_ = [('x', c_float), ('y', c_float), ('z', c_float)]

@on_main_thread
class Sceneobj(object):
  def __init__(self):
    self.name = ""
  def make_view(self,mv):
    global pitch,roll,yaw
    global box_node
    self.main_view=mv
    main_view_objc = ObjCInstance(main_view['view2'])
    scene_view = SCNView.alloc().initWithFrame_options_(((0, 0),(400, 400)), None).autorelease()
    scene_view.setAutoresizingMask_(18)
    scene_view.setAllowsCameraControl_(True)
    scene = SCNScene.scene()
    root_node = scene.rootNode()

    box= SCNBox.boxWithWidth_height_length_chamferRadius_(W, L, H, 0)
    box_node = SCNNode.nodeWithGeometry_(box)
    box_node.setPosition_((0, 1, 0))

    light_node = SCNNode.node()
    light_node.setPosition_((1.5, 1.5, 1.5))
    light = SCNLight.light()
    light.setType_('omni')
    light.setCastsShadow_(True)
    light.setColor_(UIColor.blueColor().CGColor())
    light_node.setLight_(light)

    camera = SCNCamera.camera()
    camera_node = SCNNode.node()
    camera_node.setCamera(camera)
    camera_node.setPosition((0, 0, 5))

    root_node.addChildNode_(camera_node)
    root_node.addChildNode_(box_node)
    root_node.addChildNode_(light_node)

    box_node.runAction_(SCNAction.rotateToX_y_z_duration_(math.pi*pitch/180, math.pi*roll/180, math.pi*yaw/180,0))
    scene_view.setScene_(scene)
    main_view_objc.addSubview_(scene_view)

class MyScene (Scene):
    def setup(self):
        global fig,ax1
        #motionセンサスタート
        motion.start_updates()
        # data initial
        self.py = [pitch for i in range(0, 60)]      # pitch array setup
        self.ry = [roll for i in range(0, 60)]       # roll array setupr
        self.yy = [yaw for i in range(0, 60)]        # yaw array setup
        self.xl = [i for i in range(0, 60)]          # x_line
        # graph set up -------------------------#
        ymin=-180
        ymax=180
        fig = plt.figure()                      # graphics setup
        ax1 = fig.add_subplot(111)              #
        ax1.grid(True)                          # axis
        plt.ylim(ymin, ymax)
    def draw(self):
        global box_node,box
        global pitch,roll,yaw,ax,ay,az,gx,gy,gz
        global main_view
        global ax1,fig
        #処理が追い付かないのでタイマーをいれる
        #time.sleep(0.01)
        #加速度、ジャイロの値を更新
        ax,ay,az = motion.get_user_acceleration()
        gx,gy,gz= motion.get_gravity()
        gravity_vectors=motion.get_attitude()
        mgx,mgy,mgz,mga=motion.get_magnetic_field()

        pitch, roll, yaw = [x for x in gravity_vectors]
        # ラジアン→度へ変換
        pitch=-pitch*180/3.1415926
        roll=roll*180/3.1415926
        yaw=-yaw*180/3.1415926
        #再描画
        box_node.runAction_(SCNAction.rotateToX_y_z_duration_(math.pi*pitch/180, math.pi*roll/180,-math.pi*yaw/180,0))
        #加速度、ジャイロ、地磁気センサーの値を表示
        main_view['ax'].text=str(round(ax,2))
        main_view['ay'].text=str(round(ay,2))
        main_view['az'].text=str(round(az,2))

        main_view['gx'].text=str(round(gx,2))
        main_view['gy'].text=str(round(gy,2))
        main_view['gz'].text=str(round(gz,2))

        main_view['mx'].text=str(round(mgx,2))
        main_view['my'].text=str(round(mgy,2))
        main_view['mz'].text=str(round(mgz,2))
        # graphics
        self.py.pop(0); self.ry.pop(0); self.yy.pop(0)                # left
        self.py.append(pitch); self.ry.append(roll); self.yy.append(yaw)# add data

        ax1.plot(self.xl, self.py, color='lightgreen', lw='1')   # pitch graph
        ax1.plot(self.xl, self.ry, color='red', lw='1')          # roll graph
        ax1.plot(self.xl, self.yy, color='skyblue', lw='1')      # yaw graph

        plt.savefig('rt.png')       # save the graph on the consolen
        main_view['imageview1'].image = ui.Image.named('rt.png') # imageview
        plt.cla()                   # clear graph
        plt.close()                 # close graph
        fig = plt.figure()          #
        ax1 = fig.add_subplot(111)  #
        ax1.grid(True)
        ymin=-180
        ymax=180
        plt.ylim(ymin, ymax)
if __name__ == "__main__":
    main_view = ui.load_view()
    main_view.name = 'Motion plot Demo'
    my_scene = MyScene()
    scene_view = SceneView(frame=main_view.bounds, flex='WH')
    main_view['view2'].add_subview(scene_view)
    scene_view.scene = my_scene
    scene_kit=Sceneobj()
    scene_kit.make_view(main_view)
    main_view.present('sheet')
リアルタイムグラフの作成は、macsbugさんのDisplay the graph on the iPadを参考にコーディングしました。
ほぼほぼコピペです。
Matplotlibでの描画が画像を保存して、再表示なので遅いです。
次回はGenuino101のimuとbleを使って遊びたいと思います。