初めに
みなさん、こんにちは!
株式会社LIFULL SETグループの@rueyjyeです。
自動テストフレームワーク「Bucky」をOSSとして公開しました!
直近にSeleniumConf Tokyo 2019と弊社のイベントLtech#6 Quality Talk Night!も発表する予定ですが、
実際の動かし方をこの記事でご紹介します。
今回はテスト実行部分のBucky-coreのハンズオンを実際にやってみます!
Buckyとは
一言というと、
YAML形式で書いたテストコードが実行でき、実行したテスト結果を簡単にレポートにできるツール
です。
※ 他にも機能があります
Buckyは二つのリポジトリで構成されています。
テストコード実行を担当:Bucky-core
テスト結果レポート担当:Bucky-management
Bucky-coreのハンズオンをやりましょう
百聞は一見にしかず、実際に試してみたら分かりやすいと思います。
ハンズオン手順はリポジトリのexampleを参照しながら進めたいと思います。
example/hands-on
0. 準備
Gem installでBucky-coreを取得する。
gem install bucky-core
1. プロジェクトディレクトリを作成
- プロジェクトはBucky実行する時のワーキングディレクトリです
# hands-onというプロジェクトを作ります
bucky new hands-on
2. プロジェクト内にサービスディレクトリを作成
- サービスはテスト対象のサービス名です
- ネーミングはスネークケースを使ってください
先に作ったプロジェクトに移動しましょう。
# 先作ったプロジェクトディレクトリに移動
cd hands-on
# bucky_hands_onというサービスを作ります
bucky make service bucky_hands_on
サービスディレクトリ作成出来たら、ディレクトリ構造は下記のようになります。
.
├── config
│   ├── bucky_config.yml
│   ├── e2e_config.yml
│   ├── linkstatus_config.yml
│   └── test_db_config.yml
├── services
│   └── README.md
└── system
    ├── evidences
    │   ├── README.md
    │   └── screen_shots
    │       └── README.md
    └── logs
        └── README.md
3. デバイスディレクトリを作成し、ページオブジェクト、パーツ、テストコードを作成します
- ページオブジェクトはSeleniumのパターンであり、特定ページのメソッドを定義するファイルです
- パーツは各ページのエレメントを管理するファイルです
- ネーミングはスネークケースを使ってください
一気に作成します。
# github_topというページを作成
bucky make page github_top --service bucky_hands_on --device pc
# github_search_listというページを作成
bucky make page github_search_list --service bucky_hands_on --device pc
いくつのディレクトリとファイルが作成され、下記のようになります。
.
├── config
│   ├── bucky_config.yml
│   ├── e2e_config.yml
│   ├── linkstatus_config.yml
│   └── test_db_config.yml
├── services
│   ├── README.md
│   └── bucky_hands_on
│       └── pc
│           ├── pageobject
│           │   ├── github_search_list.rb
│           │   └── github_top.rb
│           └── parts
│               ├── github_search_list.yml
│               └── github_top.yml
└── system
    ├── evidences
    │   ├── README.md
    │   └── screen_shots
    │       └── README.md
    └── logs
        └── README.md
4. 使うエレメントをパーツファイルに追加
- エレメントの記述はxpathとidに対応しています
- ネーミングはスネークケースを使ってください
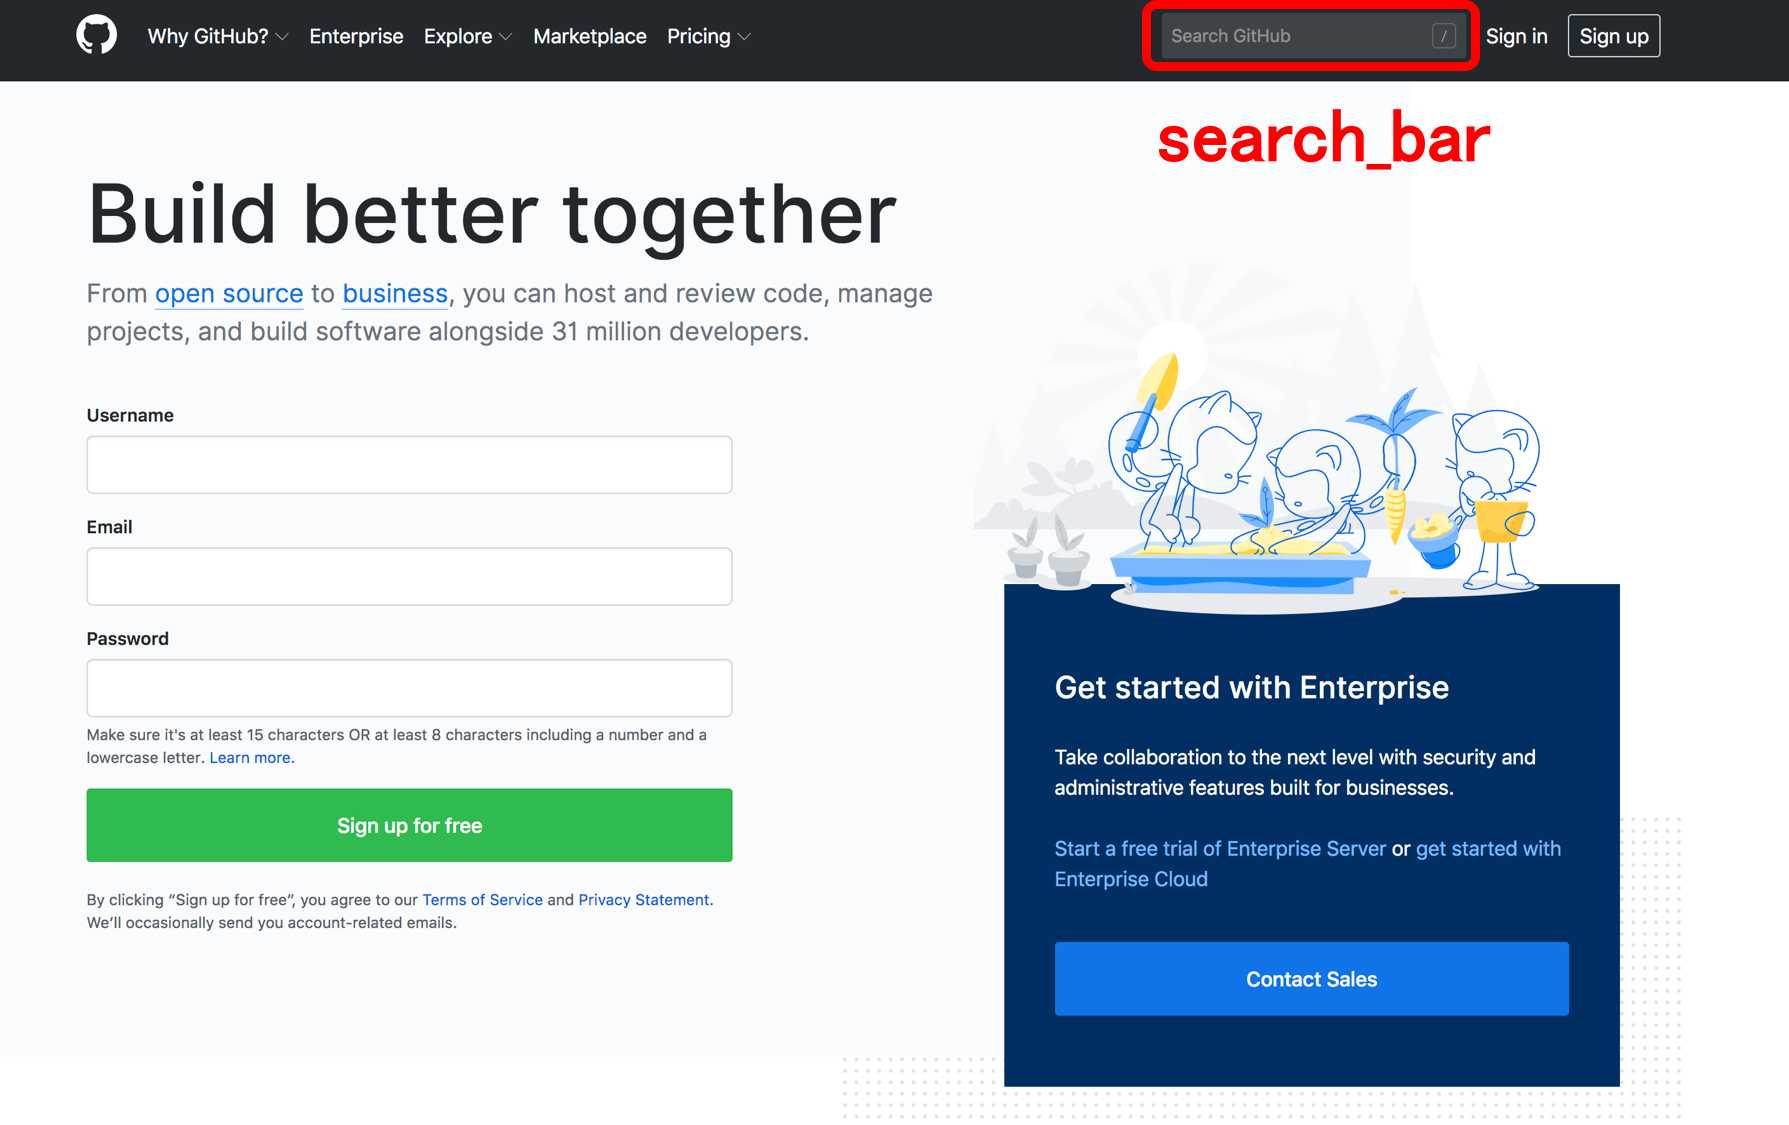
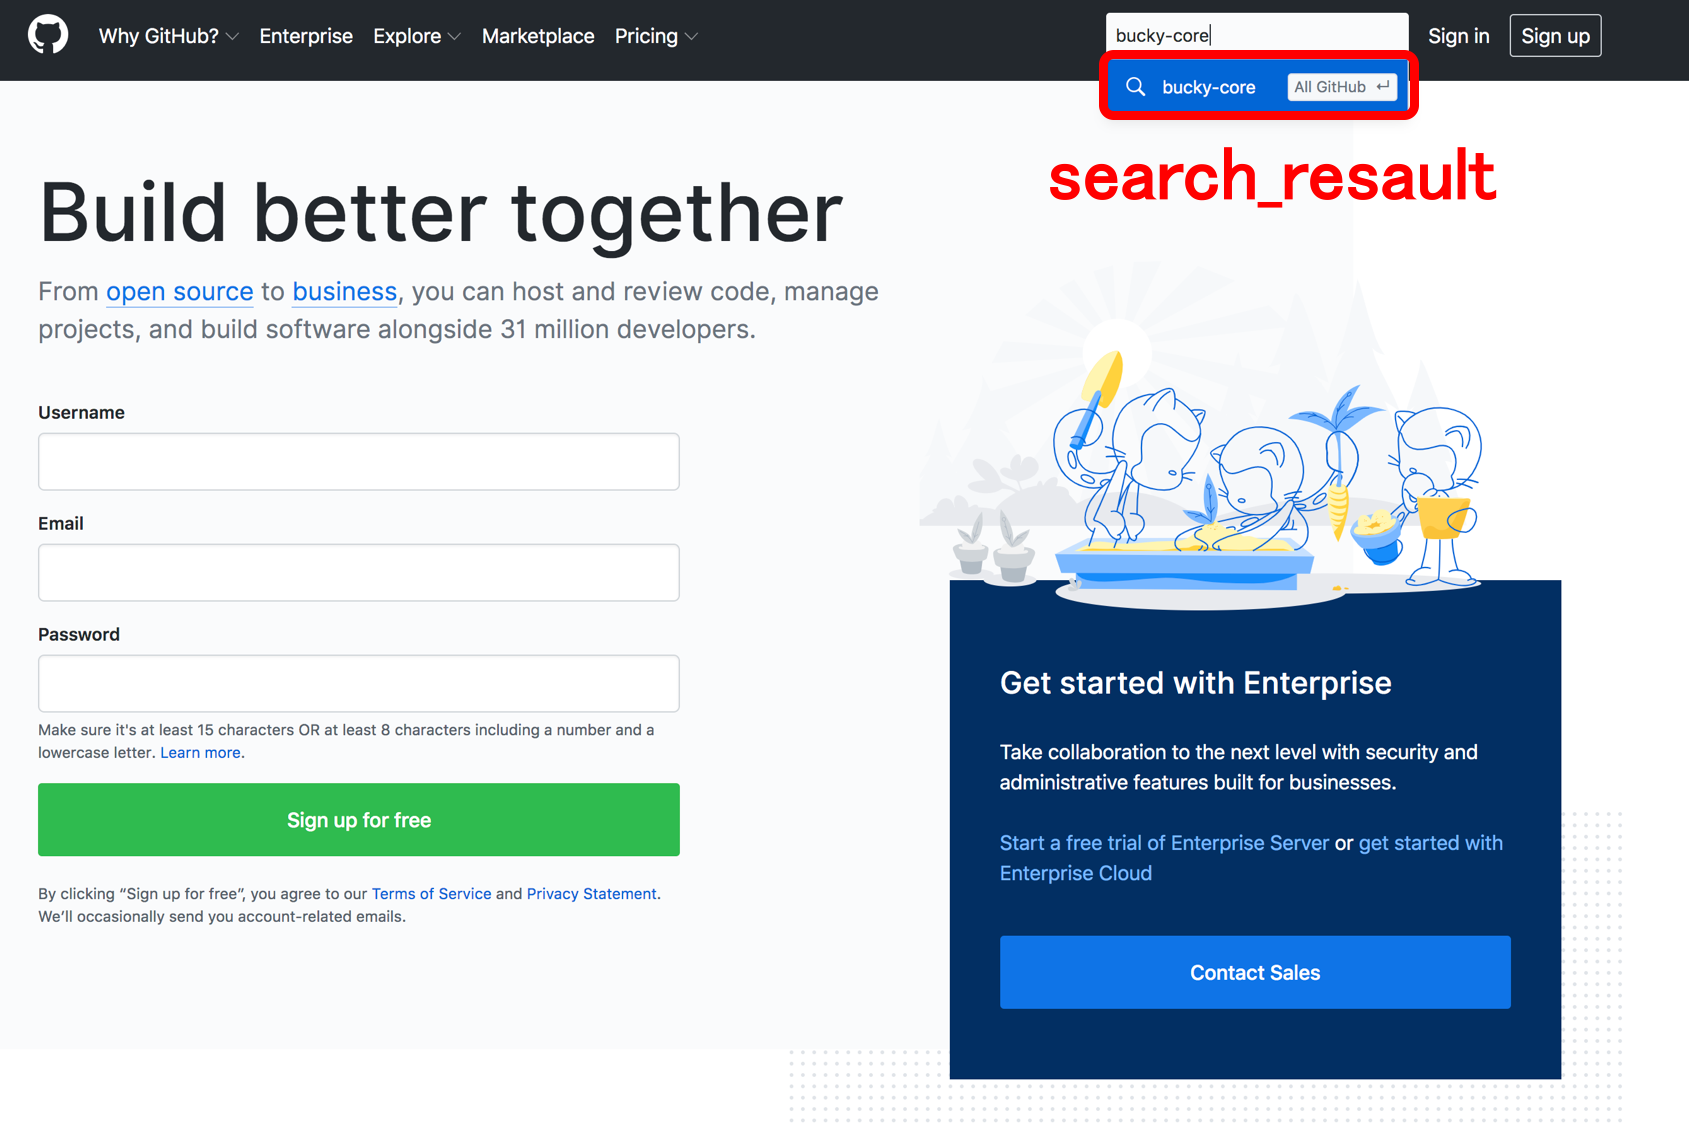
githubトップページのエレメントを追加
# 検索欄
search_bar:
    - xpath
    - //input[contains(@class,'header-search-input')]
# 検索欄入力後の結果
search_resault:
    - xpath
    - //div[contains(@class,'jump-to-suggestions')]
エレメント実際の場所
githubサーチリストページのエレメントを追加
# 検索一覧中のBucky-core
bucky_core_a_tag:
    - xpath
    - //a[contains(text(),'lifull-dev')]
エレメント実際の場所

5. E2Eテストのディレクトリとテストコードを追加
E2Eディレクトリを作成
mkdir -p services/bucky_hands_on/pc/scenarios/e2e
テストスイート名「search_and_assert」のファイルを作成
touch services/bucky_hands_on/pc/scenarios/e2e/search_and_assert.yml
テストコードを追加します
このケースはGithubトップページでBucky-coreを検索して、Bucky-coreのリポジトリページに遷移することを確認するケースです。
# Describe for this test suite
desc: search in github and check page transition
device: pc
service: bucky_hands_on
priority: high
test_category: e2e
labels:
  - example
cases:
  # You should create test case name as {test suite name + _ + number}
  - case_name: search_and_assert_1
    func: transition
    desc: Should able to search bucky-core in github, and move to bucky-core page.
    # Procedures to do in this case
    procs:
      - proc: Open github top page
        exec:
          operate: go
          url: https://github.com/
      - proc: Input 'bucky-core' in search bar
        exec:
          operate: input
          page: github_top
          part: search_bar
          word: 'bucky-core'
      - proc: Click search result
        exec:
          operate: click
          page: github_top
          part: search_resault
      - proc: Click target result
        exec:
          operate: click
          page: github_search_list
          part: bucky_core_a_tag
      - proc: assert_text
        exec:
          verify: assert_title
          expect: 'GitHub - lifull-dev/bucky-core: System testing framework for web application.'
現在のディレクトリ構造は下記になります。
.
├── config
│   ├── bucky_config.yml
│   ├── e2e_config.yml
│   ├── linkstatus_config.yml
│   └── test_db_config.yml
├── services
│   ├── README.md
│   └── bucky_hands_on
│       └── pc
│           ├── pageobject
│           │   ├── github_search_list.rb
│           │   └── github_top.rb
│           ├── parts
│           │   ├── github_search_list.yml
│           │   └── github_top.yml
│           └── scenarios
│               └── e2e
│                   └── search_and_assert.yml
└── system
    ├── evidences
    │   ├── README.md
    │   └── screen_shots
    │       └── README.md
    └── logs
        └── README.md
6. Linkstatusテストのディレクトリとテストコードを追加
- Linkstatusは対象urlのaタグのHTTPステータスコードを確認するテスト手法です
Linkstatusディレクトリを作成
mkdir -p services/bucky_hands_on/pc/scenarios/linkstatus
テストスイート名「github_top」のファイルを作成
touch services/bucky_hands_on/pc/scenarios/linkstatus/github_top.yml
テストコードを追加します
# Describe for this test suite
desc: Check all a tag in githib top
device: pc
service: bucky_hands_on
priority: high
test_category: linkstatus
labels:
  - example
# You can exclude url that you don't want to check
exclude_urls:
  - https://github.com/customer-stories/*
cases:
  - case_name: github_top_1
    desc: Check github top
    urls:
      - https://github.com/
現在のディレクトリ構造は下記になります。
.
├── config
│   ├── bucky_config.yml
│   ├── e2e_config.yml
│   ├── linkstatus_config.yml
│   └── test_db_config.yml
├── services
│   ├── README.md
│   └── bucky_hands_on
│       └── pc
│           ├── pageobject
│           │   ├── github_search_list.rb
│           │   └── github_top.rb
│           ├── parts
│           │   ├── github_search_list.yml
│           │   └── github_top.yml
│           └── scenarios
│               ├── e2e
│               │   └── search_and_assert.yml
│               └── linkstatus
│                   └── github_top.yml
└── system
    ├── evidences
    │   ├── README.md
    │   └── screen_shots
    │       └── README.md
    └── logs
        └── README.md
7. テストコードを実行
実行する前にChrome driverを起動してください。
起動手順は下のおまけにあります。
E2Eテストの設定ファイルにchrome driverのIPを記入
:selenium_ip: localhost # ここでIPを記入する
:selenium_port: '4444'
E2Eテストを実行します!
ここのコメントとオプションは:
E2Eカテゴリの下にケース名が「search_and_assert_1」のケースを実行する
# -t, --test_category テストカテゴリ
# -c, --case CASE_NAME ケース名
# -d, --debug デバッグモード (結果をDBに保存しない)
bucky run -t e2e -c search_and_assert_1 -d

linkstatusテストを実行します!
ここのコメントとオプションは:
Linkstatusカテゴリの下にケース名が「github_top_1」のケースを実行する
# -t, --test_category テストカテゴリ
# -c, --case CASE_NAME ケース名
# -d, --debug デバッグモード (結果をDBに保存しない)
bucky run -t linkstatus -c github_top_1 -d

テスト実行できました!
【おまけ】 DockerでChrome driverを起動する例
docker runでstandalone-chrome-debugを起動します。
docker run -d -p 4444:4444 -p 5900:5900 selenium/standalone-chrome-debug
MACの場合は画面共有 localhost:5900 で確認出来ます。
最後に
いかがでしょうか?
これで簡単にYAMLでテストコード実装できますよね。
これから他の例をどんどん追加する予定です。
もしよければ是非使ってみてください!