HDRPでは、ポストエフェクトはPost-processing Stack v2ではなく、Volumeに統合されています。本記事ではVolumeにカスタムポストエフェクトを追加する方法をまとめます。
内容は公式ドキュメントに基づいているので、そちらもあわせてどうぞ。
1. 必要なファイルを作る
カスタムポストエフェクトを書くには、以下の二つのファイルを作成します。
- CustomPostProcessVolumeComponentとIPostProcessComponentを継承したクラス
- Projectウィンドウで右クリック > Create > Rendering > C# Post Process Volumeで作成
- 実際に処理を行うシェーダー(HLSL)
- Projectウィンドウで右クリック > Create > Shader > HDRP > Post Processで作成
2. スクリプトを書く
作成したC# スクリプトを編集します。
using UnityEngine;
using UnityEngine.Rendering;
using UnityEngine.Rendering.HighDefinition;
using System;

[Serializable, VolumeComponentMenu("Post-processing/Custom/GrayScale")]
public sealed class GrayScale : CustomPostProcessVolumeComponent, IPostProcessComponent
{
    [Tooltip("Controls the intensity of the effect.")]
    public ClampedFloatParameter intensity = new ClampedFloatParameter(0f, 0f, 1f);

    Material m_Material;

    public bool IsActive() => m_Material != null && intensity.value > 0f;

    public override CustomPostProcessInjectionPoint injectionPoint => CustomPostProcessInjectionPoint.AfterPostProcess;

    public override void Setup()
    {
        if (Shader.Find("Hidden/Shader/GrayScale") != null)
            m_Material = new Material(Shader.Find("Hidden/Shader/GrayScale"));
    }

    public override void Render(CommandBuffer cmd, HDCamera camera, RTHandle source, RTHandle destination)
    {
        if (m_Material == null)
            return;

        m_Material.SetFloat("_Intensity", intensity.value);
        m_Material.SetTexture("_InputTexture", source);

        HDUtils.DrawFullScreen(cmd, m_Material, destination);
    }

    public override void Cleanup() => CoreUtils.Destroy(m_Material);

}
VolumeComponentMenu
[Serializable, VolumeComponentMenu("Post-processing/Custom/GrayScale")]
VolumeComponentMenuAttributeでは、VolumeのAdd Overrideボタンを押したときの表示階層を定義します。
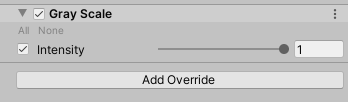
Volumeに露出するプロパティを定義する
    [Tooltip("Controls the intensity of the effect.")]
    public ClampedFloatParameter intensity = new ClampedFloatParameter(0f, 0f, 1f);
ClampedFloatParameterは、エディターではスライダーで表示されます。ほかにもFloatParameter、Vector3Parameterなどいろいろなものが用意されており、リファレンスを見ると一覧があります。
IsActive()
public bool IsActive() => m_Material != null && intensity.value > 0f;
IsActive()がfalseを返すと、エフェクトの実行がスキップされます。パラメーターによってエフェクトの実行をスキップできる場合は、スキップして無駄な処理を省きましょう。
エフェクトの実行タイミングを定義する
public override CustomPostProcessInjectionPoint injectionPoint => CustomPostProcessInjectionPoint.AfterPostProcess;
CustomPostProcessInjectionPointはエフェクトが実行されるタイミングを定義します。指定できるタイミングには
- AfterOpaqueAndSky
- BeforePostProcess
- AfterPostProcess
があります。こことかを見るとパイプラインのどこにあたるかがわかると思います。
シェーダーの読み込み
    public override void Setup()
    {
        if (Shader.Find("Hidden/Shader/GrayScale") != null)
            m_Material = new Material(Shader.Find("Hidden/Shader/GrayScale"));
    }
エフェクトに使用するシェーダーからマテリアルを作ります。ここのシェーダー名は先ほど作成したシェーダーの名前を指定します。
Render()
    public override void Render(CommandBuffer cmd, HDCamera camera, RTHandle source, RTHandle destination)
    {
        if (m_Material == null)
            return;

        m_Material.SetFloat("_Intensity", intensity.value);
        m_Material.SetTexture("_InputTexture", source);

        HDUtils.DrawFullScreen(cmd, m_Material, destination);
    }
実際に毎フレームの描画時に呼び出されるメソッドです。ImageEffectやLegacy RPにおけるCommandBufferと同じノリで、sourceからdestinationに書き込めばいいという感じです。ただし、シェーダーの実行にはHDUtils.DrawFullScreenを使用しますが、これには入力テクスチャの指定がないため、テクスチャの入力はMaterialのSetTextureや、CommandBuffer.SetGlobalTextureから行う必要があります。
Cleanup()
public override void Cleanup() => CoreUtils.Destroy(m_Material);
リソースの開放を行います。
3. シェーダーを書く
Shader "Hidden/Shader/GrayScale"
{

    HLSLINCLUDE

    #pragma target 4.5
    #pragma only_renderers d3d11 ps4 xboxone vulkan metal switch

    #include "Packages/com.unity.render-pipelines.core/ShaderLibrary/Common.hlsl"
    #include "Packages/com.unity.render-pipelines.core/ShaderLibrary/Color.hlsl"
    #include "Packages/com.unity.render-pipelines.high-definition/Runtime/ShaderLibrary/ShaderVariables.hlsl"
    #include "Packages/com.unity.render-pipelines.high-definition/Runtime/PostProcessing/Shaders/FXAA.hlsl"
    #include "Packages/com.unity.render-pipelines.high-definition/Runtime/PostProcessing/Shaders/RTUpscale.hlsl"

    struct Attributes
    {
        uint vertexID : SV_VertexID;
        UNITY_VERTEX_INPUT_INSTANCE_ID
    };

    struct Varyings
    {
        float4 positionCS : SV_POSITION;
        float2 texcoord   : TEXCOORD0;
        UNITY_VERTEX_OUTPUT_STEREO
    };

    Varyings Vert(Attributes input)
    {
        Varyings output;
        UNITY_SETUP_INSTANCE_ID(input);
        UNITY_INITIALIZE_VERTEX_OUTPUT_STEREO(output);
        output.positionCS = GetFullScreenTriangleVertexPosition(input.vertexID);
        output.texcoord = GetFullScreenTriangleTexCoord(input.vertexID);
        return output;
    }

    // List of properties to control your post process effect
    float _Intensity;
    TEXTURE2D_X(_InputTexture);

    float4 CustomPostProcess(Varyings input) : SV_Target
    {
        UNITY_SETUP_STEREO_EYE_INDEX_POST_VERTEX(input);
        uint2 positionSS = input.texcoord * _ScreenSize.xy;
        float3 outColor = LOAD_TEXTURE2D_X(_InputTexture, positionSS).xyz;
        return float4(lerp(outColor, Luminance(outColor).xxx, _Intensity), 1);
    }

    ENDHLSL

    SubShader
    {
        Pass
        {
            Name "GrayScale"
            ZWrite Off
            ZTest Always
            Blend Off
            Cull Off

            HLSLPROGRAM

                #pragma fragment CustomPostProcess
                #pragma vertex Vert

            ENDHLSL
        }
    }

    Fallback Off
}
シェーダーはHLSLで記述します。いつものCg/HLSLと言語自体の構文はほとんど同じですが、様々なプラットフォームに対応する都合上、いくつかの命令はHDRP側で定義されたマクロを使用します。
例えば、テクスチャのサンプリングひとつをとっても、
TEXTURE2D(_InputTexture)
でテクスチャを定義し、
LOAD_TEXTURE2D_X(_InputTexture, positionSS)
でピクセルを参照します。さらにこの座標系はUV ( (0,0) ~ (1,1) ) ではなく、ピクセル単位です。
このマクロが曲者で、どういうときにどういうマクロを使用するかは、ソースとにらめっこしながらなんとなく把握するしかないので、includeしているHLSLなどを片手に書いていくのがよいです。
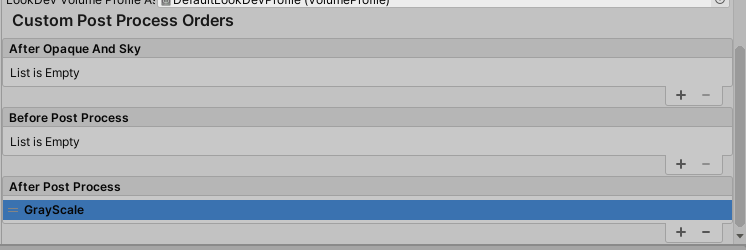
4. エフェクトを登録する
さて、スクリプトとシェーダーの両方が準備できたら、HDRP側にエフェクトを登録してあげる必要があります。
Project Settingsを開き、HDRP Default Settingsを開きます。
下の方にCustom Post Process Ordersがあるので、スクリプトで指定したタイミングのところに、作成したエフェクトを登録します。
5. 使う
Volumeから追加して使えます。