概要
この記事では、Firebase Cloud Functions(Beta)のHTTP関数を使用して、postリクエストされたjsonをCloud Firestoreのコレクションへ更新するデモプログラムの説明をします。
記事の前半はCloud Functionsが利用できるようになるまで、後半はデモプログラム(HTTP関数)の簡単な説明になります。
Cloud Functionsを利用するにはFirebaseにプロジェクトを作成する必要がありますが、プロジェクトの作成手順は省略し作成済みの前提で進めます。
環境
- Windows 10 Professional
- Node.js 6.11.5
- Firabase CLI 3.18.4
参考
- [Cloud Functions for Firebase] (https://firebase.google.com/docs/functions/)
- [Reference Functions] (https://firebase.google.com/docs/reference/functions/)
- [firebase/functions-samples] (https://github.com/firebase/functions-samples)
Cloud Functionsを利用するための事前準備
firebase-toolsのインストール
プロジェクトの初期化やデプロイに使用するfirebase-toolsというコマンドラインツールをインストールします。
> npm install firebase-tools --global

// ...省略...

If you're using the Emulator via the Firebase CLI, you can
disregard this message.

If you're upgrading @google-cloud/functions-emulator, these
are the recommended upgrade steps:

1.  Stop the currently running emulator, if any:

        functions stop

2.  Uninstall the current emulator, if any:

        npm uninstall -g @google-cloud/functions-emulator

3.  Install the new version of the emulator:

        npm install -g @google-cloud/functions-emulator

If you have trouble after upgrading, try deleting the config
directory found in:

    ~/.config/configstore/@google-cloud/functions-emulator

Then restart the emulator. You can also check for any renegade
Node.js emulator processes that may need to be killed:

    ps aux | grep node
バージョンの確認
> firebase -V
3.18.4
認証
Googleアカウントで認証します。途中でブラウザが立ち上がり認証画面が表示されるので認証するGoogleアカウントを選択(または入力)します。
> firebase login
? Allow Firebase to collect anonymous CLI usage and error reporting information? Yes

Visit this URL on any device to log in:
https://accounts.google.com/o/oauth2/auth?client_id= ...省略...
Waiting for authentication...

+  Success! Logged in as <email>@gmail.com
認証の成功画面

認証できればFirebase上のプルジェクトの一覧をlistコマンドで確認できると思います。
> firebase list
┌──────────────────┬───────────────────────┬─────────────┐
│ Name             │ Project ID / Instance │ Permissions │
├──────────────────┼───────────────────────┼─────────────┤
│ project********* │ project*********      │ Owner       │
└──────────────────┴───────────────────────┴─────────────┘
以上でCloud Functionsの利用準備が整いました。
firebase-toolsのアップデート
Beta版ということもあると思いますが、定期的にアップデートをした方がよいようです。
多くの場合、新機能とバグ修正は Firebase CLI の最新バージョンと firebase-functions SDK でのみ利用できます。Firebase プロジェクトの functions フォルダ内で以下のコマンドを使用して Firebase CLI と SDK の両方を頻繁に更新することをおすすめします。
> npm install firebase-functions@latest firebase-admin@latest --save
> npm install -g firebase-tools
デモプログラム(HTTP関数)の開発
開発するデモプログラムの機能は以下の通りです。
- クライアントからHTTP Postリクエストされたjsonデータを受け取る
- そのデータをCloud Firestoreのコレクションへ書き込む
- 書き込みが正常終了したらHTTPステータス200、失敗したらHTTPステータス500のレスポンスを返す
postするjsonのフォーマットは下記のようなもので、1件分のメモデータを表しています。
{
  "title": "test title",
  "description": "test description",
  "platforms": ["A", "B"],
  "million": false,
  "releasedAt": "2018-05-01"
}
このjsonを受け取り、Cloud Firestoreに作成するmemosというコレクションへそのまま追加します。
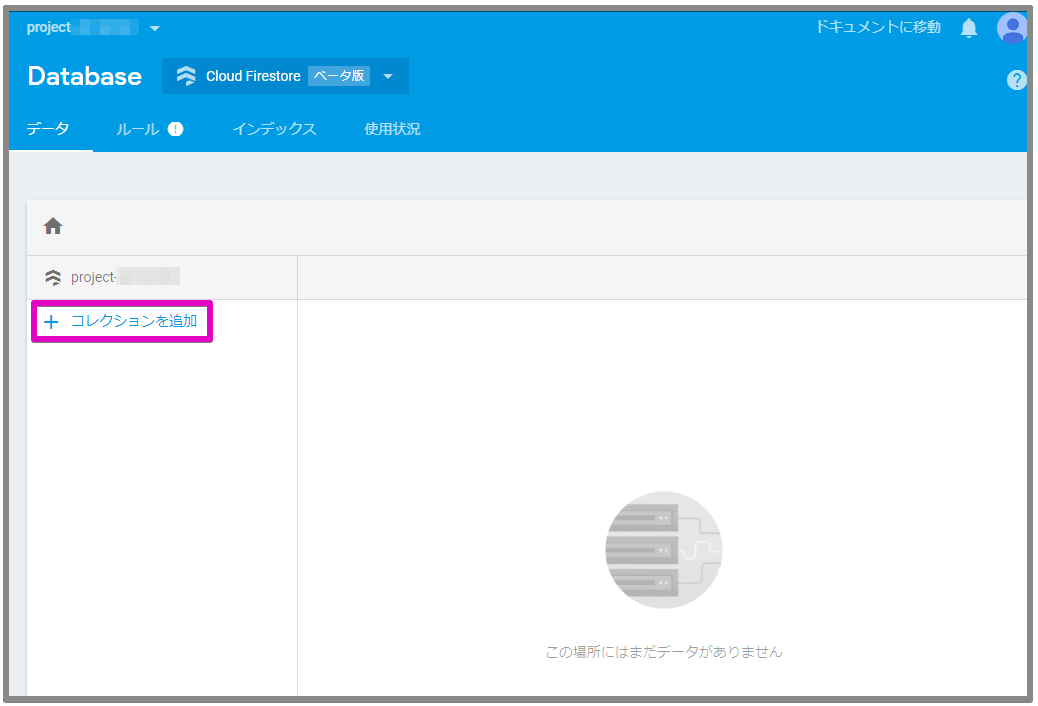
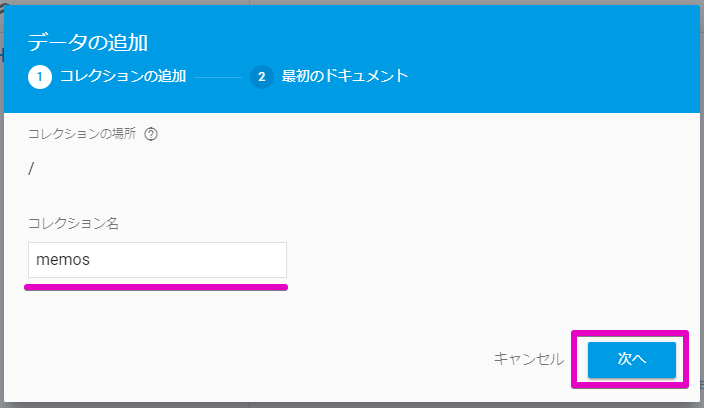
Cloud Firestoreにコレクションを作成
Firebase Consoleからmemosコレクションを作成します。
(正確には別のQiita記事でmemosコレクションを作成していてそれを再利用しました)
プロジェクトディレクトリの作成と初期化
プロジェクトのディレクトリを作成し、
> mkdir add-memo
> cd add-memo
init functionsコマンドでディレクトリを初期化します。途中でいくつか選択肢がありますがこの後で補足します。
> firebase init functions

     ######## #### ########  ######## ########     ###     ######  ########
     ##        ##  ##     ## ##       ##     ##  ##   ##  ##       ##
     ######    ##  ########  ######   ########  #########  ######  ######
     ##        ##  ##    ##  ##       ##     ## ##     ##       ## ##
     ##       #### ##     ## ######## ########  ##     ##  ######  ########

You're about to initialize a Firebase project in this directory:

  D:\dev\firebase-workspace\add-memo

? Are you ready to proceed? Yes

=== Project Setup

First, let's associate this project directory with a Firebase project.
You can create multiple project aliases by running firebase use --add,
but for now we'll just set up a default project.

? Select a default Firebase project for this directory: project********* (project*********)

=== Functions Setup

A functions directory will be created in your project with a Node.js
package pre-configured. Functions can be deployed with firebase deploy.

? What language would you like to use to write Cloud Functions? JavaScript
? Do you want to use ESLint to catch probable bugs and enforce style? No
+  Wrote functions/package.json
+  Wrote functions/index.js
? Do you want to install dependencies with npm now? Yes

i  Writing configuration info to firebase.json...
i  Writing project information to .firebaserc...

+  Firebase initialization complete!
選択肢について
作成するプロジェクトディレクトリをFirebaseのプロジェクトに関連付けます。
この例では、既存のFirebaseプロジェクトを選択肢から選んでいます。なお、ここで関連付けなくても後からfirebase useコマンドで設定することもできます。
? Select a default Firebase project for this directory:
  [don't setup a default project]
> project********* (project*********)
  [create a new project]
関数の開発言語にJavascriptかTypescriptから選択します。
? What language would you like to use to write Cloud Functions?
> JavaScript
  TypeScript
ESLintを使用するか尋ねられますが、Windows環境では現時点(2018/05)でYesにするとdeploy時にエラーになるのでNoにしました。
? Do you want to use ESLint to catch probable bugs and enforce style? (Y/n)
ESLintを使用したときのエラー
ESLintを使用するようにした場合、deployコマンド実行時に[Cloud Functions deploy error during lint on Windows: “enoent ENOENT: no such file or directory”] (https://stackoverflow.com/questions/48370690/cloud-functions-deploy-error-during-lint-on-windows-enoent-enoent-no-such-fil)で質問されているのと同じようなエラーが発生します。
This is a known problem with the Firebase CLI 3.17.0 through at least 3.17.3
This issue should be fixed with projects created with CLI version 3.17.5.
バージョン3.17.5で修正されているとのことですが、この記事で使用しているバージョンは3.18.4なので、違う問題かもしれません。
プロジェクトディレクトリの構成
初期化直後のディレクトリは下記のようになっています。開発するHTTP関数はfunctions/index.jsに実装します。
/add-memo
  |
  +--- /functions
  |      |
  |      +--- /node_modules
  |      |
  |      +--- index.js
  |      |
  |      +--- package.json
  |
  +--- .firebaserc
  |
  +--- firebase.json
簡単な動作確認
postされたjsonファイルの内容をエコーするだけの簡単なHTTP関数を作成し、関数のデプロイと呼び出し、削除方法までを確認します。
const functions = require('firebase-functions');

exports.addMemo = functions.https.onRequest((req, res) => {
  if (req.method !== 'POST') {
    res.status(405).send('Method Not Allowed');
    return;
  }
  res.status(200).send(req.body);
});
デプロイ
> firebase deploy --only functions

=== Deploying to 'project*********'...

i  deploying functions
i  functions: ensuring necessary APIs are enabled...
+  functions: all necessary APIs are enabled
i  functions: preparing functions directory for uploading...
i  functions: packaged functions (884 B) for uploading
+  functions: functions folder uploaded successfully
i  functions: creating function addMemo...
+  functions[addMemo]: Successful create operation.
Function URL (addMemo): https://us-central1-project*********.cloudfunctions.net/addMemo

+  Deploy complete!

Project Console: https://console.firebase.google.com/project/project*********/overview
もしくは関数名を指定します。
index.jsに複数の関数を定義している場合で且つ、特定の関数だけデプロイしたい場合に使用します。
> firebase deploy --only functions:addMemo
関数の呼び出し
下記のjsonファイルをcurlコマンドでpostし、デプロイした関数が期待通りに動作するか確認します。
{
  "title": "test title",
  "description": "test description",
  "platforms": ["A", "B"],
  "million": false,
  "releasedAt": "2018-05-01"
}
> curl -X POST -H "Content-Type:application/json" "https://us-central1-project*********.cloudfunctions.net/addMemo" -d @new_memo.json

{"title":"test title","description":"test description","platforms":["A","B"],"million":false,"releasedAt":"2018-05-01"}
ダッシュボード
Firebase consoleのFunctionsダッシュボードで関数の実行回数やログを確認できます。

関数の削除
デプロイした関数の削除は今のところコマンドラインツールやFunctionsダッシュボードからは出来ませんが、GCP (Google Cloud Platform)コンソールのCloud Functionsダッシュボードで削除できます。
Cloud Firestoreのコレクションにデータを追加する
受け取ったjsonをFirestoreのコレクションへ追加する処理を実装します。
admin.firestore()
  // memosコレクションを指定
  .collection('memos')
  // addでデータを追加
  .add(memo)
  .then(docRef => {
    // 登録が成功したときの処理
  })
  .catch(err => {
    // 登録が失敗した時の処理
  });
ソースコード全体
'use strict';
const functions = require('firebase-functions');
const admin = require('firebase-admin');

admin.initializeApp();

exports.addMemo = functions.https.onRequest((req, res) => {
  if (req.method !== 'POST') {
    res.status(405).send('Method Not Allowed');
    return;
  }
  if (!req.body || !req.body.title) {
    res.status(400).send('Request Body Not Found');
    return;
  }

  const memo = {
    'title': req.body.title,
    'description': req.body.description || 'unknown',
    'platforms': req.body.platforms || [],
    'million': req.body.million || false,
    'releasedAt': req.body.releasedAt ? new Date(req.body.releasedAt) : new Date()
  };
  console.log(memo);

  return admin.firestore()
    .collection('memos')
    .add(memo)
    .then(docRef => {
      // ここの処理は特に意味はありませんが登録したデータを取得するにはgetメソッドを使用します
      docRef.get().then(snapshot => {
        if (snapshot.exists) {
          console.log('Document retrieved successfully.', snapshot.data());
        }
      });
      // 登録に成功したら200を返す
      res.status(200).send(docRef.id);
    })
    .catch(err => {
      console.error(err);
      // 登録に失敗したら500を返す
      res.status(500).send('Error adding document:', err)
    });
});
collection()
collection(collectionPath) returns CollectionReference
collectionメソッドの戻り値の型は[CollectionReference] (https://cloud.google.com/nodejs/docs/reference/firestore/0.13.x/CollectionReference)
add()
add(data) returns Promise containing DocumentReference
addメソッドの戻り値の型は[DocumentReference] (https://cloud.google.com/nodejs/docs/reference/firestore/0.13.x/DocumentReference)
get()
get() returns Promise containing DocumentSnapshot
getメソッドの戻り値の型は[DocumentSnapshot] (https://cloud.google.com/nodejs/docs/reference/firestore/0.13.x/DocumentSnapshot)
ドキュメントはget().data()で取得できます。